
Articles
How To Thread Conduit
Modified: August 31, 2024
Learn the step-by-step process of threading conduit with our comprehensive articles. Master this essential skill and ensure safe electrical installations.
(Many of the links in this article redirect to a specific reviewed product. Your purchase of these products through affiliate links helps to generate commission for Storables.com, at no extra cost. Learn more)
Introduction
Welcome to the world of electrical installations and the fascinating realm of conduit threading. If you’re looking to learn how to thread conduit, you’ve come to the right place. Conduit threading is an essential skill for electricians, as it allows for the secure and efficient installation of electrical wiring.
Threading conduit involves cutting precise threads into the ends of rigid metal conduit pipes to allow for the connection of fittings and the creation of a seamless electrical pathway. With the right tools, materials, and techniques, you can thread conduit like a pro.
This step-by-step guide will walk you through the process of threading conduit, from measuring and marking to attaching fittings and securing the conduit sections. By following these instructions, you’ll gain the knowledge and confidence to tackle conduit threading projects with ease.
But before we jump into the steps, let’s talk about the materials you’ll need to get started.
Key Takeaways:
- Threading conduit is a crucial skill for electricians, involving precise measurements, cutting, deburring, and threading processes. Properly attaching fittings and securing the conduit ensures a reliable and robust electrical installation.
- Safety is paramount when working with electrical systems. Always wear protective gear and consult a professional electrician for guidance to ensure adherence to local electrical codes and regulations.
Read more: How To Store Embroidery Thread
Materials Needed
Before you begin threading conduit, make sure you have the following materials:
- Rigid metal conduit pipes: These are the pipes through which the electrical wires will pass. Choose the appropriate size and length for your specific project.
- Conduit cutter: A conduit cutter is a specialized tool used to cut conduit pipes to the desired length. Make sure you have a cutter that is suitable for the size of conduit you are working with.
- Deburring tool: This tool is used to remove any sharp edges or burrs from the cut ends of the conduit. It ensures a smooth and clean finish.
- Conduit threader: The conduit threader is the main tool used to create the threads on the conduit. It is available in manual or electric models, depending on your preference.
- Threading dies: Threading dies are the interchangeable components of the conduit threader that actually create the threads on the conduit. Make sure you have the appropriate dies for the size of conduit you are working with.
- Lubricant: A lubricant is essential for creating clean and precise threads. Use a lubricant specifically designed for conduit threading to ensure optimal results.
- Conduit fittings: These are the connectors that allow you to join sections of conduit together, as well as attach the conduit to junction boxes, panels, or other electrical components.
- Wrenches: Depending on the type of conduit threader you are using, you may need wrenches to secure the dies or adjust the threading process.
- Protective gear: To ensure your safety, it’s important to wear appropriate protective gear, such as safety goggles, gloves, and ear protection, while working with conduit threading tools.
Having these materials on hand will ensure that you can complete the conduit threading process efficiently and effectively. Now that you have everything you need, let’s dive into the step-by-step instructions for threading conduit.
Step 1: Measure and Mark
Before you can start threading conduit, you need to measure and mark the sections that require threading. This ensures that you have the correct length of conduit and that the threads will be placed in the right location.
Here’s how to measure and mark the conduit:
- Using a tape measure, determine the length of conduit needed for your installation. Take into account any bends or turns in the electrical pathway.
- Mark the measurement on the conduit pipe using a pencil or a permanent marker. Make sure the mark is clear and easily visible.
- If you are working with multiple sections of conduit, repeat steps 1 and 2 for each section, ensuring that they are all marked correctly.
- Double-check the accuracy of your measurements and marks before moving on to the next step.
By accurately measuring and marking the conduit, you can ensure a precise fit and alignment with the electrical components you’ll be connecting. This step is crucial for a successful conduit threading process, so take your time and be meticulous in your measurements.
Now that you have measured and marked the conduit, it’s time to move on to the next step: cutting the conduit to the correct length.
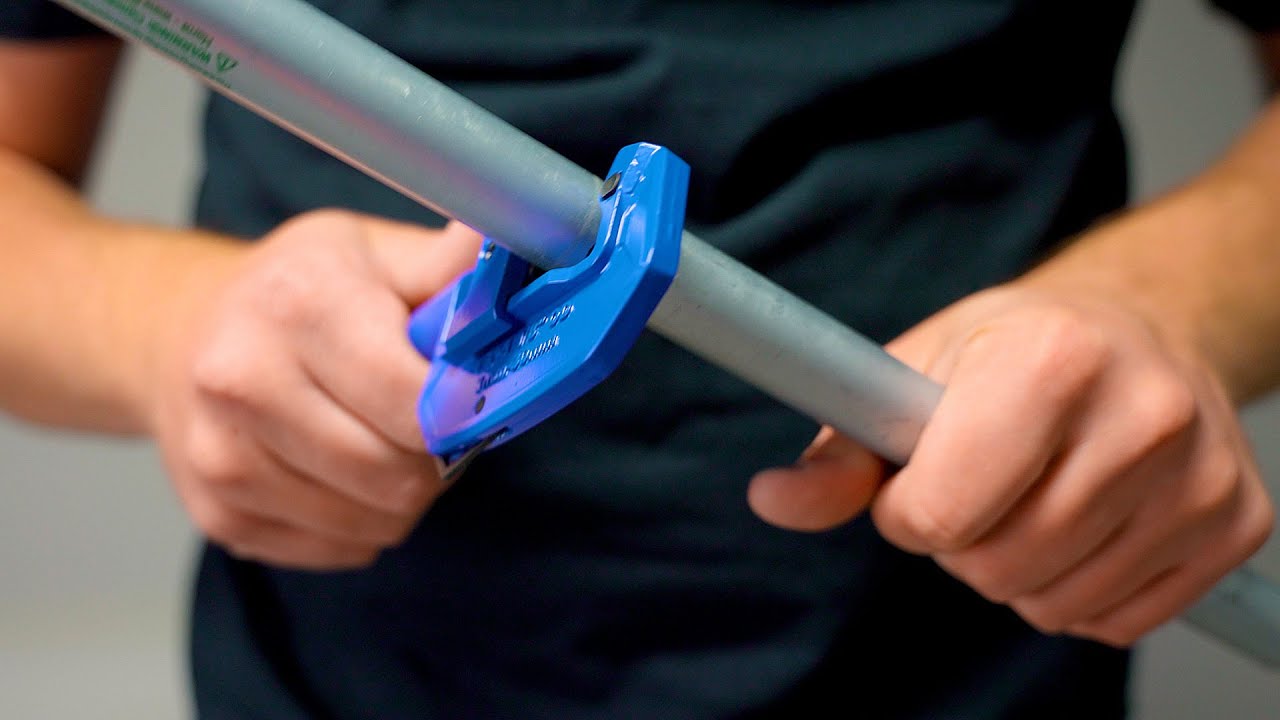
Step 2: Cut Conduit
Once you have measured and marked the conduit, the next step is to cut it to the correct length. Cutting the conduit accurately is important to ensure a proper fit and functionality in your electrical installation.
Here’s how to cut the conduit:
- Secure the conduit pipe in a vise or clamp to hold it steady during the cutting process.
- Wearing appropriate safety gear, such as gloves and safety goggles, use a conduit cutter to make a clean and precise cut at the marked location on the conduit.
- Rotate the conduit cutter around the pipe, tightening the blade gradually with each rotation until the cut is complete. Make sure to apply steady pressure and keep the cutter perpendicular to the conduit to ensure an even cut.
- Release the conduit from the vise or clamp and inspect the cut end to ensure it is smooth and free of any burrs or rough edges. If necessary, use a deburring tool to remove any sharp or uneven edges.
- Repeat the process for any additional sections of conduit that you need to cut.
By cutting the conduit accurately, you’ll ensure a seamless connection between sections and minimize the risk of any rough edges or obstructions that could hinder the threading process.
Now that you’ve cut the conduit to the correct length, it’s time to move on to the next step: deburring the cut end of the conduit.
Step 3: Deburring
After cutting the conduit to the correct length, it’s important to deburr the cut end. Deburring removes any sharp edges or burrs that may have been created during the cutting process. This step ensures that the conduit threads smoothly and reduces the risk of injury during installation.
Here’s how to deburr the cut end of the conduit:
- Inspect the cut end of the conduit for any rough edges or burrs that need to be removed.
- Using a deburring tool, gently scrape the inner and outer edges of the cut end to remove any imperfections.
- Continue deburring until the edges feel smooth to the touch and there are no sharp protrusions.
- Take care not to remove too much material or alter the shape of the conduit in the process.
- After deburring, visually inspect the cut end again to ensure it is clean and free from any remaining burrs.
Deburring the cut end of the conduit is essential to ensure a seamless threading process. By removing any rough edges or burrs, you’ll facilitate the smooth rotation of the threading dies and prevent any potential damage to the conduit threads.
With the cut end of the conduit deburred, you’re now ready to move on to the next step: threading the conduit.
Read more: How To Store Spools Of Thread
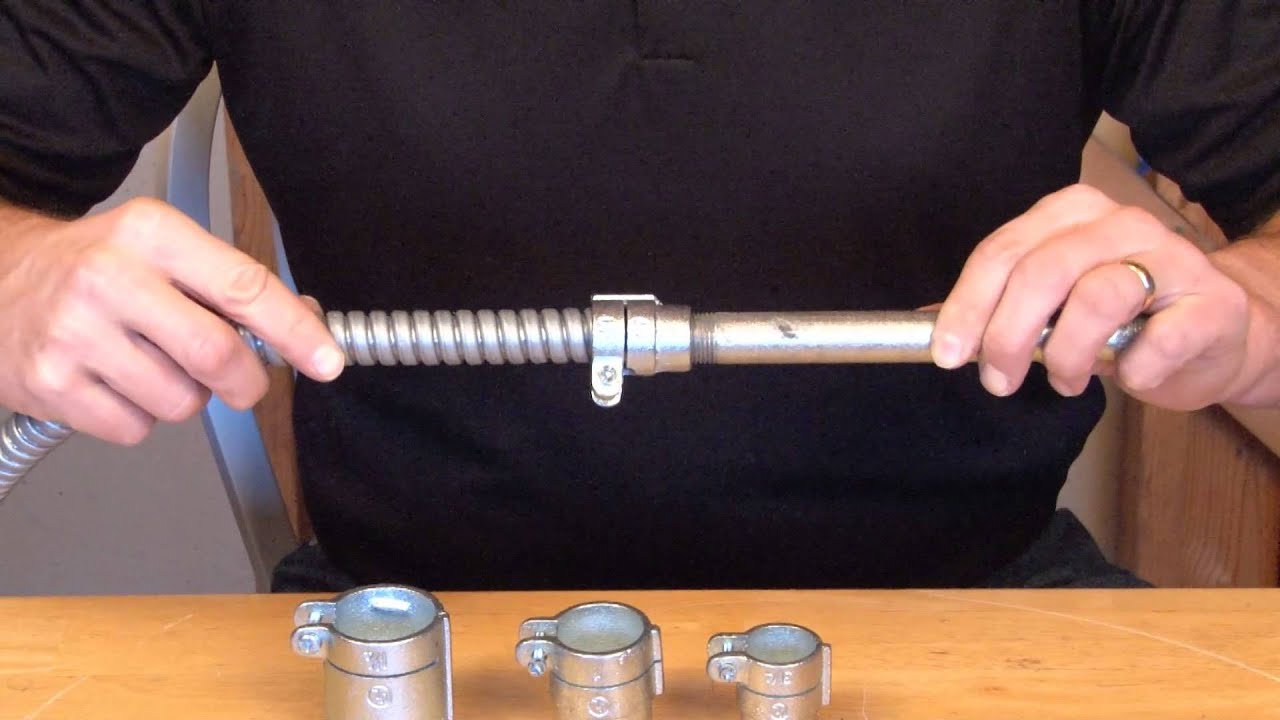
Step 4: Threading
Threading is the process of creating the threads on the cut end of the conduit. This step is crucial for connecting fittings and creating a secure electrical pathway. Proper threading ensures a tight and reliable connection between conduit sections.
Here’s how to thread the conduit:
- Secure the conduit in a vise or pipe threading machine, ensuring that the cut end is easily accessible.
- If you are using a manual conduit threader, select the appropriate threading die for the size of conduit you are working with. Insert the die into the threader.
- If you are using an electric conduit threader, ensure that the appropriate threading die is securely attached to the machine.
- Apply a generous amount of lubricant to the cut end of the conduit. This will reduce friction and help create smooth, clean threads.
- Position the threading die at the start of the conduit, aligning it perpendicular to the conduit surface.
- If using a manual conduit threader, rotate the handle in a clockwise motion to start threading the conduit. Apply steady and even pressure as you rotate the handle.
- If using an electric conduit threader, follow the manufacturer’s instructions to engage the threading process. Ensure that the machine is securely held and stable during operation.
- Continue rotating the threading die along the length of the conduit, maintaining consistent pressure and speed until the threads reach the desired depth.
- If necessary, use a thread gauge to check the depth and quality of the threads throughout the process.
Threading conduit requires precision and attention to detail. Take your time and ensure that the threads are clean and well-formed. A properly threaded conduit will provide a secure and reliable connection for your electrical installation.
Once you have threaded the conduit, it’s time to move on to the next step: applying lubricant.
Step 5: Apply Lubricant
Applying lubricant is an essential step in the conduit threading process. Lubricant reduces friction between the threading dies and the conduit, allowing for smoother, more accurate thread creation. By using lubricant, you’ll ensure that the threads are clean, well-formed, and free from damage.
Here’s how to apply lubricant to the threaded conduit:
- Before applying lubricant, ensure that the threaded conduit is clean and free from any debris or excess lubricant.
- Choose a lubricant specifically designed for conduit threading. These lubricants are formulated to provide optimal performance and protect the threads.
- Apply a thin, even layer of lubricant to the entire length of the threaded conduit. Use your hand, a brush, or a cloth to spread the lubricant evenly.
- Make sure that the lubricant reaches into the crevices and gaps of the threads.
- Take care not to apply too much lubricant, as excessive amounts can lead to a messy finish or interfere with the tight connection of fittings.
By applying lubricant to the threaded conduit, you’ll reduce friction and prevent damage to the threads during installation. This step is crucial for ensuring a smooth connection with fittings and promoting longevity in your electrical system.
With the lubricant applied, you’re ready to move on to the next step: inspecting the threads for quality and precision.
When threading conduit, make sure to use a proper threading tool and lubricant to ensure clean and precise threads. This will make the installation process much smoother and prevent any damage to the conduit.
Step 6: Thread Conduit
Now that you have prepared the conduit by measuring, cutting, deburring, and applying lubricant, it’s time to thread the conduit. This step involves using a threading tool to create the threads on the conduit, allowing for the secure attachment of fittings and the formation of a seamless electrical pathway.
Follow these steps to thread the conduit:
- Secure the conduit in a vise or pipe threading machine, ensuring that the threaded end is easily accessible.
- Choose the appropriate threading die for the size of conduit you are working with and insert it into the threading tool.
- If using a manual threading tool, position the threading die at the start of the conduit, making sure it is perpendicular to the conduit surface.
- If using an electric threading machine, ensure that the threading die is securely attached to the machine.
- Engage the threading tool by turning the handle of the manual tool in a clockwise motion or by following the instructions provided for the electric machine.
- Apply steady pressure and rotate the threading tool along the length of the conduit. Take care to maintain a consistent speed and pressure.
- Continue threading until the desired length of the conduit has been threaded, ensuring that the threads are clean, well-formed, and properly aligned.
- If necessary, use a thread gauge to check the depth and quality of the threads throughout the process.
Threading the conduit properly is crucial for a secure and reliable electrical installation. Take your time, apply steady pressure, and ensure that the threading tool creates clean and precise threads along the entire length of the conduit.
Once you have threaded the conduit, it’s time to move on to the next step: inspecting the threads for any imperfections or inconsistencies.
Step 7: Inspect Threads
After threading the conduit, it’s important to inspect the threads for any imperfections or inconsistencies. Inspecting the threads ensures that they are clean, well-formed, and compatible with fittings. This step helps to guarantee a secure and reliable connection in your electrical installation.
Follow these steps to inspect the threads:
- Visually examine the threaded section of the conduit. Look for any signs of damage, such as burrs, unevenness, or deformities.
- Check that the threads are uniform in depth and pitch along the entire length of the conduit.
- Run your fingers along the threads to feel for any rough spots or irregularities. Smooth, consistent threads are essential for a proper fitting connection.
- Ensure that the threads are compatible with the fittings you will be using. They should align and engage easily without excessive force.
- If you notice any issues with the threads, such as roughness or misalignment, you may need to re-thread the conduit or make necessary adjustments.
- Repeat the inspection process for each section of threaded conduit that you have prepared.
Thoroughly inspecting the threads is vital for ensuring a successful conduit installation. By identifying and addressing any issues or inconsistencies, you can prevent potential problems down the line and ensure a secure electrical pathway.
Once you have inspected the threads and are satisfied with their quality, you’re ready to move on to the next step: attaching fittings to the threaded conduit.
Read more: How To Seal Plumbing Threads
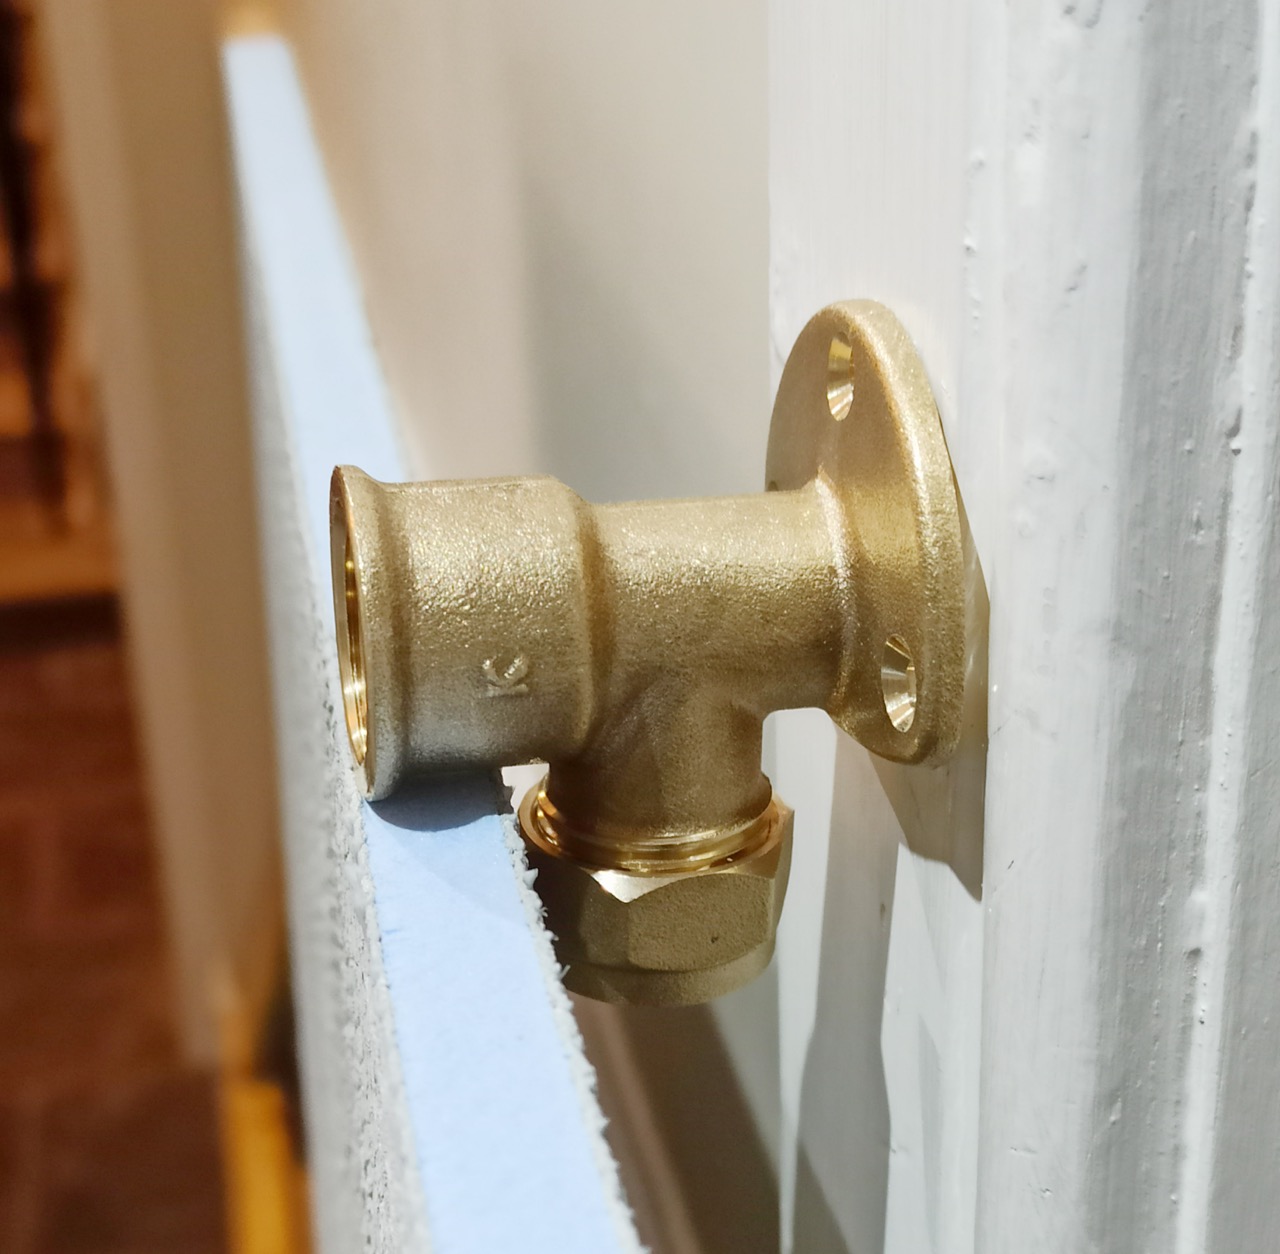
Step 8: Attach Fittings
Now that you have threaded the conduit and inspected the threads, it’s time to attach fittings. Fittings are used to connect sections of conduit, as well as to attach the conduit to junction boxes, panels, or other electrical components. Properly attaching fittings ensures a secure and reliable electrical installation.
Follow these steps to attach the fittings to the threaded conduit:
- Select the appropriate fittings for your specific installation requirements. This may include couplings, connectors, elbows, or other types of fittings.
- Apply a thin layer of lubricant to the threads of both the conduit and the fitting. This will facilitate a smooth and secure connection.
- Align the threads of the fitting with the threaded end of the conduit.
- Rotate the fitting clockwise to engage the threads, starting with a hand-tight connection.
- Use an appropriate wrench to securely tighten the fitting, applying sufficient force to create a watertight seal without over-tightening.
- Inspect the connection to ensure that the fitting is securely attached to the conduit with no gaps or misalignment.
- Repeat the process for each fitting that needs to be attached to the threaded conduit.
Attaching fittings to the threaded conduit is a critical step in the installation process. Ensure that the fittings are properly tightened and aligned to create a secure and reliable electrical connection.
Once the fittings are securely attached, you’re ready to move on to the next step: connecting the sections of conduit.
Step 9: Connect Conduit Sections
With the fittings securely attached to the threaded conduit, it’s time to connect the sections of conduit. Connecting conduit sections allows for the creation of a continuous electrical pathway and is an important step in ensuring the functionality and integrity of your electrical installation.
Follow these steps to connect the conduit sections:
- Ensure that the ends of the conduit sections to be connected are clean and free from any debris or excess lubricant.
- Insert one end of the conduit into the fitting or coupling of the adjacent section.
- Rotate the conduit clockwise to engage the threads and create a secure connection.
- Hand-tighten the connection as much as possible.
- Use a wrench to firmly tighten the connection, ensuring that it is secure.
- Inspect the connection to ensure that there are no gaps or misalignment between the sections of conduit.
- If necessary, repeat the process for any additional sections of conduit that need to be connected.
Connecting conduit sections properly ensures a seamless electrical pathway without any breaks or interruptions. It’s important to ensure that the connections are secure and free from gaps or misalignment that could affect the performance of your electrical system.
Once the conduit sections are connected, it’s time to move on to the final step: securing the conduit in place.
Step 10: Secure Conduit
Securing the conduit in place is the final step in the conduit threading process. Properly securing the conduit ensures that it remains stable and in the desired position, preventing movement or damage to the electrical wiring. This step is crucial for maintaining the integrity and safety of your electrical installation.
Follow these steps to secure the conduit:
- Inspect the entire length of the conduit to identify areas where additional support may be needed.
- Use conduit straps or clamps to secure the conduit to walls, ceilings, or other structural surfaces. Position the straps evenly along the conduit at regular intervals.
- Use screws or nails to fasten the straps to the surface, ensuring that they are secure.
- Check the support and stability of the conduit by gently applying pressure and ensuring that it remains firmly in place.
- Verify the overall alignment of the conduit and make any necessary adjustments to ensure a straight and level installation.
- Ensure that the conduit is positioned in a way that complies with local electrical codes and regulations.
- Double-check all connections, fittings, and supports to make sure they are secure and properly aligned.
By securely fastening and supporting the conduit, you’ll minimize the risk of damage to the wiring and ensure the longevity of your electrical installation.
Congratulations! You have successfully completed the process of threading and securing conduit. Your electrical installation is now ready to be connected to junction boxes, electrical panels, or other relevant components.
Remember, if you have any doubts or uncertainties about the process, it’s always best to consult a professional electrician or refer to local electrical codes and regulations for guidance.
Now that you have mastered the art of conduit threading, you can confidently tackle future projects and ensure safe and efficient electrical installations.
We hope this comprehensive guide has been helpful in guiding you through the process of threading conduit. Good luck with your future electrical endeavors!
Disclaimer: This article is for informational purposes only and should not be considered as professional advice. Always consult a certified electrician for specific guidance and adherence to local electrical codes and regulations.
Conclusion
Congratulations! You have reached the end of this comprehensive guide on how to thread conduit. By following the step-by-step instructions and tips provided, you have gained the knowledge and skills necessary to successfully thread conduit for your electrical installations.
Threading conduit is a critical skill for electricians and ensures secure and efficient electrical wiring. From measuring and marking to cutting, deburring, and threading, each step plays a vital role in creating a seamless electrical pathway. By applying lubricant, attaching fittings, connecting conduit sections, and securing the conduit in place, you have created a reliable and robust electrical installation.
Remember, safety is of utmost importance when working with electrical systems. Always wear appropriate protective gear and follow safety protocols to minimize the risk of accidents.
If you ever feel unsure or encounter complex situations during the conduit threading process, it is advisable to consult a professional electrician for guidance and support. They can provide expert advice and ensure that your electrical installation meets all necessary codes and regulations.
Now armed with the knowledge and skills to thread conduit, you are ready to tackle your next electrical project with confidence. Whether it’s installing electrical wiring in a residential or commercial building, you have the ability to create a reliable and efficient electrical system.
Thank you for taking the time to learn about threading conduit. We hope this guide has been helpful, and we wish you success in all your future electrical endeavors!
Disclaimer: This article is for informational purposes only and should not be considered as professional advice. Always consult a certified electrician for specific guidance and adherence to local electrical codes and regulations.
Frequently Asked Questions about How To Thread Conduit
Was this page helpful?
At Storables.com, we guarantee accurate and reliable information. Our content, validated by Expert Board Contributors, is crafted following stringent Editorial Policies. We're committed to providing you with well-researched, expert-backed insights for all your informational needs.


0 thoughts on “How To Thread Conduit”