Home>Furniture & Design>Bathroom Accessories>How To Apply Silicone To A Bathtub
Bathroom Accessories
How To Apply Silicone To A Bathtub
Published: February 18, 2024
Learn how to properly apply silicone to your bathtub for a watertight seal with our step-by-step guide. Find out the best techniques and tools to use for a professional finish. Perfect for bathroom accessories and DIY enthusiasts.
(Many of the links in this article redirect to a specific reviewed product. Your purchase of these products through affiliate links helps to generate commission for Storables.com, at no extra cost. Learn more)
Introduction
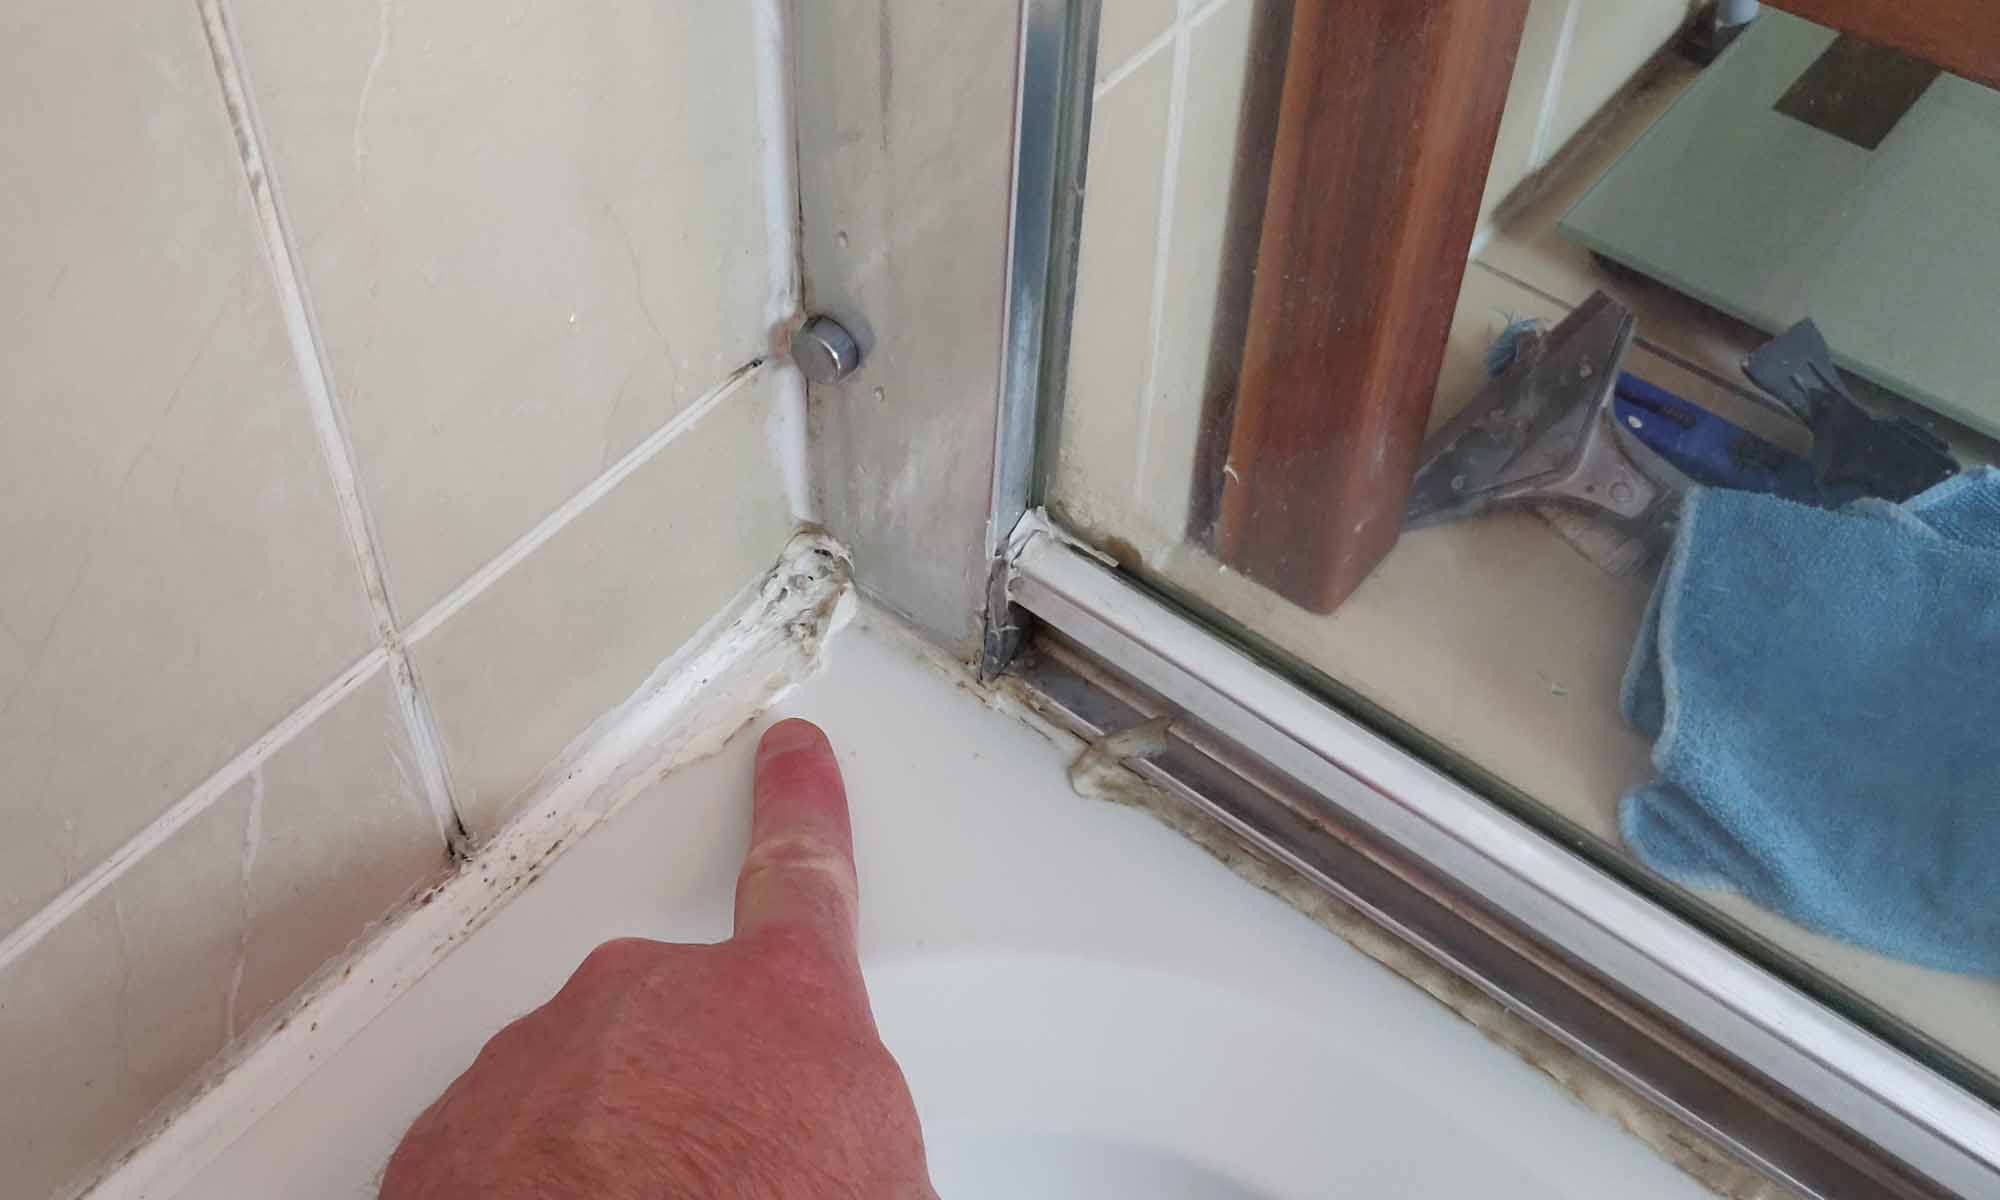
Applying silicone to a bathtub is a crucial step in maintaining the integrity of your bathroom and preventing water damage. Whether you're installing a new bathtub or repairing existing seals, properly applying silicone is essential for ensuring a watertight and durable seal. Silicone sealant acts as a protective barrier, preventing water from seeping into crevices and causing damage to the surrounding walls and flooring. In this comprehensive guide, we will walk you through the step-by-step process of applying silicone to your bathtub, ensuring that you achieve a professional-looking finish while safeguarding your bathroom against potential water-related issues.
Properly applying silicone to a bathtub requires attention to detail and the use of the right tools and techniques. By following the steps outlined in this guide, you can effectively seal the edges of your bathtub, creating a watertight barrier that enhances the longevity of your bathroom fixtures. Whether you're a seasoned DIY enthusiast or a novice homeowner looking to tackle a bathroom improvement project, mastering the art of applying silicone to a bathtub is a valuable skill that can save you time and money in the long run.
In the following sections, we will delve into the preparatory steps, the selection of the appropriate silicone sealant, the application process, and the finishing touches required to achieve a professional result. By the end of this guide, you will have the knowledge and confidence to tackle your bathtub sealing project with precision and expertise. Let's dive into the details and learn how to apply silicone to a bathtub effectively, ensuring a watertight and visually appealing finish that enhances the overall aesthetics and functionality of your bathroom.
Key Takeaways:
- Protect your bathtub by applying silicone to prevent water damage. Follow the steps for prep, choosing the right sealant, application, smoothing, and allowing it to dry for a professional finish.
- Master the art of applying silicone to your bathtub to safeguard against water damage and enhance the aesthetics of your bathroom. Follow the detailed steps for a successful sealing project.
Read more: How To Get Silicone Off A Bathtub
Step 1: Prepare the bathtub surface
Before applying silicone to your bathtub, it's crucial to prepare the surface to ensure optimal adhesion and a professional finish. Here's a detailed breakdown of the preparatory steps:
-
Clean the Surface: Start by thoroughly cleaning the edges and surrounding areas of the bathtub. Use a mild detergent or a specialized bathroom cleaner to remove any dirt, grime, or soap residue. Additionally, ensure that all existing silicone sealant is completely removed using a silicone remover or scraper. A clean surface is essential for the new silicone to adhere effectively.
-
Dry the Area: Once the surface is clean, dry it thoroughly using a clean, lint-free cloth. Moisture can hinder the adhesion of the silicone, so it's important to ensure that the surface is completely dry before proceeding with the application.
-
Masking: To achieve clean, straight lines and prevent excess silicone from spreading onto unwanted areas, use masking tape to outline the edges of the bathtub. This will create a defined boundary for the silicone application and make the cleanup process much easier.
-
Ventilation: Proper ventilation is essential when working with silicone sealant. Open windows and doors to ensure adequate airflow, which helps in expediting the curing process and prevents the buildup of strong fumes.
-
Protective Gear: It's advisable to wear protective gloves and, if necessary, a mask to shield yourself from direct contact with the silicone and its fumes. Safety goggles can also be worn to protect your eyes during the application process.
By meticulously preparing the bathtub surface, you set the stage for a successful silicone application. These preparatory steps not only ensure a strong bond between the silicone and the bathtub but also contribute to a neat and professional-looking finish. With the surface properly prepped, you're now ready to move on to the next step of choosing the right silicone sealant for your bathtub.
Step 2: Choose the right silicone sealant
Selecting the appropriate silicone sealant is a critical aspect of ensuring a successful bathtub sealing project. With a wide array of options available in the market, it's essential to consider several factors to determine the most suitable sealant for your specific needs.
Consider the Type of Silicone Sealant
When choosing a silicone sealant for your bathtub, it's important to opt for a product specifically designed for bathroom and kitchen applications. These sealants are formulated to withstand constant exposure to moisture, humidity, and temperature variations, making them ideal for sealing bathtubs and shower enclosures. Look for silicone sealants labeled as "mildew-resistant" or "mold-resistant" to ensure long-term protection against fungal growth in wet environments.
Evaluate the Color Options
Silicone sealants are available in a variety of colors, allowing you to select a shade that complements the aesthetic of your bathroom. While white and clear are popular choices for bathtub applications, you can also find silicone sealants in an assortment of colors to match different tile and fixture designs. Consider the overall color scheme of your bathroom and choose a silicone sealant that seamlessly integrates with the existing decor.
Read more: How To Store Silicone Toys
Assess the Flexibility and Durability
Opt for a silicone sealant with excellent flexibility and durability to accommodate the natural movement of the bathtub and prevent cracks or gaps from forming over time. Look for products that offer high elasticity and are capable of withstanding frequent use without deteriorating. A flexible silicone sealant ensures that the seal remains intact even when the bathtub experiences slight shifts or vibrations.
Check for Waterproof Properties
Ensure that the silicone sealant you choose is explicitly labeled as waterproof or water-resistant. This feature is crucial for maintaining a watertight seal around the bathtub, preventing water from seeping into the surrounding walls and flooring. A waterproof silicone sealant provides reliable protection against leaks and water damage, contributing to the overall longevity of your bathroom fixtures.
Consider Antimicrobial Formulations
Some silicone sealants are formulated with antimicrobial properties, inhibiting the growth of mold, mildew, and bacteria. This feature is particularly beneficial for bathtubs and shower areas, where moisture and warmth create an ideal environment for microbial proliferation. By choosing a silicone sealant with antimicrobial additives, you can enhance the hygiene and cleanliness of your bathroom while prolonging the lifespan of the sealant.
By carefully considering these factors and selecting a high-quality silicone sealant tailored to your specific requirements, you can ensure a durable, long-lasting seal around your bathtub. The right silicone sealant not only provides effective waterproofing but also contributes to the overall aesthetic appeal and functionality of your bathroom. With the selection process complete, you're now ready to proceed to the next step of applying the silicone to the bathtub surface.
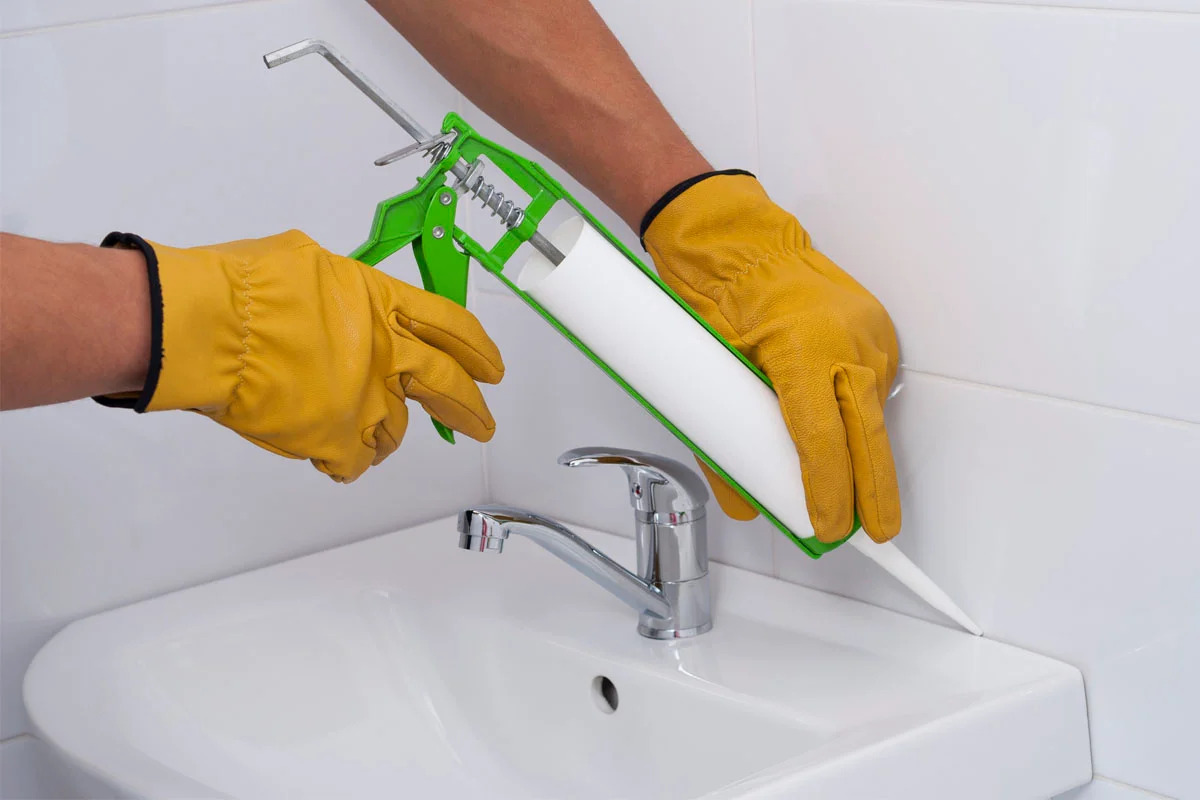
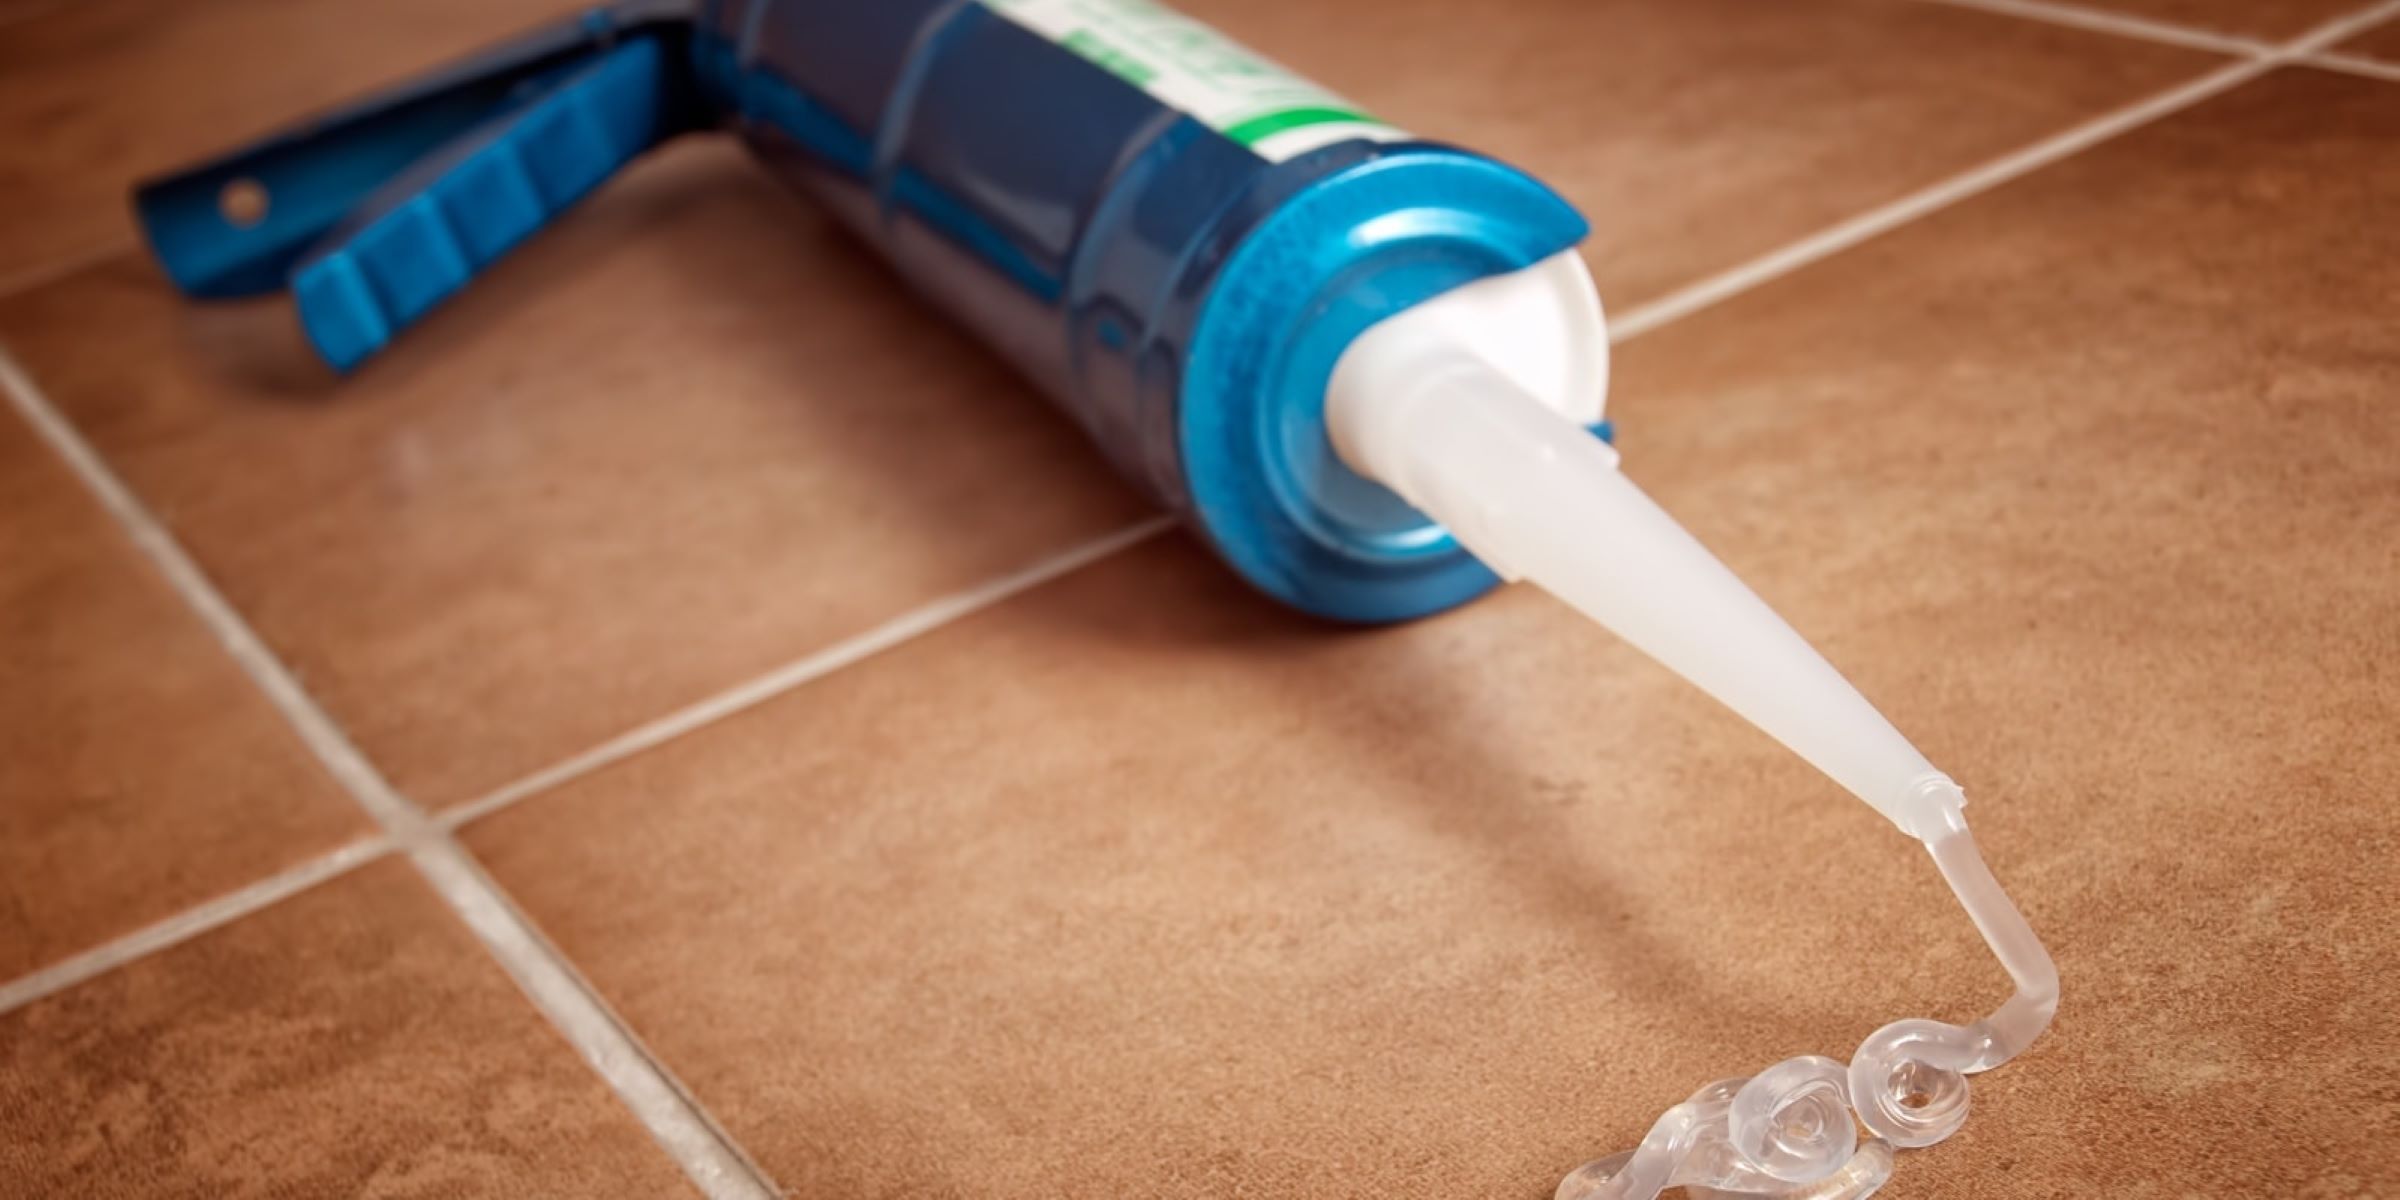
Step 3: Apply the silicone to the bathtub
Now that the bathtub surface is meticulously prepared and the appropriate silicone sealant has been selected, it's time to proceed with the application process. Applying silicone to the bathtub requires precision and attention to detail to ensure a seamless and watertight seal. Here's a comprehensive guide on how to effectively apply the silicone to the bathtub:
Read more: How To Remove Silicone From Glass
Gather Your Tools
Before starting the application, gather the necessary tools and materials, including a caulking gun, a cartridge of silicone sealant, a utility knife or scissors, and a damp cloth for smoothing the silicone.
Load the Caulking Gun
Insert the cartridge of silicone sealant into the caulking gun and cut the tip of the cartridge at a 45-degree angle using a utility knife. Ensure that the opening is sized to deliver the desired bead of silicone.
Begin the Application
Starting at one end of the bathtub, hold the caulking gun at a 45-degree angle and steadily apply a consistent bead of silicone along the seam where the bathtub meets the wall or the surrounding tiles. Maintain a steady hand and a consistent pressure on the caulking gun to achieve an even application.
Smooth the Silicone
After applying the silicone, dampen your finger or a cloth with water and gently smooth the bead of silicone to create a neat and uniform finish. This step helps to ensure that the silicone adheres well to the surface and eliminates any uneven edges.
Read more: How To Get Silicone Off Of Glass
Work in Sections
Continue applying and smoothing the silicone in manageable sections, working methodically around the perimeter of the bathtub. Take your time to maintain a steady pace and consistent technique to achieve a professional-looking result.
Fill Gaps and Crevices
Pay close attention to any gaps or crevices along the bathtub edges, ensuring that the silicone fills these areas completely. Properly sealing these gaps is essential for preventing water infiltration and maintaining the integrity of the seal.
Clean Up Excess Silicone
As you progress, periodically clean up any excess silicone using a damp cloth or a specialized silicone smoothing tool. This helps to maintain a tidy workspace and ensures a clean, finished appearance.
By following these detailed steps, you can effectively apply silicone to your bathtub, creating a durable and visually appealing seal that safeguards your bathroom against water damage. With the silicone successfully applied, the next crucial step is to smooth out the silicone to achieve a professional finish. Let's delve into the specifics of this essential process in the next section.
Step 4: Smooth out the silicone
After applying the silicone to the bathtub, the next critical step is to smooth out the sealant to achieve a professional finish. Smoothing the silicone not only enhances the visual appeal of the seal but also ensures optimal adhesion and water-tightness. Here's a detailed guide on how to effectively smooth out the silicone:
Read more: How To Apply Fertilizer To Plants
Use a Damp Cloth or Silicone Tool
Begin by preparing a damp cloth or a specialized silicone smoothing tool. The cloth should be slightly damp, allowing it to glide smoothly over the silicone without sticking. Alternatively, silicone smoothing tools are designed specifically for this purpose, offering precise control and a clean finish.
Apply Gentle Pressure
With the damp cloth or silicone tool in hand, gently press it against the bead of silicone. Use steady, even pressure to smooth out the silicone, working in a continuous motion along the entire length of the seal. This process helps to eliminate any uneven ridges or excess silicone, resulting in a uniform and professional-looking finish.
Maintain Consistent Motion
As you smooth out the silicone, maintain a consistent motion to ensure an even appearance. Avoid applying excessive pressure, as this can cause the silicone to spread unevenly or become too thin in certain areas. By maintaining a steady and controlled motion, you can achieve a seamless finish that enhances the overall aesthetics of the bathtub seal.
Clean Up Excess Silicone
Periodically check for any excess silicone that may accumulate on the damp cloth or silicone tool. Wipe off the excess sealant using a separate cloth to prevent it from smearing onto the smoothed areas. This step contributes to a clean and polished result, ensuring that the silicone seal appears neat and well-defined.
Read more: How To Apply Astro Turf
Check for Uniformity
After smoothing out the silicone, visually inspect the seal to ensure that it appears uniform and free of any imperfections. Pay attention to any areas that may require additional smoothing, and make necessary adjustments to achieve a consistent and visually appealing finish.
By following these detailed steps, you can effectively smooth out the silicone sealant, creating a professional-looking result that enhances the overall appearance of your bathtub. With the silicone successfully smoothed, the final step is to allow the sealant to dry thoroughly, completing the process of applying silicone to your bathtub with precision and expertise.
Step 5: Let the silicone dry
Once the silicone has been meticulously applied and smoothed onto the bathtub surface, allowing it to dry thoroughly is crucial to ensure a durable and effective seal. The drying process is essential for the silicone to form a strong bond with the bathtub and surrounding materials, creating a watertight barrier that withstands regular use and exposure to moisture. Here's a detailed breakdown of the steps involved in letting the silicone dry:
Check the Drying Time
Different types of silicone sealants have varying drying times, typically ranging from 24 to 48 hours for a complete cure. Refer to the manufacturer's instructions on the silicone sealant packaging to determine the specific drying time for the product you've used. It's important to adhere to the recommended drying period to allow the silicone to fully set and achieve its maximum strength.
Maintain Optimal Conditions
During the drying period, it's essential to maintain optimal conditions to facilitate the curing process. Ensure that the bathroom remains well-ventilated to promote airflow and expedite the drying of the silicone. Open windows and doors to allow fresh air to circulate, aiding in the dissipation of any residual fumes from the silicone sealant.
Read more: How To Make A Silicone Mold For Candles
Avoid Disturbance
To prevent any disruptions to the drying silicone, avoid using the bathtub or shower during the designated drying period. Minimizing movement and contact with the freshly applied silicone ensures that it can cure undisturbed, leading to a robust and long-lasting seal.
Perform a Touch Test
After the initial drying period, perform a gentle touch test to assess the silicone's readiness. Lightly press your finger against a small, inconspicuous area of the silicone sealant. If the silicone feels firm and no longer tacky to the touch, it is likely to have completed the initial curing stage.
Allow Additional Time if Necessary
In some cases, particularly in environments with high humidity or lower temperatures, the silicone may require additional time to dry completely. If the silicone still feels slightly soft or exhibits any tackiness, allow it to cure for an extended period as recommended by the manufacturer.
By following these steps and allowing the silicone to dry thoroughly, you ensure that the sealant achieves its maximum strength and durability, providing long-term protection against water infiltration and maintaining the integrity of your bathtub. Once the silicone has fully dried, you can confidently enjoy a professionally sealed bathtub that enhances the functionality and aesthetics of your bathroom.
Conclusion
In conclusion, mastering the art of applying silicone to a bathtub is a valuable skill that empowers homeowners to safeguard their bathrooms against water damage while enhancing the overall aesthetics and functionality of the space. By meticulously following the step-by-step process outlined in this guide, you can achieve a professional-looking finish and ensure a watertight seal that prolongs the lifespan of your bathtub and surrounding fixtures.
The preparatory steps, including thorough surface cleaning, drying, masking, ventilation, and the use of protective gear, lay the foundation for a successful silicone application. By meticulously preparing the bathtub surface, you set the stage for optimal adhesion and a neat, professional finish.
Choosing the right silicone sealant is crucial for achieving a durable and long-lasting seal. Factors such as the type of silicone, color options, flexibility, waterproof properties, and antimicrobial formulations play a pivotal role in selecting a sealant that meets the specific requirements of your bathtub sealing project.
The application process, which involves loading the caulking gun, applying the silicone, smoothing it out, and filling gaps, requires precision and attention to detail. Working methodically and ensuring complete coverage along the bathtub edges is essential for creating a robust and visually appealing seal.
Smoothing out the silicone is a critical step that contributes to the overall aesthetics and effectiveness of the seal. By using a damp cloth or silicone tool to achieve a uniform finish, you can ensure that the silicone adheres well to the surface and eliminates any uneven edges or excess sealant.
Allowing the silicone to dry thoroughly is the final step in the process, ensuring that the sealant forms a strong bond with the bathtub and surrounding materials. By adhering to the recommended drying time and maintaining optimal conditions, you can guarantee that the silicone achieves its maximum strength and durability.
In essence, the process of applying silicone to a bathtub demands attention to detail, patience, and the use of high-quality materials. By mastering this essential skill, homeowners can take proactive measures to protect their bathrooms from water-related issues, ultimately contributing to the longevity and resilience of their living spaces. With the knowledge and expertise gained from this guide, you are well-equipped to embark on your bathtub sealing project with confidence and precision.
Frequently Asked Questions about How To Apply Silicone To A Bathtub
Was this page helpful?
At Storables.com, we guarantee accurate and reliable information. Our content, validated by Expert Board Contributors, is crafted following stringent Editorial Policies. We're committed to providing you with well-researched, expert-backed insights for all your informational needs.


0 thoughts on “How To Apply Silicone To A Bathtub”