Home>Furniture & Design>Interior Design Trends>How To Get The Stained Glass Egg
Interior Design Trends
How To Get The Stained Glass Egg
Modified: November 1, 2024
Discover the latest interior design trends with our guide on how to create a stunning stained glass egg for your home decor. Explore innovative techniques and ideas to elevate your space.
(Many of the links in this article redirect to a specific reviewed product. Your purchase of these products through affiliate links helps to generate commission for Storables.com, at no extra cost. Learn more)
Introduction
Creating a stained glass effect on an egg is a delightful and creative way to add a touch of elegance to your home decor. This unique craft project offers a wonderful opportunity to showcase your artistic flair and attention to detail. The process of transforming a simple egg into a stunning piece of art is both rewarding and enjoyable. By following a few simple steps and utilizing basic materials, you can achieve a beautiful stained glass effect that will captivate the eyes of all who behold it.
The stained glass egg project is not only a visually appealing endeavor but also a fantastic way to explore your creativity and indulge in a relaxing and fulfilling activity. Whether you are a seasoned crafter or a novice enthusiast, this project provides an excellent opportunity to experiment with colors, patterns, and textures, allowing you to express your individual style and personality.
As you embark on this artistic journey, you will discover the joy of working with your hands and witnessing the transformation of a humble egg into a stunning work of art. The process of creating a stained glass effect on an egg is a testament to the beauty that can be achieved through simplicity and creativity. With each brushstroke and carefully chosen color, you will witness the egg come to life, exuding a radiant and timeless charm.
The stained glass egg project is not only a delightful way to adorn your living space but also an excellent way to engage in a mindful and meditative activity. As you immerse yourself in the process, you will find a sense of calm and tranquility, allowing your mind to wander and your creativity to flow freely. This project offers a perfect opportunity to unwind and indulge in a creative pursuit that brings joy and satisfaction.
In the following steps, we will guide you through the process of creating your very own stained glass egg, providing detailed instructions and tips to ensure a successful and visually stunning outcome. So, gather your materials and prepare to embark on a delightful journey of creativity and artistry as we bring the beauty of stained glass to a simple egg.
Key Takeaways:
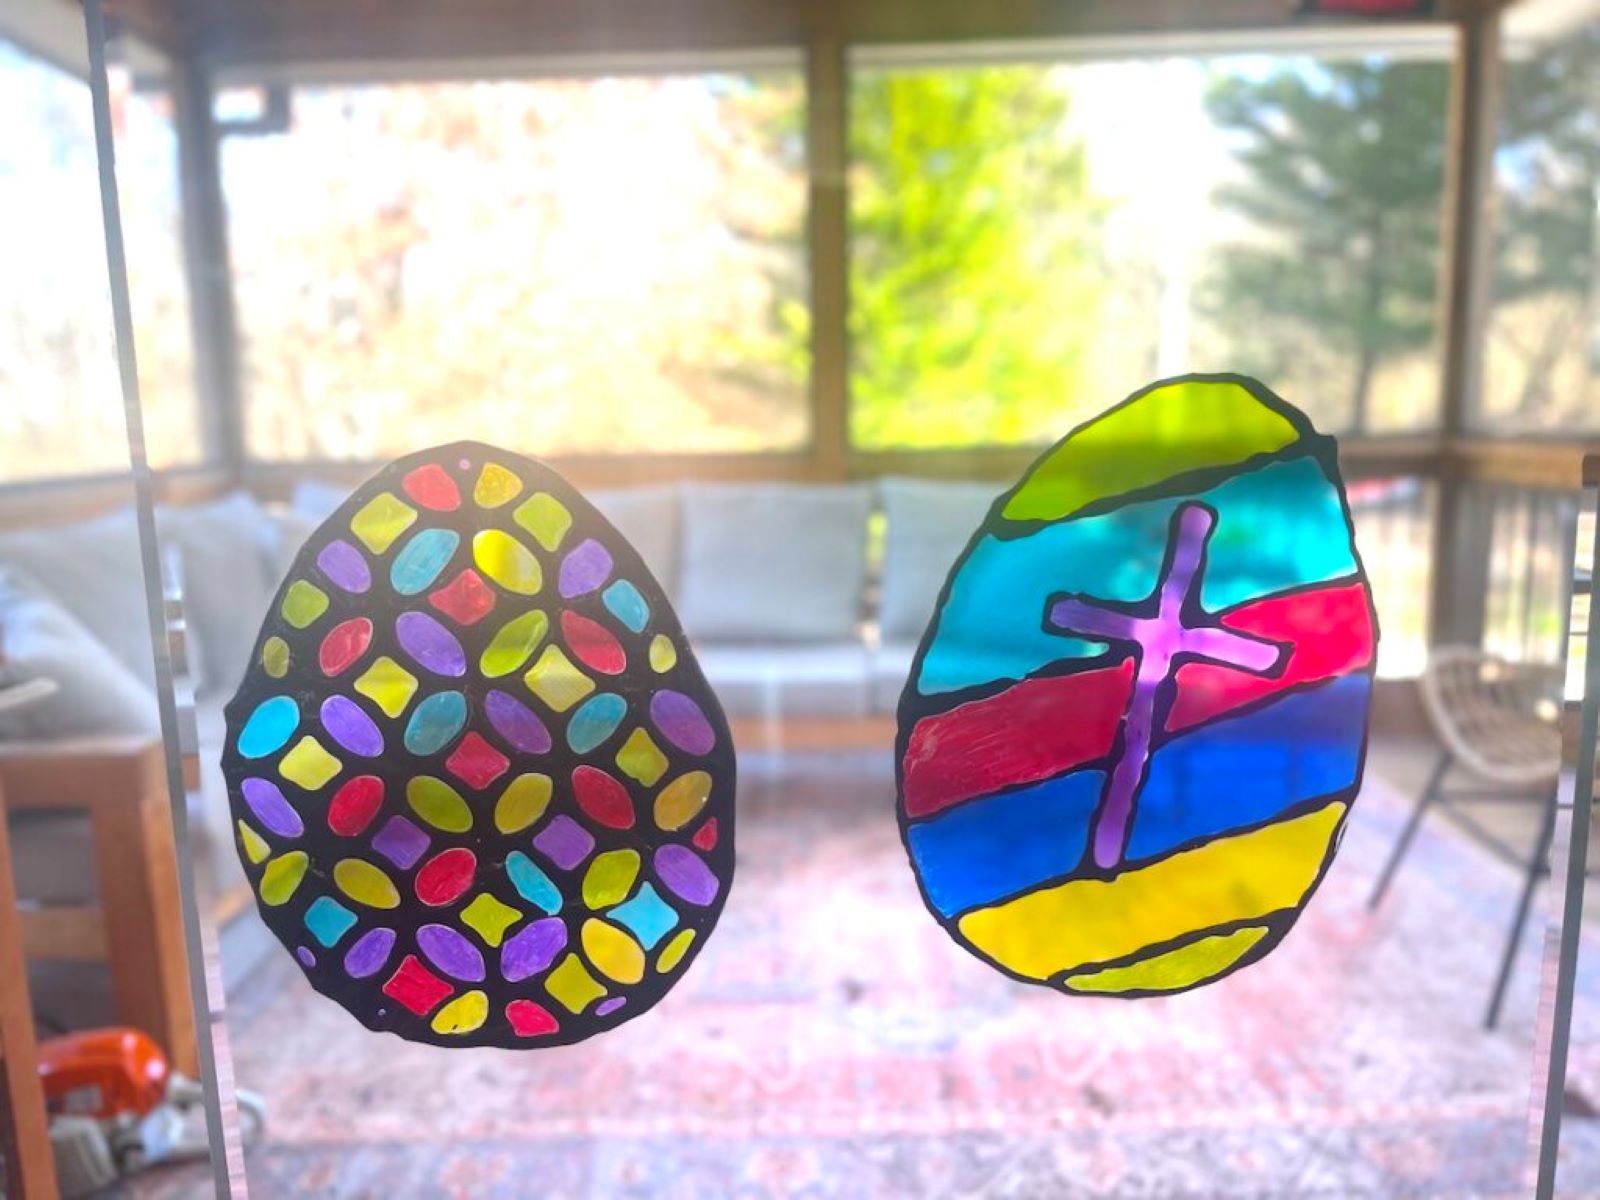
- Unleash Your Creativity: Transform a simple egg into a stunning work of art with vibrant colors and intricate designs, creating a mesmerizing stained glass effect that captivates the eyes and brings joy.
- Showcase Your Masterpiece: Display your exquisite stained glass egg as a focal point in your home, infusing elegance and charm into your living space while sharing your creativity with others.
Read more: How To Get Water Stains Off Of Glass
Step 1: Gather the necessary materials
To embark on the enchanting journey of creating a stained glass effect on an egg, you will need to gather a few essential materials. These items are readily available and will serve as the foundation for your artistic endeavor. Here's what you'll need:
Materials:
-
Eggs: Select fresh, clean eggs as the base for your stained glass project. The smooth surface of the egg will provide an ideal canvas for the vibrant colors and intricate designs.
-
Acrylic Paints: Choose a variety of acrylic paints in an array of colors to bring your stained glass vision to life. Opt for high-quality paints that offer rich pigmentation and easy application.
-
Paintbrushes: Ensure you have a selection of fine-tipped paintbrushes to delicately apply the paints to the egg's surface. Different brush sizes will allow for precise detailing and broad strokes, enabling you to create intricate patterns and designs.
-
Palette: A palette or mixing surface will be essential for blending and diluting the acrylic paints to achieve the desired hues and shades for your stained glass effect.
-
Protective Sealant: Select a clear protective sealant to preserve the vibrancy and longevity of your stained glass egg. The sealant will also provide a glossy finish, enhancing the overall visual appeal.
-
Egg Carton or Holder: To facilitate the drying process and prevent smudging or damage to your masterpiece, a secure and stable egg carton or holder will be necessary.
-
Paper Towels: Keep a supply of paper towels handy to wipe brushes, clean up spills, and ensure a tidy workspace throughout the creative process.
-
Optional: Glitter or Metallic Paints: For an added touch of sparkle and dimension, consider incorporating glitter or metallic paints into your design to elevate the beauty of your stained glass egg.
By gathering these materials, you will be well-equipped to embark on the next steps of preparing and transforming the humble egg into a stunning piece of art. With these essentials at your disposal, you are poised to unleash your creativity and bring your stained glass vision to fruition.
Step 2: Prepare the egg
Before delving into the artistic process of creating a stained glass effect on the egg, it is crucial to prepare the canvas – the egg – to ensure optimal results. The preparation phase sets the stage for the application of colors and designs, laying the foundation for a visually captivating stained glass effect. Here's how to prepare the egg for this transformative artistic endeavor:
Cleaning the Egg:
Begin by gently washing the egg under lukewarm water to remove any dirt or debris that may be present on the surface. Use a mild dish soap to ensure thorough cleaning, taking care not to apply excessive pressure that could potentially crack the delicate shell. Once cleaned, allow the egg to air dry completely before proceeding to the next step.
Read more: How To Water Glass Eggs
Marking the Access Point:
To facilitate the removal of the egg contents, carefully mark a small access point on the egg using a pencil or a fine-tipped marker. This access point will enable you to extract the egg's contents, leaving behind an empty shell that will serve as the canvas for the stained glass effect.
Emptying the Egg:
With the marked access point as a guide, delicately puncture the shell using a sharp pin or needle, creating a small hole through which the egg's contents can be emptied. Gently insert the pin and carefully enlarge the hole, allowing the egg to drain into a bowl. Take care to handle the egg with utmost delicacy to prevent any cracks or breakage.
Rinsing the Shell:
Once the egg has been emptied, rinse the shell with water to ensure that all residual egg contents are removed. Gently swish water inside the shell and carefully pour it out, repeating the process until the shell is thoroughly clean. Allow the shell to air dry completely before proceeding to the next phase of the artistic process.
By meticulously preparing the egg through these essential steps, you are laying the groundwork for the application of vibrant colors and intricate designs that will bring the stained glass effect to life. With the egg now primed and ready, you are poised to embark on the creative journey of transforming it into a stunning work of art.
Step 3: Create the stained glass effect
With the meticulously prepared egg as your canvas, it's time to bring the captivating stained glass effect to life. This step is where your creativity takes center stage, allowing you to infuse the egg with vibrant colors and intricate designs reminiscent of traditional stained glass art. The following detailed process will guide you through the transformative journey of adorning the egg with a mesmerizing stained glass effect.
Read more: How To Stain A Glass
Applying the Base Colors:
Begin by selecting a base color for the egg, which will serve as the backdrop for the stained glass design. Using a fine-tipped paintbrush, delicately apply the chosen base color to the entire surface of the egg, ensuring smooth and even coverage. This foundational hue will provide a harmonious backdrop for the subsequent layers of colors and designs, setting the stage for the stunning stained glass effect.
Creating Intricate Designs:
Once the base color has dried, unleash your artistic vision by meticulously crafting intricate designs on the egg's surface. Draw inspiration from traditional stained glass patterns or let your imagination soar as you carefully outline and fill in captivating motifs and geometric shapes. The key is to embrace precision and attention to detail, as these elements will elevate the visual impact of the stained glass effect.
Layering Vibrant Colors:
With the base designs in place, it's time to infuse the egg with a kaleidoscope of vibrant colors. Select an array of richly pigmented acrylic paints and, using fine-tipped brushes, carefully fill in the outlined designs with a stunning palette of hues. Embrace the beauty of translucent colors blending seamlessly to evoke the timeless allure of stained glass art. Each brushstroke adds depth and dimension, bringing the egg to life with a captivating interplay of colors.
Adding Dimension and Texture:
To enhance the visual allure of the stained glass effect, consider incorporating techniques to add dimension and texture to the designs. Experiment with layering translucent colors to create a sense of depth, and use contrasting shades to accentuate contours and highlights. Additionally, you can introduce subtle touches of metallic or iridescent paints to infuse the designs with a captivating shimmer, further evoking the luminous beauty of stained glass.
Embracing Creativity and Experimentation:
Throughout the process of creating the stained glass effect, embrace your creativity and allow for experimentation. Explore the interplay of colors, patterns, and textures, and don't hesitate to deviate from traditional designs to infuse the egg with your unique artistic expression. The beauty of this endeavor lies in the freedom to explore and innovate, resulting in a stained glass effect that reflects your individual style and creativity.
By following these detailed steps and infusing the process with your artistic flair, you will witness the egg undergo a breathtaking transformation, evolving into a mesmerizing work of art exuding the timeless charm of stained glass. With the stained glass effect now adorning the egg's surface, you are one step closer to showcasing a stunning masterpiece that will captivate and enchant all who behold it.
Step 4: Let the egg dry
After meticulously infusing the egg with the captivating stained glass effect, it is imperative to allow ample time for the paint to dry thoroughly. This crucial step ensures that the colors set and adhere to the egg's surface, preserving the intricate designs and vibrant hues for a lasting and visually stunning outcome.
As you delicately place the adorned egg in a secure and stable egg carton or holder, take care to position it in a well-ventilated area with minimal exposure to dust or potential disturbances. The drying process is a pivotal stage in the creation of the stained glass effect, as it allows the acrylic paints to cure and form a durable bond with the egg's surface.
Patience is paramount during this phase, as the drying time may vary depending on factors such as humidity, temperature, and the thickness of the paint layers. It is advisable to allow the egg to air dry naturally, avoiding the use of heat sources or accelerants that may compromise the integrity of the stained glass effect.
Throughout the drying period, periodically inspect the egg to ensure that the paint is setting evenly and that the intricate designs retain their clarity and vibrancy. As the colors gradually solidify, you will witness the stained glass effect coming to life with a radiant and lustrous sheen, enhancing the visual allure of the egg.
Depending on the complexity of the designs and the number of paint layers, the drying process may span several hours to a day or more. Exercise caution and refrain from handling the egg until the paint has fully dried, as premature contact may result in smudges or imperfections that could detract from the overall aesthetic impact.
Once the paint has thoroughly dried and cured, carefully inspect the egg to ensure that the stained glass effect has achieved the desired level of brilliance and resilience. The colors should exude a captivating luminosity, and the designs should exhibit a seamless and polished finish, indicative of the meticulous craftsmanship invested in the artistic endeavor.
With the egg now adorned with the resplendent stained glass effect and the paint thoroughly dried and set, you have successfully navigated through this pivotal phase of the creative process. The next step beckons, inviting you to display your masterpiece and revel in the admiration it is sure to inspire.
Step 5: Display your stained glass egg
Once the paint has thoroughly dried and the stained glass effect has been meticulously crafted onto the egg's surface, the time has come to showcase your exquisite masterpiece. The display of the stained glass egg serves as a culmination of your artistic journey, allowing you to share the captivating beauty of your creation with others and infuse your living space with an enchanting touch of elegance.
To effectively display your stained glass egg, consider the following suggestions:
Selecting a Display Stand or Holder:
Choose a display stand or holder that complements the aesthetic of the stained glass egg while providing stable and secure support. Opt for a stand that elevates the egg, allowing it to command attention and be admired from all angles. A clear or neutral-colored stand can accentuate the vibrant colors of the stained glass effect, creating a visually striking presentation.
Read more: How To Solder Stained Glass
Positioning in a Well-Lit Area:
Place the stained glass egg in a well-lit area to maximize the visual impact of the vibrant colors and intricate designs. Natural light or strategically positioned artificial lighting can accentuate the luminosity of the stained glass effect, casting captivating reflections and shadows that enhance the overall allure of the display.
Showcasing as a Centerpiece:
Consider positioning the stained glass egg as a centerpiece on a mantelpiece, coffee table, or display shelf to draw attention and serve as a focal point in the room. Surrounding the egg with complementary decor or accentuating its presence with subtle embellishments can further elevate its visual prominence and create a captivating vignette.
Incorporating Decorative Accents:
Enhance the display of the stained glass egg by incorporating decorative accents such as fresh flowers, greenery, or ornamental elements that harmonize with the color palette and theme of the stained glass effect. Thoughtfully curated accents can enrich the visual narrative and create a cohesive and enchanting display.
Rotating the Display:
To fully appreciate the intricate details and captivating hues of the stained glass effect, consider periodically rotating the display of the egg to showcase different perspectives and angles. This dynamic approach allows for a renewed appreciation of the artistry and ensures that the egg's beauty is admired from various viewpoints.
By thoughtfully curating the display of your stained glass egg, you have the opportunity to share the enchanting beauty of your creation with others and infuse your living space with a timeless and captivating work of art. The display serves as a testament to your creativity and craftsmanship, inviting admiration and appreciation from all who behold the resplendent stained glass egg.
Frequently Asked Questions about How To Get The Stained Glass Egg
Was this page helpful?
At Storables.com, we guarantee accurate and reliable information. Our content, validated by Expert Board Contributors, is crafted following stringent Editorial Policies. We're committed to providing you with well-researched, expert-backed insights for all your informational needs.


0 thoughts on “How To Get The Stained Glass Egg”