Home>Furniture & Design>Interior Design Trends>How To Solder Stained Glass
Interior Design Trends
How To Solder Stained Glass
Modified: October 19, 2024
Learn how to solder stained glass with our expert tips and techniques. Stay updated on the latest interior design trends for your creative projects. Start creating beautiful stained glass designs today!
(Many of the links in this article redirect to a specific reviewed product. Your purchase of these products through affiliate links helps to generate commission for Storables.com, at no extra cost. Learn more)
Introduction
Soldering stained glass is a captivating and intricate art form that has been cherished for centuries. This delicate craft involves joining individual pieces of colored glass together using solder, a metal alloy with a low melting point. The process of soldering not only creates a strong bond between the glass pieces but also adds a beautiful, seamless finish to the artwork.
Soldering stained glass requires precision, patience, and a keen eye for detail. It is a skill that has been passed down through generations, evolving with time to incorporate modern techniques and tools. Whether you are a seasoned stained glass artisan or a novice enthusiast eager to explore this timeless craft, mastering the art of soldering is essential for creating stunning stained glass pieces that stand the test of time.
In this comprehensive guide, we will delve into the intricacies of soldering stained glass, exploring the tools and materials needed, the process of choosing the right solder, preparing the stained glass pieces, applying flux, soldering the stained glass pieces, and finally, cleaning and finishing the soldered stained glass. By the end of this guide, you will have gained valuable insights and practical knowledge to embark on your soldering journey with confidence and finesse. So, let's embark on this creative adventure and unlock the secrets of soldering stained glass!
Key Takeaways:
- Choosing the Right Solder
When soldering stained glass, consider lead-based solder for smooth joints or lead-free solder for safety. Your choice impacts ease of use and environmental responsibility. - Soldering Process
Soldering stained glass requires precision and patience. Apply flux, heat the soldering iron, and fuse the joints carefully to create enduring and visually appealing artwork.
Read more: How To Solder Glass Together
Tools and Materials Needed
Soldering stained glass is a meticulous process that requires a specific set of tools and materials to ensure precision and efficiency. Before embarking on your soldering journey, it is essential to gather the following items:
Tools:
-
Soldering Iron: A high-quality soldering iron with adjustable temperature settings is crucial for achieving precise and controlled soldering. Look for a soldering iron specifically designed for stained glass work, as it provides the necessary heat and stability.
-
Soldering Iron Stand: A sturdy stand is essential for safely holding the hot soldering iron when not in use. This helps prevent accidental burns and ensures a secure resting place for the iron.
-
Glass Cutter: A reliable glass cutter is indispensable for accurately shaping and cutting the stained glass pieces to fit your design. Look for a cutter with a carbide wheel for smooth and precise cuts.
-
Glass Grinder: While not mandatory, a glass grinder is highly beneficial for smoothing the edges of the glass pieces and refining their shapes to achieve a perfect fit during assembly.
-
Soldering Grozing Pliers: These pliers are designed to break and trim glass pieces with precision, allowing for seamless adjustments and fine-tuning of the shapes before soldering.
-
Flux Brush: A small, fine-bristled brush is used for applying flux to the copper foil or lead came, ensuring proper adhesion and facilitating the soldering process.
-
Safety Equipment: Safety should always be a priority when working with stained glass. Ensure you have safety glasses, heat-resistant gloves, and a well-ventilated workspace to protect yourself from potential hazards.
Materials:
-
Solder: Selecting the right type of solder is crucial for achieving strong and visually appealing soldered joints. Lead-based and lead-free solders are available, each with its own characteristics and melting points.
-
Flux: Flux is essential for preparing the surface of the copper foil or lead came to promote solder adhesion. Choose a flux specifically formulated for stained glass work to ensure optimal results.
-
Copper Foil or Lead Came: Depending on your preferred method of assembly, you will need either copper foil or lead came to wrap around the edges of the glass pieces before soldering.
-
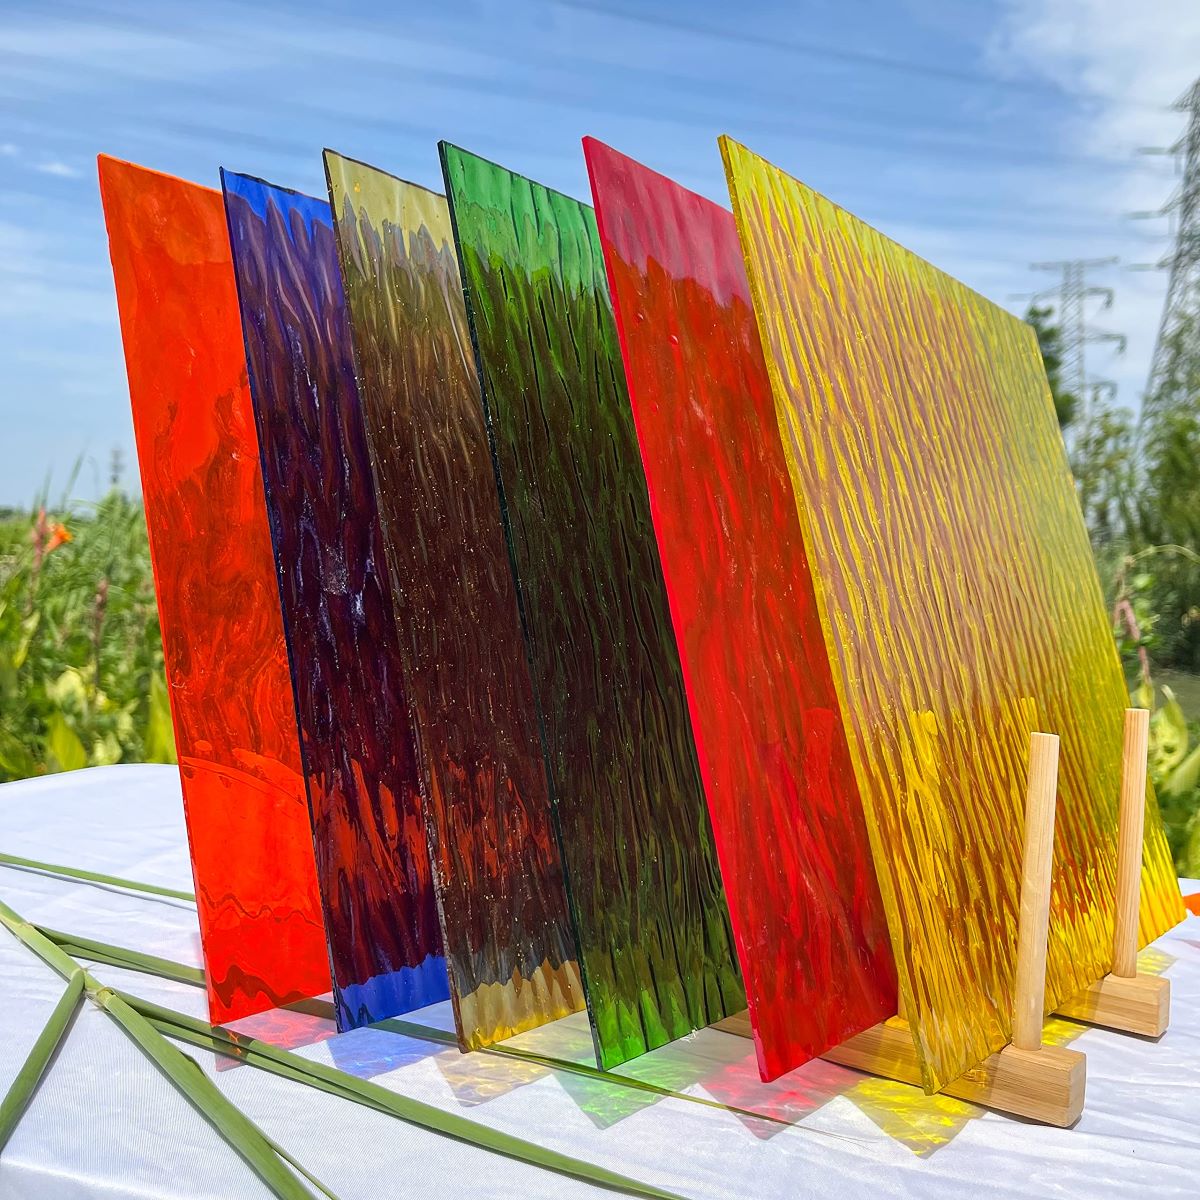
Stained Glass Sheets: Of course, the heart of your project will be the stained glass itself. Choose high-quality stained glass sheets in an array of colors and textures to bring your artistic vision to life.
-
Soldering Board: A fire-resistant soldering board provides a safe and stable surface for soldering, protecting your work surface from heat damage and ensuring a steady platform for your project.
By assembling these essential tools and materials, you will be well-equipped to embark on your soldering journey with confidence and precision. Each item plays a crucial role in the soldering process, contributing to the creation of exquisite stained glass pieces that showcase your creativity and craftsmanship.
Choosing the Right Solder
Selecting the right solder is a pivotal decision that significantly impacts the quality and durability of your soldered stained glass pieces. When it comes to soldering stained glass, artisans have the option of choosing between lead-based and lead-free solders, each with distinct characteristics and considerations.
Read more: How To Stain A Glass
Lead-Based Solder
Lead-based solder, traditionally composed of a mixture of tin and lead, has been a longstanding choice for stained glass soldering due to its favorable melting properties and ease of use. The addition of lead to the solder lowers its melting point, allowing for smoother and more controlled soldering. This characteristic is particularly beneficial when working with delicate stained glass pieces, as it reduces the risk of thermal stress and damage to the glass.
However, it is essential to approach lead-based solder with caution, as lead poses potential health risks if proper safety measures are not observed. When using lead-based solder, it is imperative to work in a well-ventilated area, wear appropriate safety gear, and adhere to recommended handling and disposal practices to minimize exposure.
Lead-Free Solder
In response to growing health and environmental concerns, lead-free solder has emerged as a viable alternative for stained glass soldering. Composed of tin, silver, and other metals, lead-free solder offers a safer and more environmentally conscious option while still delivering reliable soldering performance.
One of the primary considerations when opting for lead-free solder is its higher melting point compared to lead-based solder. This requires careful attention to temperature control during the soldering process to achieve optimal results without overheating the stained glass. Additionally, lead-free solder may exhibit slightly different flow and adhesion characteristics, necessitating adjustments in soldering techniques and timing.
Making the Choice
When choosing the right solder for your stained glass project, it is essential to consider factors such as your level of experience, safety precautions, and the specific requirements of your design. If you prioritize ease of use and are comfortable with the necessary safety measures, lead-based solder may be a suitable choice, offering smooth soldering and a lower melting point. On the other hand, if environmental considerations and safety are paramount, lead-free solder provides a responsible alternative, albeit with a higher melting point and potential adjustments in soldering technique.
Ultimately, the decision between lead-based and lead-free solder hinges on a careful evaluation of your preferences, project requirements, and commitment to safety and environmental responsibility. By making an informed choice, you can embark on your soldering journey with confidence, knowing that your selection aligns with your values and supports the creation of exquisite, enduring stained glass artistry.
Preparing the Stained Glass Pieces
Preparing the stained glass pieces is a crucial step that sets the foundation for successful soldering and ensures the structural integrity and visual appeal of the final artwork. This meticulous process involves cutting, grinding, and fitting the individual glass pieces to create a cohesive and seamless composition. Here's a detailed look at the essential steps involved in preparing the stained glass pieces for soldering:
Read more: How To Hang Stained Glass
Cutting the Glass
The first step in preparing stained glass pieces is cutting the glass sheets into the desired shapes and sizes. A high-quality glass cutter with a sharp carbide wheel is used to score the glass along the intended cutting lines. Careful and precise scoring is essential to achieve clean and accurate cuts, ensuring that the glass pieces fit together seamlessly during assembly.
Grinding the Edges
After cutting the glass, the edges of the pieces are smoothed and refined using a glass grinder. This step is crucial for removing any sharp or uneven edges resulting from the cutting process. By carefully grinding the edges, artisans can achieve a perfect fit between the glass pieces, facilitating a seamless soldering process and enhancing the overall aesthetic appeal of the artwork.
Fitting the Glass Pieces
Once the edges are smoothed, the glass pieces are meticulously fitted together to ensure that they align precisely according to the design. This step requires attention to detail and may involve minor adjustments to the shapes and sizes of the glass pieces to achieve a cohesive and harmonious composition. Proper fitting is essential for creating strong soldered joints and a visually stunning finished piece.
Applying Copper Foil or Lead Came
Depending on the chosen method of assembly, the edges of the prepared glass pieces are wrapped with copper foil or encased in lead came. Copper foil is a thin, adhesive-backed tape that is carefully applied to the edges of each glass piece, providing a surface for the solder to adhere to. Alternatively, lead came, which is a channel-shaped lead strip, can be used to encase the glass pieces for a traditional and decorative look.
Read more: How To Learn Stained Glass
Inspecting for Flaws
Before proceeding to the soldering stage, it is crucial to inspect the prepared glass pieces for any flaws or imperfections. This includes checking for proper alignment, ensuring the integrity of the copper foil or lead came application, and confirming that the glass pieces are free from chips, cracks, or other defects that could compromise the structural integrity of the final assembly.
By meticulously preparing the stained glass pieces through cutting, grinding, fitting, and applying the appropriate wrapping material, artisans lay the groundwork for a successful soldering process. This careful preparation not only ensures the durability and strength of the soldered joints but also contributes to the overall beauty and precision of the finished stained glass artwork.
Applying Flux
Applying flux is a critical step in the process of soldering stained glass, playing a pivotal role in facilitating the adhesion of solder to the copper foil or lead came. Flux, a chemical compound typically in liquid or paste form, serves multiple essential functions in the soldering process, ensuring clean and strong soldered joints while protecting the metal and glass surfaces from oxidation and discoloration.
Choosing the Right Flux
Before delving into the application process, it is crucial to select the appropriate flux for stained glass soldering. Fluxes designed specifically for stained glass work are formulated to effectively remove oxides and contaminants from the metal surfaces, promoting the flow and adhesion of solder. Look for a flux that is compatible with the type of solder being used, whether lead-based or lead-free, to ensure optimal performance and compatibility.
Application Process
The application of flux begins by preparing the soldering area and ensuring that the stained glass pieces are securely positioned on the soldering board. Using a small, fine-bristled flux brush, the flux is carefully applied to the exposed copper foil or lead came surrounding the glass pieces. It is essential to apply a thin and even layer of flux, ensuring complete coverage of the metal surfaces without excess pooling or dripping.
As the flux is applied, it actively cleans the metal surfaces, removing any oxidation or impurities that could hinder the soldering process. The flux also serves as a protective barrier, preventing the metal from oxidizing during the application of heat, which can compromise the integrity of the soldered joints.
Read more: How To Start Stained Glass
Safety Considerations
When working with flux, it is important to observe safety precautions to minimize exposure to potentially harmful chemicals. Ensure adequate ventilation in the workspace to dissipate fumes and use personal protective equipment, such as gloves and safety glasses, to prevent skin contact and eye irritation. Additionally, carefully follow the manufacturer's guidelines for handling and disposing of flux to maintain a safe and healthy working environment.
Importance of Flux in Soldering
The role of flux in the soldering process cannot be overstated. By effectively preparing the metal surfaces and safeguarding against oxidation, flux promotes the smooth flow and adhesion of solder, resulting in strong, durable, and visually appealing soldered joints. Additionally, the use of flux contributes to the overall longevity and structural integrity of the stained glass artwork, ensuring that the soldered connections withstand the test of time.
In essence, the application of flux is a fundamental step that sets the stage for successful soldering, enabling artisans to achieve precise and reliable soldered joints while preserving the beauty and integrity of the stained glass artwork. By understanding the significance of flux and mastering its application, artisans can elevate their soldering craftsmanship and create exquisite stained glass pieces that captivate and endure.
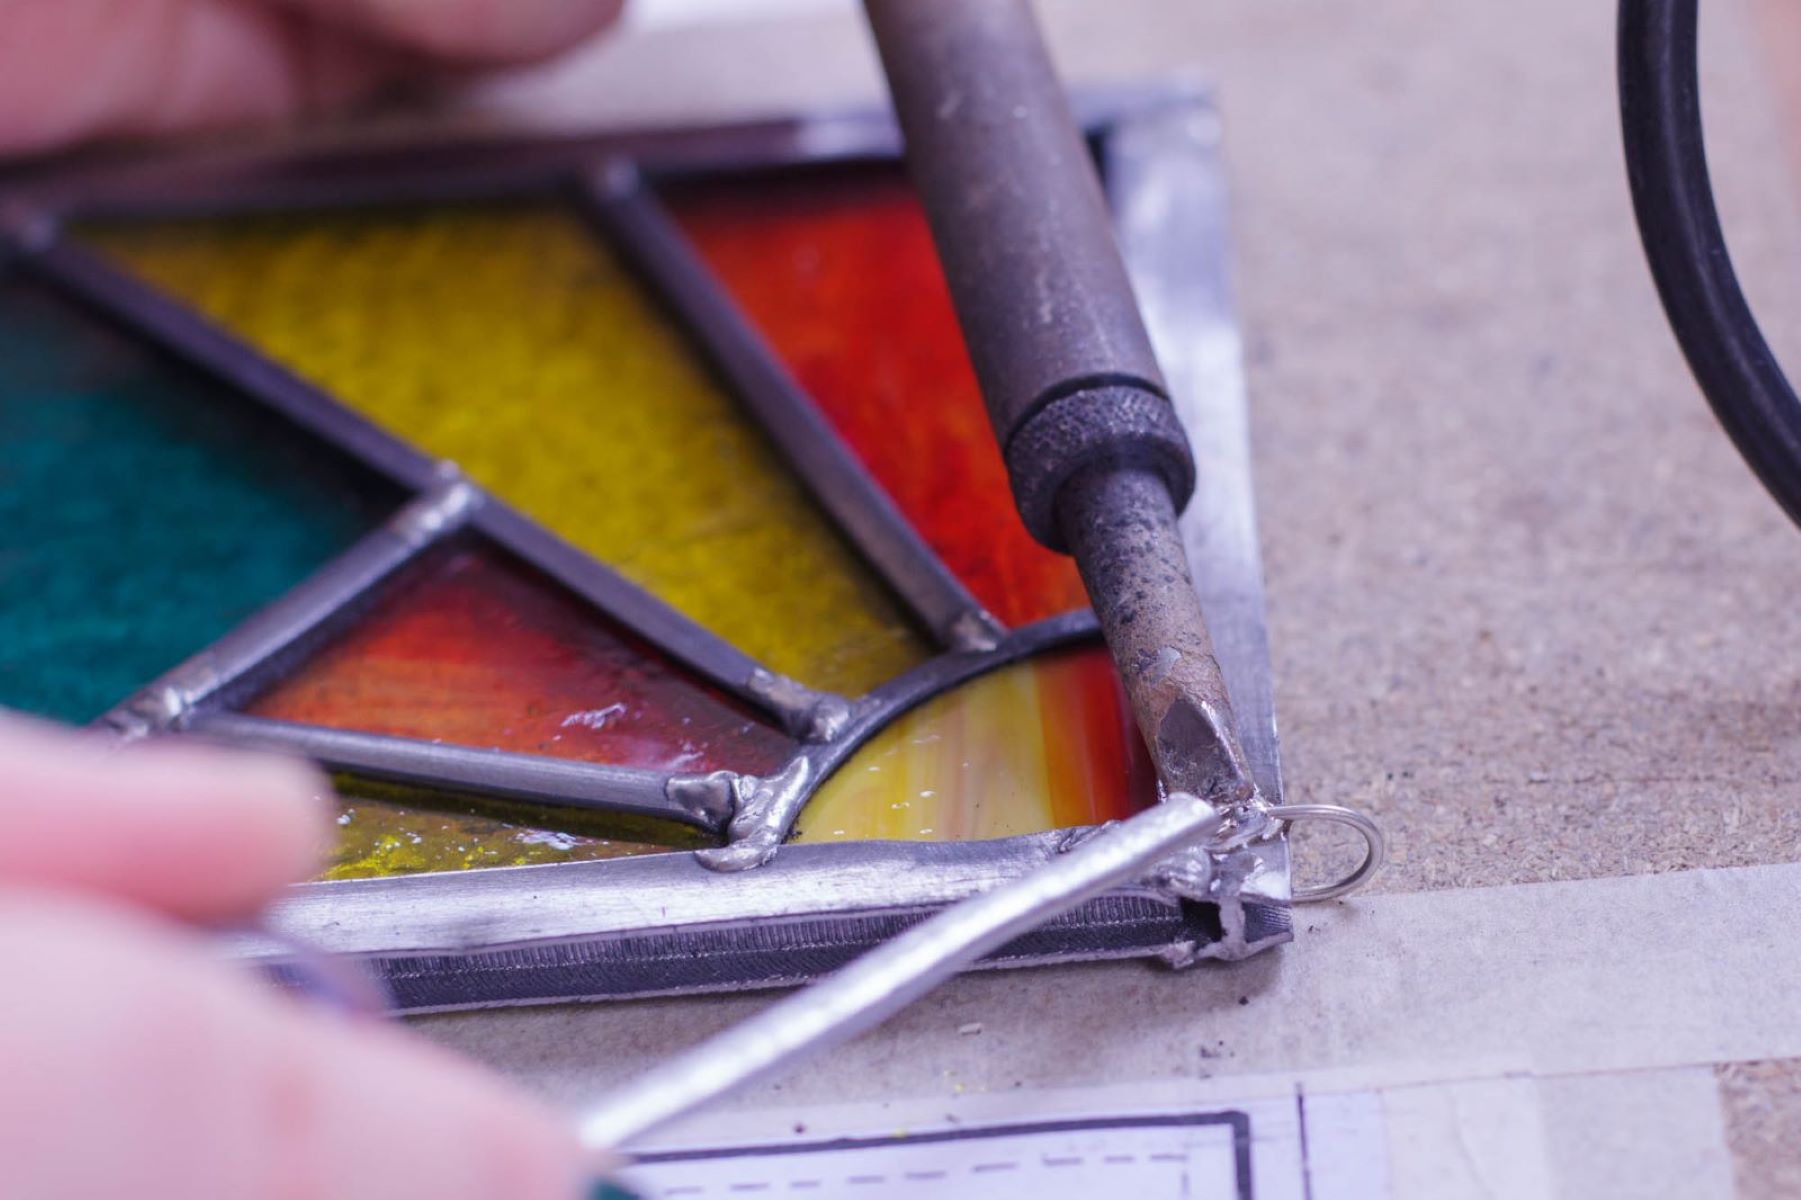
Soldering the Stained Glass Pieces
Soldering the stained glass pieces is the pivotal stage where individual elements seamlessly unite to form a cohesive and enduring artwork. This intricate process requires precision, patience, and a meticulous approach to ensure the creation of strong, visually appealing soldered joints that enhance the overall beauty of the stained glass composition.
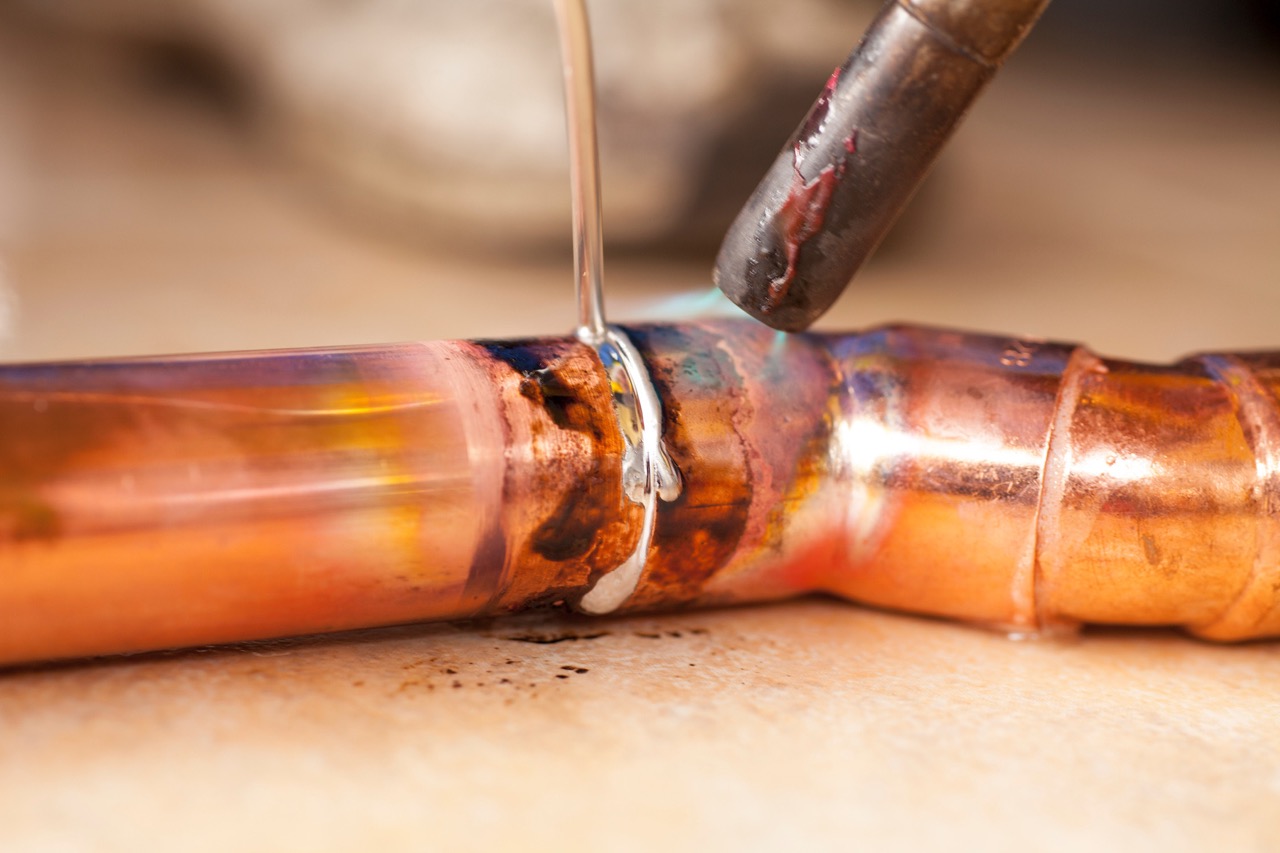
Heating the Soldering Iron
Before commencing the soldering process, it is essential to heat the soldering iron to the appropriate temperature. The temperature setting should align with the type of solder being used, whether lead-based or lead-free. Achieving the optimal soldering temperature is crucial for promoting the smooth flow and adhesion of the solder while minimizing the risk of overheating the stained glass, which could lead to thermal stress and damage.
Read more: How To Display Stained Glass On Wall
Applying Solder to the Copper Foil or Lead Came
With the soldering iron at the ready, artisans carefully apply the solder to the prepared copper foil or lead came, ensuring that the molten solder flows evenly along the seams between the glass pieces. The goal is to create strong and uniform soldered joints that securely bond the glass elements together. The solder should flow smoothly and adhere to the metal surfaces, forming a seamless connection that enhances the structural integrity of the artwork.
Ensuring Even Distribution and Coverage
As the solder is applied, artisans pay close attention to achieving even distribution and coverage along the soldering seams. This meticulous approach ensures that the soldered joints are consistent in strength and appearance, contributing to the overall cohesiveness and visual harmony of the stained glass composition. Careful control of the soldering iron and the flow of solder is essential to maintain precision and avoid excessive buildup or uneven application.
Fusing the Soldered Joints
Once the solder has been applied along the seams, the next step involves fusing the soldered joints to create a durable and resilient bond. This is achieved by carefully guiding the heated soldering iron along the soldered seams, allowing the molten solder to fuse with the copper foil or lead came and the adjoining glass pieces. The controlled application of heat ensures that the solder solidifies into a strong and enduring connection, reinforcing the structural integrity of the artwork.
Inspecting and Refining
After soldering the stained glass pieces, artisans meticulously inspect the soldered joints, ensuring that they exhibit uniformity, strength, and visual appeal. Any imperfections or inconsistencies are addressed through careful refinement, which may involve minor adjustments and additional soldering to achieve the desired finish. This meticulous inspection and refinement process is essential for producing flawless and enduring soldered joints that elevate the overall quality of the stained glass artwork.
By mastering the art of soldering stained glass pieces, artisans bring their creative visions to life, uniting individual elements into captivating and enduring works of art. The careful application of solder, precise fusion of soldered joints, and meticulous attention to detail culminate in the creation of exquisite stained glass compositions that stand as timeless testaments to the artistry and craftsmanship of the artisans.
Read more: How To Get The Stained Glass Egg
Cleaning and Finishing the Soldered Stained Glass
Cleaning and finishing the soldered stained glass marks the final phase of the intricate soldering process, where meticulous attention to detail and precision are paramount to achieving a flawless and enduring masterpiece. This critical stage involves the careful removal of flux residues, polishing of the soldered joints, and the application of finishing touches to enhance the overall aesthetic appeal of the stained glass artwork.
Removing Flux Residues
After the soldering process is complete, the stained glass undergoes a thorough cleaning to remove any residual flux that may remain on the surface. Flux residues, if left unattended, can lead to discoloration and detract from the visual clarity of the soldered joints. To address this, the stained glass is gently washed with a mild detergent and warm water, ensuring that all traces of flux are effectively removed. Careful rinsing and drying of the stained glass pieces are essential to prepare them for the subsequent finishing steps.
Polishing the Soldered Joints
Once the flux residues have been removed, the soldered joints are meticulously polished to achieve a smooth and lustrous finish. This process involves using a fine abrasive material, such as a polishing compound or a specialized buffing tool, to gently buff the soldered seams. The aim is to refine the appearance of the solder, removing any rough edges or irregularities and creating a uniform and visually appealing surface. The careful polishing of the soldered joints enhances the overall presentation of the stained glass artwork, elevating its aesthetic allure and ensuring that the soldered connections exhibit a professional and refined finish.
Applying Patina and Finishing Touches
To further enhance the visual impact of the soldered stained glass, artisans may choose to apply a patina to the soldered seams. Patina, available in various shades and finishes, adds depth and character to the soldered joints, accentuating the contours and details of the artwork. The application of patina is a delicate and precise process, requiring a steady hand and a keen eye for achieving the desired effect. Additionally, artisans may opt to add finishing touches, such as decorative framing or embellishments, to complement the overall design and elevate the artistic expression of the stained glass composition.
Read more: What Is A Stained Glass Window
Final Inspection and Presentation
Following the cleaning, polishing, and application of patina, the soldered stained glass undergoes a final inspection to ensure that every detail meets the highest standards of craftsmanship. Any remaining imperfections are meticulously addressed, and the artwork is presented in its full splendor, ready to captivate and inspire viewers with its timeless beauty and enduring artistry.
In essence, the process of cleaning and finishing the soldered stained glass represents the culmination of meticulous craftsmanship and unwavering dedication to excellence. Through careful cleaning, precise polishing, and thoughtful finishing touches, artisans breathe life into their creations, transforming individual glass pieces into captivating works of art that stand as enduring testaments to the timeless allure of stained glass craftsmanship.
Frequently Asked Questions about How To Solder Stained Glass
Was this page helpful?
At Storables.com, we guarantee accurate and reliable information. Our content, validated by Expert Board Contributors, is crafted following stringent Editorial Policies. We're committed to providing you with well-researched, expert-backed insights for all your informational needs.


0 thoughts on “How To Solder Stained Glass”