Articles
How To Make A Stained Glass Quilt
Modified: December 7, 2023
Learn how to create a stunning stained glass quilt with our step-by-step articles. Get expert tips and techniques for a beautiful finished project.
(Many of the links in this article redirect to a specific reviewed product. Your purchase of these products through affiliate links helps to generate commission for Storables.com, at no extra cost. Learn more)
Introduction
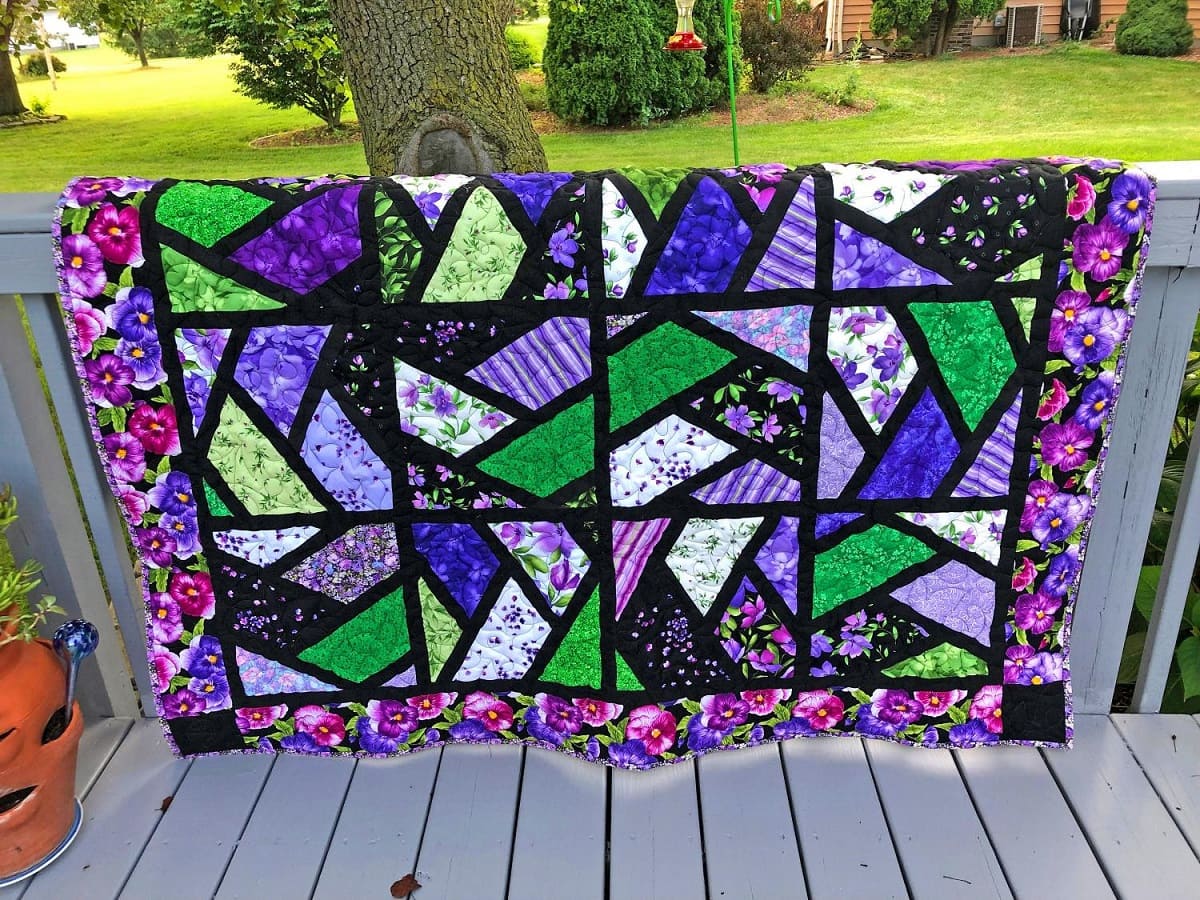
Welcome to the world of stained glass quilting! If you’re looking for a creative and visually stunning project to showcase your quilting skills, then making a stained glass quilt is the perfect choice. Combining the artistry of stained glass with the beloved tradition of quilting, these quilts mimic the beauty and elegance of stained glass windows.
Stained glass quilts are made by piecing together fabric in a way that simulates the intricate design and colorful glass pieces found in traditional stained glass artwork. While the process may seem complex, this step-by-step guide will walk you through the process, making it accessible even for beginners.
In this article, we will cover all the necessary materials, along with detailed instructions on how to create your own stunning stained glass quilt. So let’s grab our fabric and get ready to embark on this artistic journey!
Key Takeaways:
- Creating a stunning stained glass quilt involves meticulous fabric selection, precise cutting, and skillful assembly. The step-by-step process combines the artistry of stained glass with the cherished tradition of quilting, resulting in a unique and visually captivating masterpiece.
- From picking a design to adding the finishing touches, the journey of making a stained glass quilt hones quilting skills and unleashes creativity. Each step plays a crucial role in bringing the vision to life, culminating in a beautiful and personalized work of art.
Read more: How To Make A Stained Glass Lamp Shade
Materials Needed
Before we dive into the process of creating a stained glass quilt, let’s gather all the necessary materials. Here’s what you’ll need to get started:
- Fabric: Choose a variety of colored fabric that resembles the stained glass pieces you’d like to replicate. Opt for 100% cotton fabric for best results.
- Quilting Tools: You’ll need a rotary cutter, cutting mat, ruler, and fabric scissors for precise cutting.
- Iron and Ironing Board: An iron is essential to press the fabric and create crisp seams.
- Quilting Thread: Use a high-quality quilting thread that matches the colors of your fabric.
- Needles and Pins: Choose needles suitable for quilting and a pack of quilting pins to securely hold your fabric in place.
- Quilting Batting: Select a batting that provides enough loft and warmth for your quilt.
- Backing Fabric: Pick a fabric for the backing of your quilt that complements the stained glass design.
- Clear Vinyl: This will serve as the “leading” in your stained glass quilt, creating the illusion of the lead lines separating the glass pieces.
- Scrap Paper: Use this to create a pattern for your stained glass design before cutting it out of fabric.
- Sewing Machine: While hand-sewing is an option, using a sewing machine will make the process quicker and more efficient.
These materials will provide a solid foundation for creating your stained glass quilt. Prepare them ahead of time, ensuring that you have enough fabric and supplies to complete your project.
Step 1: Picking the Design
The first step in creating a stained glass quilt is selecting a design. Take some time to explore different stained glass patterns and choose one that appeals to you. Look for designs with clean lines and bold shapes that are achievable with fabric pieces.
Once you have your design in mind, you’ll need to create a pattern. Begin by sketching the design on scrap paper, breaking it down into separate sections or “blocks” for easier assembly. This will serve as your guide when cutting out the fabric pieces.
Keep in mind that you can either create your own design or find pre-made patterns online or in quilting books. Whichever route you choose, remember to scale the design to the desired size of your finished quilt.
An important factor to consider when picking a design is the color scheme. Traditional stained glass windows often feature vibrant, bold colors. Aim to replicate this color palette in your fabric selection. Experiment with different combinations to find a harmonious balance of colors.
Remember, the design you choose will be the centerpiece of your quilt, so take your time to find one that truly speaks to you and showcases your personal style.
Once you have settled on a design, you are ready to move on to the next step: cutting the fabric pieces.
Step 2: Cutting the Fabric
With your design selected and pattern created, it’s time to cut out the fabric pieces for your stained glass quilt. This step requires precision and attention to detail to ensure that the fabric accurately replicates the stained glass effect.
Start by laying out your selected fabric on a clean and flat surface. Use your pattern as a guide to determine the sizes and shapes of fabric pieces needed for each section of your design.
Using a rotary cutter, cutting mat, and ruler, carefully cut the fabric into the desired shapes. It’s important to make clean, straight cuts to ensure seamless assembly later. Take your time and double-check your measurements to avoid any mistakes.
As you cut the fabric pieces, you may find it helpful to label and organize them according to their corresponding sections. This will make it easier to assemble the quilt later on.
While cutting the fabric, don’t forget to account for seam allowance. The standard seam allowance for quilting is ¼ inch, so be sure to add this extra measurement when cutting your fabric pieces.
Remember, accuracy is key in this step. Take your time and aim for precision. The better your cutting, the more realistic and polished your stained glass quilt will look.
Once all the fabric pieces for your design are cut, you’re ready to move on to the next step: preparing the base of the quilt.
Step 3: Preparing the Base
After cutting the fabric pieces, it’s time to prepare the base for your stained glass quilt. The base, or background fabric, will provide a foundation for the design to come to life.
Start by selecting a suitable fabric for the base. Opt for a solid or subtle print that complements the colors and theme of your stained glass design. This will allow the focus to be on the vibrant fabric pieces that will create the stained glass effect.
Before assembling the quilt, it’s important to square up and trim the base fabric to the desired size for your project. Use a ruler to measure and mark the dimensions, and then cut along the lines to achieve a neatly trimmed base.
Once the base fabric is trimmed, it’s time to arrange and position the fabric pieces on top. Refer to your pattern and design to guide the placement of each piece. Remember to leave a small seam allowance around each fabric piece for stitching.
As you arrange the fabric pieces, play around with the positioning to ensure they fit together seamlessly. This step is crucial for achieving the stained glass effect and creating the illusion of separate glass pieces.
When you are satisfied with the arrangement, use pins to secure the fabric pieces in place on the base fabric. This will prevent them from shifting during the sewing process.
With the fabric pieces pinned in place, you’re now ready to move on to the next step: assembling the quilt.
When making a stained glass quilt, use black bias tape or fabric strips to create the “lead” lines between the colored fabric pieces for a realistic stained glass effect.
Read more: How To Stain A Glass
Step 4: Assembling the Quilt
Now that the fabric pieces are positioned and secured on the base fabric, it’s time to assemble the quilt. This step involves stitching the fabric pieces together to create the cohesive stained glass design.
Start by removing the pins from one section of the quilt at a time. Fold back the fabric pieces along the seam lines to expose the base fabric underneath.
Using a sewing machine, stitch along the edges of the fabric pieces, securing them to the base fabric. Use a straight stitch or a small zigzag stitch to ensure a strong and durable connection between the fabric pieces.
Take your time and sew carefully along the edges, maintaining a consistent seam allowance. It’s important to sew close to the edges to create a clean and precise finish that mimics the look of stained glass.
As you complete each section, fold back the fabric pieces and admire the emerging stained glass effect on your quilt. Continue this process for the remaining sections, stitching and folding back the fabric pieces one by one.
Remember to backstitch at the beginning and end of each seam to secure the stitches and prevent them from unraveling.
Once all the fabric pieces are sewn to the base fabric, step back and admire your assembled stained glass quilt. The careful stitching and precise assembly bring the design to life, creating the beautiful stained glass effect you envisioned.
With the quilt assembled, it’s time to move on to the next step: adding the “leading.”
Step 5: Adding the “Leading”
Adding the “leading” to your stained glass quilt is a crucial step in enhancing the appearance and authenticity of the design. The leading creates the illusion of the lead lines that traditionally separate the glass pieces in stained glass artwork.
To add the leading, you will use clear vinyl strips or bias tape. Clear vinyl strips are a popular choice as they provide a transparent and flexible option that closely resembles the look of traditional leading.
Start by measuring and cutting the vinyl strips to the appropriate lengths, ensuring they match the outlines of the fabric pieces on your quilt. You can use a ruler and fabric scissors to achieve clean and straight strips.
Once cut, carefully position the vinyl strips on top of the seams between the fabric pieces. Depending on your design, you may need to cut and shape the strips to fit the contours of the quilt.
Using a sewing machine or hand-stitching, secure the vinyl strips in place, following the lines of each seam. Stitch close to the edges of the vinyl to maintain a neat and professional finish.
As you add the leading, take care to secure the vinyl strips evenly, creating consistent lines throughout the quilt. Pay attention to the corners and intersections, ensuring the leading seamlessly connects and follows the design of your stained glass quilt.
Once the leading is in place, step back and admire the enhanced appearance of your quilt. The addition of the “leading” brings the design to life and further emphasizes the stained glass effect.
With the leading added, it’s time to move on to the next step: attaching the backing.
Step 6: Attaching the Backing
As we near the final stages of creating your stained glass quilt, it’s time to attach the backing fabric. The backing fabric not only completes the quilt but also provides stability and protection for the finished piece.
Start by selecting a fabric for the backing that complements your stained glass design. You can choose a solid color or a coordinating print that enhances the overall look of the quilt.
Lay the backing fabric flat on a clean, spacious surface. Ensure that the fabric is larger than the quilt top, allowing for a generous seam allowance on all sides.
Place the quilt top on top of the backing fabric, right sides facing each other. Align the edges of the two layers and smooth out any wrinkles or unevenness.
Using quilting pins, secure the layers together, starting from the center and working your way outwards. Space the pins evenly to ensure the layers stay aligned during the next steps.
Now it’s time to sew the layers together. Using a sewing machine, stitch around the edges of the quilt, leaving a gap of a few inches for turning the quilt inside out.
Trim the excess backing fabric and batting, leaving a small seam allowance. Be mindful not to cut through the stitches and ensure the corners are nicely trimmed.
Once trimmed, turn the quilt inside out through the gap you left. Use a blunt object, such as a knitting needle or chopstick, to gently push out the corners and edges, creating crisp lines.
Once the quilt is fully turned inside out, fold in the raw edges of the gap and press them flat. Use a needle and thread or a sewing machine to stitch the gap closed.
With the backing securely attached, your stained glass quilt is almost complete. All that’s left is the final step: quilting and finishing touches.
Step 7: Quilting and Finishing Touches
We’ve reached the final step in creating your stained glass quilt – quilting and adding those finishing touches that will elevate the overall look of your masterpiece.
Quilting refers to the stitching that holds the layers of the quilt together, providing both functional and aesthetic appeal. There are several quilting techniques you can choose from, depending on your preference and skill level.
One popular option is machine quilting, where you use a sewing machine to stitch intricate patterns or straight lines across the quilt. Choose a quilting design that complements your stained glass design, such as parallel lines, swirls, or geometric shapes. Make sure to secure the layers together evenly as you quilt.
If you prefer a more traditional approach, hand quilting allows you to add intricate stitching patterns by hand. This method can be time-consuming but adds a charming and personalized touch to your quilt.
Once your quilt is quilted, it’s time for the finishing touches. Trim any excess batting or backing fabric to create clean edges. Consider adding a border to frame your stained glass design and enhance the overall aesthetic appeal of your quilt.
At this stage, inspect your quilt for any loose threads or imperfections. Carefully trim any stray threads and make any necessary adjustments to ensure a polished and professional finish.
If desired, you can add additional embellishments, such as beads, sequins, or embroidery, to further enhance the look of your stained glass quilt. Be mindful of the overall design and ensure that any added embellishments enhance the beauty rather than overpower it.
Finally, give your quilt a final press with an iron to smooth out any wrinkles and give it a polished appearance.
Congratulations! You have successfully completed the steps to create a stunning stained glass quilt. Stand back and admire your masterpiece, showcasing the artistry and craftsmanship that went into creating this unique and beautiful quilt.
Remember to label and sign your quilt to leave a personal mark and cherish the memories of creating this work of art for years to come.
Enjoy the warmth and beauty of your stained glass quilt or share it with others as a thoughtful and cherished gift. Happy quilting!
Read more: How To Make A Quilt
Conclusion
Congratulations on completing your stained glass quilt! You have embarked on a creative journey that beautifully combines the artistry of stained glass with the cherished tradition of quilting. Through careful selection of fabric, precise cutting, and skillful assembly, you have brought to life a stunning piece of art that mimics the beauty and elegance of stained glass windows.
Throughout the process, you have explored the steps of picking a design, cutting the fabric, preparing the base, assembling the quilt, adding the “leading,” attaching the backing, quilting, and adding finishing touches. Each step has played a crucial role in creating the realistic stained glass effect and bringing your vision to life.
As you worked on your stained glass quilt, you honed your quilting skills and developed an eye for color, design, and precision. The final result is a unique and personal quilt that reflects your creativity and passion for both quilting and the art of stained glass.
Whether you choose to display your stained glass quilt as a wall hanging, use it as a decorative throw, or gift it to a loved one, remember the time, effort, and love that went into its creation. Your stained glass quilt is a testament to your dedication to the craft and your ability to transform fabric into a work of art.
We hope that this step-by-step guide has inspired you to explore the beautiful world of stained glass quilting and encouraged you to unleash your creativity. With practice and experimentation, you can create even more intricate and visually stunning stained glass quilts that will leave a lasting impression on all who see them.
So gather your fabric, quilting tools, and imagination, and continue to explore and push the boundaries of this unique quilting technique. There are countless possibilities awaiting you as you embark on this artistic journey.
Enjoy the process, embrace your creativity, and happy quilting!
Frequently Asked Questions about How To Make A Stained Glass Quilt
Was this page helpful?
At Storables.com, we guarantee accurate and reliable information. Our content, validated by Expert Board Contributors, is crafted following stringent Editorial Policies. We're committed to providing you with well-researched, expert-backed insights for all your informational needs.


0 thoughts on “How To Make A Stained Glass Quilt”