Home>Furniture & Design>Interior Design Trends>How To Open A Glass Bottle Cap
Interior Design Trends
How To Open A Glass Bottle Cap
Modified: February 18, 2024
Discover the latest interior design trends and learn how to open a glass bottle cap with our expert tips and techniques. Elevate your space and master the art of bottle opening today!
(Many of the links in this article redirect to a specific reviewed product. Your purchase of these products through affiliate links helps to generate commission for Storables.com, at no extra cost. Learn more)
Introduction
Opening a glass bottle with a cap can sometimes be a challenging task, especially when a bottle opener is not readily available. Whether you're at a picnic, a party, or simply at home, knowing alternative methods to open a glass bottle cap can come in handy. In this guide, we will explore various creative and practical techniques to open a glass bottle cap using everyday items. From using a lighter to employing a spoon or a piece of paper, we will walk you through step-by-step instructions to help you master the art of opening a glass bottle cap without a traditional bottle opener. So, let's dive in and discover the ingenious ways to crack open a refreshing beverage without the need for specialized tools.
Key Takeaways:
- You can open a glass bottle cap without a traditional bottle opener using everyday items like a lighter, spoon, paper, or rubber band. Get creative and enjoy your favorite beverages hassle-free!
- Preparation is key! Before attempting alternative methods, ensure the bottle is stable and the cap is ready for manipulation. With the right tools and techniques, you can master the art of opening a glass bottle cap without a traditional bottle opener.
Read more: How To Open A Glass Bottle Without Opener
Tools and Materials Needed
Before embarking on the journey of opening a glass bottle cap without a traditional bottle opener, it's essential to gather the necessary tools and materials. While these items may not be conventional bottle-opening tools, they can serve as effective alternatives in a pinch. Here's what you'll need:
-
Glass Bottle with a Cap: The star of the show is, of course, the glass bottle with a securely fastened cap. Whether it's a soda, beer, or any other beverage bottle, ensure that the cap is intact and firmly sealed to practice the various methods of opening it.
-
Bottle Opener (Optional): While the focus of this guide is to explore alternative methods, having a traditional bottle opener on hand can provide a straightforward solution. If available, a standard bottle opener can be used as a comparison to gauge the effectiveness of the alternative techniques.
-
Lighter: A common household item, a lighter can be a versatile tool for opening a glass bottle cap. Whether it's a disposable lighter or a refillable one, having a lighter with a functional flint wheel is essential for using the heat to expand the metal cap.
-
Spoon: Look for a sturdy metal spoon with a thick handle. The spoon will be used to leverage the cap open by applying pressure to the edges, making it a crucial tool in the absence of a traditional bottle opener.
-
Piece of Paper: A simple piece of paper can be surprisingly effective in opening a glass bottle cap. Opt for a standard sheet of paper, such as a piece torn from a magazine or notebook, to utilize its unique properties in this process.
-
Rubber Band: A rubber band, preferably wide and durable, can be employed to enhance grip and traction when attempting to twist open the bottle cap. This item is particularly useful when dealing with stubborn or tightly sealed caps.
By assembling these tools and materials, you'll be well-equipped to explore the alternative methods of opening a glass bottle cap without a traditional bottle opener. Each item plays a unique role in the various techniques, offering creative and practical solutions to the common challenge of accessing the contents of a sealed glass bottle.
Step 1: Prepare the Bottle and Cap
Before delving into the alternative methods of opening a glass bottle cap, it's crucial to prepare the bottle and cap for the upcoming techniques. Ensuring that the bottle is stable and the cap is ready for manipulation can significantly impact the success of the subsequent steps. Here's how to prepare the bottle and cap for the bottle-opening process:
-
Inspect the Bottle: Start by examining the glass bottle to ensure it is free from any cracks or damage. It's essential to work with a structurally sound bottle to prevent any mishaps during the opening process. Additionally, check for any liquid residue around the cap to avoid spillage when the cap is loosened.
-
Secure the Bottle: Place the bottle on a flat, stable surface to provide a steady foundation for the opening techniques. This will prevent the bottle from tipping over or moving excessively, allowing you to focus on the task at hand without unnecessary distractions.
-
Position the Cap: Orient the bottle so that the cap is easily accessible and visible. This positioning will facilitate a smooth transition between preparing the bottle and executing the chosen bottle-opening method. Ensuring good visibility and accessibility to the cap is essential for a successful outcome.
By meticulously preparing the bottle and cap, you set the stage for a seamless and effective bottle-opening experience. This initial step lays the groundwork for the subsequent techniques, ensuring that the bottle is stable and the cap is primed for the alternative methods to come. With the bottle and cap prepared, you're now ready to explore the creative and practical approaches to opening a glass bottle cap without a traditional bottle opener.
Step 2: Use a Bottle Opener
When it comes to opening a glass bottle cap, the traditional bottle opener is the go-to tool for many. Its simple yet effective design allows for quick and efficient removal of bottle caps, making it a staple in any kitchen or bar. To use a bottle opener, follow these steps:
-
Position the Bottle: Hold the glass bottle securely with one hand, ensuring a firm grip to prevent any slippage during the opening process.
-
Engage the Cap: Place the metal lip of the bottle opener under the edge of the bottle cap, ensuring that it is securely hooked onto the cap's rim.
-
Apply Leverage: With the bottle opener securely positioned, use your hand to apply gentle upward pressure on the handle, leveraging the cap off the bottle. The fulcrum action of the bottle opener will gradually lift the cap, allowing it to be effortlessly removed.
-
Complete the Removal: Continue applying upward pressure until the cap is fully dislodged from the bottle, then carefully lift the opener and the detached cap away from the bottle.
Using a traditional bottle opener offers a straightforward and reliable method for opening glass bottle caps. Its time-tested design and functionality make it a popular choice for both casual and professional settings. However, in situations where a bottle opener is not readily available, exploring alternative methods can provide valuable insights and practical solutions for accessing the contents of a sealed glass bottle.
By mastering the use of a bottle opener and understanding its mechanics, you can appreciate the simplicity and effectiveness of this classic tool. Whether at home, at a gathering, or in a scenario where a bottle opener is absent, having the knowledge of alternative techniques can empower you to confidently open a glass bottle cap using everyday items.
Step 3: Use a Lighter
When faced with the challenge of opening a glass bottle cap without a traditional bottle opener, a lighter can serve as a versatile and effective alternative tool. The process of using a lighter to open a bottle cap involves leveraging the heat generated by the flame to expand the metal, ultimately loosening the cap and allowing for its removal. Here's a detailed guide on how to use a lighter for this purpose:
-
Prepare the Lighter: Ensure that the lighter is in good working condition, with an operational flint wheel and a consistent flame. A disposable lighter or a refillable one can both be used for this method, as long as the flame is reliable and capable of generating sufficient heat.
-
Hold the Bottle Securely: Grasp the glass bottle firmly, ensuring a stable grip to prevent any accidental slippage during the process. Position the bottle in a way that allows easy access to the cap and provides a clear view of the area where the lighter will be applied.
-
Ignite the Lighter: With the bottle held securely, use your free hand to ignite the lighter, creating a steady flame. It's important to exercise caution and keep the flame away from any flammable materials or surfaces, maintaining a safe distance while focusing the heat on the bottle cap.
-
Apply Heat to the Cap: Direct the flame of the lighter towards the edge of the bottle cap, concentrating the heat on the metal surface. Move the flame back and forth along the rim of the cap, ensuring even exposure to the heat. The goal is to expand the metal, causing the cap to loosen and become easier to remove.
-
Attempt to Open the Cap: After applying heat to the cap for a brief period, attempt to twist the bottle cap open using your hand. The expansion of the metal, facilitated by the heat from the lighter, should make it easier to unscrew the cap. If the cap remains stubborn, repeat the process of applying heat with the lighter before attempting to open it again.
Using a lighter to open a glass bottle cap offers a practical and resourceful solution, especially in situations where a traditional bottle opener is unavailable. The application of heat to expand the metal cap demonstrates the ingenuity of utilizing everyday items for unconventional purposes. By mastering this technique, you can confidently open a glass bottle cap using a lighter, adding a touch of creativity to the process of accessing the contents of a sealed bottle.
Use a bottle opener or a flat, sturdy object like a spoon or a lighter to pry the cap off. Place the edge under the cap and apply upward pressure to pop it off.
Read more: How To Make Bottle Cap Coasters
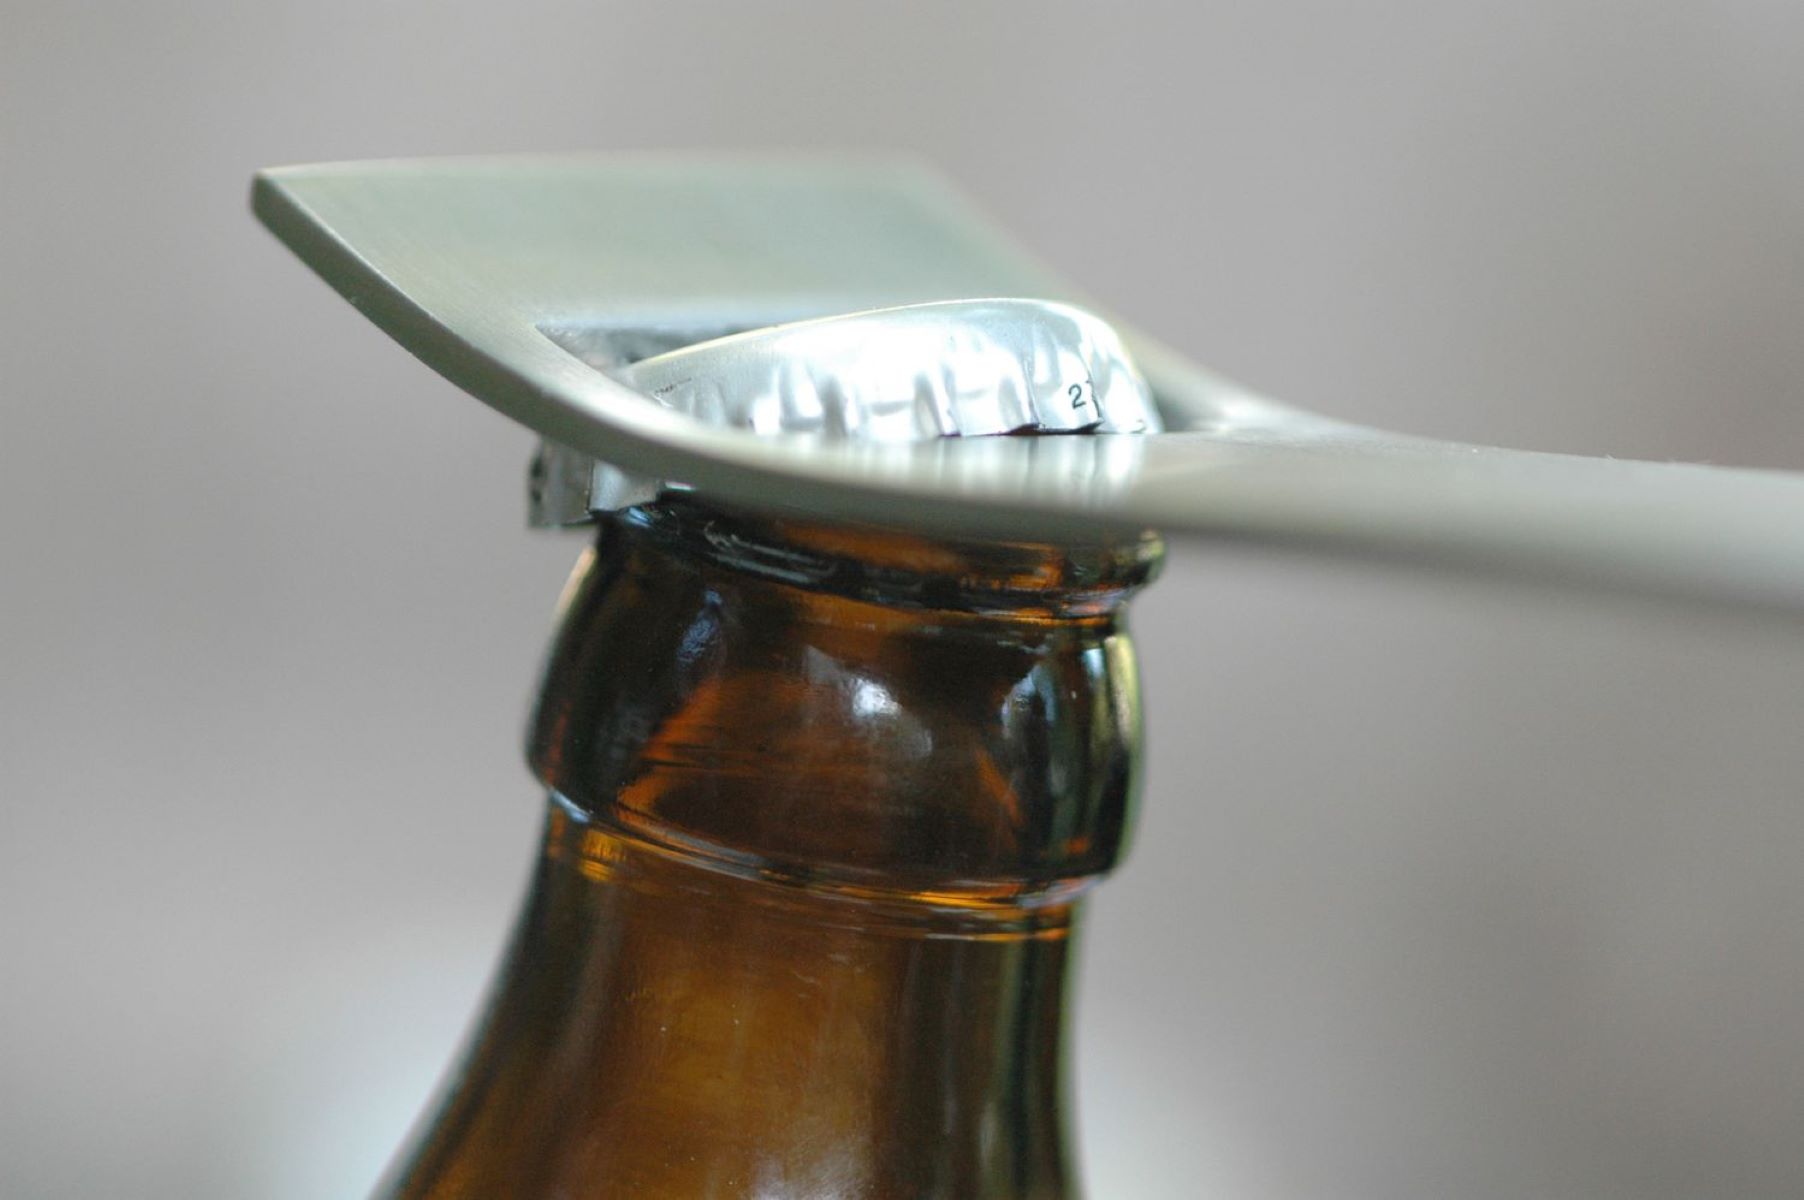
Step 4: Use a Spoon
When faced with the challenge of opening a glass bottle cap without a traditional bottle opener, a simple yet ingenious alternative involves utilizing a sturdy metal spoon. The unique design and leverage provided by the spoon make it an effective tool for prying open a tightly sealed bottle cap. Here's a detailed guide on how to use a spoon for this purpose:
-
Select a Sturdy Metal Spoon: Begin by selecting a sturdy metal spoon with a thick handle. The robust construction of the spoon is essential for withstanding the pressure exerted during the bottle-opening process. A durable spoon with a solid handle provides the necessary leverage to effectively manipulate the bottle cap.
-
Position the Bottle Securely: Hold the glass bottle firmly, ensuring a stable grip to prevent any accidental slippage during the process. Position the bottle on a flat, secure surface, allowing for easy access to the cap and providing a clear view of the area where the spoon will be applied.
-
Engage the Spoon Under the Cap: Insert the edge of the spoon's handle under the rim of the bottle cap, ensuring a secure and stable placement. The thick handle of the spoon provides the necessary leverage to initiate the lifting of the cap, setting the stage for its eventual removal.
-
Leverage and Apply Pressure: With the spoon securely positioned under the cap, use your hand to apply gentle upward pressure on the handle, leveraging the cap off the bottle. The design of the spoon allows for effective leverage, gradually loosening the cap from its sealed position.
-
Gradually Pry Open the Cap: Continue applying upward pressure on the spoon's handle, gradually prying the cap open. The combination of leverage and controlled pressure allows the spoon to effectively lift the cap, creating a gap between the cap and the bottle's opening.
-
Complete the Removal: Once the cap has been sufficiently lifted, carefully maneuver the spoon to fully dislodge the cap from the bottle. With a steady and controlled motion, lift the spoon and the detached cap away from the bottle, successfully accessing the contents of the sealed glass bottle.
Using a spoon to open a glass bottle cap showcases the resourcefulness of everyday items in overcoming common challenges. The simple yet effective application of the spoon's design and leverage demonstrates the versatility of this household utensil. By mastering this technique, you can confidently open a glass bottle cap using a spoon, adding a touch of ingenuity to the process of accessing the contents of a sealed bottle.
Step 5: Use a Piece of Paper
When faced with the challenge of opening a glass bottle cap without a traditional bottle opener, a seemingly ordinary piece of paper can transform into a surprisingly effective tool. The unique properties of paper, combined with strategic folding and positioning, enable it to provide the leverage necessary to pry open a tightly sealed bottle cap. Here's a detailed guide on how to use a piece of paper for this purpose:
-
Select a Standard Sheet of Paper: Begin by selecting a standard piece of paper, such as a sheet torn from a magazine or notebook. The flexibility and durability of the paper make it suitable for this method, allowing it to withstand the pressure exerted during the bottle-opening process.
-
Fold the Paper for Reinforcement: Fold the piece of paper multiple times to create a sturdy, compact strip. The goal is to reinforce the paper, enhancing its rigidity and strength for the subsequent steps. The folded paper will serve as the primary tool for engaging and lifting the bottle cap.
-
Position the Bottle Securely: Hold the glass bottle firmly, ensuring a stable grip to prevent any accidental slippage during the process. Position the bottle on a flat, secure surface, allowing for easy access to the cap and providing a clear view of the area where the folded paper will be applied.
-
Insert the Paper Under the Cap: Insert one end of the folded paper strip under the rim of the bottle cap, ensuring a secure and stable placement. The reinforced paper strip provides the necessary leverage to initiate the lifting of the cap, setting the stage for its eventual removal.
-
Leverage and Apply Pressure: With the paper securely positioned under the cap, use your hand to apply gentle upward pressure on the strip, leveraging the cap off the bottle. The reinforced paper strip's design allows for effective leverage, gradually loosening the cap from its sealed position.
-
Gradually Pry Open the Cap: Continue applying upward pressure on the paper strip, gradually prying the cap open. The combination of leverage and controlled pressure allows the paper to effectively lift the cap, creating a gap between the cap and the bottle's opening.
-
Complete the Removal: Once the cap has been sufficiently lifted, carefully maneuver the paper strip to fully dislodge the cap from the bottle. With a steady and controlled motion, lift the paper strip and the detached cap away from the bottle, successfully accessing the contents of the sealed glass bottle.
Using a piece of paper to open a glass bottle cap exemplifies the innovative use of everyday items to overcome common challenges. The strategic folding and positioning of the paper strip showcase its versatility as a makeshift bottle-opening tool. By mastering this technique, you can confidently open a glass bottle cap using a piece of paper, adding a touch of resourcefulness to the process of accessing the contents of a sealed bottle.
Step 6: Use a Rubber Band
When faced with the challenge of opening a glass bottle cap without a traditional bottle opener, a simple yet effective alternative involves utilizing a rubber band. The unique properties of a rubber band, particularly its elasticity and grip-enhancing capabilities, make it an ingenious tool for loosening and removing tightly sealed bottle caps. Here's a detailed guide on how to use a rubber band for this purpose:
-
Select a Wide and Durable Rubber Band: Begin by selecting a wide and durable rubber band, preferably one with a thick construction and strong elasticity. The robust nature of the rubber band is essential for providing the necessary traction and grip during the bottle-opening process.
-
Position the Bottle Securely: Hold the glass bottle firmly, ensuring a stable grip to prevent any accidental slippage during the process. Position the bottle on a flat, secure surface, allowing for easy access to the cap and providing a clear view of the area where the rubber band will be applied.
-
Wrap the Rubber Band Around the Cap: Place the rubber band around the circumference of the bottle cap, ensuring a snug and secure fit. The elasticity of the rubber band allows it to conform to the shape of the cap, creating a firm grip that facilitates the twisting motion required to open the bottle.
-
Enhance Grip and Traction: Once the rubber band is securely wrapped around the cap, use your hand to grip the rubber band and apply downward pressure while simultaneously twisting the cap. The rubber band's traction-enhancing properties provide the necessary friction to effectively loosen the cap from its sealed position.
-
Twist and Loosen the Cap: With the rubber band providing enhanced grip and traction, continue twisting the bottle cap in a counterclockwise direction. The combination of the rubber band's grip and the twisting motion gradually loosens the cap, making it easier to unscrew and remove from the bottle.
-
Complete the Removal: Once the cap has been sufficiently loosened, carefully remove the rubber band and proceed to unscrew the cap using your hand. The enhanced grip and traction provided by the rubber band contribute to the successful removal of the cap, allowing you to access the contents of the sealed glass bottle.
Using a rubber band to open a glass bottle cap demonstrates the resourcefulness of everyday items in overcoming common challenges. The unique properties of the rubber band, including its elasticity and grip-enhancing capabilities, make it a versatile tool for accessing the contents of a sealed bottle. By mastering this technique, you can confidently open a glass bottle cap using a rubber band, adding a touch of ingenuity to the process of accessing the contents of a sealed bottle.
Conclusion
In conclusion, mastering the art of opening a glass bottle cap without a traditional bottle opener unveils a world of creativity and resourcefulness. From utilizing everyday items such as a lighter, spoon, piece of paper, and rubber band to the classic technique of using a bottle opener, the diverse methods presented in this guide showcase the ingenuity and adaptability of individuals when faced with common challenges.
The exploration of alternative bottle-opening techniques not only provides practical solutions for accessing the contents of a sealed glass bottle but also fosters a sense of innovation and problem-solving. By leveraging the unique properties of household items, individuals can confidently navigate scenarios where a traditional bottle opener may not be readily available, empowering them to enjoy their favorite beverages without constraints.
Furthermore, the process of preparing the bottle and cap sets the stage for a seamless and effective bottle-opening experience. Ensuring that the bottle is stable and the cap is ready for manipulation significantly impacts the success of the subsequent techniques, highlighting the importance of meticulous preparation in overcoming everyday obstacles.
As we reflect on the diverse methods explored, it becomes evident that the ability to adapt and improvise is a valuable skill in various situations. Whether at a picnic, a social gathering, or in the comfort of one's home, the knowledge of alternative bottle-opening techniques adds a layer of versatility and self-sufficiency to everyday experiences.
Ultimately, the journey of mastering the art of opening a glass bottle cap without a traditional bottle opener is a testament to human ingenuity and the ability to find innovative solutions using the resources at hand. By embracing creativity and exploring unconventional methods, individuals can navigate challenges with confidence, turning ordinary moments into opportunities for inventive problem-solving.
In essence, the pursuit of alternative bottle-opening techniques transcends the practical act of accessing a beverage; it embodies a spirit of adaptability, creativity, and resourcefulness that enriches everyday experiences and fosters a mindset of resilience and ingenuity. So, the next time you find yourself without a traditional bottle opener, remember the diverse methods at your disposal and embrace the opportunity to showcase your resourcefulness in opening a glass bottle cap.
Frequently Asked Questions about How To Open A Glass Bottle Cap
Was this page helpful?
At Storables.com, we guarantee accurate and reliable information. Our content, validated by Expert Board Contributors, is crafted following stringent Editorial Policies. We're committed to providing you with well-researched, expert-backed insights for all your informational needs.


0 thoughts on “How To Open A Glass Bottle Cap”