Home>Furniture & Design>Interior Design Trends>How To Remove Rear Quarter Glass
Interior Design Trends
How To Remove Rear Quarter Glass
Published: February 4, 2024
Learn how to remove rear quarter glass and stay updated with the latest interior design trends. Get expert tips and advice for a modern and stylish home.
(Many of the links in this article redirect to a specific reviewed product. Your purchase of these products through affiliate links helps to generate commission for Storables.com, at no extra cost. Learn more)
Introduction
Removing the rear quarter glass from a vehicle may seem like a daunting task, but with the right tools and a methodical approach, it can be accomplished with relative ease. Whether you're replacing a damaged glass or performing maintenance on the window mechanism, understanding the step-by-step process is crucial for a successful outcome.
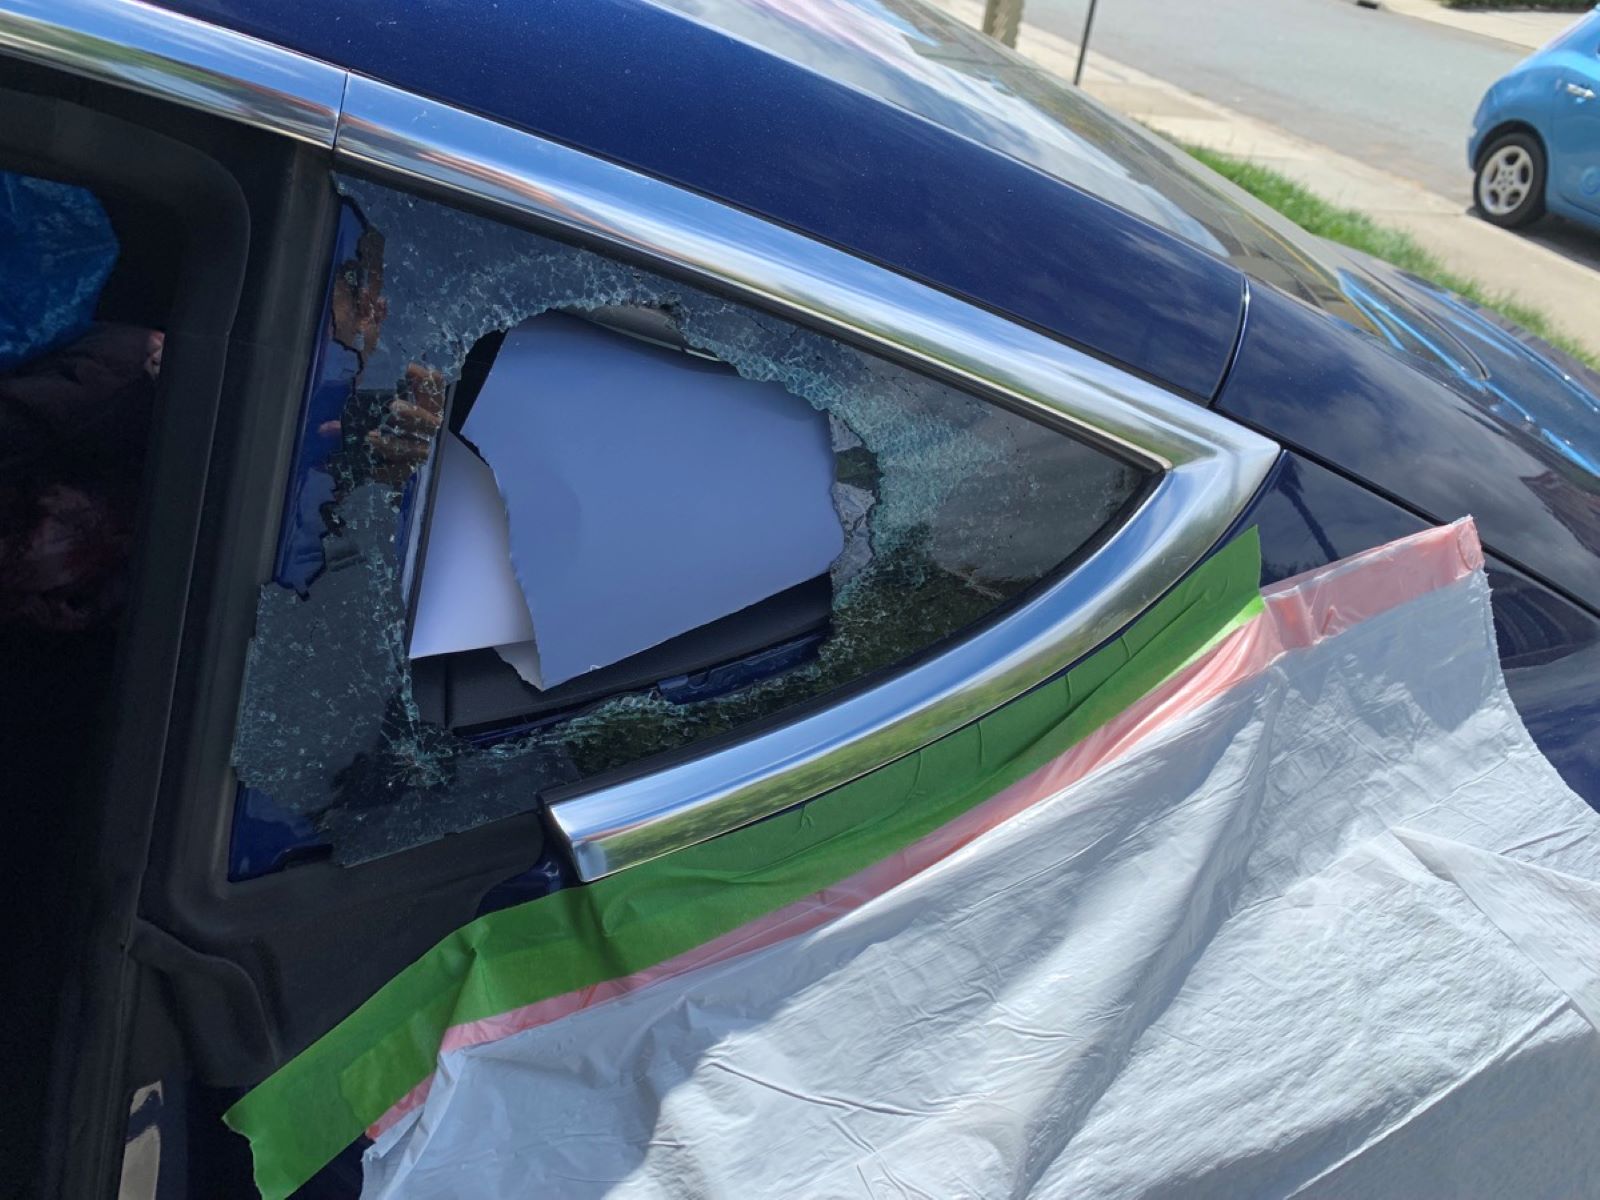
The rear quarter glass, also known as the rear side window, plays a vital role in providing visibility and enhancing the overall aesthetic of the vehicle. It serves as a barrier against external elements while allowing natural light to illuminate the interior. Over time, wear and tear, or unforeseen accidents, may necessitate the removal and replacement of this essential component.
By following a systematic approach, you can effectively remove the rear quarter glass without causing damage to the surrounding components or compromising the structural integrity of the vehicle. This process involves gathering the necessary tools and materials, removing the interior trim panel, weatherstripping, and finally, the glass itself. Additionally, proper cleaning and preparation of the area for installation are crucial to ensure a seamless and secure fit for the new glass.
In the subsequent steps, we will delve into the detailed procedures, providing clear instructions and insights to guide you through the process. With a methodical approach and attention to detail, you can successfully remove and replace the rear quarter glass, restoring both functionality and aesthetics to your vehicle. Let's embark on this journey to master the art of rear quarter glass removal and installation.
Key Takeaways:
- Removing rear quarter glass requires patience and the right tools. Carefully removing the interior trim panel and weatherstripping sets the stage for a successful glass replacement, ensuring optimal visibility and protection for your vehicle.
- Installing the new glass demands precision and attention to detail. Proper alignment, securing, and sealing are crucial for a seamless transition, restoring both functionality and aesthetics to your vehicle’s rear quarter panel.
Read more: How To Store Fat Quarters
Step 1: Gather the necessary tools and materials
Before embarking on the rear quarter glass removal process, it is essential to gather the requisite tools and materials to ensure a smooth and efficient workflow. Having the right equipment at your disposal will not only streamline the task but also contribute to the overall safety and precision of the operation.
Tools:
- Screwdriver Set: A comprehensive set of screwdrivers, including Phillips and flat-head varieties, will be indispensable for removing various fasteners and trim pieces.
- Trim Removal Tools: These specialized tools are designed to safely pry and remove interior trim panels without causing damage to the surrounding surfaces.
- Protective Gloves and Eyewear: Safety should always be a priority. Durable gloves and protective eyewear will shield your hands and eyes from potential hazards during the removal process.
- Trim Clip Removal Tool: This tool is essential for safely removing trim clips without causing damage to the vehicle's body or interior components.
- Sealant Remover: In cases where the glass is adhered with sealant, a sealant remover will facilitate the separation process without damaging the surrounding surfaces.
Materials:
- Replacement Glass: If the rear quarter glass is being replaced, ensure that the new glass is compatible with the make and model of the vehicle.
- Weatherstripping: Depending on the condition of the existing weatherstripping, it may be necessary to replace it during the glass removal process to ensure a proper seal upon reinstallation.
- Cleaning Solvent: A mild cleaning solvent or glass cleaner will be required to prepare the area for the new glass installation.
- Protective Tarp or Blanket: To protect the interior of the vehicle from debris and potential damage during the removal process, a tarp or blanket can be used to cover the area surrounding the glass.
By assembling these tools and materials before commencing the rear quarter glass removal, you will set the stage for a well-organized and efficient procedure. With the necessary equipment at hand, you can proceed to the subsequent steps with confidence, knowing that you are fully prepared to tackle the task at hand.
Step 2: Remove the interior trim panel
The interior trim panel serves as a protective and aesthetic covering for the inner workings of the rear quarter glass assembly. Removing this panel is a crucial preliminary step in gaining access to the components that secure the glass in place. By following a systematic approach, you can successfully remove the interior trim panel without causing damage to the surrounding surfaces.
-
Locate and Remove Fasteners: Begin by identifying and removing any visible fasteners securing the trim panel in place. These fasteners may be in the form of screws, clips, or bolts, and are often located along the perimeter of the panel and within the interior door frame. Utilize the appropriate screwdriver or trim removal tool to carefully extract these fasteners, ensuring that they are safely stored for reassembly.
-
Pry and Release Clips: In addition to fasteners, the trim panel may be secured by hidden clips that snap into place. Using a trim removal tool, gently pry along the edges of the panel to release these clips. Exercise caution to avoid applying excessive force, as this may result in damage to the panel or surrounding components.
-
Disconnect Electrical Components: In modern vehicles, the interior trim panel may house electrical components such as window switches, speakers, or lighting. Before fully detaching the panel, carefully disconnect any electrical connectors to ensure a safe and seamless removal process. Take note of the connector types and their respective positions for reconnection during reassembly.
-
Lift and Remove the Panel: With all fasteners, clips, and electrical connections released, carefully lift the trim panel away from the door frame. Exercise caution to prevent any abrupt movements that may cause damage to the panel or the underlying components. If the panel exhibits resistance, recheck for any overlooked fasteners or clips that may still be engaged.
-
Secure and Label Components: As the trim panel is removed, it is essential to secure any loose components such as clips, fasteners, or electrical connectors. Organizing and labeling these components will streamline the reassembly process and mitigate the risk of misplacement or confusion during the subsequent steps.
By meticulously following these steps, you can effectively remove the interior trim panel, unveiling the underlying components and mechanisms associated with the rear quarter glass. This preparatory phase sets the stage for the subsequent steps, allowing for unhindered access to the elements requiring attention during the glass removal process.
Read more: How To Remove Frosted Glass
Step 3: Remove the weatherstripping
The weatherstripping surrounding the rear quarter glass serves as a crucial barrier against external elements, ensuring a secure seal and protection against moisture and debris. Removing the weatherstripping is a pivotal step in the rear quarter glass removal process, as it allows for unhindered access to the glass and its securing mechanisms. By approaching this task with precision and care, you can effectively remove the weatherstripping without compromising its integrity or causing damage to the surrounding surfaces.
Assess the Weatherstripping Configuration
Before initiating the removal process, it is essential to assess the configuration of the weatherstripping. Depending on the vehicle's make and model, the weatherstripping may be secured using adhesive, clips, or a combination of both. Carefully examine the perimeter of the glass to identify the attachment method, as this will dictate the approach for removal.
Loosen Adhesive Bond (If Applicable)
In cases where the weatherstripping is adhered to the vehicle's body with sealant or adhesive, it is imperative to gently loosen the bond to facilitate safe removal. Utilize a suitable sealant remover or adhesive dissolver to gradually soften the adhesive, taking care not to damage the paint or underlying surfaces. Patience is key in this process, as rushing the adhesive removal may lead to unintended damage.
Release Retaining Clips or Fasteners
For weatherstripping secured with retaining clips or fasteners, carefully locate and release these attachment points. Utilize a trim removal tool to gently pry and disengage the clips, ensuring that they are safely stored for reinstallation. Exercise caution to prevent bending or damaging the clips during removal, as they play a vital role in securing the weatherstripping in place.
Read more: How Much Are Rear View Mirrors
Gradually Peel and Remove the Weatherstripping
With the adhesive bond loosened or the retaining clips released, begin the gradual process of peeling and removing the weatherstripping from the perimeter of the glass. Exercise patience and precision to avoid tearing or stretching the weatherstripping, as this may impact its effectiveness upon reinstallation. Work methodically around the entire perimeter, ensuring that the weatherstripping is fully detached from the glass and the vehicle's body.
Inspect and Prepare for Reinstallation
As the weatherstripping is removed, take the opportunity to inspect its condition and assess the need for replacement. If the weatherstripping exhibits signs of wear, tearing, or deterioration, it is advisable to procure a suitable replacement to ensure optimal sealing upon reinstallation. Additionally, thoroughly clean the area where the weatherstripping was situated, removing any residual adhesive or debris to prepare for the subsequent steps.
By meticulously following these steps, you can successfully remove the weatherstripping, paving the way for the subsequent phase of the rear quarter glass removal process. This meticulous approach ensures that the weatherstripping is handled with care and precision, setting the stage for a seamless and effective reinstallation of the glass and associated components.
Step 4: Remove the glass
Removing the glass from the rear quarter panel is a critical phase in the overall process of rear quarter glass removal. This step demands precision, caution, and a methodical approach to ensure the safe extraction of the glass without causing damage to the vehicle or compromising safety. By following a systematic procedure, you can effectively remove the glass, preparing the area for the installation of a new or refurbished component.
Assess the Glass Mounting Method
Before initiating the removal process, it is essential to assess how the glass is mounted within the rear quarter panel. Depending on the vehicle's make and model, the glass may be secured using a combination of adhesive, retaining clips, or a dedicated mounting mechanism. Carefully examine the perimeter of the glass to identify the specific mounting method, as this will dictate the approach for safe removal.
Loosen Adhesive Bond (If Applicable)
In cases where the glass is adhered to the panel with sealant or adhesive, it is crucial to gently loosen the bond to facilitate safe removal. Utilize a suitable sealant remover or adhesive dissolver to gradually soften the adhesive, taking care not to damage the paint or surrounding surfaces. Patience is paramount in this process, as rushing the adhesive removal may lead to unintended damage.
Release Retaining Clips or Fasteners
For glass secured with retaining clips or fasteners, carefully locate and release these attachment points. Utilize a trim removal tool to gently pry and disengage the clips, ensuring that they are safely stored for potential reinstallation. Exercise caution to prevent bending or damaging the clips during removal, as they play a vital role in securing the glass in place.
Gradually Extract the Glass
With the adhesive bond loosened or the retaining clips released, begin the gradual process of extracting the glass from the rear quarter panel. It is crucial to approach this step with extreme care, ensuring that the glass is supported and guided throughout the removal process. Enlist the assistance of a second person if necessary to ensure the safe and controlled extraction of the glass from its position.
Inspect the Glass and Surrounding Area
As the glass is removed, take the opportunity to inspect its condition and assess the need for replacement. Additionally, thoroughly examine the surrounding area within the rear quarter panel, checking for any signs of corrosion, damage, or wear that may require attention before the installation of the new glass. Clean the area meticulously, removing any residual adhesive or debris to prepare for the subsequent steps.
By meticulously following these steps, you can effectively remove the glass from the rear quarter panel, setting the stage for the subsequent phase of the rear quarter glass removal process. This meticulous approach ensures that the glass is handled with care and precision, paving the way for the seamless installation of a new or refurbished component.
Read more: How Do Rear View Mirrors Work
Step 5: Clean and prepare the area for installation
After the successful removal of the rear quarter glass, the next crucial step involves thoroughly cleaning and preparing the area for the seamless installation of the new glass. This phase is essential to ensure a secure fit, optimal sealing, and the longevity of the newly installed component. By meticulously cleaning and preparing the area, you can create an ideal foundation for the installation process, setting the stage for a successful outcome.
Clear Debris and Residue
Begin by meticulously clearing the area within the rear quarter panel of any debris, dust, or residual adhesive from the previous glass installation. Utilize a gentle cleaning solvent or adhesive remover to dissolve and remove any stubborn residue, ensuring that the surface is clean and free from any impediments that may hinder the installation process.
Inspect for Damage or Corrosion
Thoroughly inspect the exposed area within the rear quarter panel for any signs of corrosion, damage, or wear that may require attention before the installation of the new glass. Address any underlying issues promptly to prevent potential complications in the future and to ensure the structural integrity of the installation.
Check Alignment and Fit
Carefully assess the alignment and fit of the new glass within the designated area. Verify that the perimeter of the installation area is free from any obstructions or irregularities that may impede the proper seating of the glass. This meticulous inspection will contribute to a seamless installation process and a secure, snug fit for the new glass.
Read more: How To Remove Adhesive From Glass
Prepare Weatherstripping and Sealing Surfaces
If the existing weatherstripping is being reused, ensure that it is thoroughly cleaned and inspected for any signs of wear or damage. In the case of replacement weatherstripping, carefully position and prepare it for installation, ensuring that it aligns perfectly with the designated sealing surfaces to guarantee an effective and watertight seal.
Final Cleaning and Surface Preparation
Conclude the preparation process by performing a final cleaning of the installation area, removing any remaining traces of debris, solvent, or residue. Ensure that the surface is dry and free from contaminants, providing an optimal foundation for the secure and effective installation of the new rear quarter glass.
By meticulously adhering to these preparatory steps, you can ensure that the area is impeccably cleaned and primed for the installation of the new glass. This meticulous approach sets the stage for a successful and enduring installation, contributing to the overall functionality, aesthetics, and longevity of the rear quarter glass within the vehicle.
Step 6: Install the new glass
Installing the new glass in the rear quarter panel is the pivotal culmination of the rear quarter glass removal and replacement process. This step demands precision, attention to detail, and a methodical approach to ensure the seamless and secure installation of the new component. By following a systematic procedure, you can effectively install the new glass, restoring both functionality and aesthetics to the vehicle.
Align and Position the New Glass
Begin by carefully aligning and positioning the new glass within the designated area of the rear quarter panel. Ensure that the glass fits snugly and uniformly within the opening, verifying that the perimeter aligns perfectly with the sealing surfaces. This meticulous alignment is crucial to guarantee a secure and effective seal upon installation.
Read more: How To Remove Haze From Glass
Secure the Glass in Place
If the new glass is designed to be secured with retaining clips or fasteners, carefully position and secure these components to hold the glass firmly in place. Exercise caution to prevent overtightening, ensuring that the glass is adequately supported without subjecting it to undue pressure or stress. Verify that the securing components are evenly distributed to maintain uniform pressure around the perimeter of the glass.
Reinstall Weatherstripping
If the existing weatherstripping is being reused, carefully position and secure it around the perimeter of the new glass. Ensure that the weatherstripping aligns perfectly with the designated sealing surfaces, providing a secure and effective barrier against external elements. In the case of replacement weatherstripping, meticulously position and affix the new component, verifying that it forms a uniform and watertight seal around the glass.
Verify Proper Seating and Alignment
After securing the glass and weatherstripping, verify that the components are seated properly and aligned uniformly within the rear quarter panel. Check for any signs of misalignment, irregular gaps, or obstructions that may impede the effectiveness of the seal. This meticulous inspection ensures that the new glass is seamlessly integrated into the vehicle, contributing to both functionality and aesthetics.
Test Functionality and Sealing
Once the new glass is securely installed, perform a comprehensive functionality and sealing test. Operate the window mechanism to verify smooth and unobstructed movement of the glass within its track. Additionally, inspect the perimeter of the glass for any signs of potential air or water leaks, ensuring that the sealing is effective and watertight.
By meticulously following these steps, you can effectively install the new glass in the rear quarter panel, culminating in the successful restoration of both functionality and aesthetics to the vehicle. This meticulous approach ensures that the new glass is seamlessly integrated, providing optimal visibility, protection, and longevity within the vehicle's rear quarter panel.
Read more: How To Remove Resin From Glass
Conclusion
In conclusion, the process of removing and replacing the rear quarter glass of a vehicle demands meticulous attention to detail, precision, and a methodical approach. By following the step-by-step procedures outlined in this guide, individuals can successfully navigate through the intricacies of rear quarter glass removal, ensuring a seamless transition to the installation of a new or refurbished component.
Throughout the process, the importance of gathering the necessary tools and materials was emphasized, setting the stage for a well-organized and efficient workflow. From screwdriver sets to sealant removers, each tool played a crucial role in facilitating the safe and effective removal of the rear quarter glass. Additionally, the significance of protective gear, such as gloves and eyewear, underscored the priority of safety in every phase of the operation.
The meticulous removal of the interior trim panel and weatherstripping was highlighted as pivotal preparatory steps, allowing for unhindered access to the glass and its securing mechanisms. By carefully releasing fasteners, clips, and adhesive bonds, individuals can ensure the safe extraction of the glass without causing damage to the vehicle or compromising safety.
The subsequent phase of cleaning and preparing the area for installation underscored the importance of creating an optimal foundation for the new glass. By meticulously clearing debris, inspecting for damage or corrosion, and preparing the weatherstripping and sealing surfaces, individuals can guarantee a secure and enduring installation.
Finally, the installation of the new glass marked the culmination of the process, requiring precision and attention to detail to ensure a seamless transition. From aligning and securing the glass to verifying proper seating and alignment, each step contributed to the successful restoration of both functionality and aesthetics to the vehicle.
In essence, the comprehensive guide to removing and replacing the rear quarter glass equips individuals with the knowledge and insights necessary to navigate through this intricate process with confidence and proficiency. By adhering to the outlined procedures and exercising patience and precision, individuals can achieve a successful outcome, restoring optimal visibility, protection, and longevity to the vehicle's rear quarter panel.
Frequently Asked Questions about How To Remove Rear Quarter Glass
Was this page helpful?
At Storables.com, we guarantee accurate and reliable information. Our content, validated by Expert Board Contributors, is crafted following stringent Editorial Policies. We're committed to providing you with well-researched, expert-backed insights for all your informational needs.


0 thoughts on “How To Remove Rear Quarter Glass”