Home>Furniture & Design>Interior Design Trends>How To Replace Passenger Side Window Glass
Interior Design Trends
How To Replace Passenger Side Window Glass
Published: February 3, 2024
Learn how to replace passenger side window glass with our expert interior design trends. Get step-by-step instructions and tips for a seamless replacement.
(Many of the links in this article redirect to a specific reviewed product. Your purchase of these products through affiliate links helps to generate commission for Storables.com, at no extra cost. Learn more)
Introduction
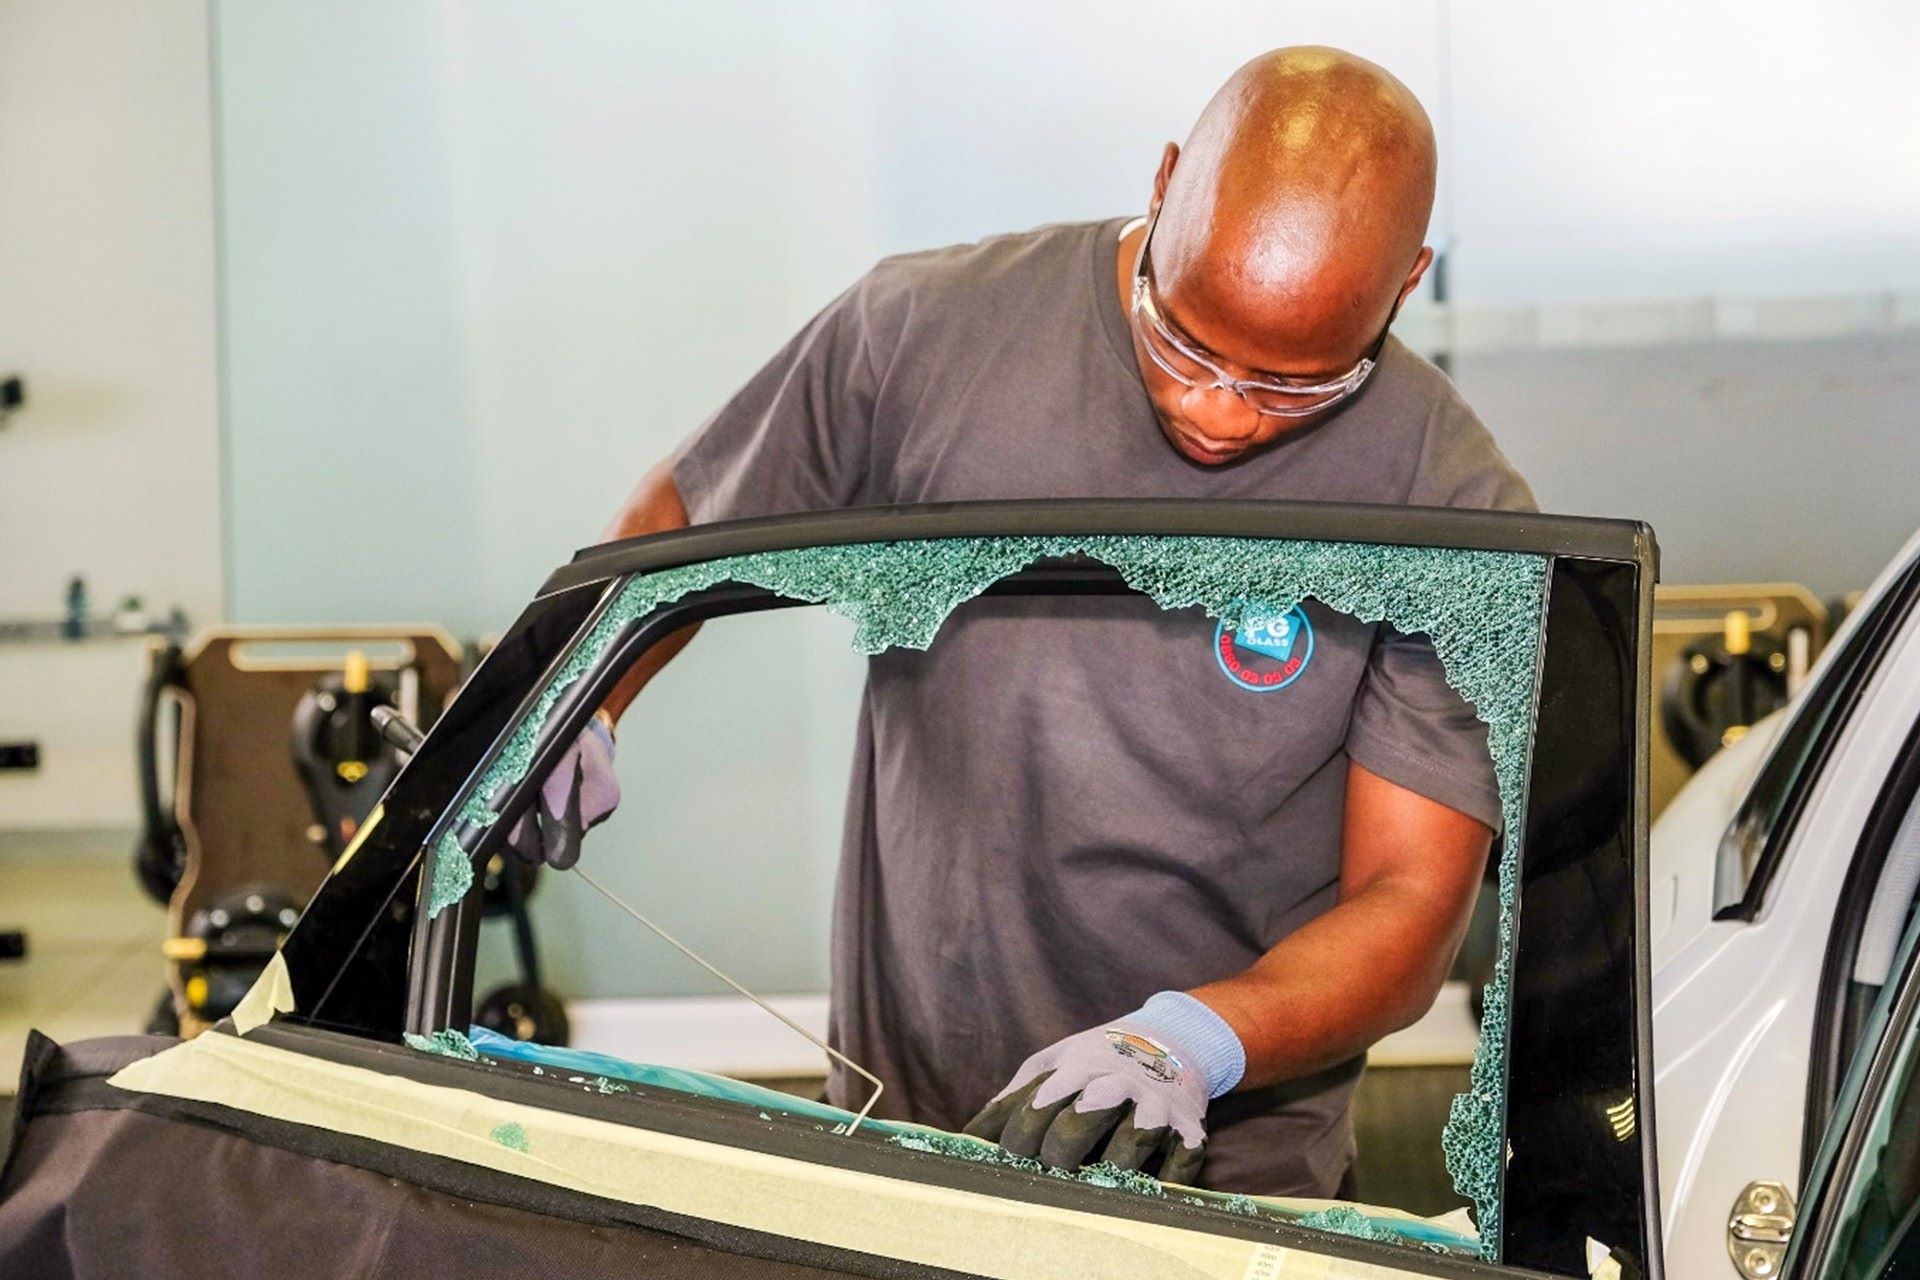
Replacing the passenger side window glass of your vehicle can be a daunting task, especially if you've never attempted it before. However, with the right tools, materials, and a clear understanding of the process, you can successfully complete this task and restore the functionality and aesthetics of your car's window. Whether the glass was damaged in an accident, by vandalism, or due to wear and tear, knowing how to replace it can save you time and money compared to seeking professional assistance.
In this comprehensive guide, we will walk you through the step-by-step process of replacing the passenger side window glass. By following these instructions, you can regain the security, protection from the elements, and overall comfort that a fully intact window provides. Before you begin, it's essential to gather all the necessary tools and materials to ensure a smooth and efficient replacement process. Once you have everything you need, you'll be ready to tackle this project with confidence and precision.
Let's dive into the details of the tools and materials required for this task, followed by a systematic approach to removing the old window glass and installing the new one. After completing the installation, we'll guide you through testing the new window glass to ensure that it operates seamlessly. With this guide at your disposal, you'll be well-equipped to take on the challenge of replacing the passenger side window glass, ultimately enhancing the safety and functionality of your vehicle.
Key Takeaways:
- Replacing your car’s passenger side window glass is a manageable DIY project that can save you time and money. With the right tools and materials, you can restore your vehicle’s functionality and aesthetics with confidence.
- By following a systematic approach, including removing the old glass, installing the new one, and conducting thorough tests, you can ensure a successful replacement. Mastering this skill empowers you to maintain and enhance your vehicle’s condition.
Tools and Materials Needed
Before embarking on the task of replacing the passenger side window glass, it's crucial to gather all the essential tools and materials to ensure a seamless and efficient process. Here's a comprehensive list of what you'll need:
Tools:
- Safety Gear: Prioritize safety by wearing protective gloves and safety goggles to shield your hands and eyes from potential glass shards and debris.
- Trim Panel Removal Tool: This tool is essential for gently prying and removing the interior door panel without causing damage.
- Phillips and Flathead Screwdrivers: These will be used to remove screws and fasteners securing the door panel and window components.
- Pliers: Useful for gripping and manipulating small components during the disassembly and reassembly process.
- Putty Knife: A putty knife can aid in carefully removing old adhesive and sealant from the window frame.
- Vacuum Cleaner: To clean up any broken glass or debris from the door cavity and interior of the vehicle.
- Painter's Tape: This can be used to secure the window in place while the adhesive sets, preventing it from slipping during installation.
- Socket and Ratchet Set: Necessary for removing bolts and nuts holding the window regulator and glass in place.
- Adhesive Application Tool: Depending on the type of adhesive used, an application tool may be required for precise and uniform application.
Materials:
- Replacement Window Glass: Ensure that the new glass is compatible with your vehicle's make, model, and year.
- Adhesive Sealant: Select a high-quality adhesive sealant designed for automotive glass installation to ensure a secure and watertight fit.
- Protective Film (Optional): Consider adding a protective film to the new glass to guard against potential future damage.
- Lint-Free Cloth: Use a lint-free cloth for cleaning the window frame and ensuring a clean surface for the new adhesive.
- Rubbing Alcohol: Ideal for removing any residual adhesive or dirt from the window frame before installing the new glass.
- Rust Inhibitor (If Necessary): In the case of rust or corrosion on the window frame, a rust inhibitor can prevent further deterioration.
- Primer (If Required): Some adhesive sealants may necessitate the use of a primer for optimal adhesion to the window frame.
By ensuring that you have all the necessary tools and materials at your disposal, you can proceed with confidence, knowing that you are well-prepared to tackle the task of replacing the passenger side window glass. With these items in hand, you'll be ready to move on to the next steps of the replacement process.
Removing the Old Window Glass
Removing the old window glass is a critical step in the process of replacing the passenger side window. It requires precision and care to avoid damage to the surrounding components and ensure a smooth transition to the new glass. Here's a detailed guide on how to effectively remove the old window glass from your vehicle:
-
Prepare the Work Area: Park your vehicle in a well-lit and spacious area, ensuring that the surrounding environment is conducive to the removal process. Roll down the damaged window to access the interior components easily.
-
Remove the Door Panel: Using a trim panel removal tool, carefully detach the door panel from the door frame. Start by locating and removing any screws or fasteners securing the panel in place. Once the fasteners are removed, gently pry the panel away from the door frame, being mindful of any electrical connections for power windows and door locks. Disconnect these connections as needed and set the door panel aside.
-
Access the Window Regulator and Glass: With the door panel removed, you'll have clear access to the window regulator and the glass itself. Identify the mounting bolts or clips securing the glass to the window regulator. Depending on the vehicle's make and model, there may be specific components or mechanisms that hold the glass in place. Carefully remove these fasteners, ensuring that the glass is adequately supported to prevent it from falling during the removal process.
-
Extract the Old Glass: Once the glass is no longer secured to the window regulator, gently maneuver it out of the window frame. Be cautious of any remaining adhesive or sealant, as it may cause resistance during removal. If the glass is damaged, handle it with care to avoid injury from sharp edges or shards.
-
Clean the Window Frame: With the old glass removed, take the opportunity to clean the window frame thoroughly. Use a vacuum cleaner to remove any glass fragments or debris from the door cavity. Wipe down the frame with a lint-free cloth and rubbing alcohol to ensure a clean and smooth surface for the installation of the new glass.
-
Inspect the Window Components: While the window is exposed, inspect the window regulator, tracks, and associated components for any signs of wear, damage, or corrosion. Addressing any issues at this stage can prevent future complications and ensure the optimal performance of the new window glass.
By following these steps meticulously, you can effectively remove the old window glass from your vehicle, setting the stage for the seamless installation of the new glass. With the old glass safely removed and the window frame prepared, you're now ready to proceed with the installation process, which we'll delve into next.
Read more: How To Replace Side Mirror Glass
Installing the New Window Glass
With the old window glass successfully removed and the window frame meticulously cleaned and inspected, it's time to proceed with the installation of the new window glass. This crucial step requires precision and attention to detail to ensure a secure and watertight fit, ultimately restoring the functionality and aesthetics of your vehicle's window. Here's a comprehensive guide on how to effectively install the new window glass:
-
Prepare the New Glass: Before installing the new glass, ensure that it is compatible with your vehicle's make, model, and year. If the glass is equipped with a protective film, verify that it is intact and undamaged. Additionally, inspect the edges of the glass to ensure that they are smooth and free from any imperfections that could hinder the installation process.
-
Apply Adhesive Sealant: Prior to placing the new glass into the window frame, apply a high-quality automotive adhesive sealant to the perimeter of the frame. The sealant serves as a crucial element in creating a secure and watertight bond between the glass and the frame. Depending on the type of sealant used, it may be necessary to apply a primer to the frame to promote optimal adhesion.
-
Position the New Glass: Carefully maneuver the new glass into the window frame, ensuring that it aligns precisely with the mounting points and edges of the frame. Exercise caution to prevent any damage to the glass or the surrounding components during this process. Once the glass is in position, gently press it against the adhesive sealant to initiate the bonding process.
-
Secure the Glass: With the new glass in place, proceed to secure it to the window regulator or mounting points using the appropriate fasteners. Ensure that the glass is adequately supported and aligned before tightening the fasteners to prevent any misalignment or stress on the glass.
-
Allow the Adhesive to Set: After securing the glass, allow the adhesive sealant to set according to the manufacturer's recommendations. This typically involves a curing period during which the sealant establishes a strong and durable bond with the window frame. To prevent the glass from shifting during this period, consider using painter's tape to secure it in place.
-
Clean and Inspect: Once the adhesive has fully set, carefully remove any excess sealant and clean the glass to ensure a pristine finish. Inspect the installation to verify that the glass is securely positioned and that the sealant has formed a uniform and watertight seal around the perimeter.
By following these steps diligently, you can effectively install the new window glass, restoring the functionality and visual appeal of your vehicle's window. With the new glass securely in place, you're now ready to proceed with testing its operation to ensure seamless functionality.
When replacing the passenger side window glass, make sure to carefully remove any remaining glass fragments and use a silicone sealant to secure the new glass in place. Be sure to follow the manufacturer’s instructions for a proper installation.
Testing the New Window Glass
After successfully installing the new window glass, it is crucial to conduct a series of tests to ensure that the functionality and performance meet the desired standards. Testing the new window glass not only verifies its operational capabilities but also provides an opportunity to address any potential issues before finalizing the installation process.
Here's a comprehensive guide on how to effectively test the new window glass:
-
Operational Testing: Begin by testing the basic operation of the window glass. Utilize the vehicle's power window controls to raise and lower the window multiple times. Observe the movement of the glass to ensure that it operates smoothly without any unusual noises or resistance. Pay close attention to any signs of misalignment or binding, as these issues can indicate improper installation or alignment.
-
Sealing and Weatherproofing: Verify the effectiveness of the adhesive sealant by conducting a preliminary assessment of the window's sealing and weatherproofing. Use a gentle stream of water from a hose to simulate rain or inclement weather. Observe the window frame and interior for any signs of water infiltration. A watertight seal is essential to protect the interior of the vehicle from moisture and environmental elements.
-
Alignment and Fit: Carefully inspect the alignment and fit of the new window glass within the frame. Ensure that the glass sits flush and level within the window opening, with uniform gaps around the perimeter. Any irregularities in alignment can lead to operational issues and compromise the overall integrity of the installation.
-
Functional Integration: If the vehicle is equipped with additional features such as automatic lowering when the door is opened or raised when the door is closed, test these integrated functions to ensure that the new window glass seamlessly integrates with the vehicle's existing systems. Address any discrepancies or malfunctions promptly to maintain the full functionality of the window.
-
Safety Mechanisms: Test the safety mechanisms associated with the window, such as the auto-reverse feature that prevents the window from closing if an obstruction is detected. Place an object, such as a rolled-up towel, in the window's path and attempt to close the window. Verify that the safety mechanism engages as intended, halting the window's movement and preventing potential hazards.
-
Final Inspection: Conduct a final visual inspection of the new window glass and its surrounding components. Verify that all fasteners are securely tightened, the adhesive sealant has fully cured, and the interior components, such as the door panel, are reinstalled correctly. Address any discrepancies or concerns identified during the testing process to ensure a complete and reliable installation.
By meticulously testing the new window glass using these comprehensive steps, you can confirm its operational integrity and address any potential issues, ultimately ensuring a successful and reliable replacement. With the window glass meeting the required standards, you can proceed with confidence, knowing that your vehicle's window is fully restored and ready for regular use.
Conclusion
In conclusion, the process of replacing the passenger side window glass encompasses a series of meticulous steps that culminate in the restoration of functionality, safety, and visual appeal to your vehicle. By following the comprehensive guide provided in this article, you have gained valuable insights into the tools, materials, and systematic approach required to undertake this task with confidence and precision.
The initial phase of gathering the necessary tools and materials ensures that you are well-equipped to navigate the removal and installation processes seamlessly. From safety gear to adhesive sealant, each item plays a crucial role in facilitating a successful window glass replacement.
The meticulous process of removing the old window glass involves careful disassembly of the door panel, extraction of the old glass, and thorough cleaning and inspection of the window components. This phase sets the stage for the subsequent installation of the new glass, ensuring that the window frame is primed and ready for the seamless integration of the replacement glass.
Installing the new window glass demands attention to detail, from applying the adhesive sealant to positioning the glass and allowing the sealant to set effectively. The precision and care exercised during this phase contribute to the longevity and reliability of the new glass, providing a secure and watertight fit within the window frame.
Following the installation, the comprehensive testing process serves as a critical validation of the operational, sealing, and safety aspects of the new window glass. By conducting thorough tests and inspections, you can identify and address any potential issues, ensuring that the replacement glass meets the highest standards of functionality and performance.
Ultimately, the successful replacement of the passenger side window glass not only enhances the aesthetic appeal of your vehicle but also reinstates the crucial protective and functional role of the window. With the new glass securely in place and operating seamlessly, you can confidently navigate various weather conditions and enjoy the comfort and security provided by a fully functional window.
By mastering the art of replacing the passenger side window glass, you have not only saved time and resources but also gained a valuable skill that empowers you to maintain and enhance the condition of your vehicle. Whether addressing damage, wear, or personalization, the ability to replace the window glass exemplifies your dedication to the care and maintenance of your vehicle.
In closing, the knowledge and expertise acquired through this guide position you as a capable and resourceful vehicle owner, equipped to tackle the challenges of maintaining and improving your vehicle. With the passenger side window glass replacement completed, you can take pride in the accomplishment and the enhanced functionality and aesthetics it brings to your vehicle.
Frequently Asked Questions about How To Replace Passenger Side Window Glass
Was this page helpful?
At Storables.com, we guarantee accurate and reliable information. Our content, validated by Expert Board Contributors, is crafted following stringent Editorial Policies. We're committed to providing you with well-researched, expert-backed insights for all your informational needs.


0 thoughts on “How To Replace Passenger Side Window Glass”