Home>Furniture & Design>Living Room Furniture>How To Fix Car Seat Recliner
Living Room Furniture
How To Fix Car Seat Recliner
Modified: August 17, 2024
Learn how to fix your living room furniture recliner with our expert tips and advice. Get your furniture back in top shape with our easy-to-follow guide.
(Many of the links in this article redirect to a specific reviewed product. Your purchase of these products through affiliate links helps to generate commission for Storables.com, at no extra cost. Learn more)
Introduction
When it comes to the comfort and functionality of your car, the seat recliner plays a crucial role. Whether you're embarking on a long road trip or simply commuting to work, having a properly functioning seat recliner can make a significant difference in your driving experience. However, over time, the recliner mechanism may encounter issues that hinder its smooth operation. From a stuck recliner to a wobbly or loose mechanism, these issues can be frustrating and compromise the overall comfort and safety of your driving experience.
Fortunately, understanding how to fix a car seat recliner can empower you to address these issues effectively. By gaining insight into the recliner mechanism and the necessary repair steps, you can restore the functionality of your car seat and ensure a comfortable and secure ride for yourself and your passengers.
In this comprehensive guide, we will delve into the intricacies of the car seat recliner mechanism, providing you with the knowledge and confidence to tackle recliner issues head-on. From identifying the tools and materials needed to dismantling and repairing the recliner mechanism, each step is designed to equip you with the expertise needed to resolve common seat recliner issues.
So, whether you're a seasoned DIY enthusiast or someone looking to take a hands-on approach to maintaining your car, this guide will walk you through the process of fixing a car seat recliner. By the end, you'll have the know-how to troubleshoot and address various recliner issues, ensuring that your driving experience remains comfortable, safe, and enjoyable. Let's dive into the world of car seat recliners and discover how to restore their functionality with ease.
Key Takeaways:
- Understanding the car seat recliner mechanism and identifying issues is crucial for effective DIY repairs. With the right tools and materials, anyone can fix common problems and restore comfort and safety to their car seat.
- By following a methodical approach to disassembly, repair, and reassembly, individuals can confidently address car seat recliner issues. This empowers them to enhance their driving experience and maintain their vehicle with ease.
Read more: How To Restuff A Recliner Seat
Understanding the Car Seat Recliner Mechanism
The car seat recliner mechanism is a pivotal component that enables drivers and passengers to adjust the angle and position of their seats for optimal comfort and support during travel. Understanding the intricacies of this mechanism is essential for effectively diagnosing and addressing any issues that may arise.
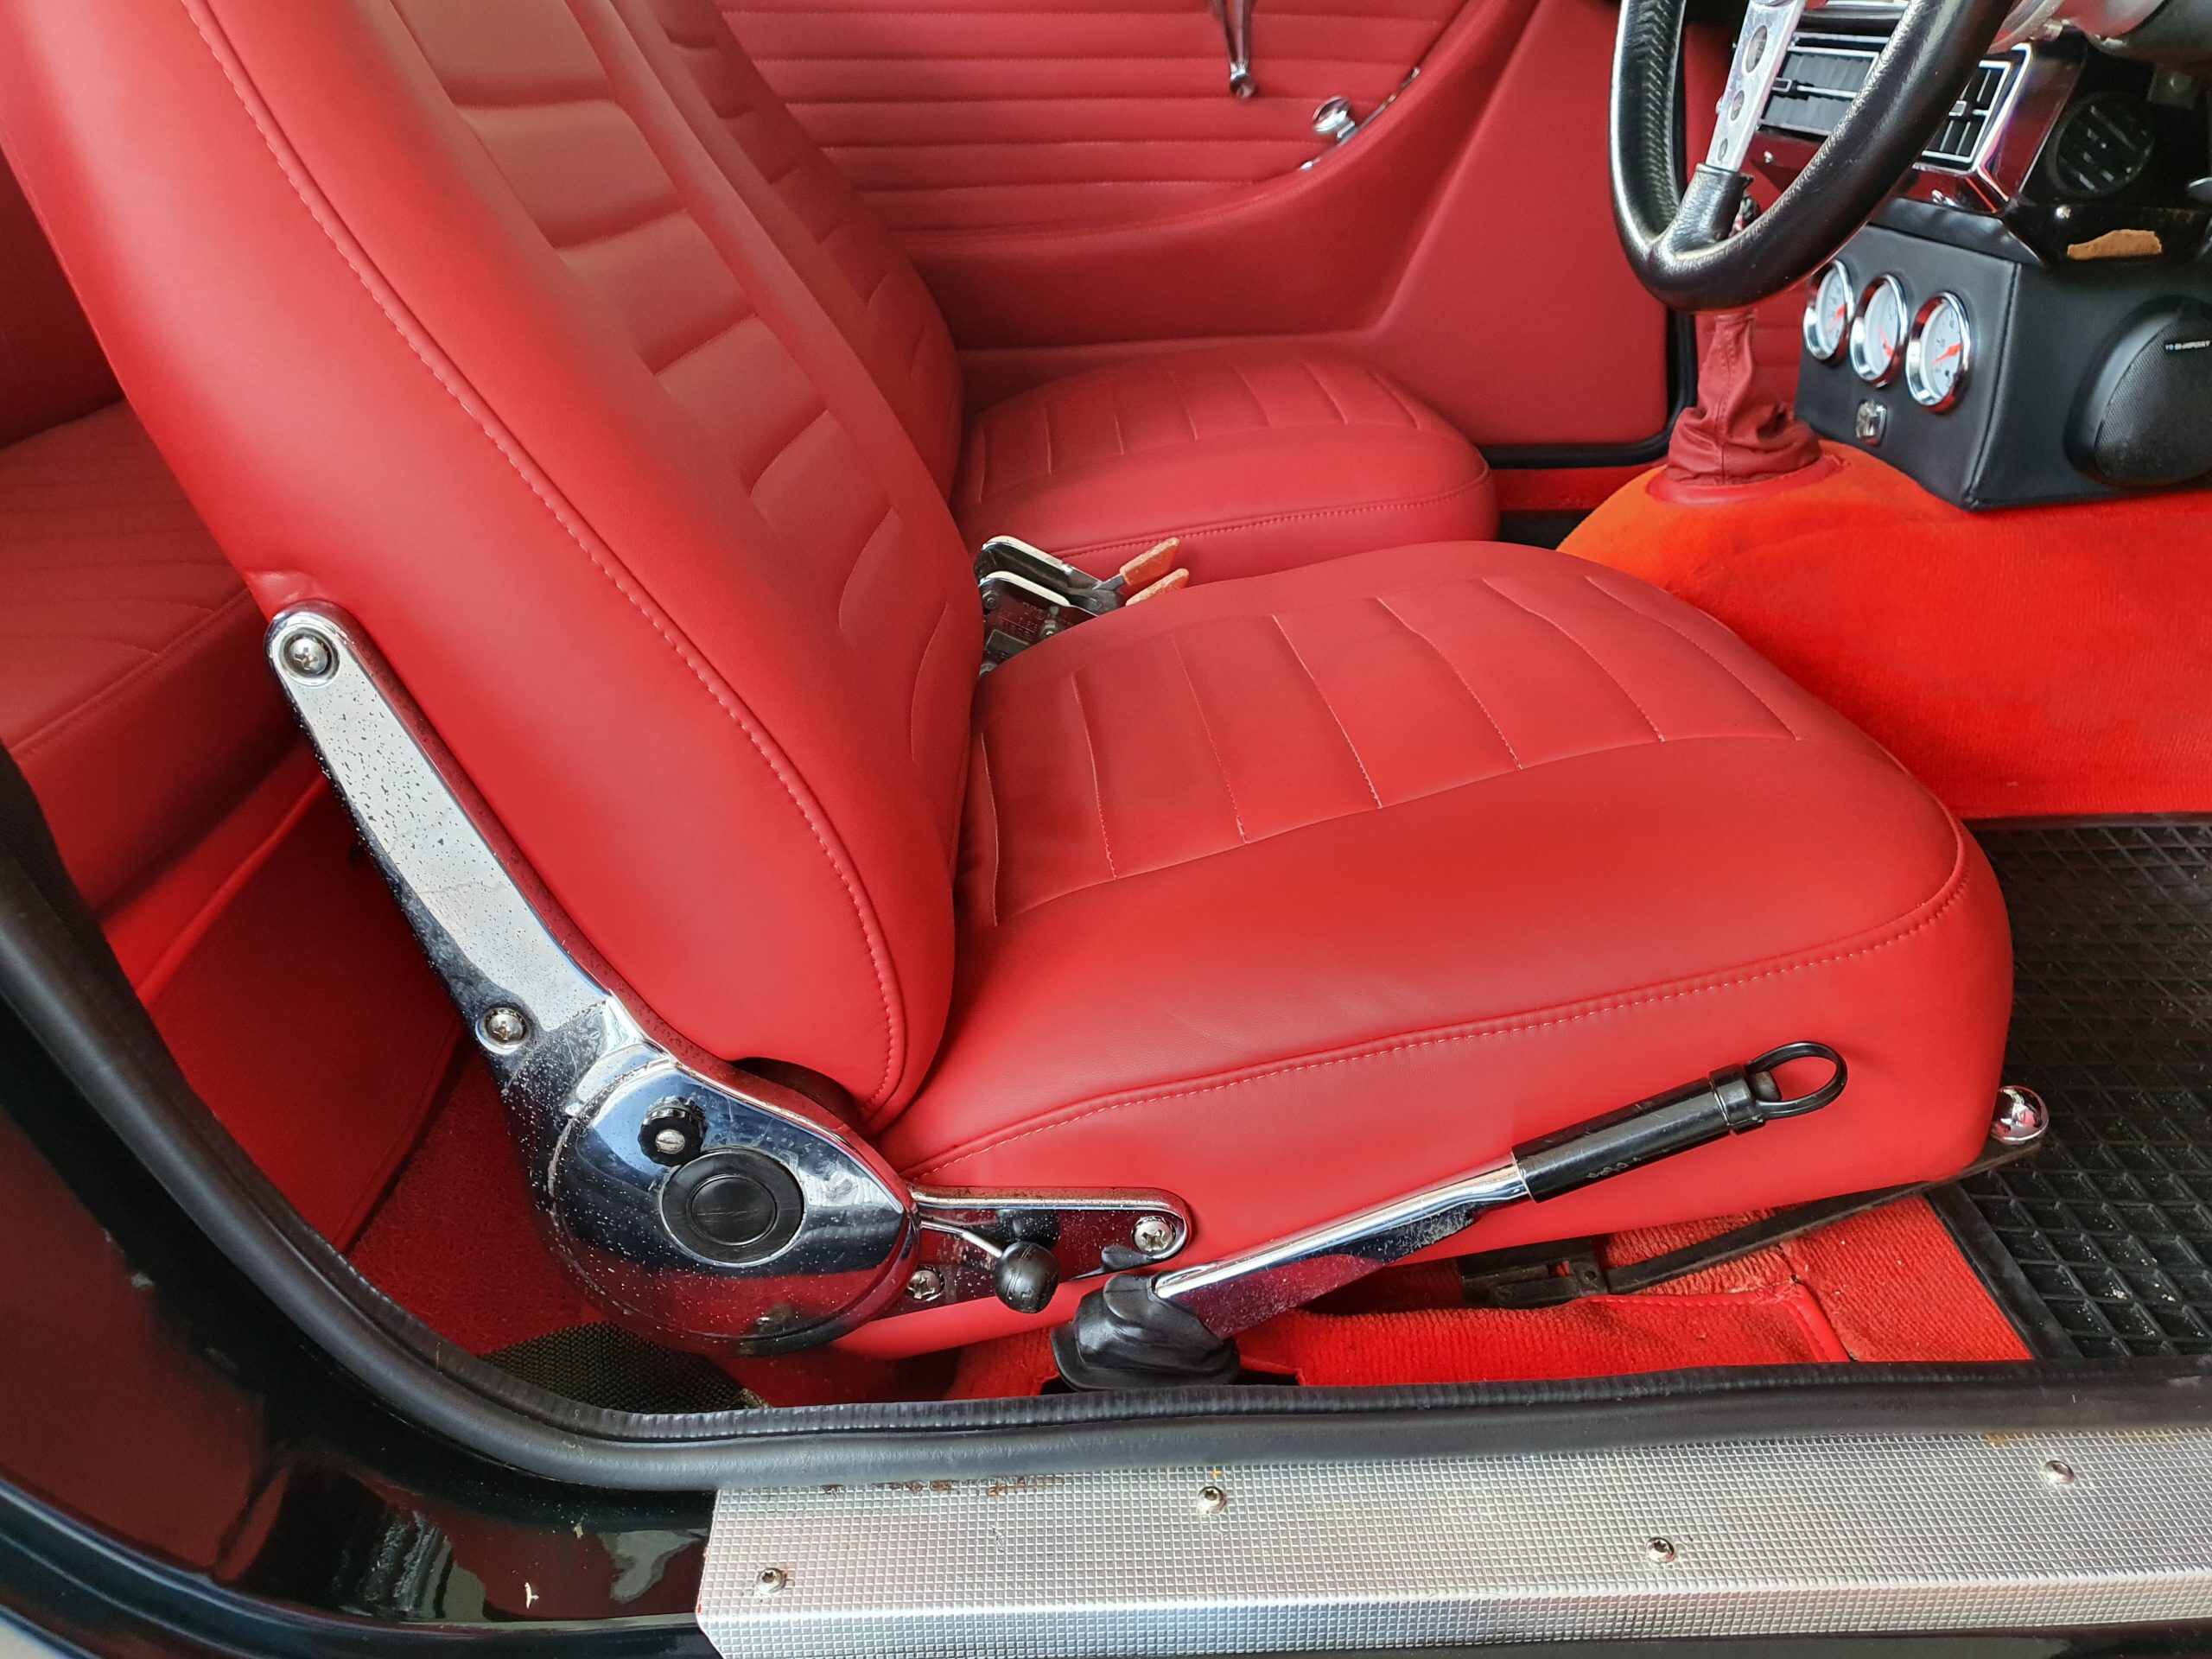
Car seat recliners typically consist of a lever or handle located on the side of the seat, which, when engaged, allows the seatback to be adjusted to various angles. This mechanism is often connected to a series of gears, springs, and latches that work in unison to facilitate smooth reclining and locking of the seatback.
The recliner mechanism's functionality is dependent on the precise alignment and engagement of these internal components. When the lever is activated, the gears and springs work together to release the seatback, allowing it to move into the desired position. Once the desired angle is achieved, the mechanism engages the latches to secure the seatback in place, providing stability and support during the journey.
Common issues with the car seat recliner mechanism may include stiffness or difficulty in reclining the seat, a loose or wobbly seatback, or the inability to lock the seatback in a specific position. These issues can stem from various factors, such as worn-out gears, broken springs, or misaligned components within the mechanism.
By gaining a comprehensive understanding of the car seat recliner mechanism, individuals can effectively troubleshoot and address these issues. Whether it involves lubricating the gears, replacing worn-out springs, or realigning the internal components, a clear understanding of the mechanism's operation is crucial for successful repairs.
In the subsequent sections, we will delve into the practical steps and techniques for diagnosing and fixing common car seat recliner issues. By equipping yourself with the knowledge of how the recliner mechanism functions, you'll be well-prepared to tackle any challenges that may arise, ensuring that your car seat remains a source of comfort and support during your travels.
Tools and Materials Needed
Before embarking on the journey of fixing a car seat recliner, it's essential to gather the necessary tools and materials to ensure a smooth and efficient repair process. Having the right equipment at your disposal will enable you to address the recliner issues effectively and restore the functionality of your car seat. Here's a comprehensive list of the tools and materials you'll need for this endeavor:
Tools:
- Socket Set: A versatile socket set with various metric and standard socket sizes will be indispensable for removing bolts and fasteners securing the seat components.
- Screwdriver Set: A set of flathead and Phillips screwdrivers will aid in dismantling the seat assembly and accessing the recliner mechanism.
- Pliers: Both needle-nose and regular pliers will be useful for gripping and manipulating small components within the recliner mechanism.
- Trim Removal Tools: These specialized tools are designed to safely remove interior trim pieces without causing damage to the surrounding surfaces.
- Torque Wrench: A torque wrench is essential for accurately tightening bolts and fasteners to the manufacturer's specifications during reassembly.
- Allen Wrench Set: Many car seat recliner mechanisms utilize Allen head bolts, making a set of Allen wrenches a valuable addition to your toolkit.
- Lubricant: A high-quality lubricant or penetrating oil will aid in addressing stiffness or resistance within the recliner mechanism.
Materials:
- Replacement Parts: Depending on the identified issue, you may need replacement gears, springs, or latches for the recliner mechanism. It's advisable to procure these parts beforehand to expedite the repair process.
- Cleaning Supplies: A mild cleaner and microfiber cloth will be useful for cleaning the recliner components and removing any debris or old lubricants.
- Protective Gloves: It's essential to prioritize safety, and a pair of protective gloves will safeguard your hands during the repair process.
- Safety Glasses: Eye protection is crucial when working on car components, ensuring that your eyes are shielded from any potential debris or contaminants.
- Shop Rags: Having a supply of clean shop rags or disposable wipes will aid in keeping your work area tidy and free from grease and grime.
By ensuring that you have these tools and materials at your disposal, you'll be well-prepared to tackle the task of fixing your car seat recliner. With a methodical approach and the right equipment, you can confidently address the identified issues and restore the comfort and functionality of your car seat, enhancing your overall driving experience.
Read more: How To Turn A Car Seat Into A Booster Seat
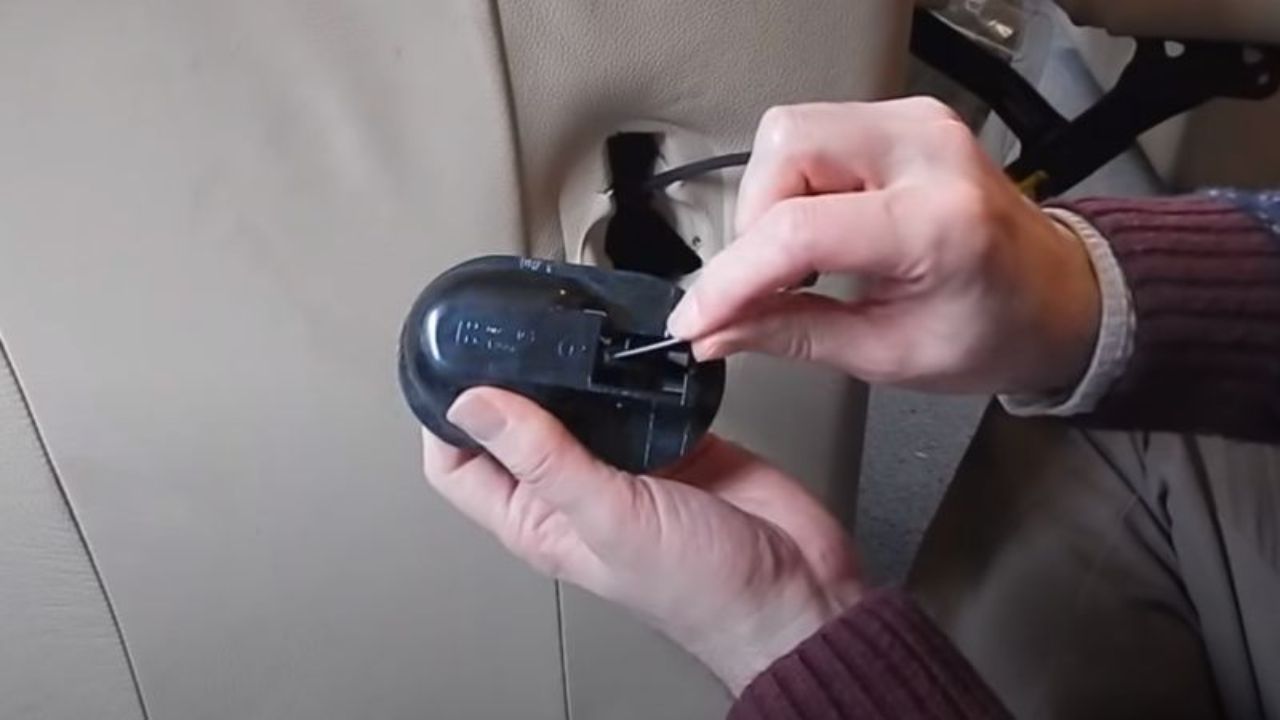
Step 1: Removing the Seat Recliner Cover
Removing the seat recliner cover is the crucial first step in gaining access to the internal components of the recliner mechanism. This process allows for a comprehensive inspection of the recliner's internal workings and facilitates the identification of any issues that may be affecting its functionality. Here's a detailed guide on how to effectively remove the seat recliner cover:
1. Positioning the Seat:
Before commencing the removal process, ensure that the car seat is positioned in a manner that provides ample space to work around it. Adjust the seat to its forwardmost position to create sufficient room for accessing the recliner mechanism.
2. Locating the Fasteners:
Inspect the underside of the seat to identify the fasteners securing the recliner cover. These fasteners may be in the form of bolts, screws, or clips, depending on the specific design of the seat assembly. Utilize a flashlight if necessary to ensure clear visibility of the fasteners.
3. Removing the Fasteners:
Using the appropriate tools from your toolkit, carefully remove the fasteners that secure the recliner cover in place. A socket set or screwdriver may be required to loosen and extract the bolts or screws. Exercise caution to avoid misplacing the fasteners during the removal process.
Read more: What Is Cradle Recliner Seat
4. Releasing the Clips (if applicable):
In some seat designs, the recliner cover may be secured in place by clips that snap into position. Gently release these clips by applying pressure in the designated release areas. Take care to avoid excessive force, as this may cause damage to the clips or the surrounding upholstery.
5. Detaching the Cover:
Once all fasteners and clips have been removed, carefully lift and detach the recliner cover from the seat assembly. Exercise patience and precision to prevent any damage to the cover or the underlying components. If the cover appears to be stuck, reassess for any overlooked fasteners or clips that may still be in place.
6. Inspection and Cleaning:
With the recliner cover removed, take the opportunity to inspect the internal components of the seat assembly. Look for any signs of wear, damage, or obstruction within the recliner mechanism. Additionally, use this time to clean the cover and the exposed areas of the seat to remove any accumulated debris or dust.
By meticulously following these steps, you can effectively remove the seat recliner cover, providing access to the internal workings of the recliner mechanism. This process sets the stage for a thorough assessment of the recliner's condition and paves the way for subsequent repair or maintenance tasks. With the cover removed, you are now ready to proceed with identifying and addressing any issues affecting the car seat recliner mechanism.
Step 2: Identifying the Issue
After successfully removing the seat recliner cover, the next crucial step in the process of fixing a car seat recliner is identifying the underlying issue affecting the mechanism. This step involves a comprehensive assessment of the internal components and a keen observation of the recliner's behavior to pinpoint the specific problem. Here's a detailed guide on how to effectively identify the issue with the car seat recliner:
Read more: How To Store Car Seats
1. Visual Inspection:
Begin by visually examining the exposed components of the recliner mechanism. Look for any visible signs of wear, damage, or misalignment. Check for broken or worn-out gears, springs that may have lost their tension, or latches that are not engaging properly. Additionally, inspect the surrounding areas for any foreign objects or debris that may be impeding the smooth operation of the recliner.
2. Functional Testing:
Engage the recliner lever or handle and observe the seatback's behavior. Pay close attention to any unusual sounds, resistance, or inconsistencies in the reclining process. Test the various reclining angles to determine if the mechanism locks securely in place or if there is any wobbling or instability in the seatback. By actively engaging the recliner and observing its response, you can gain valuable insights into the nature of the issue.
3. Movement and Alignment:
Carefully manipulate the seatback to assess its movement and alignment. Ensure that it moves smoothly through the reclining angles without any abrupt stops or jerky motions. Verify that the seatback aligns correctly with the seat base when in an upright position, as misalignment may indicate underlying issues with the recliner mechanism's internal components.
4. Consultation of Manufacturer Guidelines:
Refer to the manufacturer's guidelines or technical documentation for the specific car seat model. These resources may provide valuable insights into common issues associated with the recliner mechanism and offer guidance on diagnosing and addressing these issues. Understanding the manufacturer's recommended troubleshooting steps can streamline the identification process and ensure that the correct problem is targeted for resolution.
By meticulously conducting these assessments, you can effectively identify the issue affecting the car seat recliner mechanism. Whether it's a matter of worn-out components, misalignment, or the presence of foreign objects, a thorough understanding of the problem is essential for devising an appropriate repair strategy. With the issue identified, you can confidently proceed to the next steps of repairing or replacing the recliner mechanism, ultimately restoring the comfort and functionality of your car seat.
Read more: What Is Recliner Seat In Theatre
Step 3: Repairing or Replacing the Recliner Mechanism
Once the issue affecting the car seat recliner mechanism has been identified, the next pivotal step is to address the problem through repair or replacement of the relevant components. This process involves a systematic approach to rectifying the underlying issues and restoring the functionality of the recliner mechanism. Here's a detailed guide on how to effectively repair or replace the car seat recliner mechanism:
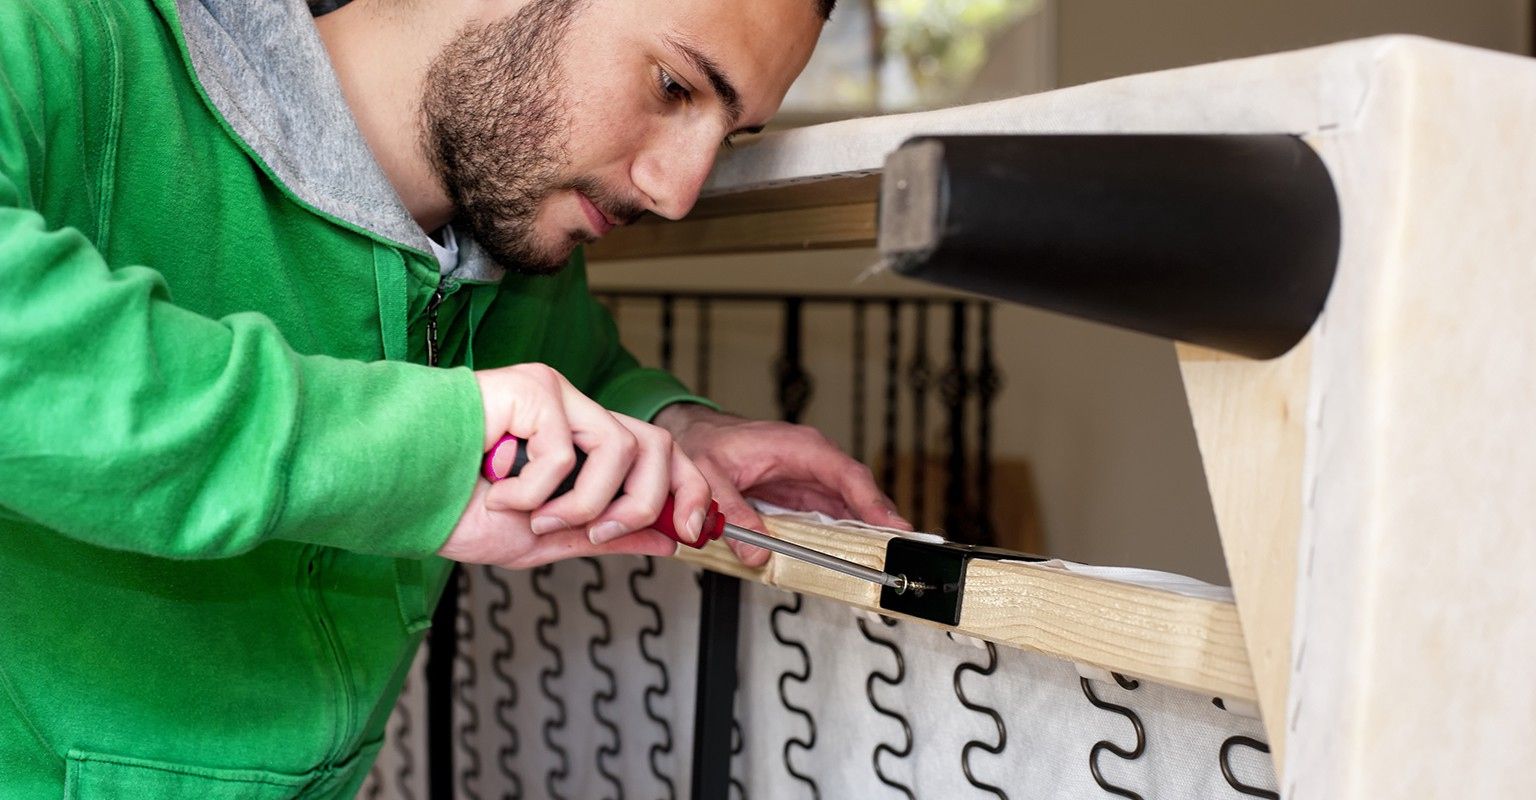
1. Disassembling the Recliner Mechanism:
Begin by carefully disassembling the components of the recliner mechanism. This may involve removing the recliner lever, accessing the gears and springs, and detaching any latches or locking mechanisms. Exercise caution during this process to prevent damage to the surrounding upholstery and components.
2. Repairing Worn-Out Components:
If the issue pertains to worn-out gears, springs, or latches, assess the feasibility of repairing these components. In some cases, gears may be reconditioned, springs may be re-tensioned, or latches may be adjusted to restore their functionality. Utilize the appropriate tools and techniques to address these specific issues, ensuring that the components are reinstated to their optimal working condition.
3. Replacement of Faulty Components:
In instances where the components are beyond repair or have sustained irreparable damage, proceed with the replacement of the faulty parts. This may involve sourcing genuine replacement gears, springs, or latches from the vehicle's manufacturer or authorized suppliers. Ensure that the replacement components are compatible with the specific make and model of the car seat to guarantee seamless integration and optimal performance.
Read more: How To Add Padding To Recliner Seat
4. Lubrication and Reassembly:
Prior to reassembling the recliner mechanism, apply a suitable lubricant to the moving parts, including gears and pivot points. This lubrication aids in ensuring smooth operation and reduces friction within the mechanism. Once lubricated, carefully reassemble the recliner components, securing them in place according to the manufacturer's specifications and guidelines.
5. Functional Testing:
After the repair or replacement process is complete, conduct comprehensive functional testing of the recliner mechanism. Engage the recliner lever and assess the seatback's movement through the various reclining angles. Verify that the mechanism locks securely in place and that the seatback exhibits stability and alignment. Address any residual issues or inconsistencies that may arise during the testing phase.
By meticulously following these steps, you can effectively repair or replace the car seat recliner mechanism, addressing the identified issues and restoring its functionality. Whether it involves repairing worn-out components or procuring genuine replacements, a methodical approach ensures that the recliner mechanism operates smoothly and securely. With the mechanism repaired or replaced, the car seat is poised to deliver enhanced comfort and support, enriching the overall driving experience for you and your passengers.
Step 4: Reassembling the Seat Recliner
Reassembling the seat recliner is a critical phase that follows the repair or replacement of the recliner mechanism components. This process involves carefully reintegrating the various elements of the recliner mechanism and the seat assembly to ensure proper functionality and structural integrity. Here's a detailed guide on how to effectively reassemble the seat recliner:
-
Component Alignment:
Before commencing the reassembly, carefully align the repaired or replaced components of the recliner mechanism. Ensure that the gears, springs, latches, and other elements are positioned correctly and securely within the seat assembly. Verify that each component interfaces seamlessly with the surrounding elements to facilitate smooth operation. -
Fastener Installation:
Utilizing the appropriate tools from your toolkit, reattach the fasteners that secure the recliner mechanism and the seat components. Exercise precision and care when tightening the bolts, screws, or clips to prevent overtightening or damage to the surrounding surfaces. Refer to the manufacturer's specifications for the recommended torque values to ensure proper fastener installation. -
Reattaching the Recliner Cover:
Carefully position the recliner cover over the seat assembly, aligning it with the designated mounting points. Reinsert any clips or fasteners that secure the cover in place, ensuring a snug and secure fit. Double-check that the cover is properly seated and that all attachment points are engaged to prevent shifting or instability during use. -
Functional Testing:
Once the reassembly is complete, conduct thorough functional testing of the seat recliner. Engage the recliner lever and verify that the seatback moves smoothly through the various reclining angles. Ensure that the recliner mechanism locks securely in place and that the seatback exhibits stability and alignment. Test the functionality of the recliner across different positions to confirm its operational integrity. -
Final Inspection:
After the functional testing, perform a final inspection of the reassembled seat recliner. Verify that all components are securely fastened, and there are no loose or protruding elements that may compromise the seat's functionality or safety. Additionally, visually inspect the recliner cover to ensure a seamless and uniform appearance, free from any misalignments or irregularities.
By meticulously following these steps, you can effectively reassemble the seat recliner, ensuring that the repaired or replaced components integrate seamlessly within the seat assembly. A methodical approach to reassembly guarantees that the recliner mechanism operates smoothly and securely, providing enhanced comfort and support during your driving experience.
Conclusion
In conclusion, the process of fixing a car seat recliner encompasses a series of meticulous steps aimed at diagnosing, addressing, and restoring the functionality of the recliner mechanism. By embarking on this journey, individuals can gain valuable insights into the intricacies of the car seat recliner, empowering them to tackle common issues with confidence and precision.
Throughout this comprehensive guide, we have delved into the fundamental aspects of the car seat recliner mechanism, shedding light on its operation and the potential issues that may arise over time. From understanding the internal components to identifying the tools and materials needed for the repair process, each step has been designed to equip individuals with the expertise to navigate the complexities of the recliner mechanism.
The process begins with the crucial step of removing the seat recliner cover, providing access to the internal components and setting the stage for a thorough assessment. By carefully identifying the issue affecting the recliner mechanism, individuals can pinpoint the root cause of the problem and devise an appropriate repair strategy tailored to the specific issue at hand.
Whether it involves repairing worn-out components or procuring genuine replacements, the repair or replacement phase is pivotal in restoring the functionality of the car seat recliner. A methodical approach to disassembly, repair, and reassembly ensures that the recliner mechanism operates smoothly and securely, enriching the overall driving experience for both the driver and passengers.
As the reassembly phase concludes, the seat recliner is poised to deliver enhanced comfort, support, and functionality, reaffirming its role as a vital component of the driving experience. By adhering to the outlined steps and techniques, individuals can take a proactive approach to maintaining and restoring the car seat recliner, ensuring that it remains a source of comfort and convenience for years to come.
In essence, the process of fixing a car seat recliner transcends mere mechanical repairs; it embodies a journey of empowerment, knowledge acquisition, and hands-on engagement with the vehicle's components. By mastering the art of car seat recliner repair, individuals can enhance their driving experience while fostering a deeper connection with the maintenance and care of their vehicles. With this newfound expertise, individuals are well-equipped to navigate the challenges of car seat recliner issues, ensuring that comfort and functionality are upheld on every journey.
Frequently Asked Questions about How To Fix Car Seat Recliner
Was this page helpful?
At Storables.com, we guarantee accurate and reliable information. Our content, validated by Expert Board Contributors, is crafted following stringent Editorial Policies. We're committed to providing you with well-researched, expert-backed insights for all your informational needs.


0 thoughts on “How To Fix Car Seat Recliner”