Home>Furniture & Design>Living Room Furniture>How To Fix Heat Marks On A Dining Table
Living Room Furniture
How To Fix Heat Marks On A Dining Table
Modified: February 17, 2024
Learn how to remove heat marks from your dining table with our expert tips and tricks. Restore the beauty of your living room furniture and design effortlessly.
(Many of the links in this article redirect to a specific reviewed product. Your purchase of these products through affiliate links helps to generate commission for Storables.com, at no extra cost. Learn more)
Introduction
Welcome to the guide on how to fix heat marks on a dining table. Your dining table serves as the heart of your home, witnessing countless meals, gatherings, and conversations. However, over time, it's not uncommon for heat marks to appear, marring the table's surface and detracting from its aesthetic appeal. While these blemishes may seem daunting, fear not, as there are several effective methods for remedying this issue and restoring your table to its former glory.
In this comprehensive guide, we will delve into the various causes of heat marks, the materials needed for the restoration process, and step-by-step instructions for five different methods to tackle this common problem. Whether you opt for the iron and cloth technique, toothpaste remedy, mayonnaise solution, baking soda and white vinegar method, or the sandpaper and wood finish approach, you'll find practical and easy-to-follow instructions to address heat marks on your dining table.
By understanding the root cause of heat marks and learning how to effectively treat them, you can extend the lifespan of your dining table and preserve its beauty for years to come. Additionally, we'll provide valuable tips on preventing heat marks from occurring in the future, ensuring that your table remains in pristine condition.
So, let's embark on this journey to revitalize your dining table and equip you with the knowledge and tools to conquer heat marks, restoring your table to its former splendor. Whether you're a seasoned DIY enthusiast or a newcomer to furniture restoration, this guide is tailored to empower you with the expertise needed to tackle this common issue with confidence and precision. Let's dive in and reclaim the charm and elegance of your dining table!
Key Takeaways:
- Say goodbye to heat marks on your dining table! From using an iron and cloth to toothpaste, mayonnaise, baking soda, and white vinegar, and sandpaper and wood finish, you’ve got the tools to restore your table’s beauty.
- Keep your dining table looking flawless by using coasters, heat-resistant pads, and gentle cleaners. Educate others on mindful practices and invest in protective coatings to prevent heat marks and preserve its timeless allure.
Read more: How To Fix A Wobbly Dining Table
Understanding Heat Marks
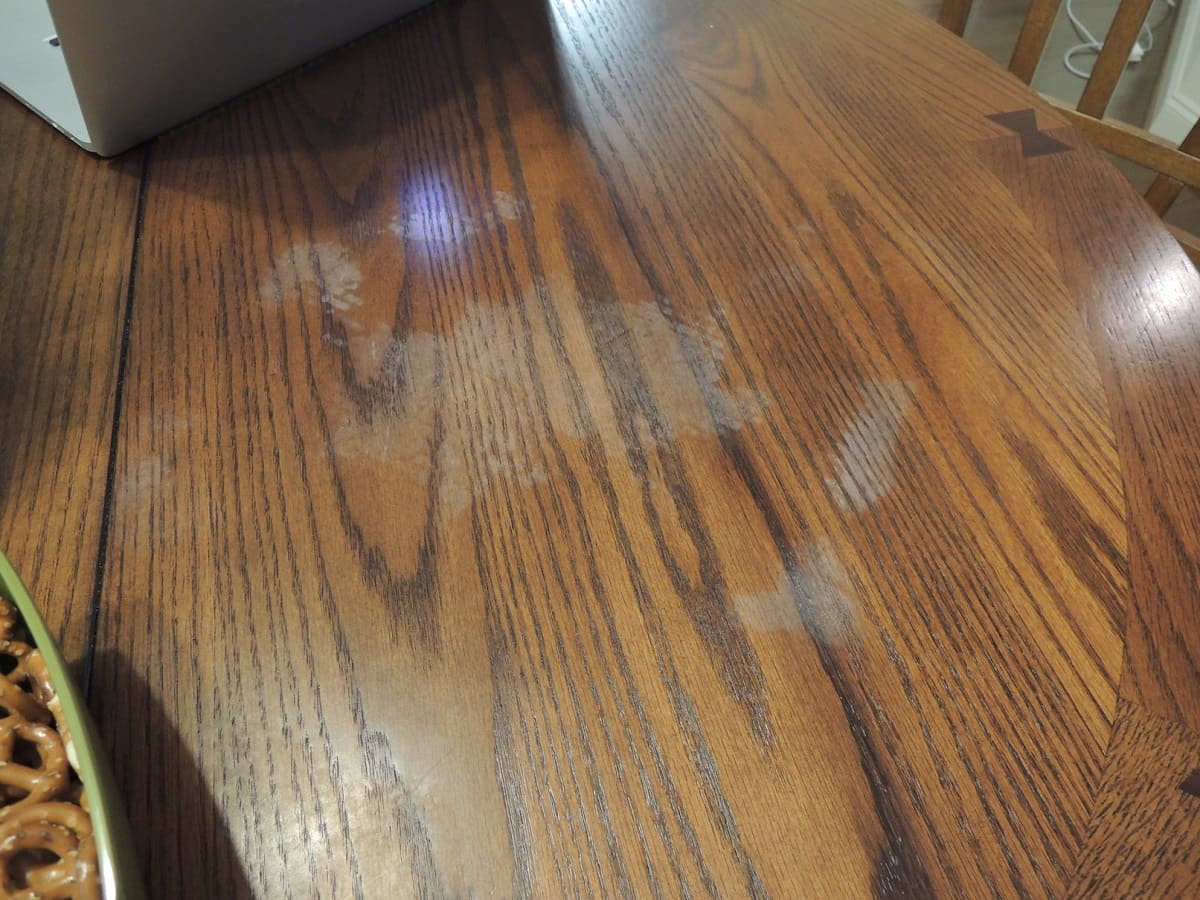
Heat marks, also known as heat stains, are a common issue that can afflict wooden dining tables. These unsightly blemishes are typically caused by the direct application of heat to the table’s surface, often resulting from hot plates, mugs, or serving dishes placed directly on the wood. The heat causes moisture to become trapped in the finish, leading to a cloudy or discolored appearance that can mar the table’s aesthetic appeal.
It’s important to note that heat marks are not the same as burns, which penetrate the wood and require more extensive repair. Heat marks, on the other hand, are superficial and primarily affect the finish of the table rather than the wood itself.
Understanding the nature of heat marks is crucial in determining the most effective approach for remedying them. By recognizing the characteristics of these blemishes, you can select the appropriate method to address them and restore your table’s surface to its original luster.
While heat marks can be an unwelcome sight, they are fortunately reversible with the right techniques and materials. In the following sections, we will explore various methods for treating heat marks, providing you with the knowledge and tools to tackle this common issue and rejuvenate your dining table.
Now that we’ve gained insight into the nature of heat marks, let’s proceed to explore the materials needed to embark on the journey of restoring your dining table to its former glory.
Materials Needed
Before embarking on the journey to remedy heat marks on your dining table, it’s essential to gather the necessary materials to ensure a successful restoration process. Each method for addressing heat marks may require specific items, so it’s important to review the materials needed for the approach you choose. Here’s a general overview of the materials commonly used across different methods:
- Clean, Soft Cloths: These are essential for applying and buffing various remedies without scratching or damaging the table’s surface.
- Iron: When utilizing the iron and cloth method, a standard household iron will be required to facilitate the removal of heat marks.
- Toothpaste: For the toothpaste method, a non-gel, white toothpaste is recommended to effectively treat the heat marks.
- Mayonnaise: When opting for the mayonnaise remedy, ensure you have a jar of regular mayonnaise on hand to address the blemishes.
- Baking Soda and White Vinegar: These common household items are utilized in conjunction to create a paste for treating heat marks.
- Sandpaper: For the sandpaper and wood finish method, fine-grit sandpaper is essential for gently sanding the affected area to remove the heat marks.
- Wood Finish or Polish: Following the treatment of heat marks, a suitable wood finish or polish will be needed to restore the table’s surface and protect it from future blemishes.
It’s important to ensure that the chosen materials are suitable for use on your specific type of dining table. Additionally, having a clean and well-ventilated workspace will contribute to a more effective and pleasant restoration experience.
Now that we’ve assembled the necessary materials, we’re ready to explore the step-by-step methods for addressing heat marks on your dining table. Let’s dive into the first method: using an iron and cloth to tackle these stubborn blemishes.
Method 1: Iron and Cloth
The iron and cloth method is a popular and effective approach for removing heat marks from wooden surfaces. This technique harnesses the power of heat to lift the trapped moisture from the finish, gradually diminishing the unsightly marks on your dining table. Here’s a step-by-step guide to utilizing this method:
- Prepare the Workspace: Start by clearing the table and ensuring that the surface is clean and free from any debris or dust. This will prevent any particles from causing additional scratches during the restoration process.
- Place a Clean Cloth: Lay a clean, soft cloth over the heat marks on the table’s surface. Ensure that the cloth completely covers the affected area.
- Heat the Iron: Set your household iron to a low to medium heat setting, ensuring that it is not too hot. Excessive heat can potentially damage the wood, so it’s crucial to exercise caution during this step.
- Apply Heat: Gently run the heated iron over the cloth in a circular motion, directly above the heat marks. The heat from the iron will gradually lift the trapped moisture from the finish, visibly reducing the appearance of the blemishes.
- Check and Repeat if Necessary: After a few passes with the iron, lift the cloth to inspect the progress. If the heat marks persist, repeat the process, applying heat in a controlled manner until the blemishes are significantly diminished or completely removed.
- Buff and Polish: Once the heat marks have been effectively treated, use a clean cloth to gently buff the area and restore the table’s natural shine. If desired, apply a suitable wood polish or finish to further enhance the surface and provide added protection.
By following these steps with care and precision, you can effectively harness the power of heat to eradicate heat marks from your dining table, restoring its pristine appearance and preserving its natural beauty.
Now that we’ve explored the iron and cloth method, we’ll proceed to the toothpaste remedy, offering an alternative approach to treating heat marks on your beloved dining table.
Method 2: Toothpaste
The toothpaste method offers a simple yet effective approach to addressing heat marks on wooden surfaces. By leveraging the gentle abrasiveness of toothpaste, combined with its cleaning properties, you can effectively diminish or eliminate heat marks from your dining table. Here’s a step-by-step guide to utilizing this method:
- Select Non-Gel, White Toothpaste: Choose a non-gel, white toothpaste, as the abrasive properties of this type are well-suited for treating heat marks without causing damage to the table’s finish.
- Apply Toothpaste to the Marks: Squeeze a small amount of toothpaste directly onto the heat marks on your dining table. Ensure that the affected area is adequately covered with a thin layer of toothpaste.
- Spread and Rub Gently: Use a clean, soft cloth to gently spread the toothpaste over the heat marks, rubbing it in using small, circular motions. This action helps the toothpaste to effectively lift the trapped moisture from the finish.
- Allow it to Sit: After applying the toothpaste, allow it to sit on the heat marks for a few minutes. This gives the toothpaste an opportunity to work its magic in treating the blemishes.
- Buff and Wipe Clean: Once the toothpaste has been given time to work, use a fresh cloth to gently buff the area, wiping away the toothpaste and any residual moisture from the surface. This reveals the progress made in diminishing the heat marks.
- Assess and Repeat if Needed: Inspect the treated area to evaluate the effectiveness of the toothpaste method. If the heat marks persist, consider repeating the process, applying fresh toothpaste and gently rubbing the affected area until the blemishes are satisfactorily diminished.
- Polish and Protect: Following the successful treatment of the heat marks, consider applying a suitable wood polish or finish to the table’s surface. This not only enhances the appearance but also provides a protective layer against future blemishes.
By following these steps, you can harness the power of toothpaste to effectively combat heat marks on your dining table, restoring its natural beauty and ensuring a polished, blemish-free surface.
Now that we’ve explored the toothpaste method, we’ll proceed to the mayonnaise remedy, offering another effective approach to treating heat marks and rejuvenating your beloved dining table.
Use a mixture of equal parts vinegar and olive oil to gently rub the heat marks on the dining table. Let it sit for a few hours, then wipe off the excess with a clean cloth. Repeat if necessary.
Read more: How To Fix Scratches On A Dining Table
Method 3: Mayonnaise
The mayonnaise method offers a unique and effective approach to treating heat marks on wooden surfaces. By harnessing the emulsifying properties of mayonnaise, combined with its moisturizing and protective qualities, you can effectively diminish or eliminate heat marks from your dining table. Here’s a step-by-step guide to utilizing this method:
- Apply a Layer of Mayonnaise: Begin by applying a generous layer of regular mayonnaise directly onto the heat marks on your dining table. Ensure that the affected area is completely covered with a consistent coating of mayonnaise.
- Allow it to Sit: After applying the mayonnaise, allow it to sit on the heat marks for several hours or overnight. This extended duration allows the mayonnaise to penetrate the finish and work its magic in treating the blemishes.
- Wipe Clean and Assess: Following the designated period, use a clean, soft cloth to wipe away the mayonnaise from the table’s surface. As you remove the mayonnaise, assess the treated area to gauge the progress in diminishing the heat marks.
- Buff and Polish: Once the mayonnaise has been wiped clean, use a fresh cloth to gently buff the area, revealing the improved appearance of the surface. Consider applying a suitable wood polish or finish to further enhance the table’s luster and provide added protection.
- Repeat if Necessary: If the heat marks persist after the initial treatment, consider repeating the process, applying a fresh layer of mayonnaise and allowing it to sit for an extended period. This iterative approach can further diminish the blemishes and restore the table’s natural beauty.
By following these steps with diligence and patience, you can harness the unique properties of mayonnaise to effectively address heat marks on your dining table, rejuvenating its appearance and preserving its timeless elegance.
Now that we’ve explored the mayonnaise method, we’ll proceed to the baking soda and white vinegar approach, offering an alternative and effective method for treating heat marks on your cherished dining table.
Method 4: Baking Soda and White Vinegar
The baking soda and white vinegar method provides a natural and effective approach to remedying heat marks on wooden surfaces. By harnessing the gentle abrasive properties of baking soda and the mild acidic nature of white vinegar, you can effectively diminish or eliminate heat marks from your dining table. Here’s a step-by-step guide to utilizing this method:
- Create a Paste: Begin by combining baking soda and white vinegar to form a paste. In a small container, mix the two ingredients in a ratio that results in a spreadable paste, ensuring that it is well-blended and consistent in texture.
- Apply the Paste to the Marks: Using a clean, soft cloth or a non-abrasive applicator, apply the baking soda and white vinegar paste directly onto the heat marks on your dining table. Ensure that the affected area is evenly covered with a thin layer of the paste.
- Gently Rub and Spread: With the paste applied, use the cloth or applicator to gently rub the mixture into the heat marks, spreading it over the affected area in small, circular motions. This action allows the paste to effectively lift the trapped moisture from the finish.
- Allow it to Sit: After applying the paste, allow it to sit on the heat marks for a few minutes. This provides the baking soda and white vinegar mixture with an opportunity to work its magic in treating the blemishes.
- Wipe Clean and Assess: Following the designated period, use a clean, damp cloth to gently wipe away the paste from the table’s surface. As you remove the paste, assess the treated area to evaluate the progress made in diminishing the heat marks.
- Buff and Polish: Once the paste has been wiped clean, use a fresh cloth to gently buff the area, revealing the improved appearance of the surface. Consider applying a suitable wood polish or finish to further enhance the table’s luster and provide added protection.
- Repeat if Necessary: If the heat marks persist after the initial treatment, consider repeating the process, applying a fresh layer of the baking soda and white vinegar paste and allowing it to sit for an extended period. This iterative approach can further diminish the blemishes and restore the table’s natural beauty.
By following these steps, you can harness the combined properties of baking soda and white vinegar to effectively combat heat marks on your dining table, restoring its timeless allure and ensuring a polished, blemish-free surface.
Now that we’ve explored the baking soda and white vinegar method, we’ll proceed to the sandpaper and wood finish approach, offering an alternative and effective method for treating heat marks on your cherished dining table.
Method 5: Sandpaper and Wood Finish
The sandpaper and wood finish method offers a targeted and precise approach to addressing heat marks on wooden surfaces. By utilizing fine-grit sandpaper and a suitable wood finish, you can effectively diminish or eliminate heat marks from your dining table, restoring its natural beauty and luster. Here’s a step-by-step guide to utilizing this method:
- Assess the Severity of the Heat Marks: Begin by assessing the extent of the heat marks on your dining table. This initial evaluation will help determine whether the use of sandpaper and wood finish is the appropriate method for treating the blemishes.
- Gently Sand the Affected Area: Using fine-grit sandpaper, gently sand the heat marks on the table’s surface. Exercise caution and control during this step, ensuring that you apply gentle pressure and maintain a consistent motion to avoid causing damage to the wood.
- Clean and Inspect the Surface: Following the sanding process, use a clean, soft cloth to wipe away any residual dust or particles from the sanded area. Inspect the surface to gauge the progress made in diminishing the heat marks and restoring the natural appearance of the wood.
- Apply Wood Finish or Polish: Once the sanded area has been cleaned and inspected, consider applying a suitable wood finish or polish to the table’s surface. This not only enhances the appearance but also provides a protective layer against future blemishes, ensuring a durable and lustrous finish.
- Repeat if Necessary: If the heat marks persist after the initial treatment, consider repeating the sanding and wood finish application process. With each iteration, exercise care and precision to gradually diminish the blemishes and restore the table’s timeless elegance.
By following these steps with precision and attention to detail, you can effectively utilize the targeted approach of sandpaper and wood finish to combat heat marks on your dining table, ensuring a smooth and rejuvenated surface that exudes timeless charm.
Now that we’ve explored the sandpaper and wood finish method, we’ll proceed to valuable tips on preventing heat marks, equipping you with essential knowledge to safeguard your dining table from future blemishes.
Prevention Tips
While remedying heat marks on your dining table is essential, implementing preventive measures can significantly reduce the likelihood of future blemishes, preserving the table’s pristine appearance. Here are valuable tips to prevent heat marks and maintain the beauty of your dining table:
- Use Coasters and Trivets: Encourage the use of coasters for beverages and trivets for hot dishes to create a protective barrier between the table’s surface and heat-emitting items. This simple practice can prevent direct contact and minimize the risk of heat marks.
- Employ Heat-Resistant Pads: Consider placing heat-resistant pads or mats on the table’s surface when serving hot dishes. These specialized pads provide an additional layer of protection, safeguarding the wood from heat damage.
- Regular Cleaning and Maintenance: Adopt a routine of regular cleaning and maintenance for your dining table. Use gentle, non-abrasive cleaners specifically formulated for wood surfaces, and follow manufacturer’s recommendations for care and maintenance.
- Monitor Temperature and Humidity: Be mindful of the temperature and humidity levels in the dining area, as extreme fluctuations can impact the wood’s condition. Maintaining a stable environment can help preserve the integrity of the table’s finish.
- Refrain from Placing Hot Items Directly on the Surface: Educate household members and guests about the importance of avoiding direct placement of hot items on the table’s surface. Encouraging mindful practices can contribute to the long-term preservation of the wood.
- Invest in Protective Coatings: Consider applying protective coatings, such as heat-resistant varnishes or lacquers, to the table’s surface. These coatings provide an added layer of defense against heat marks and other forms of damage.
By implementing these preventive tips, you can proactively safeguard your dining table from heat marks and prolong its longevity, ensuring that it remains a focal point of beauty and elegance in your home for years to come.
With these valuable prevention tips at your disposal, you are equipped to maintain the impeccable appearance of your dining table and minimize the risk of heat marks, preserving its timeless allure and charm.
Conclusion
Congratulations on completing this comprehensive guide on addressing heat marks on your beloved dining table. By delving into the various methods and preventive tips, you’ve gained valuable insights and practical knowledge to restore and maintain the beauty of your table’s surface.
From understanding the nature of heat marks to exploring the iron and cloth method, toothpaste remedy, mayonnaise solution, baking soda and white vinegar method, and the sandpaper and wood finish approach, you’ve discovered a diverse array of techniques for effectively treating heat marks. Each method offers a unique approach, providing you with the flexibility to choose the most suitable remedy for your specific situation.
Furthermore, the preventive tips presented in this guide empower you to proactively protect your dining table from future heat marks, ensuring its longevity and timeless elegance. By implementing these preventive measures, you can minimize the risk of blemishes and preserve the pristine appearance of your table for years to come.
Remember, the journey to maintaining a beautiful dining table is an ongoing endeavor. Regular care, mindful practices, and prompt treatment of blemishes are key to preserving the natural allure and charm of your table’s surface.
Armed with the knowledge and techniques provided in this guide, you are well-prepared to conquer heat marks and safeguard the timeless beauty of your dining table. Embrace these insights, apply them with care and precision, and revel in the enduring splendor of your cherished furniture.
Thank you for embarking on this journey of restoration and preservation. May your dining table continue to serve as a centerpiece of warmth, hospitality, and enduring beauty in your home.
Frequently Asked Questions about How To Fix Heat Marks On A Dining Table
Was this page helpful?
At Storables.com, we guarantee accurate and reliable information. Our content, validated by Expert Board Contributors, is crafted following stringent Editorial Policies. We're committed to providing you with well-researched, expert-backed insights for all your informational needs.


0 thoughts on “How To Fix Heat Marks On A Dining Table”