Home>Furniture & Design>Living Room Furniture>How To Make A Wine Rack Out Of PVC

Living Room Furniture
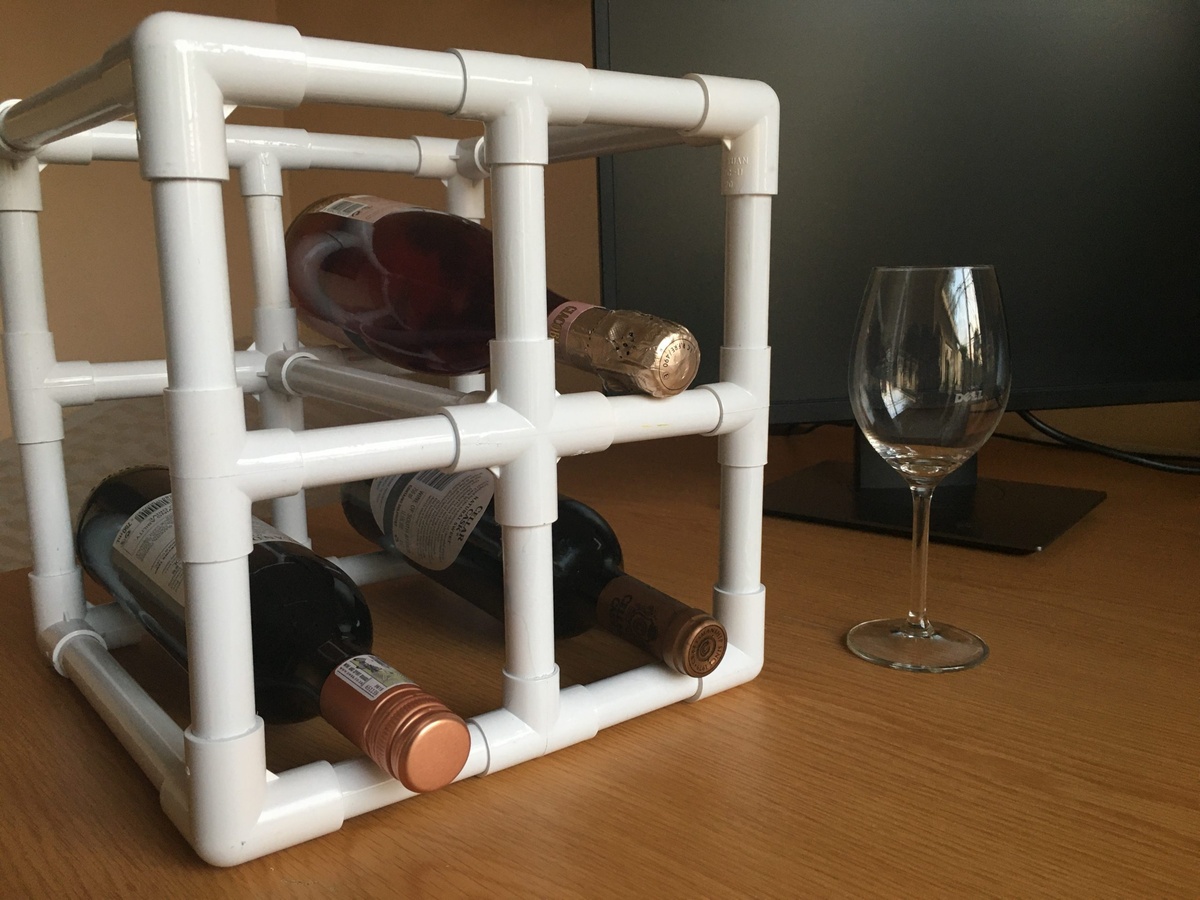
How To Make A Wine Rack Out Of PVC
Modified: October 20, 2024
Learn how to create a stylish and functional wine rack using PVC pipes for your living room furniture and design. Follow our step-by-step guide for a unique DIY project.
(Many of the links in this article redirect to a specific reviewed product. Your purchase of these products through affiliate links helps to generate commission for Storables.com, at no extra cost. Learn more)
Introduction
Welcome to the world of DIY wine rack crafting! If you're a wine enthusiast with a penchant for creativity, you're in for a treat. In this comprehensive guide, we'll delve into the art of crafting a unique wine rack using PVC pipes. Not only is this project a fantastic way to showcase your favorite vintages, but it also allows you to add a personalized touch to your living space. Whether you're a seasoned DIY aficionado or a newcomer to the world of crafting, this step-by-step tutorial will equip you with the knowledge and inspiration needed to create a stylish and functional wine rack from PVC materials.
Crafting a wine rack from PVC offers a multitude of benefits. Not only is PVC readily available and affordable, but it also provides a versatile canvas for customization. By embarking on this DIY endeavor, you'll have the opportunity to tailor the design to suit your individual style and spatial requirements. Additionally, the lightweight and durable nature of PVC makes it an ideal material for constructing a wine rack that is both practical and visually appealing.
As we embark on this creative journey, prepare to unleash your inner artisan and transform humble PVC pipes into a stunning wine storage solution. Whether you're aiming to elevate your home decor or seeking a fulfilling weekend project, this guide will empower you to bring your vision to life. So, gather your materials, roll up your sleeves, and let's dive into the art of crafting a one-of-a-kind wine rack from PVC!
Key Takeaways:
- Crafting a wine rack from PVC pipes offers a fun and affordable way to showcase your creativity while adding a personalized touch to your living space. With the right materials and tools, you can transform basic PVC pipes into a stylish and functional wine rack.
- By carefully measuring, cutting, and assembling PVC pipes, you can create a unique wine rack that reflects your individual style and craftsmanship. Adding finishing touches such as paint and mounting hardware elevates the visual appeal, making it a captivating focal point in your home.
Read more: How To Make A Wine Rack
Materials Needed
Before delving into the construction process, it’s essential to gather the necessary materials and tools for this DIY project. Here’s a comprehensive list of items you’ll need to create your PVC wine rack:
- PVC Pipes: Select high-quality PVC pipes with the desired diameter for your wine rack. The quantity will depend on the size and capacity of the rack you envision.
- Saw: A saw suitable for cutting PVC pipes is essential for achieving precise and clean cuts. Choose a saw with fine teeth to ensure smooth edges.
- Sandpaper or File: To refine the cut edges of the PVC pipes, sandpaper or a file will be indispensable for achieving a professional finish.
- Measuring Tape: Accurate measurements are crucial for ensuring that your wine rack is structurally sound and aesthetically pleasing. A reliable measuring tape will be your trusted companion throughout the crafting process.
- PVC Adhesive: Opt for a high-quality PVC adhesive to securely bond the pipes and create a sturdy framework for your wine rack.
- Level: Maintaining precision and alignment is key to the success of your wine rack. A level will help you ensure that your creation stands straight and true.
- Paint or Spray Paint: If you desire a personalized touch, paint or spray paint in your preferred color can be used to enhance the visual appeal of the wine rack.
- Sanding Sealer (Optional): For a refined and polished look, a sanding sealer can be applied to the PVC after sanding to achieve a smooth and elegant finish.
- Protective Gear: Safety should always be a priority. Equip yourself with safety glasses, gloves, and a dust mask to safeguard against potential hazards during the crafting process.
By ensuring that you have all the essential materials and tools at your disposal, you’ll be well-equipped to embark on this engaging and rewarding DIY project. With these items in hand, you’re ready to transform basic PVC pipes into a stunning wine rack that reflects your personal style and craftsmanship.
Step 1: Cutting the PVC
With your materials gathered and your creative spirit ignited, it’s time to commence the first phase of crafting your PVC wine rack. Precision is paramount when it comes to cutting the PVC pipes, as accurate measurements and clean cuts will lay the foundation for a structurally sound and visually appealing wine rack.
Begin by measuring the PVC pipes to the desired lengths, taking into account the dimensions of the wine rack you envision. Utilize a measuring tape to ensure accuracy, and mark the cutting points with a pencil or a marker. Whether you prefer a compact countertop wine rack or a sprawling wall-mounted display, meticulous measurements will be instrumental in realizing your design.
Once the cutting points are marked, carefully use a saw specifically designed for cutting PVC pipes to execute the cuts. It’s advisable to employ a saw with fine teeth to facilitate smooth and precise cuts, ensuring that the edges are clean and free from roughness. Exercise caution and patience during this process to achieve the desired results.
After the initial cuts are made, employ sandpaper or a file to refine the edges of the PVC pipes. This step is crucial for achieving a professional finish and ensuring that the pipes fit together seamlessly during the assembly phase. By smoothing the edges, you’ll not only enhance the aesthetic appeal of the wine rack but also contribute to its structural integrity.
Throughout the cutting process, prioritize safety by wearing protective gear, including safety glasses, gloves, and a dust mask. By taking these precautions, you’ll safeguard against potential hazards and ensure a secure and enjoyable crafting experience.
As you complete the cutting phase, take pride in the precision and care invested in preparing the PVC pipes for assembly. With this crucial step accomplished, you’re now ready to progress to the next stage of constructing your personalized PVC wine rack.
When making a wine rack out of PVC, make sure to measure and cut the PVC pipes accurately to ensure a snug fit for the wine bottles. Sand the edges of the pipes to smooth out any rough spots and prevent scratching the bottles.
Step 2: Assembling the Wine Rack
With the PVC pipes expertly cut and prepared, it’s time to embark on the exhilarating phase of assembling your custom wine rack. This pivotal stage will bring your vision to life as the individual components harmoniously unite to form a functional and visually striking piece of decor.
Begin by arranging the cut PVC pipes according to your design blueprint, ensuring that the dimensions and layout align with your intended wine rack configuration. Whether you envision a vertical, horizontal, or modular design, meticulous planning at this stage will lay the groundwork for a seamless assembly process.
Next, apply a high-quality PVC adhesive to the contact points of the PVC pipes, ensuring secure and durable bonds. Exercise precision and care during this step, as the adhesive will play a crucial role in fortifying the structural integrity of your wine rack. As you join the pipes together, maintain alignment and use a level to confirm that the rack stands straight and true.
As the components come together, take a moment to admire the evolving form of your wine rack. Whether you opt for a minimalist or elaborate design, the assembly phase offers an opportunity to witness your creative vision materialize into a tangible and functional piece of furniture.
If you desire a personalized aesthetic, consider applying paint or spray paint to the assembled wine rack, infusing it with your preferred color scheme to complement your living space. This customization step adds a unique touch to your creation, allowing you to tailor the wine rack to suit your individual style and decor preferences.
Upon completing the assembly and potential customization, take a step back and revel in the satisfaction of witnessing your PVC wine rack take shape. The successful execution of this phase brings you one step closer to showcasing your cherished wine collection in a handcrafted display that reflects your creativity and craftsmanship.
With the assembly phase accomplished, you’ve transformed basic PVC pipes into a captivating wine rack that exudes both functionality and aesthetic allure. As you prepare to add the finishing touches, revel in the sense of accomplishment that accompanies the realization of your DIY masterpiece.
Step 3: Adding the Finishing Touches
As your PVC wine rack nears completion, the addition of finishing touches will elevate its visual appeal and contribute to a polished and refined aesthetic. This phase offers an opportunity to refine the details and impart a personalized flair to your handcrafted creation, ensuring that it seamlessly integrates into your living space.
If you’ve opted for a painted finish, consider applying a coat of sanding sealer to the PVC surfaces after the paint has dried. This additional step will contribute to a smooth and elegant finish, imbuing your wine rack with a refined allure. By meticulously attending to these details, you’ll enhance the overall presentation of your wine rack.
For wall-mounted wine racks, mounting hardware is essential for secure installation. Select appropriate hardware based on the weight and dimensions of your wine rack, ensuring that it is robust and compatible with the mounting surface. By prioritizing safety and stability, you’ll confidently display your wine collection while enhancing the visual impact of your living space.
Upon completing the finishing touches, take a moment to assess the overall presentation of your PVC wine rack. Consider its placement within your home, envisioning how it will complement the surrounding decor and accentuate the allure of your cherished wine collection. Whether it graces a countertop, adorns a wall, or occupies a designated alcove, your handcrafted wine rack is poised to become a captivating focal point in your living space.
Finally, celebrate the culmination of your DIY journey as you admire the transformation of basic PVC pipes into a functional and visually stunning wine rack. Revel in the satisfaction of infusing your living space with a touch of your creativity and craftsmanship, and anticipate the enlivened ambiance that your personalized wine rack will impart to your home.
With the finishing touches applied, your PVC wine rack is primed to showcase your favorite vintages in a captivating display that reflects your unique style and ingenuity. As you prepare to integrate this bespoke creation into your living space, take pride in the artistry and dedication that have culminated in the realization of your handcrafted wine rack.
Read more: How To Make A PVC Pipe Towel Rack
Conclusion
Embarking on the journey of creating a wine rack from PVC has not only empowered you to craft a functional and visually striking piece of furniture but has also provided an avenue for self-expression and creativity. Through meticulous planning, precision, and a touch of artistry, you’ve transformed humble PVC pipes into a personalized wine storage solution that harmonizes with your living space.
As you reflect on the process, consider the satisfaction derived from witnessing your vision materialize into a tangible and functional piece of decor. Your dedication to precision during the cutting phase, the artful assembly of components, and the thoughtful addition of finishing touches have collectively contributed to the realization of a bespoke wine rack that stands as a testament to your craftsmanship.
Moreover, the versatility of PVC as a crafting material has allowed you to tailor the design to suit your individual style and spatial requirements. Whether you’ve opted for a compact countertop wine rack, an expansive wall-mounted display, or a modular configuration, your personalized creation serves as a reflection of your discerning taste and innovative spirit.
By infusing your living space with a handcrafted wine rack, you’ve not only elevated the presentation of your cherished wine collection but have also imbued your home with a touch of artistry and individuality. The seamless integration of your PVC wine rack into your living space promises to enliven the ambiance and serve as a captivating focal point that sparks conversation and admiration.
As you embrace the presence of your handcrafted wine rack, take pride in the artistry and dedication that have culminated in its creation. Your DIY journey has not only yielded a functional and visually appealing piece of furniture but has also enriched your living space with a touch of your creativity and ingenuity.
With your PVC wine rack poised to showcase your favorite vintages in a captivating display, revel in the fulfillment of this DIY endeavor. Your creation stands as a testament to your ability to transform basic materials into a personalized masterpiece, infusing your living space with a touch of artistry and individuality.
Cheers to the culmination of your PVC wine rack crafting journey, and may your handcrafted creation continue to enrich your living space with its functional elegance and bespoke allure.
Frequently Asked Questions about How To Make A Wine Rack Out Of PVC
Was this page helpful?
At Storables.com, we guarantee accurate and reliable information. Our content, validated by Expert Board Contributors, is crafted following stringent Editorial Policies. We're committed to providing you with well-researched, expert-backed insights for all your informational needs.









0 thoughts on “How To Make A Wine Rack Out Of PVC”