Home>Furniture & Design>Outdoor Furniture>How To Build Your Own Outdoor Sauna
Outdoor Furniture
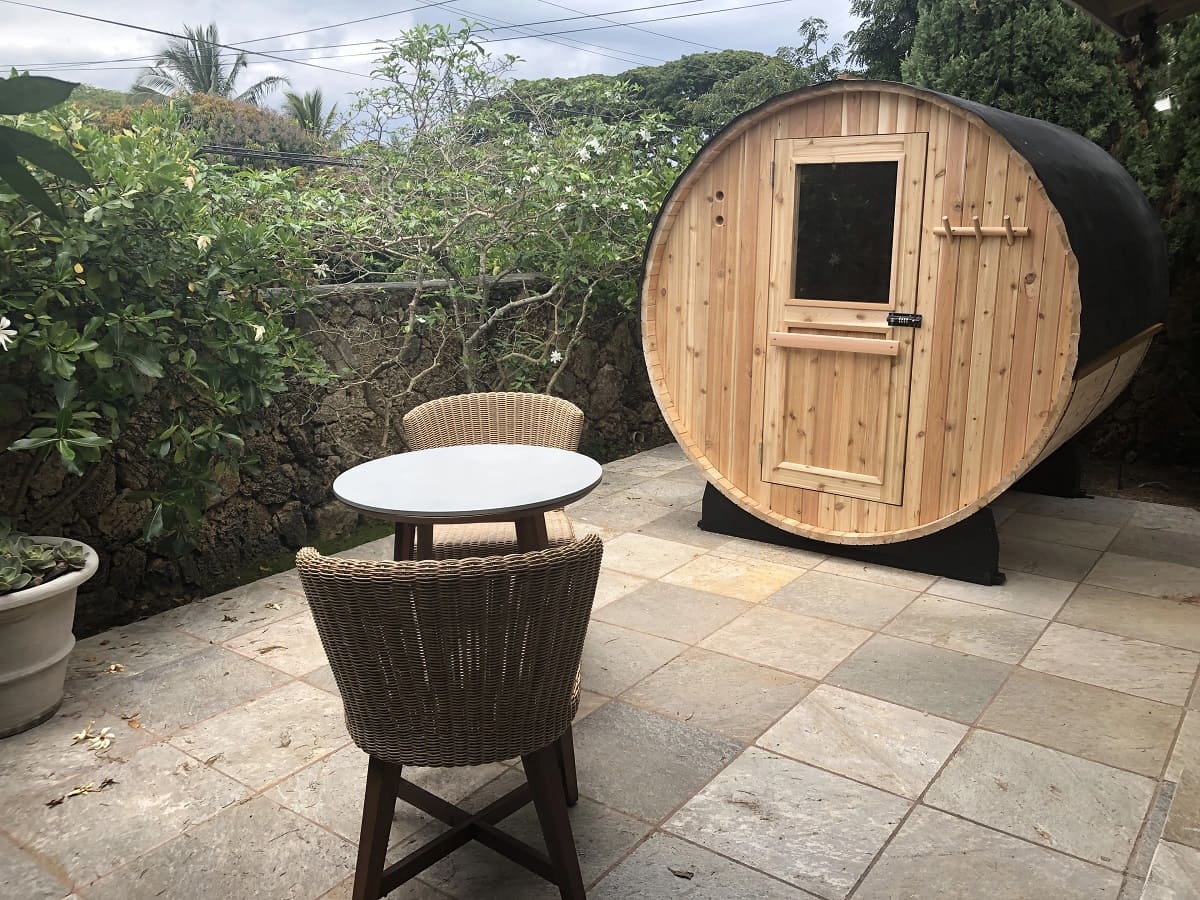
How To Build Your Own Outdoor Sauna
Modified: August 28, 2024
Learn how to build your own outdoor sauna with our expert tips and design ideas. Create a relaxing and luxurious space with our outdoor furniture and design inspiration.
(Many of the links in this article redirect to a specific reviewed product. Your purchase of these products through affiliate links helps to generate commission for Storables.com, at no extra cost. Learn more)
Introduction
Are you ready to elevate your outdoor living experience with a touch of luxury and relaxation? Building your own outdoor sauna can be a rewarding and rejuvenating project that brings the spa experience right to your backyard. Whether you're a seasoned DIY enthusiast or a first-time builder, creating your own outdoor sauna is an achievable endeavor that promises a multitude of health benefits and a tranquil retreat from the hectic pace of modern life.
In this comprehensive guide, we'll walk you through the step-by-step process of constructing your very own outdoor sauna. From selecting the perfect location to assembling the necessary materials and tools, and from building the frame to adding the finishing touches, we'll cover every aspect of this exciting project. By the end of this journey, you'll be equipped with the knowledge and confidence to embark on this fulfilling endeavor, turning your outdoor space into a sanctuary of wellness and relaxation.
So, roll up your sleeves, gather your tools, and get ready to embark on a rewarding adventure that will not only enhance your property but also provide you with a serene escape to unwind and rejuvenate. Let's dive into the details of how to transform your outdoor space into a haven of warmth and tranquility with your very own custom-built outdoor sauna.
Key Takeaways:
- Building your own outdoor sauna is a rewarding DIY project that brings luxury and relaxation to your backyard. It offers health benefits and a tranquil retreat from modern life.
- Choosing the right location, gathering materials and tools, and adding finishing touches are crucial steps in creating a personalized and rejuvenating outdoor sauna experience.
Choosing the Right Location
Before you start building your outdoor sauna, it’s crucial to carefully select the ideal location for this relaxing retreat. Consider placing your sauna in a spot that offers a balance of convenience, aesthetics, and functionality. Here are some essential factors to keep in mind as you choose the perfect location:
- Accessibility: Select a location that is easily accessible from your home, yet provides a sense of seclusion and privacy. This will ensure that you can effortlessly slip away to your sauna for a rejuvenating session without feeling too far removed from the comforts of your home.
- Level Ground: Look for a spot with level ground to serve as the foundation for your sauna. This will simplify the construction process and ensure that your sauna is stable and secure.
- Proximity to Utilities: If you plan to incorporate amenities such as electricity or water into your sauna, consider the proximity to these utilities when choosing a location. This will make the installation of these features more convenient.
- Natural Surroundings: Embrace the beauty of your outdoor space by selecting a location that offers pleasant views and a connection to nature. Whether it’s a serene garden, a tranquil wooded area, or a picturesque view, the surroundings can enhance the overall experience of your outdoor sauna.
- Consider Sun and Shade: Think about the sun’s position throughout the day and the shade patterns in your outdoor space. While some may prefer abundant natural light, others may desire a more shaded and cool environment for their sauna. Find a balance that suits your preferences.
By taking these factors into account, you can ensure that your outdoor sauna is situated in an optimal location that harmonizes with your lifestyle and maximizes the enjoyment of this relaxing retreat.
Gathering Materials and Tools
Embarking on the construction of your outdoor sauna requires a thoughtful approach to gathering the necessary materials and tools. By ensuring that you have everything you need at the outset, you can streamline the building process and minimize potential delays. Here’s a comprehensive list of the materials and tools you’ll need to bring your outdoor sauna to life:
Materials
- Wood: Select high-quality, durable wood for the construction of the sauna frame and interior. Cedar and redwood are popular choices due to their natural resistance to moisture and decay.
- Sauna Heater: Choose a reliable sauna heater that suits the size of your sauna and provides efficient heat distribution. Electric and wood-burning heaters are common options.
- Insulation: Invest in proper insulation materials to ensure that your sauna retains heat effectively. Mineral wool or fiberglass insulation are commonly used for this purpose.
- Bench Materials: Consider the wood or material for constructing the benches inside the sauna. Opt for materials that are comfortable, durable, and resistant to moisture.
- Interior Finishes: Plan for interior finishes such as sauna oil or stain to protect the wood and enhance its natural beauty.
- Door and Windows: If desired, select a suitable sauna door and windows to complement the design and functionality of your outdoor sauna.
- Hardware and Fasteners: Gather screws, nails, hinges, and other necessary hardware for assembling the sauna frame and securing components.
Tools
- Saw: A circular saw or a miter saw for cutting wood to the required dimensions.
- Drill: A power drill with various drill bits for creating holes and securing fasteners.
- Level: Ensure the precision of your construction with a reliable level for straight and balanced assembly.
- Tape Measure: Accurate measurements are essential, making a quality tape measure indispensable.
- Hammer and Nails: Essential for securing components and framing the sauna structure.
- Insulation Knife: A specialized knife for cutting and shaping insulation materials to fit the sauna walls and ceiling.
- Paintbrushes and Rollers: For applying interior finishes and protective coatings.
By gathering these materials and tools, you’ll be well-prepared to commence the construction of your outdoor sauna, ensuring a smooth and efficient building process.
Read more: How To Build Your Own Bathroom Vanity
Building the Sauna Frame
With the materials and tools at the ready, it’s time to embark on the exciting phase of constructing the sauna frame. This foundational step forms the skeleton of your outdoor sauna, providing the structure upon which the rest of the sauna will be built. Follow these steps to build the sauna frame with precision and care:
1. Prepare the Foundation:
Ensure that the ground where the sauna will be placed is level and stable. Lay the foundation, which may consist of concrete footings, deck blocks, or a solid base to support the sauna structure.
2. Cut and Assemble the Frame:
Measure and cut the wood to the required dimensions for the sauna walls, ceiling, and entrance. Assemble the frame using the appropriate fasteners, ensuring that the structure is sturdy and well-aligned. Pay attention to creating a secure and square frame, as this will serve as the foundation for the rest of the sauna components.
3. Install the Wall and Ceiling Boards:
Once the frame is assembled, begin attaching the wall and ceiling boards to enclose the sauna. Use tongue-and-groove boards for a tight and secure fit, creating a cozy and visually appealing interior. Leave space for the sauna door and any desired windows, ensuring that the openings are properly framed.
Read more: How To Design And Build Your Own Home
4. Ventilation and Air Circulation:
Consider the placement of vents to facilitate air circulation within the sauna. Proper ventilation is essential for maintaining a comfortable and safe sauna environment. Install vents near the floor and ceiling to promote airflow and prevent the buildup of excess heat and moisture.
By meticulously constructing the sauna frame and paying attention to detail, you’ll lay the groundwork for a durable, well-ventilated, and inviting outdoor sauna that promises years of relaxation and rejuvenation.
Installing the Sauna Heater
With the sauna frame in place, the next crucial step is the installation of the sauna heater. The heater is the heart of the sauna, responsible for generating the comforting warmth that envelops the space, creating a therapeutic environment for relaxation and rejuvenation. Follow these essential steps to install the sauna heater with precision and ensure optimal functionality:
1. Heater Selection:
Choose a sauna heater that is well-suited to the size of your sauna and operates efficiently. Consider factors such as the type of heater, whether electric or wood-burning, and ensure that it complies with safety standards and regulations.
2. Positioning the Heater:
Select an appropriate location for the sauna heater within the sauna space. Ensure that it is positioned at a safe distance from the walls and any combustible materials. Follow the manufacturer’s guidelines for the recommended clearances and installation requirements.
Read more: How To Start Building Your Own Home
3. Electrical Considerations:
If you opt for an electric sauna heater, ensure that the electrical connections are carried out by a qualified electrician to guarantee safety and compliance with local building codes. If a wood-burning heater is chosen, ensure that the chimney or venting system complies with regulations and provides effective smoke exhaust.
4. Ventilation and Heat Distribution:
Consider the placement of the heater in relation to the sauna benches to ensure even heat distribution. Additionally, ensure that the sauna’s ventilation system complements the heater’s output, allowing for the efficient circulation of heat and maintaining a comfortable and invigorating sauna experience.
5. Safety Precautions:
Prioritize safety by installing a protective guard around the heater to prevent accidental contact and burns. Educate yourself and potential users about the safe operation and maintenance of the sauna heater to prevent accidents and ensure a secure and enjoyable sauna experience.
By meticulously installing the sauna heater and adhering to safety guidelines, you’ll create a welcoming and therapeutic sauna environment that invites you to unwind and indulge in the soothing warmth of your outdoor retreat.
Adding the Benches and Interior
As the construction of your outdoor sauna progresses, it’s time to focus on adding the essential elements that will enhance the comfort and functionality of the space. The installation of benches and the interior components will transform your sauna into a cozy and inviting haven for relaxation. Follow these steps to create a serene and comfortable interior for your outdoor sauna:
Read more: How To Build Your Own Steam Shower
1. Bench Placement and Construction:
Position the benches within the sauna to maximize space and accommodate the desired number of users. Construct the benches using the chosen materials, ensuring that they are sturdy, comfortable, and resistant to the heat and moisture present in the sauna environment.
2. Consider Tiered Seating:
If space allows, consider incorporating tiered seating to provide different levels of heat exposure. This allows users to choose their preferred level of warmth, with higher benches experiencing more heat and lower benches offering a cooler experience.
3. Interior Finishes:
Apply sauna oil or stain to the interior wood surfaces, protecting them from the effects of heat and moisture while enhancing the natural beauty of the wood. This step also adds a pleasing aroma to the sauna space, contributing to the overall sensory experience.
4. Lighting and Accessories:
Install soft, ambient lighting within the sauna to create a tranquil atmosphere. Consider the placement of accessories such as a sauna bucket and ladle, essential for generating steam when water is ladled onto the sauna heater’s rocks, enhancing the sauna experience.
Read more: How To Build Your Own Patio Furniture
5. Personal Touches:
Add personal touches to the interior, such as a clock, thermometer, or other elements that contribute to the functionality and ambiance of the sauna. Consider the placement of hooks or shelves for towels and robes, ensuring convenience and comfort for sauna users.
By meticulously attending to the placement of benches, the application of interior finishes, and the addition of thoughtful accessories, you’ll create an inviting and tranquil interior for your outdoor sauna, setting the stage for moments of relaxation and rejuvenation.
Insulating and Sealing the Sauna
As you near the completion of your outdoor sauna construction, it’s essential to focus on insulating and sealing the space to ensure optimal heat retention, energy efficiency, and a comfortable sauna experience. Proper insulation and sealing measures will contribute to a cozy and inviting sauna environment. Follow these essential steps to insulate and seal your outdoor sauna:
1. Insulation Installation:
Install high-quality insulation material within the sauna walls and ceiling to minimize heat loss and ensure efficient heat retention. Common insulation materials for saunas include mineral wool or fiberglass, chosen for their thermal properties and resistance to moisture.
2. Vapor Barrier Application:
Apply a vapor barrier over the insulation to prevent moisture from penetrating the sauna walls and causing damage. This barrier helps maintain a dry and comfortable sauna environment while protecting the structure from the effects of humidity and condensation.
Read more: How To Build Your Own Water Fountain
3. Sealing Joints and Gaps:
Seal any gaps or joints in the sauna walls and ceiling to prevent heat leakage and maintain a consistent and comfortable temperature within the sauna. Use a suitable sealant to ensure a tight and secure seal, paying attention to areas around windows, doors, and vents.
4. Door and Window Seals:
Install seals around the sauna door and any windows to prevent heat loss and maintain a well-insulated environment. Ensure that the seals provide a tight closure, effectively containing the heat within the sauna space.
5. Exterior Finishing:
Consider the exterior finishing of the sauna to protect it from the elements. Apply a weather-resistant sealant or paint to the exterior wood surfaces, safeguarding the sauna against moisture and ensuring its longevity and durability.
By meticulously insulating and sealing the sauna, you’ll create an environment that retains heat efficiently, promotes energy efficiency, and provides a comfortable and inviting space for relaxation and rejuvenation. These measures will contribute to the longevity and functionality of your outdoor sauna, ensuring a rewarding and therapeutic experience for years to come.
Finishing Touches
As you approach the completion of your outdoor sauna construction, it’s time to focus on the finishing touches that will elevate the aesthetics, functionality, and overall appeal of the space. These final details will add character and comfort to your sauna, creating a welcoming environment for relaxation and rejuvenation. Follow these essential steps to add the finishing touches to your outdoor sauna:
Read more: How To Build A Sauna In Basement
1. Interior and Exterior Lighting:
Install soft, ambient lighting within the sauna to create a tranquil atmosphere. Consider the placement of exterior lighting around the sauna to enhance its visual appeal and ensure safety during evening use.
2. Sauna Accessories:
Add essential accessories such as a sauna bucket and ladle, allowing users to generate steam by ladling water onto the sauna heater’s rocks. Consider the inclusion of a thermometer to monitor the sauna’s temperature, enhancing the overall sauna experience.
3. Comfort Elements:
Enhance the comfort of the sauna by adding hooks or shelves for towels and robes. Consider the inclusion of a bench cushion for added comfort during sauna sessions, ensuring a relaxing and enjoyable experience for users.
4. Landscaping and Privacy:
Surround the sauna with landscaping elements to create a serene and secluded environment. Incorporate plants, shrubs, or a privacy screen to enhance the ambiance and provide a sense of tranquility and privacy for sauna users.
Read more: How To Build Your Own Home Security System
5. Personalization:
Add personal touches to the sauna space, such as artwork, decorative elements, or a custom sign, infusing the space with your unique style and personality. These personal touches contribute to a sense of ownership and create a welcoming and inviting environment for relaxation.
By attending to these finishing touches, you’ll transform your outdoor sauna into a captivating and inviting retreat, offering a sanctuary for relaxation and rejuvenation. These final details will enhance the functionality, comfort, and visual appeal of your outdoor sauna, ensuring a rewarding and therapeutic experience for years to come.
Conclusion
Congratulations on successfully completing the construction of your very own outdoor sauna! This transformative project has not only added a luxurious and rejuvenating element to your outdoor space but has also provided you with a serene retreat to unwind and recharge. As you reflect on the journey of building your outdoor sauna, it’s important to recognize the numerous benefits and the sense of accomplishment that this endeavor has brought into your life.
By carefully choosing the ideal location, gathering the necessary materials and tools, and meticulously constructing each component of the sauna, you’ve created a space that embodies comfort, relaxation, and wellness. The sauna’s warmth and inviting ambiance offer a sanctuary where you can escape the stresses of daily life and indulge in moments of tranquility and rejuvenation.
As you bask in the soothing heat of your outdoor sauna, surrounded by the natural beauty of your surroundings, you’ll find that this space becomes a cherished retreat for personal reflection, relaxation, and connection with nature. The therapeutic benefits of regular sauna use, including stress reduction, improved circulation, and muscle relaxation, are now easily accessible in the comfort of your own backyard.
Furthermore, the completion of this project has not only added value to your property but has also created a space for cherished moments with family and friends. Whether it’s a tranquil solo session or a shared experience with loved ones, your outdoor sauna will undoubtedly become a centerpiece for relaxation and rejuvenation in your life.
As you embark on this new chapter of enjoying your outdoor sauna, remember to prioritize safety, proper maintenance, and responsible usage to ensure a rewarding and enduring experience. Embrace the warmth, tranquility, and wellness that your outdoor sauna brings, and relish in the countless moments of relaxation and rejuvenation that await you in this captivating oasis.
Cheers to your successful outdoor sauna project, and here’s to many years of blissful relaxation and wellness in your own backyard sanctuary!
Frequently Asked Questions about How To Build Your Own Outdoor Sauna
Was this page helpful?
At Storables.com, we guarantee accurate and reliable information. Our content, validated by Expert Board Contributors, is crafted following stringent Editorial Policies. We're committed to providing you with well-researched, expert-backed insights for all your informational needs.


0 thoughts on “How To Build Your Own Outdoor Sauna”