Home>Garden Essentials>How To Grow A Watermelon From A Seed
Garden Essentials
How To Grow A Watermelon From A Seed
Modified: August 20, 2024
Learn how to grow a watermelon from a seed in your garden with our step-by-step guide. Start your own backyard fruit harvest today!
(Many of the links in this article redirect to a specific reviewed product. Your purchase of these products through affiliate links helps to generate commission for Storables.com, at no extra cost. Learn more)
Introduction to Growing Watermelons
Welcome to the wonderful world of watermelon cultivation! Growing your own watermelons can be a rewarding and delicious experience. Whether you have a spacious garden or a small balcony, you can easily grow these juicy fruits from seeds and enjoy the taste of summer right in your own backyard. In this guide, we will walk you through the process of growing watermelons, from selecting the right seeds to harvesting and enjoying your bountiful harvest.
Watermelons, scientifically known as Citrullus lanatus, are native to Africa and belong to the Cucurbitaceae family, along with cucumbers and pumpkins. They are renowned for their vibrant red or yellow flesh, high water content, and refreshing sweetness. With a little preparation and care, you can grow watermelons that are even more delicious than those found in grocery stores.
The first step in the journey of growing watermelons is selecting the right seeds. There are various types of watermelons, ranging from mini-sized varieties to large, juicy ones. Consider factors such as the available space in your garden, the amount of sunlight it receives, and your personal preference for taste and size. You can find watermelon seeds at local nurseries, gardening stores, or even purchase them online.
Before planting your watermelon seeds, it’s essential to prepare the soil properly. Watermelons thrive in well-draining soil, rich in organic matter. Begin by clearing the area of any weeds or debris. Loosen the soil to a depth of around 12 inches and mix in compost or well-rotted manure to improve fertility. This will ensure that your watermelon plants have the nutrients they need to grow strong and healthy.
When it comes to planting watermelon seeds, timing is crucial. Watermelons are warm-season crops that require temperatures above 70°F (21°C) to germinate successfully. In most regions, it’s best to start planting the seeds outdoors after the last frost date, when the soil has warmed up. If you live in a colder climate, you can get a head start by starting your seeds indoors about 2-4 weeks before the last frost. Sow the seeds about 1 inch deep and keep the soil consistently moist.
Watermelons thrive in full sunlight, so choose a location in your garden that receives at least 6-8 hours of direct sunlight each day. As your watermelon seedlings start to grow, make sure to provide them with ample water. Watermelons have deep roots, so it’s important to water them deeply but infrequently to encourage root growth. Aim to keep the soil evenly moist, but avoid overwatering, as it can lead to root rot.
While growing watermelons, it’s important to keep an eye out for weeds and pests. Weeds can compete with watermelon plants for nutrients and water, so regular weeding is essential. You can also use organic mulch, such as straw or grass clippings, to suppress weeds and retain moisture in the soil. As for pests, common culprits include aphids, squash bugs, and cucumber beetles. Monitor your plants regularly and take appropriate measures to control any pest infestation.
As your watermelon vines start to grow, it’s a good idea to prune and train them. This will help improve air circulation, prevent diseases, and promote better fruit development. Remove any lateral shoots and pinch off the growing tips of the main vine once it reaches about 10-12 feet in length. You can also use trellises or stakes to support the heavy fruit and keep it off the ground, reducing the risk of rotting.
Knowing when to harvest your watermelons is crucial for enjoying them at their peak. A ripe watermelon will have a dull skin color, a hollow sound when tapped, and a dry, curled tendril near the stem. Additionally, the underside of the watermelon should have a creamy yellow color. Harvesting at the right time ensures maximum sweetness and juiciness.
Once you have harvested your watermelons, store them in a cool, dry place for a few days to allow them to fully ripen. Then, it’s time to slice into the luscious fruit and enjoy the sweet reward of your hard work! Watermelons can be eaten fresh, used in fruit salads, or even blended into refreshing beverages.
Growing your own watermelons is a fulfilling experience that allows you to savor the flavors of summer while connecting with nature. With a little patience, care, and the tips shared in this guide, you’ll soon be harvesting delicious watermelons straight from your garden. So, roll up your sleeves, get your hands dirty, and embark on the journey to grow your own juicy watermelon paradise!
Key Takeaways:
- Growing watermelons requires patience, care, and attention to detail. From selecting the right seeds to harvesting at peak ripeness, the process is a rewarding journey of nurturing and enjoying the fruits of your labor.
- By properly preparing the soil, providing adequate water and sunlight, managing weeds and pests, and recognizing signs of ripeness, you can grow and harvest delicious, juicy watermelons right in your own backyard.
Read more: How Long To Grow Watermelon From Seed
Selecting the Right Watermelon Seeds
When it comes to growing watermelons, selecting the right seeds is a crucial step that can greatly impact the success of your harvest. With so many different varieties available, it’s important to consider various factors such as taste preference, size, and growing conditions before making a decision. Here are some tips to help you choose the perfect watermelon seeds for your garden.
1. Consider the Size: Watermelons come in a range of sizes, from small mini-watermelons to large, juicy varieties. Think about your available space and how many watermelons you want to grow. If you have a small garden or limited space, it might be more practical to opt for smaller-sized watermelons that require less room to thrive.
2. Determine the Flavor: Watermelons can have different flavor profiles, ranging from incredibly sweet and juicy to more subtle and refreshing. Consider your personal taste preference and the preferences of those who will be enjoying the watermelons. Some popular watermelon flavors include the classic sweet and sugary taste, crisp and mild flavor, or even a tangy and tropical twist.
3. Check Days to Maturity: Watermelon varieties have varying maturity times, with some taking as short as 70 days and others up to 100 days or more. Pay attention to the days to maturity listed on the seed packet or product description. Choose a variety that aligns with your climate and growing season length. If you live in a region with a shorter growing season, opt for quicker maturing varieties to ensure a successful harvest.
4. Consider Your Climate: Watermelons thrive in warm climates with temperatures ranging between 70°F (21°C) and 85°F (29°C). Some varieties are more heat-tolerant than others, so consider the climate conditions in your area. If you live in a region with hot summers, choose heat-tolerant varieties that can withstand high temperatures and still produce delicious fruit.
5. Disease Resistance: Watermelons can be susceptible to diseases such as powdery mildew, fusarium wilt, and anthracnose. Check the seed packet or product description for any disease resistance information. Choosing disease-resistant varieties can help minimize the risk of your plants succumbing to common watermelon diseases, increasing your chances of a successful harvest.
6. Seedless or Seeded: Watermelons come in both seedless and seeded varieties. Seedless watermelons are a popular choice for their convenience, as they eliminate the need to deal with seeds while eating. However, they require pollination from seeded watermelon plants to produce fruit. If you prefer seeded watermelons or want to save seeds for future plantings, opt for seeded varieties.
7. Organic or Conventional Seeds: Consider whether you want to grow watermelons from organic or conventional seeds. Organic seeds are produced without the use of synthetic pesticides or fertilizers, adhering to organic farming standards. If you prioritize organic gardening methods or prefer to avoid genetically modified varieties, look for certified organic watermelon seeds.
8. Read Reviews and Recommendations: Before making your final decision, read reviews and recommendations from other gardeners or experts. Look for feedback on taste, yield, disease resistance, and overall performance of specific watermelon varieties. This can provide valuable insights and help you make an informed choice based on the experiences of others.
Remember, growing watermelons from seeds requires patience and care. By selecting the right seeds that align with your preferences and growing conditions, you are setting yourself up for a successful and enjoyable watermelon-growing experience. So take your time, do your research, and get ready to grow delicious, juicy watermelons in your own backyard.
Preparing the Soil for Planting
Before you begin planting watermelon seeds, it’s essential to prepare the soil properly to provide the ideal growing conditions for your plants. Watermelons thrive in well-drained soil that is rich in organic matter, as it provides the necessary nutrients and moisture retention capacity for healthy growth. Here are some steps to help you prepare your soil for planting watermelon:
1. Clearing the Area: Start by clearing the planting area of any weeds, rocks, or debris. Weeds can compete with watermelon plants for nutrients and water, so it’s important to remove them before planting. Clearing the area will also help create a clean and organized space for your watermelon plants to grow.
2. Testing the Soil: Testing the soil can give you valuable information about its pH level and nutrient content. Watermelons thrive in soil with a pH range of 6.0 to 6.8. You can purchase a soil testing kit from a garden center or send a soil sample to a professional laboratory for analysis. Based on the results, you may need to amend the soil to adjust its pH or nutrient levels.
3. Loosening the Soil: Watermelon plants have deep roots, so it’s important to create loose and well-drained soil to allow their roots to penetrate easily. Use a garden fork or a tiller to loosen the soil to a depth of around 12 inches (30 cm). Breaking up any compacted soil will improve aeration, drainage, and root development.
4. Adding Organic Matter: Watermelons appreciate soil that is rich in organic matter, such as compost or well-rotted manure. Organic matter helps improve soil structure, provides essential nutrients, and enhances water retention capacity. Spread a layer of 2-3 inches (5-8 cm) of organic matter on top of the loosened soil and incorporate it by gently tilling or digging it into the soil.
5. Fertilizing the Soil: Watermelons are heavy feeders and benefit from a nutrient-rich soil. Before planting, apply a balanced, slow-release fertilizer following the manufacturer’s instructions. This will provide your watermelon plants with the necessary nutrients for healthy growth and fruit production. Avoid using excessive amounts of fertilizer as it can lead to burns and nutrient imbalances.
6. Mulching the Soil: Mulching is a beneficial practice that helps to retain soil moisture, suppress weeds, and regulate soil temperature. After planting your watermelon seeds, apply a layer of organic mulch, such as straw or grass clippings, around the base of the plants. This will help conserve moisture in the soil and reduce competition from weeds.
7. Irrigation Preparation: Watermelons require consistent moisture, especially during their growing and fruiting stages. Before planting, make sure you have a reliable irrigation system in place. Consider using a drip irrigation system to provide water directly to the roots, minimizing water loss through evaporation and reducing the risk of fungal diseases.
By taking the time to properly prepare the soil, you are setting your watermelon plants up for success. The loose, nutrient-rich soil will allow their roots to grow deep and access the necessary moisture and nutrients. Remember to maintain regular soil maintenance throughout the growing season, including regular weeding, watering, and fertilizing. With a well-prepared soil foundation, your watermelon plants will thrive and reward you with a bountiful harvest of delicious and juicy fruits.
Planting Watermelon Seeds
Now that your soil is prepared, it’s time to sow your watermelon seeds and begin the exciting journey of growing your own juicy watermelons. Proper planting techniques and considerations can greatly impact the success of your watermelon crop. Here’s a step-by-step guide to help you plant your watermelon seeds:
1. Determine the Planting Location: Choose a sunny spot in your garden that receives at least 6-8 hours of direct sunlight each day. Watermelons thrive in warm temperatures, so selecting a location with good sun exposure is crucial for their growth and fruit development.
2. Plan Plant Spacing: Watermelon vines require ample space to spread and grow. Plan for proper spacing between each plant to prevent overcrowding and ensure proper airflow. Leave around 3-4 feet (0.9-1.2 meters) between each watermelon plant, and allow for 6-8 feet (1.8-2.4 meters) between rows.
3. Create Planting Mounds: Watermelons prefer well-drained soil and can benefit from planting on raised mounds. Form small mounds or hills of soil that are about 12 inches (30 cm) in diameter and 6 inches (15 cm) tall. This will help improve soil drainage and warm up the soil faster, promoting better seed germination.
4. Sow the Seeds: Dig a small hole in the center of each mound to a depth of about 1 inch (2.5 cm). Place 2-3 watermelon seeds in each hole and cover them with soil. Firmly press down on the soil to ensure good seed-to-soil contact. If you’re planting multiple rows, space the mounds accordingly and repeat the planting process.
5. Water the Seeds: After planting, water the seeds thoroughly to moisten the soil. Be careful not to overwater, as watermelon seeds can rot in excessively damp conditions. Aim to keep the soil evenly moist, but not soaking wet, during the germination stage.
6. Protect the Seedlings: Watermelon seedlings are vulnerable to pests and harsh weather conditions. Consider using row covers or plant protection fabric to shield the seedlings from insects and provide some protection from extreme temperatures. Remove the covers once the seedlings have established and the weather has warmed up.
7. Thin the Seedlings: Once the seedlings have emerged and grown a few leaves, it’s time to thin them out. Carefully remove weaker or overcrowded seedlings so that only one healthy and vigorous seedling remains per mound. Thinning helps ensure that the remaining seedling has enough space, nutrients, and sunlight to grow into a robust plant.
8. Provide Support: As watermelon plants grow, they will produce long trailing vines that can benefit from support. Consider placing trellises, cages, or stakes near the plants to provide support and prevent the fruit from sitting directly on the ground. This helps improve air circulation, reduce the risk of rot, and make harvesting easier.
9. Maintain Care and Watering: Throughout the growing season, continue to take care of your watermelon plants by providing regular watering, especially during dry periods. Watermelons require deep, infrequent watering, so ensure the soil is evenly moist but not waterlogged. Regularly monitor the plants for any signs of pests or diseases and take appropriate action to address any issues.
10. Enjoy the Fruits of Your Labor: With proper care, your watermelon plants will produce beautiful blooms and set fruits. As the watermelons grow, you can monitor their progress and start anticipating the delicious taste of your homegrown fruits. Keep an eye on the plants, provide any necessary support, and look forward to a bountiful harvest!
Planting watermelon seeds is an exciting and fulfilling experience. With the right techniques and proper care, you can enjoy the taste of freshly grown watermelons right from your own garden.
Providing Proper Water and Sunlight
Water and sunlight are two essential factors for the successful growth of watermelon plants. Providing your plants with the right amount of water and ensuring they receive adequate sunlight is crucial for their overall health and productivity. Here are some guidelines on how to properly water and provide sunlight for your watermelon plants:
Watering:
Watermelons require consistent moisture throughout their growing season, particularly during the fruit development stage. Here are some key points to keep in mind when watering watermelon plants:
1. Deep Watering: Watermelons have deep root systems, so it’s important to water them deeply to encourage root growth. Water the plants at the base rather than overhead to minimize the risk of fungal diseases. Provide enough water to thoroughly moisten the soil to a depth of at least 6-8 inches.
2. Frequency: Watermelons prefer an even and consistent supply of water. Aim to water your plants at least once a week, or more frequently if the weather is hot and dry. Adjust the frequency based on the moisture levels of the soil. Avoid overwatering, as it can lead to root rot and other water-related issues.
3. Mulching: Applying a layer of organic mulch around the base of watermelon plants can help retain soil moisture and reduce water evaporation. Mulching also helps suppress weed growth, reducing competition for water and nutrients. Use organic materials such as straw, hay, or wood chips for effective mulching.
4. Rainwater Collection: Consider collecting rainwater to use for watering your watermelon plants. Rainwater is free from chemicals and has natural properties that benefit plant growth. Place barrels or buckets in your garden to collect rainwater and use it during dry periods, reducing your reliance on tap water.
Sunlight:
Watermelons are sun-loving plants that require ample sunlight to grow and produce sweet, juicy fruits. Here are some tips to ensure your watermelon plants receive enough sunlight:
1. Full Sun Exposure: Watermelons thrive in full sunlight, so select a planting location that receives at least 6-8 hours of direct sunlight each day. Avoid planting them in shaded areas or near tall structures that may cast shadows on the plants. Adequate sunlight is crucial for photosynthesis, fruit development, and overall plant health.
2. Orientation: When planting watermelon plants, orient them in a way that maximizes sun exposure. Place them in a north-south orientation so that the leaves receive sunlight throughout the day, avoiding any shading from neighboring plants. This helps ensure that all parts of the plant receive optimal sunlight for growth.
3. Monitor Shade Patterns: Observe the growth of nearby trees, buildings, or structures that may cast shadows on your watermelon plants. Over time, the shade pattern in your garden may change, potentially affecting the amount of sunlight your plants receive. Adjust the positioning of your plants or consider pruning or removing any shading elements if necessary.
4. Adequate Air Circulation: Along with sunlight, proper air circulation is important for watermelon plants. Good air movement helps prevent the buildup of moisture on leaves, reducing the risk of fungal diseases. Avoid overcrowding plants and ensure they have enough space around them for air to circulate freely.
Properly watering and providing adequate sunlight are key aspects of watermelon plant care. By ensuring your plants receive the right amount of water and sunlight, you’ll promote healthy growth, abundant fruit production, and ultimately, enjoy the delicious taste of homegrown watermelons. Be mindful of the specific needs of your watermelon variety and make adjustments as necessary to provide the optimal growing conditions.
Plant watermelon seeds in well-draining soil, in a sunny spot with plenty of space for the vines to spread. Keep the soil consistently moist and fertilize regularly to encourage healthy growth.
Read more: How To Save Watermelon Seeds
Managing Weeds and Pests
Keeping weeds and pests under control is essential for the successful growth of your watermelon plants. Weeds can compete for nutrients, water, and sunlight, while pests can damage foliage, flowers, and fruits. By implementing effective management strategies, you can minimize the impact of weeds and pests and ensure the health and productivity of your watermelon plants. Here are some methods to help you manage weeds and pests in your garden:
Weed Management:
1. Mulching: Applying a layer of organic mulch, such as straw, wood chips, or grass clippings, around the base of your watermelon plants can help suppress weed growth. Mulch acts as a physical barrier, preventing weeds from germinating and reducing the amount of sunlight they receive. Additionally, mulch retains soil moisture, which can deter weed growth by limiting their access to water.
2. Regular Weeding: Regularly inspect your watermelon beds and remove any emerging weeds. Be diligent in removing weeds when they are small, as they are easier to pull out and less likely to have developed strong root systems. Take care not to damage the watermelon plants while weeding, and avoid using herbicides that can harm both the weeds and your watermelon plants.
3. Hand Cultivation: Use a hand cultivator or a garden hoe to lightly cultivate the soil around your watermelon plants. This process disrupts weed seedlings and uproots small weeds. Take care not to disturb the watermelon roots in the process. Cultivation should be done when the soil is moist to minimize weed regrowth and prevent soil erosion.
4. Landscape Fabric: Another effective weed management technique is using landscape fabric or weed barrier cloth. Lay the fabric over your prepared soil, cut holes where you plan to plant your watermelon seedlings, and secure it with stakes. This fabric blocks sunlight, preventing weed growth while still allowing water to penetrate. Remember to remove the fabric once the plants are established.
Pest Management:
1. Regular Inspection: Regularly inspect your watermelon plants for any signs of pest damage. Check the leaves, stems, and fruit for unusual spots, holes, or discoloration. Early detection is crucial in preventing pests from spreading and causing significant damage. Also, monitor the undersides of leaves, as pests such as aphids and spider mites often hide there.
2. Companion Planting: Consider planting companion plants that repel common watermelon pests. For example, marigolds can deter pests like nematodes and aphids, while plants such as radishes, mint, and oregano can repel various insect pests. Research companion planting options and incorporate them strategically in and around your watermelon beds.
3. Natural Predators: Encourage natural predators such as ladybugs, lacewings, and birds to visit your garden. These beneficial insects and birds feed on common watermelon pests like aphids, caterpillars, and beetles. Planting diverse flowers, providing water sources, and avoiding the use of broad-spectrum pesticides can attract and support these natural predators.
4. Organic Pest Control: If pests become a significant problem, consider using organic pest control methods. Options include insecticidal soaps, neem oil sprays, and homemade remedies like garlic and chili pepper sprays. Always follow label instructions and use these methods sparingly and judiciously to avoid harming beneficial insects and pollinators.
5. Crop Rotation: Practice crop rotation in your garden to disrupt pest lifecycles. Avoid planting watermelons in the same location year after year. Rotating crops helps reduce the buildup of pests in the soil, as different plants have different susceptibility to specific pests. Consider rotating with non-related crops like legumes or leafy greens.
By implementing effective weed and pest management strategies, you can maintain a healthy and productive watermelon garden. Regular monitoring, timely action, and a combination of preventative and organic control methods will help keep your watermelon plants thriving while minimizing the impact of weeds and pests. Remember, a little attention and effort go a long way in ensuring a successful harvest of delicious, pest-free watermelons.
Pruning and Training Watermelon Vines
Pruning and training your watermelon vines is an important practice that can improve airflow, manage vine growth, and promote better fruit development. While watermelon plants naturally have long, sprawling vines, strategic pruning and training techniques can help optimize their growth and maximize fruit production. Here are some guidelines on how to properly prune and train your watermelon vines:
1. Removing Lateral Shoots: As your watermelon plants grow, they will produce lateral shoots or side branches. These shoots can divert energy away from the main fruiting vines and result in smaller fruits. To redirect the plant’s resources, identify and remove these lateral shoots by carefully cutting them off at the base with clean shears or scissors. This will allow more energy to be directed towards the main vines and developing fruits.
2. Pinching off the Tips: Watermelon vines have a tendency to grow vigorously, and their terminal ends can continue to elongate indefinitely. To manage vine growth and encourage lateral branching, pinch off the growing tips of the main vines once they reach about 10-12 feet (3-3.6 meters) in length. Use your fingers or pruning shears to gently remove the tip, which will help promote the development of side shoots and increase fruit production.
3. Training onto Supports: While watermelon vines naturally trail along the ground, training them onto supports can be beneficial in several ways. By elevating the vines, you can help improve air circulation, reduce the risk of diseases, and prevent fruit rot. Additionally, training watermelon vines vertically can save space in your garden and make it easier to manage and harvest the fruits.
There are a few different methods you can use to train your watermelon vines:
– Trellises: Install trellises made of sturdy materials, such as wood or metal, behind your watermelon vines. Secure the vines to the trellis using soft ties or garden twine at regular intervals. As the vines grow, gently guide them upwards, ensuring that they are supported by the trellis. Regularly check the vines and adjust their position as needed to prevent them from slipping or sagging.
– Fences: If you have a fence in your garden, you can train the watermelon vines to grow vertically along the fence. Use soft ties or garden twine to affix the vines to the fence at regular intervals. As the vines grow, guide them upwards along the fence, providing support and preventing them from spreading onto neighboring plants.
– A-Frame Structures: Construct A-frame structures using stakes or bamboo poles and attach chicken wire or trellis netting to create a supportive framework. Place the A-frames at suitable intervals in your garden and guide the watermelon vines to climb up the structure. This method works well for larger watermelon varieties that may require additional support.
While training your watermelon vines, be careful not to apply excessive pressure or bend the vines unnaturally, as this can damage them. The goal is to provide support and encourage upward growth while allowing the vines to spread naturally.
4. Pruning Suckers: Watermelon plants occasionally produce suckers, which are shoots that emerge from the base of the plant. Suckers divert nutrients from the main vines and can result in reduced fruit size and yield. Regularly monitor your plants and remove any suckers that appear at the base using clean, sharp pruning shears or scissors.
Remember, watermelon vines are vigorous and can continue to grow even after pruning and training. Regular monitoring and maintenance are essential throughout the growing season. Adjust and secure the vines as they grow, redirecting them as needed to ensure they remain trained onto supports or within the allotted space.
By implementing proper pruning and training techniques, you can optimize the growth and development of your watermelon vines. This practice not only helps manage vine growth and increase fruit production but also improves airflow and reduces the risk of diseases. So invest the time and effort in pruning and training your watermelon vines, and enjoy a more manageable and bountiful watermelon harvest.
Recognizing Signs of Ripeness
One of the most exciting moments for a watermelon grower is the anticipation of harvesting ripe and juicy fruits. To ensure that you pick your watermelons at the peak of ripeness, it’s important to know how to recognize the signs that indicate they are ready to be enjoyed. Here are some key indicators to look for when determining if your watermelons are ripe:
1. Skin Color: The skin color of a ripe watermelon can vary depending on the variety, but in general, it should have a dull or matte appearance rather than a shiny or glossy sheen. The color of the skin should also be vibrant and uniform. For example, green-skinned watermelons will turn a deeper shade of green, while yellow-skinned varieties will take on a more golden hue.
2. Spot on the Underside: Examine the underside of the watermelon, where it rests on the ground. A ripe watermelon will have a creamy yellow or light yellow spot, often referred to as the “ground spot.” This is an indication that the fruit has fully ripened and is ready to be harvested. If the spot is still green or white, it may indicate that the watermelon is not yet fully ripe.
3. Hollow Sound: Give the watermelon a gentle tap with your knuckles or palm. A ripe watermelon will produce a hollow sound, similar to tapping on a drum. If the sound is dull or muffled, it may indicate that the fruit is not yet ripe. Use this method in combination with other indicators to determine if the watermelon is ready to be harvested.
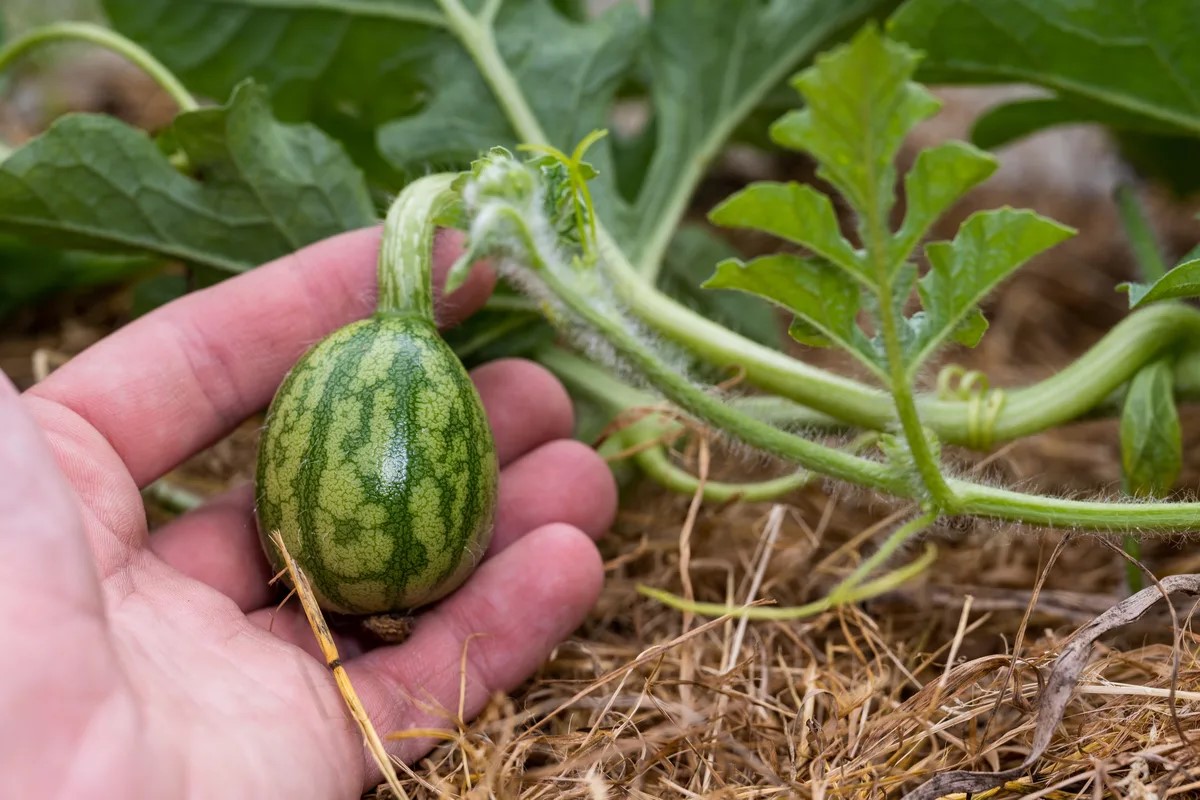
4. Tendril Dryness: Watermelon plants have curly tendrils that grow near the stem where the fruit attaches to the vine. When the watermelon is still immature, these tendrils are green and pliable. As the fruit ripens, the tendril closest to the fruit will start to dry out and turn brown. If the tendril is completely dry and shriveled, it’s a good indication that the watermelon is ripe and ready to be picked.
5. Size and Shape: Different watermelon varieties come in various sizes and shapes, so it’s helpful to know the expected size and shape of the specific variety you’re growing. Ripe watermelons should generally feel heavy for their size. The fruit should also have a symmetrical shape and no visible signs of sunken or soft spots.
6. Sugar Spots: Some watermelon varieties develop small sugar spots as they ripen. These spots are caramelized areas on the skin where sugars have been concentrated. If you notice these sweet spots on the surface of the watermelon, it’s a good indication that the fruit is ripe and ready to be enjoyed.
7. Taste Test: While all the visual and physical indicators mentioned before can help determine if your watermelons are ripe, nothing beats the taste test. When you believe a watermelon is ripe based on its external attributes, cut into it and taste a small portion. A ripe watermelon should have a sweet, juicy, and refreshing taste. If the flavor is not yet fully developed or lacks sweetness, allow the watermelon to continue ripening on the vine for a few more days.
Remember that the timing of ripeness can vary depending on the specific watermelon variety and growing conditions. Factors such as temperature, sunlight, and the stage of the growing season can influence the ripening process. Regular monitoring and observation of the indicators mentioned above will help you determine the perfect time to harvest your watermelons and enjoy their peak flavor and juiciness.
By paying attention to the signs of ripeness, you can ensure that you pick your watermelons at the perfect moment for optimal taste and enjoyment. So, trust your senses, keep an eye out for these indicators, and get ready to savor the refreshing and delicious fruits of your labor.
Harvesting Watermelons
After weeks of careful nurturing and anticipation, the time has finally come to harvest your watermelons. Harvesting watermelons at the right moment ensures maximum sweetness, juiciness, and overall flavor. Here are some guidelines to help you determine when and how to harvest your watermelons:
1. Check for Ripeness Indicators: Before harvesting, check for the key indicators of ripeness mentioned earlier. Look for a dull or matte skin color, a yellow or light yellow spot on the underside, a hollow sound when tapped, a dried tendril nearest the fruit, and a symmetrical shape. These signs will help you confirm that the watermelons are ready for harvest.
2. Consider Days to Maturity: Refer to the seed packet or product description for the estimated days to maturity for the watermelon variety you are growing. This information can give you a general idea of when to expect the fruits to ripen. However, note that some environmental factors, such as temperature and sunlight, can affect the actual ripening time, so use this as a guide with the ripeness indicators as your main reference.
3. Use a Sharp Knife or Pruners: When it comes time to harvest, use a sharp knife or pruners to sever the watermelon from the vine. Make a clean cut, leaving about an inch or two of the stem attached to the fruit. Avoid pulling or twisting the watermelon, as this can damage both the fruit and the vine.
4. Handle with Care: Watermelons are fragile fruits, so handle them with care during the harvesting process to avoid bruising or damaging them. Lift the watermelon gently, supporting its weight from underneath with both hands. Avoid dropping or bumping the fruits against hard surfaces.
5. Cut Rather Than Pull: It’s best to cut the watermelon from the vine rather than yank or pull it off. Cutting helps prevent damage to the vine and leaves the stem intact, which can prolong the shelf life of the harvested watermelon. Plus, leaving a short stem attached to the fruit adds a visual appeal when displaying or storing it.
6. Harvest in the Morning: Plan to harvest your watermelons in the morning when temperatures are cooler. This allows for optimal flavor and reduces the risk of watermelons becoming overheated and losing quality. If mornings aren’t possible, choose a time of day when the temperature is relatively cool to avoid exposing the fruits to excessive heat as you pick them.
7. Perform Regular Harvests: Watermelon varieties can produce multiple fruits on each vine, and the ripening times may vary. Check your watermelon plants regularly and harvest any ripe fruits as soon as they are ready. Leaving overripe watermelons on the vine can attract pests or contribute to disease spread.
8. Store Properly: After harvest, store your watermelons in a cool, dry place for a few days to allow them to fully ripen and reach their maximum sweetness. Avoid placing them in direct sunlight or refrigerating them until they are fully ripe, as this can impact the flavor and texture. Once fully ripened, you can store watermelons in the refrigerator to keep them fresh for an extended period.
9. Enjoy the Fruits of Your Labor: Finally, the moment you’ve been waiting for! Slice into your homegrown watermelons and savor the delicious, juicy flesh. Enjoy them fresh on their own, use them in refreshing fruit salads, or experiment with various recipes and beverages. The reward of your hard work and care is a burst of summertime flavor in every bite.
By harvesting watermelons at their peak ripeness, you can enjoy the maximum sweetness and juiciness that these fruits have to offer. Be patient, trust your observation skills, and embrace the joy of harvesting and indulging in your homegrown watermelons!
Read more: How Many Seeds In A Watermelon
Storing and Enjoying Your Homegrown Watermelons
Congratulations on successfully growing and harvesting your watermelons! Now it’s time to think about how to store and enjoy these delicious fruits to make the most of your hard work. Proper storage and preparation will help maintain their freshness and ensure a delightful experience. Here are some tips on storing and enjoying your homegrown watermelons:
1. Post-Harvest Ripening: After harvesting, allow your watermelons to ripen fully before enjoying them. Place them in a cool, dry area, away from direct sunlight, for a few days. This ripening period will enhance the sweetness and flavor of the fruit. Once the watermelons reach their desired ripeness, it’s time to indulge!
2. Refrigeration: For longer storage, refrigerate your ripe watermelons. Wrap each watermelon individually in plastic wrap or place them in a perforated plastic bag to prevent moisture buildup. Store them in the refrigerator’s crisper drawer, which provides a cool and humid environment. Well-stored watermelons can last for up to two weeks in the refrigerator.
3. Chilling: Watermelons are best enjoyed chilled for a refreshing treat. Before consuming, it’s a good idea to keep your watermelons in the refrigerator for a few hours or overnight. This will enhance their crispness and intensify their natural sweetness. Cut watermelon slices can also be chilled before serving for an extra cooling and thirst-quenching experience.
4. Slicing and Preparing: When you’re ready to enjoy your watermelon, slice it into wedges or bite-sized cubes. Remove the seeds if necessary, although many modern varieties are seedless. The vibrant red or yellow flesh is perfect for snacking on its own or incorporating into various culinary creations. Get creative and add watermelon to salads, smoothies, juices, popsicles, or even grilled recipes for a unique and refreshing twist.
5. Freezing: If you find yourself with an abundance of watermelons, consider freezing some for future use. Cut the watermelon into cubes or use a melon baller to create small portions. Arrange the pieces on a baking sheet lined with parchment paper, making sure they don’t touch each other. Place the baking sheet in the freezer until the watermelon is firm, then transfer the pieces to a freezer-safe container or bag for long-term storage. Frozen watermelon can be enjoyed as a refreshing and healthy snack or used in smoothies and frozen desserts.
6. Sharing the Bounty: Watermelons are a summer staple, and sharing your harvest with friends, family, and neighbors is a great way to spread joy and appreciation. Organize a watermelon tasting party or donate some of your excess fruits to local community organizations or food banks. Sharing the bounty of your garden not only fosters a sense of community but also invites others to savor the deliciousness of homegrown watermelons.
7. Preserving: If you’re interested in preserving the flavor of your watermelons beyond the growing season, you can try making watermelon preserves, jams, or fruit leather. These homemade treats allow you to enjoy the taste of summer all year round. Look for recipes that suit your taste preferences and experiment with adding complementary flavors like citrus, mint, or ginger for an exciting twist.
Remember, the pleasure of homegrown watermelons is not only in their taste but also in the rewarding experience of nurturing and harvesting them yourself. Enjoy the freshness, sweetness, and hydrating qualities of your watermelons, and savor the moments of pure summer bliss as you indulge in each juicy bite.
So take a moment to appreciate your accomplishment, invite family and friends to join in the delight, and relish the satisfaction of enjoying the fruits of your labor. Your homegrown watermelons are a true testament to the joys of gardening and the beauty of nature’s bounty.
Frequently Asked Questions about How To Grow A Watermelon From A Seed
Was this page helpful?
At Storables.com, we guarantee accurate and reliable information. Our content, validated by Expert Board Contributors, is crafted following stringent Editorial Policies. We're committed to providing you with well-researched, expert-backed insights for all your informational needs.


0 thoughts on “How To Grow A Watermelon From A Seed”