Home>Garden Essentials>How To Grow Asparagus From Seed
Garden Essentials
How To Grow Asparagus From Seed
Modified: March 15, 2024
Learn how to grow asparagus from seed in your garden. Get tips on planting, caring for, and harvesting delicious homegrown asparagus.
(Many of the links in this article redirect to a specific reviewed product. Your purchase of these products through affiliate links helps to generate commission for Storables.com, at no extra cost. Learn more)
Introduction
Imagine having a delicious, nutritious, and versatile vegetable growing right in your own backyard. With its vibrant green spears and unique flavor, asparagus is a favorite among gardeners and food enthusiasts alike. And the best part? You can easily grow asparagus from seed, allowing you to enjoy the satisfaction of nurturing a crop from start to finish.
Growing asparagus from seed may require a bit of patience and dedication, but the rewards are well worth it. In this guide, we will walk you through the step-by-step process of growing asparagus from seed, ensuring that you have all the information you need to successfully cultivate this delectable vegetable.
Before we dive into the details, it’s important to understand a few key things about asparagus. Asparagus is a perennial plant, which means it will continue to produce spears year after year. It does take some time for asparagus seeds to develop into mature plants, but the investment is well worth it. Once established, asparagus can provide a bountiful harvest for several years.
Asparagus also has some specific requirements when it comes to soil, sunlight, and water. Understanding these needs will help you create the ideal growing conditions for your asparagus plants. So, let’s get started on this exciting journey of growing asparagus from seed!
Key Takeaways:
- Growing asparagus from seed requires patience and attention to detail, but the delicious rewards and bountiful harvests make it all worthwhile. With proper care and nurturing, you can enjoy homegrown asparagus for years to come.
- From preparing the soil to harvesting the spears, each step in growing asparagus plays a crucial role in the plant’s success. By following the guide and providing the necessary care, you can experience the joy of nurturing your own delicious asparagus crop.
Read more: How To Grow Asparagus From Seeds
Step 1: Preparing the Soil
The first step in growing asparagus from seed is to prepare the soil. Asparagus thrives in well-draining soil that is rich in organic matter. Follow these steps to create the perfect environment for your asparagus seeds to germinate and grow:
- Choose the Right Location: Select a location in your garden that receives full sun for at least 6-8 hours a day. Asparagus prefers a slightly acidic to neutral soil pH, ideally between 6.0 and 7.5.
- Clear the Area: Remove any weeds, grass, or debris from the chosen location. Asparagus plants are sensitive to competition, so a clear space will allow them to grow without obstruction.
- Loosen the Soil: Use a garden fork or tiller to loosen the soil to a depth of about 12-18 inches (30-45 cm). This will improve drainage and make it easier for the asparagus roots to penetrate the soil.
- Amend the Soil: Incorporate generous amounts of organic matter, such as compost or well-rotted manure, into the soil. This will enrich the soil with nutrients and improve its overall structure.
- Level and Rake: Smooth out the soil surface using a rake to create a level, even bed for planting the asparagus seeds.
By preparing the soil properly, you are setting a solid foundation for your asparagus plants to thrive. Once the soil is well-prepared, you can move on to the next step: soaking the asparagus seeds.
Step 2: Soaking the Asparagus Seeds
Now that you have prepared the soil, it’s time to prepare the asparagus seeds for planting. Soaking the seeds before planting can help promote better germination rates and ensure a successful start for your asparagus plants. Follow these steps to soak the asparagus seeds:
- Gather the Seeds: Collect fresh, high-quality asparagus seeds either from your own plants or purchase them from a reputable source. It’s important to use fresh seeds as they have a higher chance of germination.
- Place the Seeds in Warm Water: Fill a bowl or container with warm water and add the asparagus seeds. Allow them to soak for about 24 to 48 hours. This process helps to soften the seed coat and improves the chances of successful germination.
- Change the Water: After the initial soak, drain the water and refill the container with fresh warm water. Let the seeds soak for an additional 24 hours.
While soaking the seeds can increase germination rates, it’s important to note that not all seeds will sprout. Asparagus seeds have natural variations in viability, and some may not germinate even with soaking. Soaking simply helps to improve the chances of germination for the viable seeds.
Once the seeds have completed the soaking process, they are ready to be planted in the prepared soil. Let’s move on to the next step: planting the asparagus seeds.
Step 3: Planting the Seeds
With the asparagus seeds soaked and ready, it’s time to plant them in the prepared soil. Follow these steps to ensure proper planting and give your seeds the best opportunity to grow into healthy asparagus plants:
- Create Furrows: Use a hoe or your hand to create shallow furrows in the soil. Make the furrows about 1 inch (2.5 cm) deep and space them about 12-18 inches (30-45 cm) apart. These furrows will provide a designated area for planting the seeds.
- Plant the Seeds: Place the soaked asparagus seeds into the furrows, spacing them about 2 inches (5 cm) apart. Gently cover the seeds with soil, ensuring that they are no deeper than 1 inch (2.5 cm) below the surface.
- Water the Bed: After planting, give the bed a good watering to settle the soil and provide moisture for the seeds to germinate. Be careful not to overwater, as excessive moisture can hinder germination.
It’s important to note that asparagus seeds are slow to germinate and can take several weeks to sprout. Patience is key during this stage, so it’s important to monitor the soil moisture and provide consistent care for the growing bed.
Once the seeds have successfully germinated and the seedlings have developed, it’s time to move on to the next step: providing adequate water and sunlight for your asparagus plants.
Step 4: Providing Adequate Water and Sunlight
Water and sunlight are essential for the healthy growth and development of asparagus plants. By providing them with the right amount of water and sunlight, you will ensure strong and vigorous plants. Follow these guidelines to meet the water and sunlight requirements of your asparagus:
- Watering: Asparagus plants require consistent moisture, especially during the early stages of growth. Water the plants regularly, keeping the soil evenly moist but not waterlogged. Aim to provide about 1 inch (2.5 cm) of water per week, either through rainfall or manual watering. However, avoid overwatering, as it can lead to root rot and other diseases.
- Sunlight: Asparagus thrives in full sun conditions, so it’s important to choose a location that receives at least 6-8 hours of direct sunlight per day. Lack of sunlight can result in weaker plants and reduced yields. If your garden has partial shade, select a spot that gets the most sunlight during the day.
- Shading: While asparagus plants love full sun, they can be sensitive to scorching heat in some regions. If you live in a hot climate, provide some afternoon shade to protect the plants from extreme heat. You can use shade cloth or strategically place tall plants to provide partial shade during the hottest parts of the day.
By ensuring that your asparagus plants receive adequate water and sunlight, you will create the optimal growing conditions for their success. The next step involves controlling weeds to prevent competition and maximize the growth of your asparagus plants.
To grow asparagus from seed, start by soaking the seeds in water for 24 hours. Then, plant them in a well-draining soil and keep them moist. Once the seedlings are 12 inches tall, transplant them to a permanent location in your garden.
Read more: How To Grow Okra From Seed
Step 5: Controlling Weeds
Weeds can compete with asparagus plants for nutrients, water, and sunlight, ultimately hindering their growth and productivity. Therefore, it’s essential to implement proper weed control measures to ensure the success of your asparagus bed. Follow these steps to effectively control weeds:
- Mulching: Apply a layer of organic mulch, such as straw, wood chips, or compost, around the asparagus plants. Mulch helps suppress weed growth by blocking sunlight and preventing weed seeds from germinating. It also helps to retain soil moisture and regulate temperature.
- Hand Weeding: Regularly inspect the asparagus bed and manually remove any weeds that emerge. Be careful not to disturb the shallow roots of the asparagus plants while weeding. Hand weeding is especially important during the early stages of growth when the asparagus plants are still establishing themselves.
- Using Weed Fabric: Consider using weed fabric or landscape fabric as a barrier against weeds. Before planting the asparagus seeds, place the fabric over the prepared soil and cut holes for the seedlings to emerge. The fabric provides effective weed control while still allowing the asparagus plants to grow.
- Applying Herbicides (if necessary): If weed infestation becomes overwhelming, you may opt to use herbicides specifically formulated for asparagus beds. It’s important to follow the instructions on the herbicide label and apply it carefully to avoid damage to the asparagus plants.
Consistent weed control is crucial throughout the growing season to give your asparagus plants the best opportunity to thrive. By implementing these weed control strategies, you can minimize weed competition and maximize the growth and productivity of your asparagus bed.
Once your asparagus seedlings have matured, you can transfer them to a permanent bed. This will be covered in the next step.
Step 6: Transferring the Seedlings to a Permanent Bed
As your asparagus seedlings continue to grow and develop, they will eventually need to be transferred from their nursery bed to a permanent bed. This step is crucial for the long-term success of your asparagus plants. Follow these steps to safely transplant your seedlings:
- Choose the Right Timing: Wait until the seedlings have reached a height of around 8-10 inches (20-25 cm) before transplanting. This usually takes about one to two years from seed germination.
- Prepare the Permanent Bed: Select a location for your asparagus bed that provides full sun exposure and sufficient space for the mature plants to spread. Prepare the bed by removing any weeds or grass and amending the soil with organic matter and fertilizer to ensure optimal growing conditions.
- Transplant the Seedlings: Carefully dig up the seedlings from the nursery bed, ensuring that you take as much of the root system as possible. Dig holes in the permanent bed, spacing them about 12-18 inches (30-45 cm) apart. Gently place the seedlings into the holes and cover the roots with soil, leaving the crown of the plant just above the surface.
- Water and Mulch: Give the newly transplanted seedlings a thorough watering to help settle the soil around the roots. Apply a layer of mulch around the plants to conserve moisture, suppress weed growth, and maintain a consistent soil temperature.
Transferring the seedlings to a permanent bed allows the asparagus plants to establish themselves and continue their growth for the coming years. It’s important to maintain proper care and regular watering to support their growth and development.
Next, let’s move on to step 7, where we will discuss the ongoing care required for established asparagus plants.
Step 7: Caring for Established Asparagus Plants
Once your asparagus plants have been transferred to their permanent bed, they will require ongoing care to ensure their health and productivity. Follow these guidelines to provide proper care for your established asparagus plants:
- Watering: Continue to provide regular watering, especially during dry spells or periods of drought. Deep, thorough watering is essential to keep the soil consistently moist, but be careful not to overwater, as it can lead to root rot.
- Fertilizing: Asparagus plants are heavy feeders and benefit from regular fertilization. Apply a balanced fertilizer, such as 10-10-10 or 14-14-14, in early spring before the spears emerge. Follow the instructions on the fertilizer packaging for proper application rates.
- Controlling Pests and Diseases: Monitor your asparagus plants for any signs of pests or diseases, such as asparagus beetles, aphids, or fungal infections. Use organic pest control methods or appropriate insecticides when necessary to prevent damage to the plants.
- Supporting the Plants: As the fern-like foliage of the asparagus plants grow, they may require support to prevent them from falling over. Install stakes or a trellis system to provide support for the plants as they reach their full height.
- Removing Female Plants: Asparagus plants can be either male or female, with the male plants generally producing a higher yield of spears. Female plants produce berries, which can sap energy from the plant. Remove any female plants that develop berries to redirect energy towards spear production.
By providing proper care and attention to your established asparagus plants, you will ensure their longevity and productivity. Regular maintenance and observation are key to addressing any issues that may arise and maximizing the yield of your asparagus bed.
Now that your asparagus plants have matured and are well-cared for, it’s time to enjoy the fruits of your labor. Let’s move on to the final step: harvesting the asparagus spears!
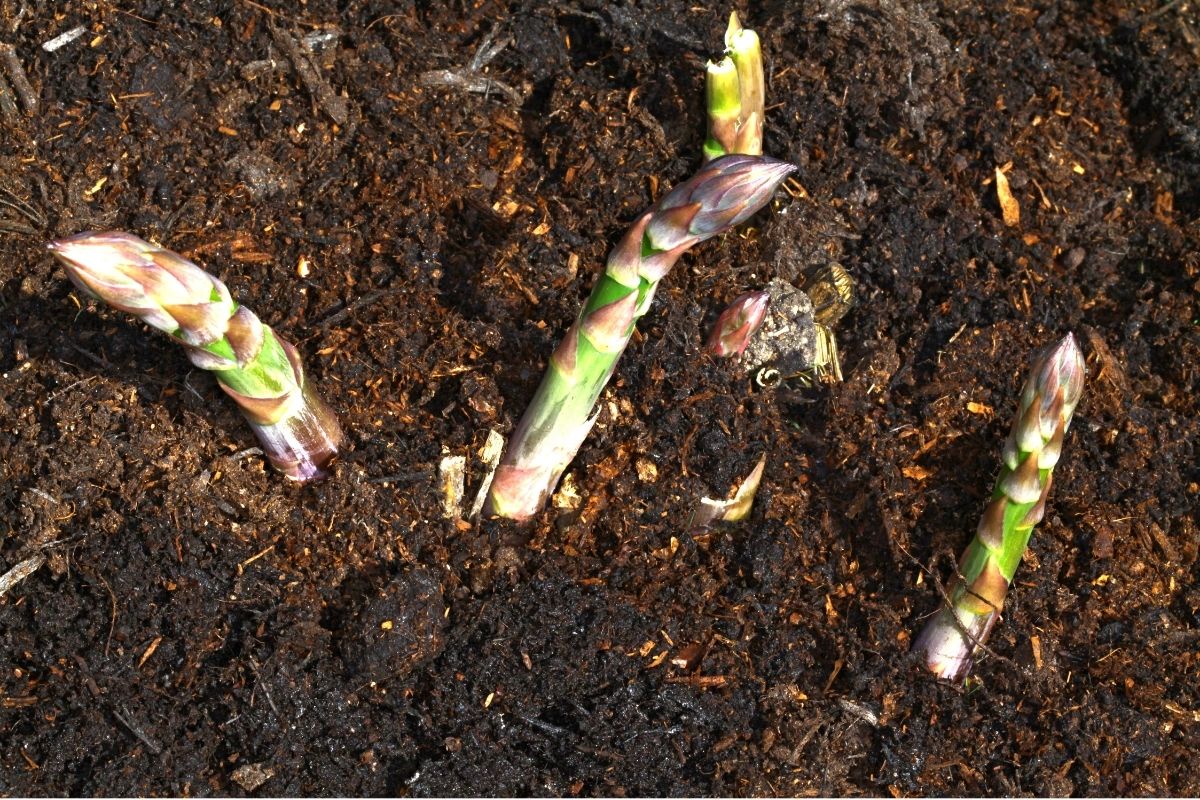
Step 8: Harvesting Asparagus Spears
One of the most exciting moments for any asparagus grower is the time to harvest the delicious spears. Harvesting asparagus is a delicate process that requires careful attention to ensure the continued growth and productivity of the plants. Follow these steps to harvest your asparagus spears:
- Timing: Wait until the asparagus spears are at least 6-8 inches (15-20 cm) tall before harvesting. This usually occurs in the second or third year after planting, once the plants have become established.
- Tools: Use a sharp knife or asparagus cutter to cut the spears just below the soil surface. Avoid pulling or twisting the spears, as this can damage the plant and potentially inhibit future growth.
- Harvesting Method: Harvest the larger, thicker spears by cutting them at the base. Leave the smaller, thinner spears in place to allow them to develop into ferns. This process helps the plants store energy in their crowns for future growth.
- Harvest Length: Generally, the asparagus spears should be harvested when they reach a length of 6-8 inches (15-20 cm). However, you can adjust the harvest length based on personal preference. Harvesting shorter spears will result in a tender and more delicate taste, while longer spears will have a heartier texture.
- Harvesting Duration: Continue harvesting asparagus spears over a 3-4 week period. After this initial harvesting period, allow the remaining spears to grow and develop into ferns. This allows the plants to replenish their energy reserves and prepare for the next growing season.
Asparagus spears are best enjoyed when harvested fresh and consumed as soon as possible. They can be cooked in a variety of ways, including grilling, steaming, sautéing, or adding them to salads and stir-fries.
Remember to always leave a portion of the asparagus spears to grow into ferns. These ferns are essential for photosynthesis and energy production, which will support the growth of future spears. Once the ferns turn yellow or brown in the fall, you can trim them down to ground level to prepare for the winter season.
By following these steps, you can enjoy a bountiful harvest of flavorful asparagus spears each year.
Congratulations on successfully growing asparagus from seed and completing the process from preparation to harvest. We hope you enjoy the rewards of your hard work and have many delicious meals featuring homegrown asparagus!
If you have any questions or need further assistance, feel free to reach out. Happy gardening!
Read more: How To Grow A Tree From A Seed
Conclusion
Growing asparagus from seed is a rewarding and fulfilling endeavor that allows you to enjoy the taste and benefits of fresh, homegrown asparagus. By following the steps outlined in this guide, you can successfully nurture your asparagus plants from seed to harvest.
From preparing the soil to transplanting the seedlings and providing proper care, each step plays a crucial role in the growth and productivity of your asparagus bed. By selecting a sunny location, providing adequate water and sunlight, controlling weeds, and caring for the established plants, you create an ideal environment for your asparagus to thrive.
Patience is key when growing asparagus from seed, as it takes time for the plants to establish and mature. However, the rewards are well worth it. Once your asparagus plants are fully established, you can look forward to bountiful harvests of delicious spears year after year.
Remember to always harvest the spears at the correct length, leaving a portion of them to grow into ferns to support future growth. By practicing proper harvesting techniques and providing the necessary care, you can enjoy a sustainable supply of asparagus from your own garden.
So, roll up your sleeves, gather your asparagus seeds, and embark on this exciting journey of growing asparagus from seed. The satisfaction of watching your plants flourish and savoring the vibrant flavor of freshly harvested asparagus will make all your efforts worthwhile.
If you have any questions or need further guidance, don’t hesitate to seek advice from fellow gardeners or gardening resources. Happy gardening, and here’s to many delicious meals featuring your homegrown asparagus!
Frequently Asked Questions about How To Grow Asparagus From Seed
Was this page helpful?
At Storables.com, we guarantee accurate and reliable information. Our content, validated by Expert Board Contributors, is crafted following stringent Editorial Policies. We're committed to providing you with well-researched, expert-backed insights for all your informational needs.


0 thoughts on “How To Grow Asparagus From Seed”