Home>Garden Essentials>How To Grow Grapes From Seed
Garden Essentials
How To Grow Grapes From Seed
Modified: October 20, 2024
Learn how to grow grapes from seed in your own garden and enjoy fresh, homegrown fruit all season long.
(Many of the links in this article redirect to a specific reviewed product. Your purchase of these products through affiliate links helps to generate commission for Storables.com, at no extra cost. Learn more)
Introduction
Grapes are not only delicious to eat, but they can also be a rewarding plant to grow in your garden. Whether you have a large vineyard or a small backyard, learning how to grow grapes from seed can be a fun and fulfilling experience. While many gardeners prefer to grow grapes from cuttings or dormant plants, growing grapes from seed offers a unique opportunity to cultivate your own unique varieties.
Before you embark on this journey, it’s important to understand that growing grapes from seed requires patience and time. It can take several years before you see the fruits of your labor, as grapes typically take three to five years to fully mature and produce a harvest. However, if you’re up for the challenge, the process can be incredibly rewarding.
In this guide, we will walk you through the step-by-step process of growing grapes from seed. From preparing the seeds to nurturing the seedlings, we’ll cover all the essential aspects of grape seed cultivation.
Key Takeaways:
- Growing grapes from seed requires patience and time, but the reward of harvesting your own unique grape varieties is worth the effort. Enjoy the journey of nurturing and caring for your grapevines!
- By following the step-by-step process of growing grapes from seed, you can embark on a fulfilling grape-growing adventure. With dedication and a love for gardening, you’ll soon be enjoying your own homegrown grapes.
Read more: How To Grow A Grape Seed
Step 1: Preparing the Grape Seeds
Before you can begin the process of growing grapes from seed, you need to gather your grape seeds and prepare them for germination. Here’s what you need to do:
- Collecting Grape Seeds: Harvest mature grape cluster from healthy and disease-free grapevines. Gently remove the grapes from the cluster and separate the seeds. Ideally, choose seeds from grape varieties that are known for their desirable traits, such as flavor, color, or disease resistance.
- Cleaning the Seeds: Rinse the collected seeds under running water to remove any pulp or residue. Make sure to handle the seeds gently to avoid damaging them.
- Scarification: Some grape seeds have a hard outer coat that can hinder the germination process. To improve germination rates, you can scarify the seeds by using a knife to make a small cut or nick on the seed’s outer shell. Be careful not to damage the embryo within the seed.
- Soaking the Seeds: After scarification, place the seeds in a container of water and allow them to soak for 24 hours. This soaking process helps to soften the seeds’ outer coat and promote faster germination.
- Drying the Seeds: After soaking, carefully remove the seeds from the water and allow them to dry on a paper towel. Avoid exposing the seeds to direct sunlight or high heat during the drying process.
Once you have completed these steps, your grape seeds will be ready for stratification, which is the next crucial step in the growing process. Stratification helps to simulate the natural winter conditions that grape seeds need to break dormancy and germinate successfully.
Step 2: Stratification
Stratification is a process that mimics the cold winter conditions necessary for grape seeds to break dormancy and initiate germination. This step is crucial in preparing the seeds for successful growth. Here’s how to stratify grape seeds:
- Selecting the Stratification Method: There are two common methods for stratifying grape seeds – the cold stratification method and the moist stratification method. The cold stratification method involves placing the seeds in a moist medium and storing them in a refrigerator at around 40°F (4°C) for a specific period. The moist stratification method, on the other hand, involves placing the seeds in a moist medium and storing them at room temperature.
- Cold Stratification Method: For the cold stratification method, place the dried grape seeds in a plastic bag or airtight container with a moist medium such as peat moss, vermiculite, or damp paper towels. Make sure the medium is moist but not waterlogged. Seal the bag or container and put it in the refrigerator. The seeds should be stratified for a period of about 6-8 weeks.
- Moist Stratification Method: For the moist stratification method, place the dried grape seeds in a container with a moist medium just like the cold stratification method. Keep the container at room temperature, ensuring that the medium remains consistently moist. The seeds will need to be stratified for a longer period of about 10-12 weeks.
During the stratification period, it’s important to regularly check the seeds to ensure that the medium remains moist and to remove any mold or rotting seeds. After the stratification period is complete, the seeds are ready for germination.
Step 3: Germination
After stratifying the grape seeds, it’s time for the exciting phase of germination. This is when the seeds begin to sprout and develop into seedlings. Follow these steps to promote successful germination:
- Preparing the Germination Medium: Fill seed trays or small pots with a well-draining germination medium, such as a mixture of peat moss and perlite. Moisten the medium to ensure it is evenly damp but not waterlogged.
- Planting the Seeds: Gently press the stratified grape seeds into the germination medium. Plant the seeds about 1 inch deep, ensuring they are spaced apart to allow room for growth. Cover the seeds lightly with the germination medium.
- Providing Optimal Conditions: Place the seed trays or pots in a warm and well-lit location, such as a greenhouse or a sunny windowsill. The ideal temperature for germination is around 70-80°F (21-27°C). Provide consistent moisture by misting the medium or watering from the bottom to avoid disturbing the seeds.
- Ensuring Moisture and Drainage: It’s important to keep the germination medium consistently moist but not overly saturated. Check the moisture level regularly and adjust watering accordingly. Adequate drainage is essential to prevent waterlogged conditions, which can lead to seed rot.
- Patience and Observation: Germination can take anywhere from a few weeks to several months, depending on the grape variety. Be patient and maintain a watchful eye on the seeds. Once the seeds have germinated and seedlings start to emerge, it’s time to move on to the next step: transplanting.
Remember, each grape seed may not successfully germinate, so it’s a good idea to plant multiple seeds to increase the chances of successful growth. Once the seedlings have established themselves, it’s time to transplant them into larger pots or directly into the ground. Stay tuned for the next step in the process: transplanting the seedlings.
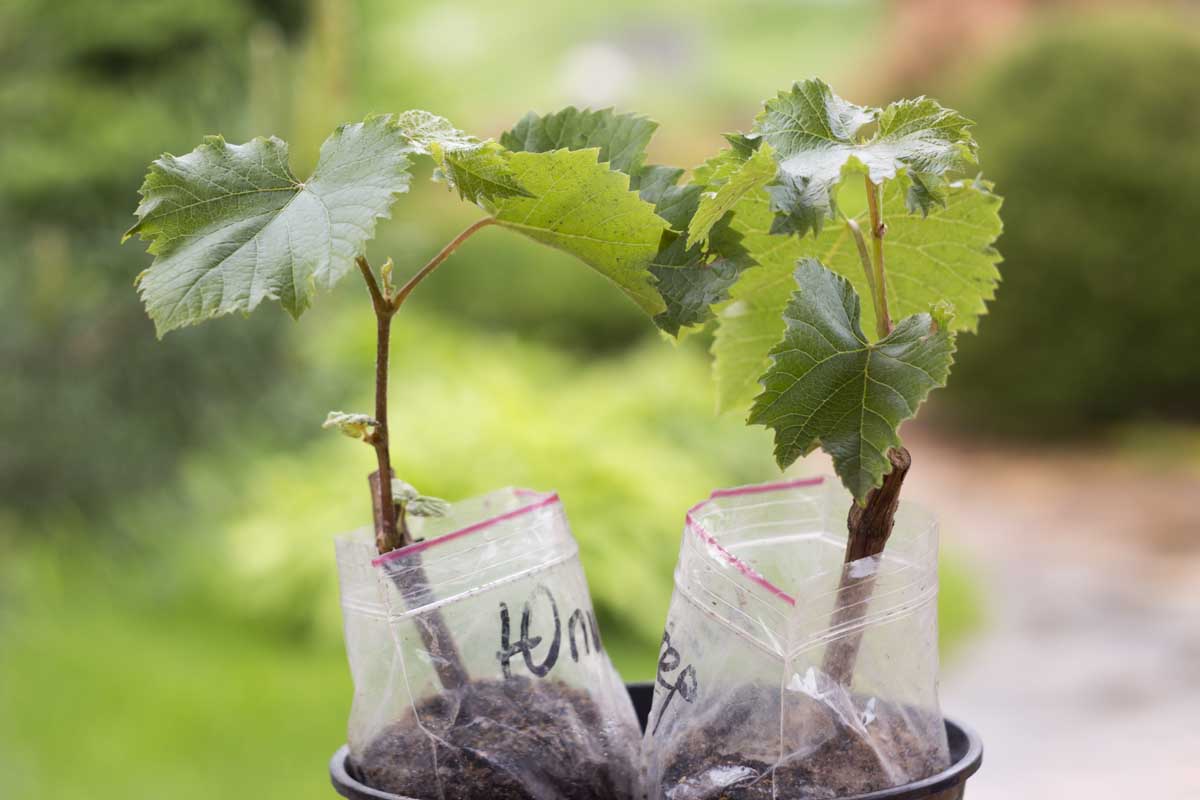
Step 4: Transplanting the Seedlings
Once the grape seedlings have successfully germinated and developed their first set of true leaves, it’s time to transplant them into larger containers or directly into the ground. Follow these steps to ensure a successful transplant:
- Choosing the Right Containers: Select containers with enough depth and width to accommodate the growing root system of the seedlings. Alternatively, if you plan to plant the seedlings directly in the ground, choose a suitable location with well-drained soil and good sunlight exposure.
- Preparing the Containers or Ground: Fill the containers or prepare the planting area by amending the soil with organic matter, such as compost or well-rotted manure. This will provide the seedlings with essential nutrients and promote healthy growth.
- Transplanting the Seedlings: Carefully remove the seedlings from the germination medium, taking care not to damage the roots. Gently tease apart any tangled roots and position the seedling in the new container or planting hole. Backfill with soil, ensuring the seedlings are planted at the same depth as they were in the germination medium.
- Watering and Mulching: After transplanting, water the seedlings thoroughly to settle the soil around the roots. Apply a layer of organic mulch, such as straw or wood chips, around the base of the plants to retain moisture and suppress weed growth.
- Caring for the Transplanted Seedlings: Provide the seedlings with regular watering, ensuring the soil remains consistently moist but not waterlogged. Keep an eye out for any signs of stress or pest infestation and take appropriate action. Consider using stakes or trellises to support the growing vines as they develop.
It’s important to note that grapevines require proper spacing, so ensure that you provide adequate room between each plant for optimal growth and airflow. As the seedlings continue to grow, they will require regular maintenance and care, which we will cover in the next step: providing proper care.
To grow grapes from seed, start by soaking the seeds in water for 24 hours. Then plant them in a well-draining soil mix and keep them in a warm, sunny location. Keep the soil consistently moist and be patient, as it can take several years for the plants to produce fruit.
Read more: How To Grow Grape Seeds
Step 5: Providing Proper Care
After transplanting the grape seedlings, it’s essential to provide them with the proper care they need to thrive and develop into healthy, productive vines. Here are some key aspects of caring for your grape plants:
- Watering: Grapevines require regular watering, especially during dry periods. Water deeply to ensure the roots receive adequate moisture, but avoid overwatering, as this can lead to root rot. Aim to keep the soil consistently moist, but not waterlogged.
- Fertilizing: Fertilize the grapevines during the growing season to provide them with the necessary nutrients. Use a balanced fertilizer or a slow-release organic fertilizer, following the manufacturer’s instructions. Avoid excessive nitrogen fertilization, as this can result in excessive vegetative growth at the expense of fruit production.
- Weed Control: Keep the area around your grapevines free from weeds to reduce competition for nutrients and water. You can manually remove weeds or use organic mulch to suppress their growth. Be careful when working around the grapevines to avoid damaging the shallow root system.
- Pest and Disease Management: Regularly monitor your grapevine for any signs of pests or diseases. Common grapevine pests include aphids, spider mites, and grape berry moths. Implement integrated pest management strategies, such as practicing good sanitation, using natural predators, and applying organic insecticides when necessary. Additionally, ensure good airflow and sunlight penetration to prevent fungal diseases like powdery mildew and downy mildew.
- Training and Pruning: As the grapevines grow, it’s important to train and prune them to achieve the desired shape and maximize fruit production. Depending on the grape variety and training system you choose, you may need to prune the vines in the winter or early spring to remove dead wood, promote proper airflow, and maintain manageable vine size.
- Protecting from Extreme Weather: Grapevines are susceptible to frost and extreme temperature fluctuations. Consider covering the plants with protective materials, such as frost blankets or row covers, during periods of frost risk. Providing adequate shelter or shade during excessively hot periods can also help protect the vines from heat stress.
By giving your grapevines the proper care they require, you’ll promote healthy growth, minimize the risk of pests and diseases, and increase the chances of a bountiful harvest. With diligent care, your grapevines will flourish and reward you with delicious, homegrown grapes.
Step 6: Pruning and Training
Pruning and training are essential steps in maintaining healthy and productive grapevines. These practices help control vine growth, improve airflow and sunlight penetration, and ensure optimal fruit production. Follow these guidelines for successful pruning and training:
- Timing: Pruning is typically done during the dormant season, in late winter or early spring before new growth begins. This allows for better visibility of the vine’s structure and minimizes the risk of disease transmission.
- Identify the Structure: Observe the grapevine’s structure to identify the main trunk, cordons (horizontal branches), and canes (vertical shoots). The number and length of cordons and canes will depend on the training system you choose.
- Remove Dead and Diseased Wood: Start by removing any dead or diseased wood, as well as any unwanted shoots or suckers that emerge from the base of the vine. Prune them back to the point of origin, making clean cuts just above a bud.
- Choose Primary Shoots and Canes: Select the healthiest and most vigorous shoots to become the primary arms or cordons. These will serve as the main framework for the vine’s growth. Remove any excess shoots to prevent overcrowding.
- Train the Cordons: Gently bend and secure the chosen shoots to the support structure (trellis, wires, or stakes). Train them horizontally along the support system, spacing them evenly and ensuring they have room to grow without crossing or overlapping.
- Prune Secondary Shoots: Along the cordons, allow selected secondary shoots to grow and produce fruiting spurs. These spurs will bear the grape clusters in subsequent seasons. Prune the secondary shoots to a desired length, typically retaining 2-3 bud spurs.
- Manage Canopy Growth: Throughout the growing season, monitor the growth of lateral shoots and tendrils. Trim or remove excessive growth to maintain adequate spacing and airflow within the vine’s canopy. This will help prevent disease and ensure sunlight reaches all parts of the plant.
Remember, the specific pruning and training techniques may vary depending on the grape variety and the training system you choose. It’s important to research and understand the requirements of your specific grapevines to achieve the best results.
Regular pruning and training are essential for rejuvenating the vine, maintaining its health, and maximizing fruit quality and yield. By following the proper techniques and investing time in this crucial step, you’ll set the foundation for a successful grape-growing journey.
Step 7: Harvesting the Grapes
After months of diligent care and nurturing, the time has finally come to enjoy the fruits of your labor. Harvesting grapes is an exciting and rewarding process. Follow these guidelines to ensure a successful grape harvest:
- Determining the Right Time: The timing of grape harvest is crucial for optimal flavor and sweetness. Different grape varieties have varying ripening times, so it’s important to know the characteristics of your specific grape variety. Typically, grapes are ready for harvest when they reach their desired color, firmness, and sugar content.
- Performing a Taste Test: To determine if the grapes are ready for harvest, perform a taste test. Pick a few grapes and sample them. Look for the desired balance of sweetness and acidity. If they still taste tart, it’s best to wait a little longer before harvesting.
- Inspecting the Grapes: Examine the grapes for uniform ripeness. Avoid harvesting underripe or overripe grapes, as they may not develop the desired flavor and quality. Remove any damaged or diseased grapes to maintain the overall health of the vineyard.
- Harvesting Properly: Use pruning shears or sharp scissors to cut the grape clusters from the vine. Be careful not to damage the adjacent clusters or the vine itself. Harvest in the early morning or late afternoon when the weather is cooler to prevent grape damage and maintain freshness.
- Handling Grapes with Care: Handle the harvested grapes gently to prevent bruising or crushing. Place them in shallow containers or baskets lined with clean towels or padding to cushion and protect the clusters.
- Storing and Enjoying: Grapes are best enjoyed fresh and are not known for their long shelf life. Store harvested grapes in a cool and humid environment, such as the refrigerator, to prolong their freshness. Avoid washing the grapes until just before consumption to prevent spoilage. Share and savor the delicious fruits of your labor with family and friends!
Remember, harvesting grapes is a highly satisfying process, but it’s important to handle the grapes with care and avoid rushing the harvest. By waiting for the right moment and following proper harvesting techniques, you’ll be rewarded with sweet, juicy grapes to enjoy.
Now that you’ve learned the step-by-step process of growing grapes from seeds, you have the knowledge and skills to embark on your own grape-growing adventure. With patience, care, and a love for gardening, you can cultivate your own vineyard and experience the joys of harvesting your own homegrown grapes.
Conclusion
Congratulations! You have now learned the comprehensive process of growing grapes from seed. From preparing the seeds to nurturing the seedlings, and finally, harvesting the delicious fruits, you have gained the knowledge and skills to embark on your own grape-growing journey.
Growing grapes from seed may require patience and time, but the reward is well worth the effort. By selecting desirable grape varieties, preparing the seeds for germination, stratifying them, and providing proper care and training, you can cultivate your own unique grapevines with flavors that suit your taste.
Throughout the process, it is essential to provide the proper care and attention that grapevines need. Regular watering, fertilizing, pruning, and protecting against pests and diseases will ensure healthy growth and maximize fruit production.
When harvest time arrives, the joy of tasting the sweet and succulent grapes you have grown from seed will be incredibly satisfying. Remember to pick the grapes at the right time, handle them with care, and store them properly to maintain their freshness.
Whether you have a small backyard garden or a sprawling vineyard, the experience of growing grapes from seed allows you to connect with nature, witness the beauty of plant growth, and enjoy the fruits of your labor. Sharing the delicious grapes with loved ones further enhances the sense of fulfillment and accomplishment.
So, start your grape-growing adventure today. Select your favorite grape varieties, gather the seeds, and follow the step-by-step process outlined in this guide. With dedication, patience, and a passion for gardening, you can cultivate a thriving vineyard and savor the pleasures of homegrown grapes for years to come.
Remember, gardening is as much about the journey as it is about the destination. Enjoy the process, learn from your experiences, and embrace the wonders of nature as you grow your own grapes from seed.
Curious about how quickly you can see results after planting those seeds? Don't miss our detailed guide on seed germination times. You'll find crucial insights into what factors affect speed and success in sprouting a variety of plants.
Frequently Asked Questions about How To Grow Grapes From Seed
Was this page helpful?
At Storables.com, we guarantee accurate and reliable information. Our content, validated by Expert Board Contributors, is crafted following stringent Editorial Policies. We're committed to providing you with well-researched, expert-backed insights for all your informational needs.


0 thoughts on “How To Grow Grapes From Seed”