Home>Garden Essentials>How To Grow Parsnips From Seeds
Garden Essentials
How To Grow Parsnips From Seeds
Modified: March 16, 2024
Learn how to grow parsnips from seeds in your garden. Get step-by-step instructions on planting, caring for, and harvesting these delicious root vegetables.
(Many of the links in this article redirect to a specific reviewed product. Your purchase of these products through affiliate links helps to generate commission for Storables.com, at no extra cost. Learn more)
Introduction
Welcome to the world of gardening! If you’re looking to add a unique and delicious vegetable to your garden, why not consider growing parsnips? Parsnips are root vegetables that are closely related to carrots and have a nutty, sweet flavor. Not only are they a versatile addition to your kitchen, but they are also relatively easy to grow from seeds. In this article, we’ll guide you through the process of growing parsnips from seeds, from choosing the right seeds to harvesting and storing your homegrown produce.
Growing parsnips can be a rewarding experience, but it does require a bit of planning and patience. Parsnips thrive in cool weather, making them an ideal crop for spring or fall planting. These root vegetables prefer a deep, loose soil that is well-drained and rich in organic matter. By following a few simple steps, you can start your own parsnip patch and enjoy a bountiful harvest in no time.
Before we dive into the details, it’s important to note that growing parsnips from seeds can take some time. Typically, parsnips take around 100-120 days to mature, so make sure you have enough space in your garden and are ready to commit to the growing process. Now, let’s get started on the journey to grow your very own parsnips!
Key Takeaways:
- Growing parsnips from seeds requires patience and attention to detail. From choosing the right seeds to providing proper care, each step contributes to a bountiful harvest of delicious parsnips.
- Harvesting and storing parsnips is just as important as growing them. Proper storage conditions and creative culinary techniques ensure that you can enjoy the unique flavors of parsnips for an extended period.
Read more: How To Grow Okra From Seed
Step 1: Choosing the Right Seeds
The first step to successfully grow parsnips from seeds is to choose the right variety. When selecting parsnip seeds, it’s important to consider the specific characteristics of the variety and the climate in which you’ll be growing them. Here are a few factors to keep in mind:
- Variety: There are several varieties of parsnips available, each with its own unique characteristics. Some popular varieties include Hollow Crown, Gladiator, and All American. Hollow Crown is known for its long, tapered roots and sweet flavor, while Gladiator is prized for its smooth skin and resistance to disease. All American is a versatile variety that performs well in various climates. Choose a variety that suits your taste preferences and growing conditions.
- Climate: Parsnips are cool-season vegetables that prefer moderate temperatures. They can tolerate light frosts and even sweeten up when exposed to cold weather. However, they may struggle in extremely hot climates. Consider the average temperatures and growing season length in your area when choosing the best parsnip variety for your garden.
- Seed Quality: To ensure successful germination, it’s important to select high-quality parsnip seeds. Look for seeds that are fresh, plump, and have a high germination rate. Buying seeds from reputable seed companies or local nurseries will help ensure that you’re starting with viable seeds.
- Organic vs. Non-Organic: You have the option to choose between organic and non-organic parsnip seeds. Organic seeds are grown without the use of synthetic fertilizers or pesticides, making them a more environmentally friendly choice. If organic gardening is important to you, opt for certified organic seeds.
Once you’ve chosen the right parsnip seeds for your garden, you’re ready to move on to the next step: preparing the soil. Creating the ideal growing environment is crucial for the successful growth of parsnips, so let’s explore how to get your soil ready in step 2.
Step 2: Preparing the Soil
The key to growing healthy and thriving parsnips lies in preparing the soil properly. Parsnips prefer a deep, loose, and well-drained soil that is rich in organic matter. Here’s how you can prepare the soil for optimal parsnip growth:
- Select the Site: Choose a sunny spot in your garden that receives at least 6 hours of direct sunlight per day. Parsnips can tolerate some shade, but they perform best in full sun.
- Remove Weeds: Before preparing the soil, remove any existing weeds or grass from the chosen area. Weeds can compete with the parsnips for nutrients and impede their growth.
- Loosen the Soil: Use a garden fork or a tiller to loosen the soil to a depth of at least 12 inches. Breaking up compacted soil helps the parsnips roots penetrate deeper and promotes better growth.
- Improve Drainage: If you have heavy clay soil that tends to retain moisture, mixing in organic matter can help improve drainage. Add compost, well-rotted manure, or peat moss to the soil to increase its porosity and promote better airflow.
- Test Soil pH: Parsnips prefer a slightly acidic to neutral soil pH between 6.0 and 7.5. Test the soil pH using a soil testing kit, and if necessary, amend the soil by adding lime to raise the pH or sulfur to lower it.
- Add Nutrients: To ensure that your parsnips have access to essential nutrients, incorporate a balanced fertilizer into the soil. Look for a fertilizer with equal nitrogen (N), phosphorus (P), and potassium (K) ratios, such as a 10-10-10 or 14-14-14 formula. Apply the fertilizer as per the instructions on the package.
- Rake and Level the Soil: After incorporating amendments and fertilizers, rake the soil surface to create a smooth and even bed for sowing the parsnip seeds.
By properly preparing the soil, you create an ideal growing environment for your parsnips. The next step is sowing the seeds, which we will explore in step 3.
Step 3: Sowing the Seeds
Now that you have prepared the soil, it’s time to sow the parsnip seeds. Follow these steps to ensure successful germination and establishment:
- Timing: Sow the parsnip seeds directly into the garden bed as soon as the soil can be worked in early spring or late summer/early fall. The soil temperature should be around 50 to 60°F (10 to 15°C) for optimal germination.
- Spacing: Create shallow trenches in the prepared soil, about ½ inch (1.3 cm) deep and 12 to 18 inches (30 to 45 cm) apart. Space the seeds about 2 inches (5 cm) apart within the trench.
- Seed Treatment (Optional): Some gardeners like to pre-soak parsnip seeds for a few hours before sowing to help with germination. Soaking the seeds in lukewarm water can soften the hard seed coat, making it easier for the embryo to emerge.
- Sowing: Place the parsnip seeds in the trenches, ensuring they are evenly spaced. Cover the seeds with a thin layer of soil (about ¼ inch or 0.6 cm) and gently press down to ensure good seed-to-soil contact.
- Watering: After sowing, water the soil gently to provide moisture for the seeds to germinate. Be careful not to wash away the seeds or create puddles. Keep the soil consistently moist during the germination period.
- Thinning: As the parsnip seedlings emerge, they will appear crowded. Once they have three or four leaves, thin them out to allow enough space for the remaining plants to grow. Thin the seedlings to one plant every 3 to 4 inches (7.6 to 10 cm).
It’s important to note that parsnip seeds can take time to germinate, usually anywhere from 14 to 21 days. Be patient and maintain consistent moisture levels in the soil to promote successful sprouting. Once the seedlings are established, it’s important to provide them with proper care, which includes adequate watering and sunlight. We’ll delve into these aspects in step 4.
Step 4: Providing Adequate Watering
Watering is a crucial aspect of growing healthy parsnips. Proper moisture levels in the soil support good root development and help the plants thrive. Follow these guidelines to ensure your parsnips receive the right amount of water:
- Consistent Moisture: Parsnips require consistently moist soil throughout their growing season. Avoid allowing the soil to dry out completely between waterings, as this can result in stunted growth and woody roots.
- Watering Frequency: Depending on the weather conditions and soil type, you may need to water your parsnips 1 to 2 inches (2.5 to 5 cm) per week. However, it’s important to monitor the soil moisture and adjust the frequency as needed. Use your finger or a soil moisture meter to check the moisture level in the soil.
- Deep Watering: When watering, aim to moisten the soil to a depth of at least 6 to 8 inches (15 to 20 cm). This encourages the parsnip roots to grow deeply, helping them access nutrients and withstand dry spells.
- Morning Watering: It’s best to water your parsnips in the morning. This allows the foliage to dry off during the day, reducing the risk of fungal diseases. Watering in the evening can lead to prolonged moisture on the leaves, creating a favorable environment for diseases to develop.
- Avoid Overwatering: While consistent moisture is essential, be cautious not to overwater your parsnips. Excessive moisture can lead to root rot and other fungal diseases. It’s better to slightly underwater than to overwater. Monitor the soil moisture regularly and adjust your watering schedule as needed.
Remember, weather conditions and soil type can influence the amount of water your parsnips require. Be attentive to their needs and provide adequate moisture to promote healthy growth. The next step is to ensure your parsnips receive sufficient sunlight for optimum development.
Read more: How To Grow A Tree From A Seed
Step 5: Ensuring Sufficient Sunlight
Sunlight is a vital factor in the growth and development of parsnips. These vegetables thrive in full sun, which typically means they need at least 6 to 8 hours of direct sunlight per day. Here are some tips to ensure your parsnips receive sufficient sunlight:
- Choose the Right Location: Before planting your parsnips, select a sunny spot in your garden that receives ample sunlight throughout the day. Avoid areas with excessive shade from trees, buildings, or other structures that may obstruct sunlight.
- Maximize Sun Exposure: If you have limited space in your garden or if there are shaded areas, consider strategic planting or trimming surrounding plants to allow more sunlight to reach your parsnips. Pruning nearby trees or removing obstacles can help maximize sun exposure.
- Rotate Crops: If you have been growing other plants in your garden, it’s important to practice crop rotation. Avoid planting parsnips in the same spot where other root crops, such as carrots or potatoes, were grown the previous year. This ensures that the soil isn’t depleted of nutrients and reduces the risk of disease and pest buildup.
- Utilize Reflective Mulch: Reflective mulches, such as silver or metallic-colored mulch, can help increase sunlight penetration to the lower leaves of the parsnip plants. By reflecting the sunlight back onto the leaves, these mulches can enhance the overall light exposure and promote better growth.
- Monitor Shade Patterns: Take note of any changes in shade patterns throughout the day due to factors like buildings, trees, or nearby structures. Adjust the positioning of your parsnips if necessary to ensure they receive continuous sunlight for the recommended duration.
By providing your parsnips with sufficient sunlight, you encourage healthy growth and development. The next step in the process involves controlling weeds and pests to protect your parsnips from potential damage. Let’s explore this in step 6.
To grow parsnips from seeds, plant them in well-drained soil in early spring. Keep the soil consistently moist and thin out the seedlings to give them room to grow. Harvest the parsnips in the fall after a few frosts for the best flavor.
Step 6: Controlling Weeds and Pests
Keeping weeds and pests at bay is essential for the successful growth of your parsnip plants. Weeds compete for nutrients, space, and water, while pests can cause significant damage to the foliage and roots. Here are some strategies to effectively control weeds and pests:
- Weed Management: Regular weeding is crucial to prevent weeds from overpowering your parsnip plants. Gently remove weeds by hand or use a small hand tool to carefully dig them out, being careful not to disturb the delicate parsnip roots. Mulching can also help suppress weed growth by smothering them and conserving soil moisture.
- Mulching: Apply a layer of organic mulch, such as straw, shredded leaves, or wood chips, around the base of the plants. Mulch helps to suppress weeds, conserve soil moisture, and regulate soil temperature, promoting a healthier growing environment for your parsnips.
- Companion Planting: Planting companion plants that provide natural pest control can help deter pests from attacking your parsnips. For instance, planting aromatic herbs like basil, chives, or thyme nearby can help repel pests such as aphids or beetles.
- Physical Barriers: Erecting physical barriers like row covers or netting can protect your parsnips from pests like carrot fly or birds. These barriers create a physical barrier, preventing access to the plants while allowing air circulation and sunlight penetration.
- Organic Pest Control: If you’re dealing with specific pests, consider organic pest control methods. For example, introducing beneficial insects like ladybugs or lacewings can help control pest populations naturally. Neem oil or insecticidal soaps can also be effective against pests when used according to the instructions.
- Regular Inspection: Keep a close eye on your parsnip plants and regularly inspect them for any signs of pest damage or disease. Early detection can help you take prompt action and prevent widespread damage.
By implementing these weed and pest control measures, you can safeguard your parsnips and ensure their sustained growth and productivity. The next step involves thinning and transplanting your parsnip seedlings. Let’s explore this in step 7.
Step 7: Thinning and Transplanting
Thinning your parsnip seedlings and, if necessary, transplanting them into their final growing positions is an important step in ensuring proper spacing and optimal growth. Here’s how you can effectively thin and transplant your parsnip seedlings:
- Thinning Seedlings: Once your parsnip seedlings have reached a height of about 3 to 4 inches (7.6 to 10 cm) and have developed a few true leaves, it’s time to thin them out. Thinning helps provide sufficient space for each plant to grow and prevents overcrowding. Carefully remove the excess seedlings, leaving only the strongest and healthiest ones. Aim for a spacing of 3 to 4 inches (7.6 to 10 cm) between each plant.
- Transplanting (if necessary): If your parsnip seedlings are overcrowded or if you started them indoors in individual containers, they may need to be transplanted into their final growing positions. Carefully dig up the seedlings, taking care not to damage their delicate roots. Dig a hole in the prepared soil that is deep enough to accommodate the roots without bending or crowding. Gently place the seedling into the hole and backfill with soil, ensuring that the plant is positioned at the same depth as it was before. Press down the soil around the base of the seedling to secure it in place.
- Watering: After thinning or transplanting, water the parsnip seedlings thoroughly to help them settle into their new positions. Provide regular watering to ensure proper establishment.
- Protect Transplants: If you have transplanted your parsnip seedlings, protect them from excessive sun or wind exposure for the first few days. You can use shade cloth or create temporary windbreaks to shield the young plants until they acclimate to their new environment.
Thinning and transplanting your parsnip seedlings ensures that each plant has enough space to grow and access to essential nutrients. It also helps minimize competition among plants and promotes optimal root development. The next step focuses on the regular maintenance and care that your parsnips require as they grow. Let’s explore this in step 8.
Step 8: Regular Maintenance and Care
Caring for your parsnip plants is essential to ensure their healthy growth and a bountiful harvest. Regular maintenance and care involve a combination of tasks, including watering, fertilizing, and protecting your plants from weeds and pests. Here’s what you need to do:
- Watering: Consistent moisture is crucial for parsnips’ growth. Water your plants regularly, aiming for 1 to 2 inches (2.5 to 5 cm) of water per week. Adjust the frequency based on weather conditions, allowing the soil to dry slightly between waterings. Avoid overwatering, as it can lead to root rot.
- Fertilizing: Parsnips benefit from a balanced fertilizer application midway through their growth. When the plants reach about 6 to 8 inches (15 to 20 cm) tall, side dress them with a balanced organic fertilizer. Follow the product’s instructions for application rates, ensuring even distribution around the plants.
- Weed Control: Keep the area around your parsnips free from weeds. Regularly remove any weeds that emerge to prevent them from competing with the parsnip plants for nutrients and space. Mulching can also help suppress weed growth and conserve soil moisture.
- Pest Management: Monitor your parsnips regularly for signs of pests. Common pests that can affect parsnips include carrot fly, aphids, and caterpillars. If you notice any pest activity, use organic pest control methods like handpicking, applying neem oil, or using insecticidal soap to keep the pests at bay.
- Support: As parsnip plants grow taller and develop heavier foliage, they may benefit from additional support. Consider gently staking the plants or providing support cages to prevent them from bending or falling over.
- Mulching: Maintain a layer of mulch around the base of your parsnip plants. Mulching helps keep the soil moist, suppresses weed growth, and regulates soil temperature, providing an optimal growing environment for your plants.
- Regular Harvesting: Start harvesting parsnips when they reach the desired size, usually about 1 to 2 inches (2.5 to 5 cm) in diameter. You can harvest them throughout the growing season, starting with the larger ones and leaving the smaller ones in the ground to continue growing. Gently loosen the soil around the roots and lift them out.
With regular maintenance and care, your parsnips will flourish and provide you with a delicious harvest. The next step is to learn about the proper techniques for harvesting parsnips. Let’s move on to step 9.
Read more: How To Grow Zinnias From Seed
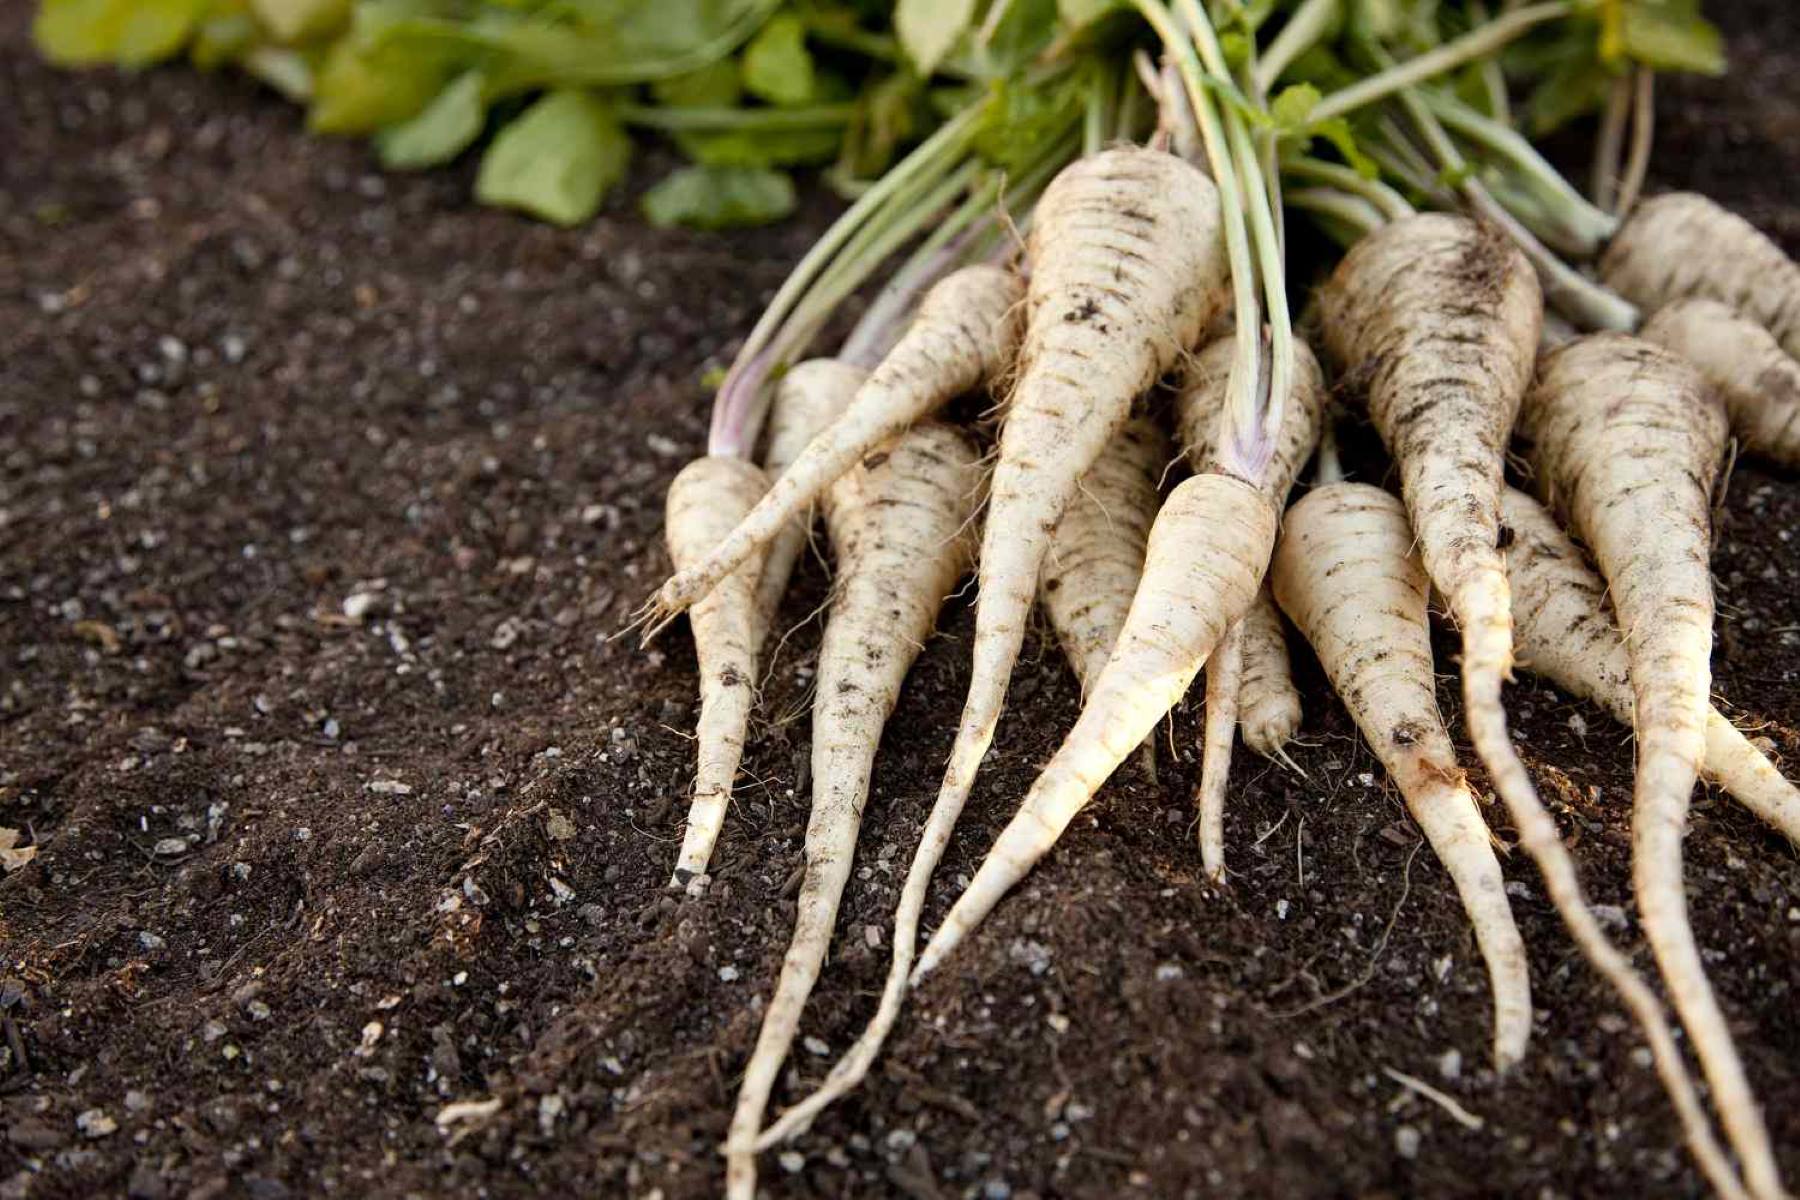
Step 9: Harvesting Parsnips
Harvesting parsnips is an exciting moment as you get to enjoy the fruits of your labor. Knowing the right time to harvest and the proper techniques ensures that you harvest parsnips at their peak of flavor and quality. Follow these guidelines for a successful harvest:
- Timing: Parsnips are typically ready for harvest starting in late fall or early winter, after they have been grown for about 90 to 120 days. However, you can also harvest them earlier if you prefer smaller roots.
- Test Size: Check the size of your parsnips by gently pushing the soil away from the top of the root. Harvest when the roots have reached the desired size, usually around 1 to 2 inches (2.5 to 5 cm) in diameter at the top. They should be firm and have a good color.
- Loosening the Soil: Before harvesting, make sure the soil is moist to facilitate easier root removal. Use a garden fork or a spade to loosen the soil around the base of the parsnip plant. Take care not to damage the roots while doing so.
- Lifting the Roots: Grasp the leafy top of the parsnip plant and gently lift it while simultaneously lifting the root out of the soil. Be cautious not to snap or break the root as you lift it out.
- Trimming and Cleaning: Once harvested, trim off the leafy tops, leaving a short stub. Remove any excessive soil clinging to the roots, but avoid washing them unless necessary, as excess moisture can cause the roots to deteriorate faster.
- Storage: Store harvested parsnips in a cool, dark, and dry place. They can be stored in a root cellar, a cool basement, or the refrigerator. Keep them in a perforated plastic bag or airtight container to maintain humidity levels. Freshly harvested parsnips can be stored for several weeks to several months.
Remember that parsnips improve in flavor after a few frosts, as the cold temperatures convert starches into sugars. Consider leaving a portion of your parsnips in the ground until late fall or early winter for sweeter flavors. Enjoy the delicious taste of your homegrown parsnips in soups, stews, roasted dishes, or as a flavorful addition to your favorite recipes.
After harvesting parsnips, it’s essential to properly store and use them to maximize their shelf life and flavor. Let’s explore the final step: storing and using parsnips in step 10.
Step 10: Storing and Using Parsnips
Once you have harvested your parsnips, proper storage and usage techniques will help you make the most of your homegrown produce. Follow these steps to store and enjoy your parsnips:
- Storage Conditions: Store parsnips in a cool, dark, and dry place with a temperature range of about 32°F to 40°F (0°C to 4°C). An ideal storage location is a root cellar, a cool basement, or the vegetable crisper drawer in the refrigerator.
- Preparation for Storage: Before storing, trim off the leafy tops of the parsnips, leaving a short stub. Remove any excess soil clinging to the roots. However, avoid washing the parsnips unless necessary, as excess moisture can promote spoilage.
- Storage Containers: Place the parsnips in a perforated plastic bag, airtight container, or wrap them in damp paper towels. This helps maintain humidity levels and prevents them from drying out too quickly.
- Storage Duration: Freshly harvested parsnips can be stored for several weeks to several months, depending on the variety and storage conditions. Periodically check the stored parsnips for any signs of spoilage and remove any damaged or rotting roots to prevent them from affecting the others.
- Cooking and Use: Parsnips can be used in a variety of culinary applications. They can be roasted, sautéed, mashed, or used in soups, stews, and casseroles. Their slightly sweet and nutty flavor pairs well with herbs and spices like thyme, rosemary, and garlic. Experiment with different recipes to discover your favorite ways of enjoying parsnips.
- Culinary Tips: To make parsnips more tender, you can blanch them in boiling water for a few minutes before using them in your desired recipe. Additionally, you can mix parsnips with other root vegetables like carrots or potatoes for added flavor and texture.
- Parsnip Greens: Did you know that parsnip greens are edible? Don’t discard those leafy tops! You can use them in salads, sautés, or soups. They have a slightly bitter taste and can add a unique twist to your dishes.
By following these storage and usage techniques, you can enjoy the goodness of your homegrown parsnips for an extended period. Embrace the versatility of this delicious root vegetable and get creative with incorporating parsnips into your culinary repertoire.
Congratulations on successfully growing and harvesting your parsnips! As a gardener, the joy of tasting your homegrown produce is truly rewarding. Remember to save some parsnip seeds for the next planting season, allowing you to continue enjoying their flavors year after year.
Happy cooking and savoring the delightful flavors of your homegrown parsnips!
Conclusion
Growing parsnips from seeds is a rewarding experience that allows you to cultivate a unique and flavorful addition to your garden. By following the steps outlined in this guide, you can successfully grow parsnips and enjoy a bountiful harvest of these delicious root vegetables.
From choosing the right seeds and preparing the soil to sowing the seeds, providing adequate watering and sunlight, and controlling weeds and pests, each step plays a vital role in the successful growth of your parsnips. Regular maintenance and care, including watering, fertilizing, and protecting your plants, ensure their continued health and productivity.
When it comes time to harvest your parsnips, remember to wait until they have reached the desired size and flavor. Proper harvesting techniques, such as loosening the soil and gently lifting the roots, will help preserve the quality of your harvest.
After harvesting, storing your parsnips in cool, dark, and dry conditions will prolong their shelf life. And when you’re ready to cook, experiment with different culinary techniques and recipes to savor the delightful flavors of parsnips in your favorite dishes.
Whether you enjoy them roasted, mashed, or in a comforting soup, parsnips offer a unique and delectable taste that will elevate your culinary creations. Remember to save some seeds for future plantings, allowing you to continue growing parsnips year after year.
So, why not give parsnips a try in your garden? With a little bit of planning, care, and patience, you can experience the satisfaction of growing and enjoying your own homegrown parsnips. Happy gardening and happy cooking!
Frequently Asked Questions about How To Grow Parsnips From Seeds
Was this page helpful?
At Storables.com, we guarantee accurate and reliable information. Our content, validated by Expert Board Contributors, is crafted following stringent Editorial Policies. We're committed to providing you with well-researched, expert-backed insights for all your informational needs.


0 thoughts on “How To Grow Parsnips From Seeds”