Home>Garden Essentials>How To Grow Persimmon From Seed
Garden Essentials
How To Grow Persimmon From Seed
Modified: March 24, 2024
Learn how to grow persimmon from seed in your garden and enjoy the delicious fruit. Follow our step-by-step guide for successful gardening.
(Many of the links in this article redirect to a specific reviewed product. Your purchase of these products through affiliate links helps to generate commission for Storables.com, at no extra cost. Learn more)
Introduction
Welcome to the wonderful world of growing persimmons from seed! If you’re a gardening enthusiast looking for a rewarding experience and a delicious addition to your garden, growing persimmons from seed is a great choice. Not only is it a cost-effective way to expand your fruit-bearing plants, but it also allows you to witness the entire life cycle of these amazing trees.
Persimmons are beautiful, slow-growing trees that belong to the Ebenaceae family. They are known for their vibrant orange fruits, which are sweet and slightly tangy in taste. Native to Asia but now grown in various parts of the world, persimmons offer both ornamental and culinary benefits.
While most gardeners prefer to grow persimmons from grafted plants for faster and more consistent results, growing them from seed can be an exciting and rewarding process. It allows you to explore the genetic diversity and unique characteristics that can emerge from seed-grown trees.
Before we dive into the step-by-step process of growing persimmons from seed, it’s important to note that patience is key. Persimmons are slow-growing trees, and it can take several years before they start bearing fruits. But fear not! The journey is filled with learning experiences and the joy of nurturing a tree from its smallest form.
In this article, we will guide you through the entire process, from seed selection to harvesting persimmons. So, put on your gardening gloves and let’s get started!
Key Takeaways:
- Growing persimmons from seed is a patient and rewarding journey, from selecting fresh seeds to nurturing seedlings and enjoying the delicious fruits.
- Patience and care are key in growing persimmons from seed, leading to the joy of harvesting your own homegrown persimmons.
Read more: How To Grow Fuyu Persimmon From Seed
Step 1: Seed Selection
The first step in growing persimmons from seed is to carefully select the seeds. While you can purchase persimmon seeds from nurseries or online suppliers, it’s also possible to use seeds from store-bought persimmons. Here’s what you need to consider when selecting persimmon seeds:
- Variety: There are two main types of persimmons: the astringent varieties and the non-astringent varieties. Astringent persimmons are high in tannins and need to be fully ripe or even soft before they are edible. Non-astringent persimmons, on the other hand, can be eaten when crisp like an apple, even before they fully ripen. Decide which type you prefer and choose seeds accordingly.
- Freshness: Look for fresh, plump seeds. Avoid using seeds that are shriveled, discolored, or damaged.
- Maturity: Collect seeds from fully ripe persimmons. The fruit should have a deep orange color and be soft to the touch.
- Source: If using store-bought persimmons, ensure they are organic and free from pesticides or chemicals.
Once you have gathered the seeds, it’s time to move on to the next step: seed preparation.
Step 2: Seed Preparation
Now that you have selected the persimmon seeds, it’s important to prepare them before planting. This step helps to increase the chances of successful germination and healthy seedling development. Follow these steps for seed preparation:
- Extraction: Gently remove the seeds from the persimmon fruit. Rinse them under cool water to remove any residue or pulp.
- Stratification: Persimmon seeds require a period of cold stratification to break their dormancy. This process mimics the natural conditions that would occur if the seeds were to fall to the ground during winter. To stratify the seeds, place them in a moist paper towel or sphagnum moss inside a sealable plastic bag. You can also add a few drops of water to ensure moisture. Label the bag with the date and variety of seeds and place it in the refrigerator for about 60-90 days.
- Periodic checks: During the stratification period, periodically check the seeds for signs of mold or excessive moisture. If necessary, adjust the moisture level by adding or removing a small amount of water. Be careful not to overwater or let the seeds dry out.
Once the stratification period is complete, it’s time to move on to the next step: the germination process.
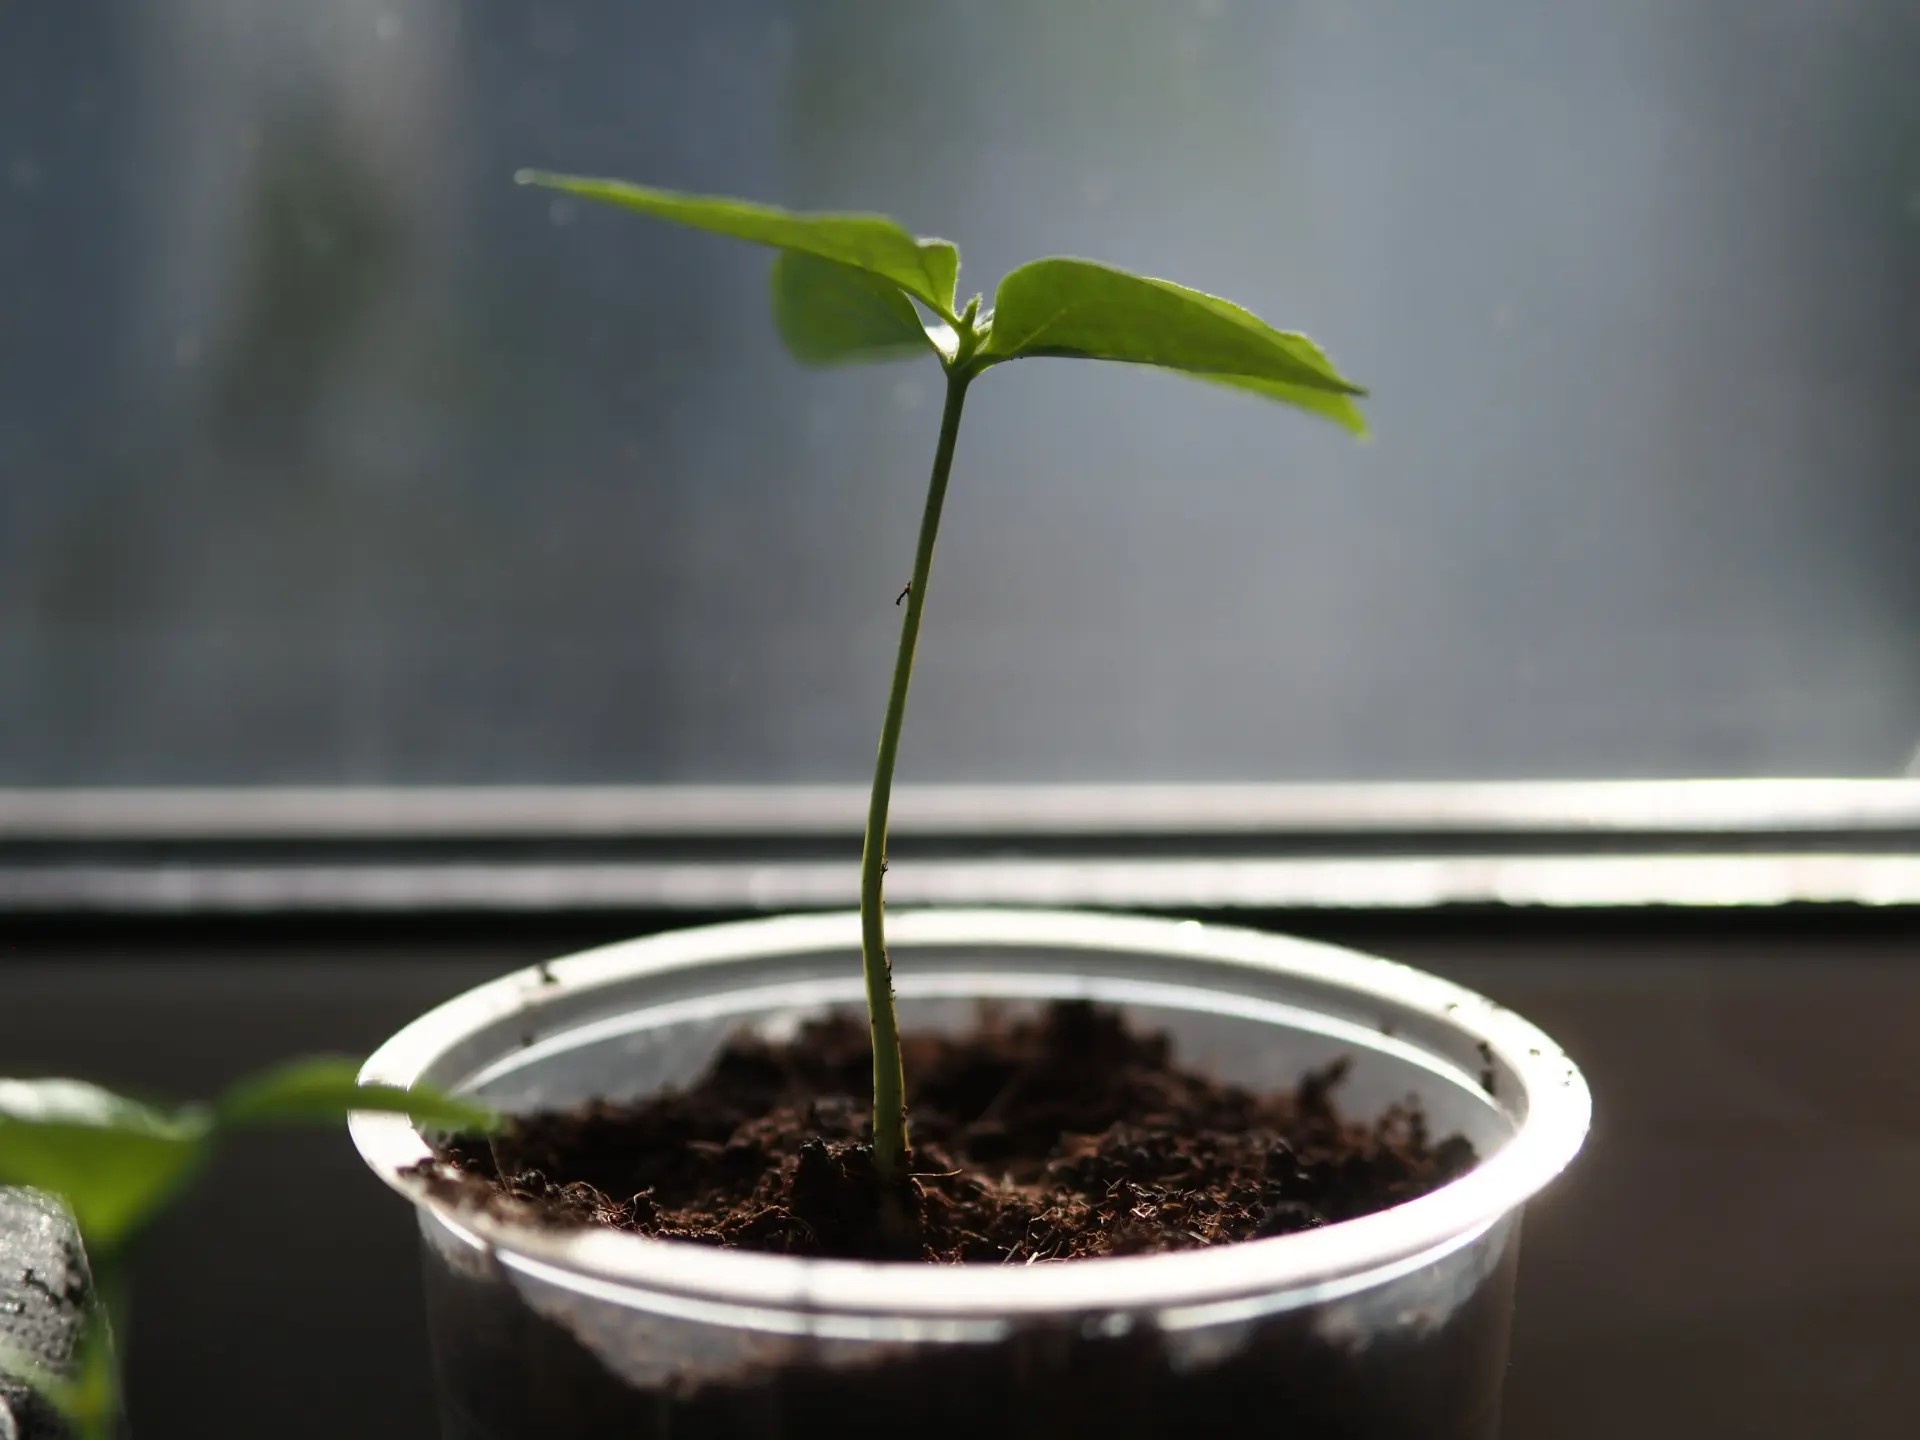
Step 3: Germination Process
After the seeds have undergone cold stratification, it’s time for the exciting part – the germination process! Follow these steps to successfully germinate your persimmon seeds:
- Sowing: Fill a seed tray or small pots with a well-draining potting mix. Make sure the soil is moist but not waterlogged. Plant the persimmon seeds about 1 inch deep into the soil, spacing them a few inches apart.
- Warmth and moisture: Place the seed tray or pots in a warm location that receives indirect sunlight. This will help create a favorable environment for germination. Keep the soil consistently moist by lightly misting it or watering from the bottom to avoid disturbing the seeds.
- Patience: Persimmon seeds can take anywhere from a few weeks to a couple of months to germinate. Be patient and resist the urge to dig up the seeds to check for progress. Maintain consistent moisture and provide gentle warmth, and soon you’ll see the first signs of germination.
- Transplanting: Once the seedlings have developed a few sets of true leaves and are sturdy enough to handle, they can be transplanted into larger pots or into the ground. Choose a sunny location with well-draining soil for optimal growth.
Now that your persimmon seeds have successfully germinated, it’s time to move on to the next step: transplanting the seedlings.
To grow persimmon from seed, first remove the seeds from ripe fruit and wash off any pulp. Then, plant the seeds in well-draining soil and keep them moist. It’s important to stratify the seeds by placing them in a plastic bag with moist peat moss in the refrigerator for 60-90 days before planting. This will help break the seed’s dormancy and improve germination. Good luck!
Step 4: Transplanting Seedlings
As your persimmon seedlings continue to grow, they will eventually outgrow their seed trays or small pots. It’s time to transplant them into larger containers or into the ground. Follow these steps for successful transplantation:
- Choose the right time: Wait until the seedlings have developed a strong root system and are at least 6 inches tall before transplanting them. This usually takes about 6-8 weeks after germination.
- Prepare the new containers or planting area: If transplanting into larger pots or containers, ensure they have drainage holes and are filled with a good quality potting mix. If planting directly into the ground, prepare the soil by loosening it and adding organic matter to improve fertility and drainage.
- Handle the seedlings with care: Gently remove the seedlings from their original containers, being careful not to damage the delicate roots. If the roots are tightly intertwined, you can use a fork or your fingers to untangle them slightly.
- Planting depth: Dig a hole in the new container or planting area that is deep enough to accommodate the seedling’s root system. Place the seedling in the hole, making sure the soil level matches the level at which it was previously planted.
- Backfill and water: Fill in the hole with soil, gently firming it around the seedling’s roots. Water the newly transplanted seedling thoroughly to encourage the roots to establish themselves in their new environment.
- Provide support if needed: If the seedling is tall and unstable, you can insert a stake next to it and use gentle ties to secure it in an upright position. However, make sure not to tie the plant too tightly, as it needs some flexibility for natural movement.
Once you have successfully transplanted your persimmon seedlings, it’s time to move on to the next step: caring for and maintaining your growing persimmon trees.
Read more: How To Plant Persimmon Tree From Seed
Step 5: Care and Maintenance
Now that your persimmon seedlings are happily settled in their new containers or planting areas, it’s important to provide them with the proper care and maintenance to ensure healthy growth and fruit production. Follow these guidelines to keep your persimmon trees thriving:
- Watering: Persimmon trees require regular watering, especially during dry spells. Keep the soil consistently moist but not waterlogged. Water deeply, allowing the water to penetrate the root zone.
- Fertilization: Apply a balanced fertilizer specifically formulated for fruit trees in the early spring before new growth begins. Follow the product instructions for application rates. Avoid over-fertilization, as it can lead to excessive vegetative growth.
- Pruning: Prune your persimmon tree during the dormant season to remove any dead, diseased, or crowded branches. Additionally, thin out the canopy to improve air circulation and sunlight penetration. Pruning helps maintain the tree’s health and shape, as well as promotes fruit production.
- Pest and Disease Control: Monitor your persimmon trees for common pests such as aphids, mealybugs, and spider mites. Use organic methods or appropriate insecticides to control infestations. Regularly check for signs of diseases like leaf spot or powdery mildew and take necessary precautions or apply appropriate treatments.
- Mulching: Apply a layer of organic mulch around the base of the tree to retain moisture, suppress weed growth, and regulate soil temperature. Keep the mulch a few inches away from the trunk to prevent rot.
- Support and Training: As your persimmon tree grows, provide support for the branches by using stakes or trellises to prevent breakage under the weight of the fruit. Prune and train the tree’s shape to a desired form, such as an open-center or central leader system.
By providing proper care and maintenance to your persimmon trees, you are helping to ensure their growth and development into productive fruit-bearing plants.
Now, we are approaching the final step – harvesting persimmons!
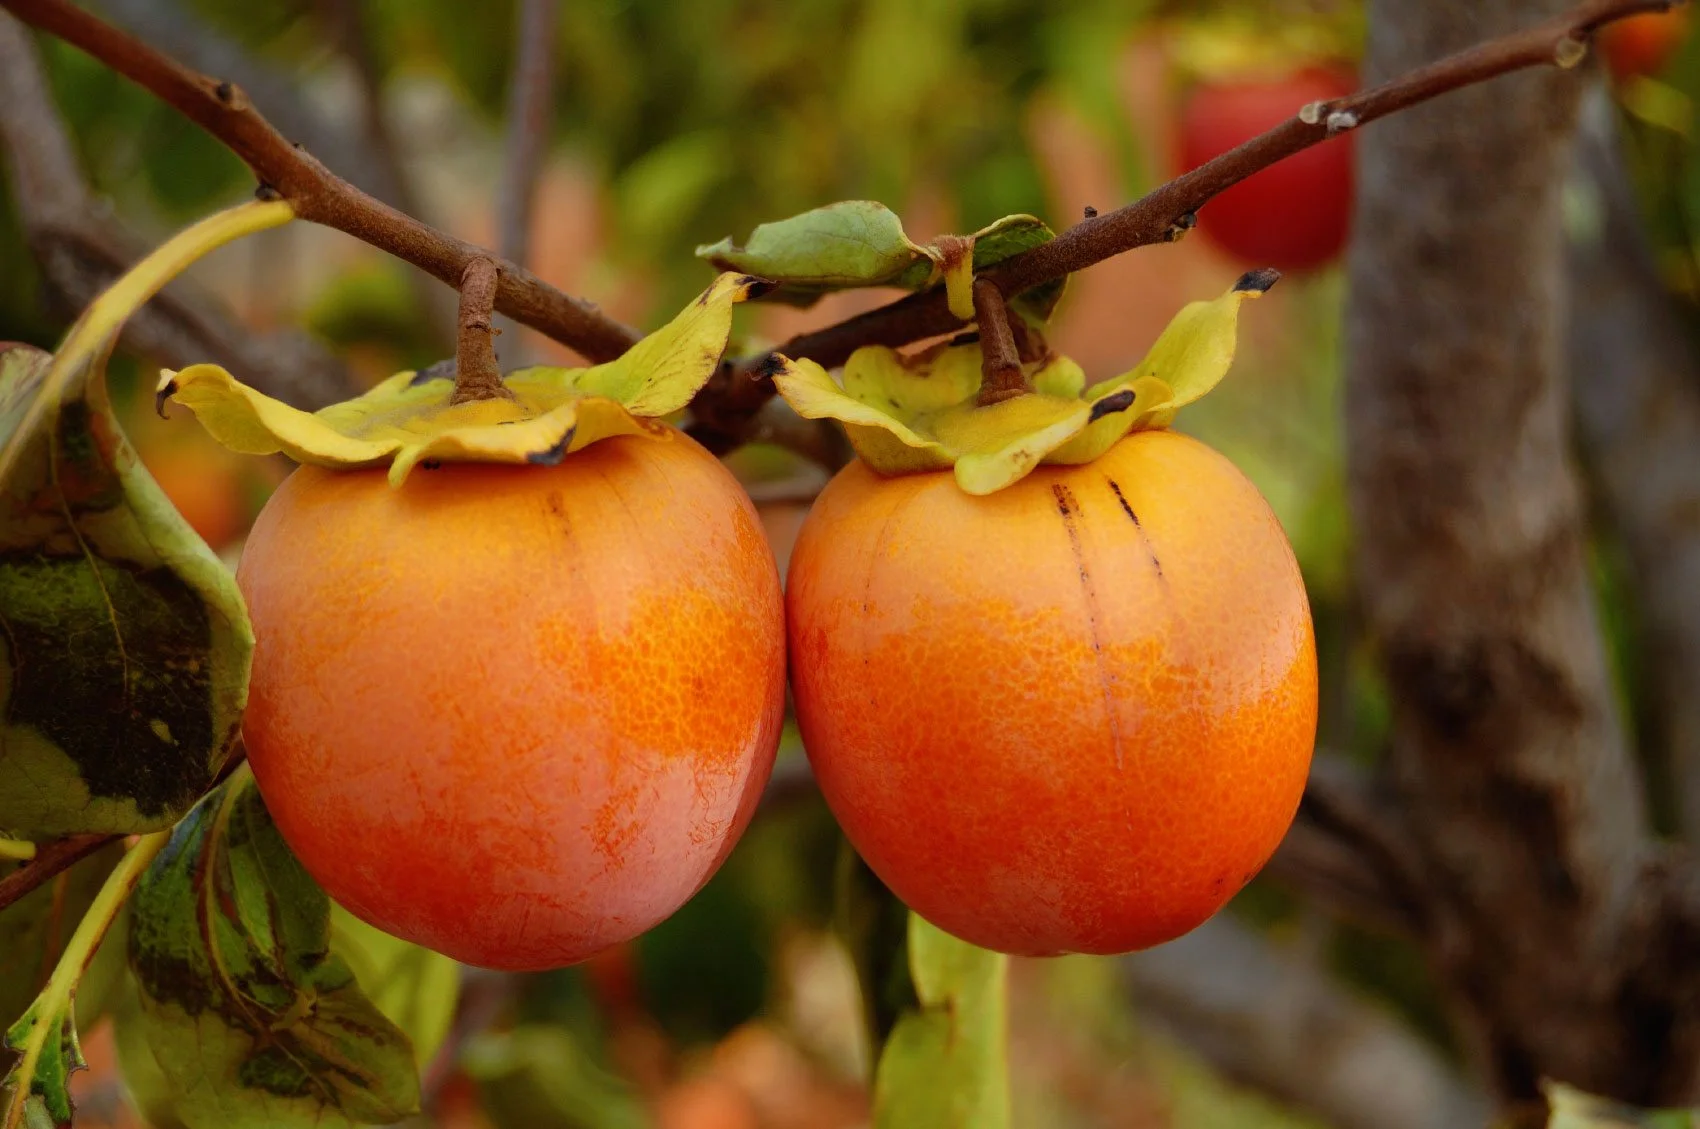
Step 6: Harvesting Persimmons
After years of patience and care, the time has finally come to enjoy the fruits of your labor – harvesting persimmons! Depending on the variety of persimmon and your climate, the timing of the harvest may vary. Here are some important things to consider when harvesting persimmons:
- Color and Texture: Persimmons should have reached their full color and firmness before harvesting. Astringent persimmons, like the Hachiya variety, should be fully ripened and very soft to the touch, as they can be quite astringent if picked too early. Non-astringent varieties, like the Fuyu, can be harvested when they are firm and have turned a deep orange color.
- Twist or Cut: To harvest persimmons, gently twist the fruit, and if it doesn’t release easily, use a pair of pruning shears to cut the stem about an inch above the fruit. Be careful not to damage the fruit or the tree while harvesting.
- Storage: Persimmons can be stored at room temperature for a few days to allow them to fully ripen. If you want to prevent over-ripening, store them in the refrigerator. Remember to separate the ripe persimmons from the unripe ones, as the ethylene gas released by the ripe fruit can accelerate ripening in others.
- Enjoying the Fruits: Persimmons can be enjoyed in various ways. Eat them fresh, use them in salads or smoothies, bake them into pies or bread, or preserve them by drying or freezing. The possibilities are endless!
Remember, persimmons are best when fully ripe, so be patient and allow them to develop their sweet, delectable flavor. Enjoy the fruits of your labor and share the bounty with friends and family.
Congratulations! You have successfully grown and harvested persimmons from seed. It’s an incredible achievement that showcases your gardening skills and dedication. Now you can sit back, relax, and savor the delicious rewards of your hard work.
Happy gardening and enjoy your persimmons!
Conclusion
Growing persimmons from seed is not only a rewarding endeavor but also a fascinating journey that allows you to witness the magic of nature firsthand. From selecting the right seeds to caring for the seedlings and finally harvesting the fruits, each step in the process brings you closer to the bountiful rewards that persimmon trees have to offer.
Throughout this article, we have explored the step-by-step process of growing persimmons from seed. Starting with seed selection, we learned about the importance of choosing the right variety and ensuring the seeds are fresh and healthy. We then moved on to seed preparation, which involved cold stratification to break seed dormancy and promote successful germination.
The germination process was an exciting phase, where we witnessed the transformation of seeds into seedlings. With patience and proper care, these tiny seedlings grew into strong and healthy trees, ready to be transplanted into larger containers or the ground.
Once the persimmon trees were settled into their new homes, we discussed the importance of caring for and maintaining them. From proper watering and fertilization to pruning and pest control, these efforts ensure the continued health and productivity of the trees.
Finally, after years of nurturing and growing, the time came to harvest the luscious persimmons. We learned about the signs of readiness and the different methods of harvesting. Whether enjoying the fruits fresh or exploring various culinary creations, persimmons provide a delightful taste sensation and a sense of accomplishment.
As we conclude this journey of growing persimmons from seed, it’s important to remember that gardening is a continuous learning process. Each experience provides valuable knowledge and insights to improve our skills and deepen our connection with the natural world.
So, seize the opportunity and explore the wonders of growing persimmons from seed. Let your garden flourish with these beautiful trees, and relish in the joy of harvesting your very own homegrown persimmons. Happy gardening!
Frequently Asked Questions about How To Grow Persimmon From Seed
Was this page helpful?
At Storables.com, we guarantee accurate and reliable information. Our content, validated by Expert Board Contributors, is crafted following stringent Editorial Policies. We're committed to providing you with well-researched, expert-backed insights for all your informational needs.


0 thoughts on “How To Grow Persimmon From Seed”