Home>Garden Essentials>How To Grow Peppers From Seed
Garden Essentials
How To Grow Peppers From Seed
Modified: August 17, 2024
Learn the secrets to successfully growing peppers from seed in your garden. Discover expert tips and techniques for a bountiful pepper harvest!
(Many of the links in this article redirect to a specific reviewed product. Your purchase of these products through affiliate links helps to generate commission for Storables.com, at no extra cost. Learn more)
Introduction
Growing peppers from seed is a rewarding and fulfilling experience for any gardener. Not only does it allow you to have a wide variety of pepper plants in your garden, but it also gives you the satisfaction of seeing those plants thrive and produce an abundance of delicious and colorful peppers. Whether you’re a seasoned gardener or just starting out, this comprehensive guide will take you through the step-by-step process of growing peppers from seed.
Peppers, known for their vibrant colors, range of flavors, and different levels of heat, are a versatile vegetable that can be used in various dishes, from salads to stir-fries and salsas to soups. By growing your own peppers, you have complete control over the quality and freshness of the produce.
Before we dive into the steps of growing peppers from seed, it’s important to note that different pepper varieties have varying requirements in terms of planting, care, and maturity. Therefore, it’s essential to choose the right pepper seeds that are suitable for your climate and personal preferences.
This guide will provide you with a general overview of the steps involved in growing peppers from seed. So, let’s gather our supplies, put on our gardening gloves, and embark on this exciting journey of growing peppers from seed.
Key Takeaways:
- Growing peppers from seed is a fun and rewarding experience that involves gathering supplies, sowing seeds, and providing proper care to enjoy a bountiful harvest of delicious peppers.
- To ensure healthy pepper plants, it’s important to provide adequate lighting, water, and nutrients, while also being mindful of potential pests, diseases, and environmental stress.
Read more: How To Grow Pepper Plants From Seeds
Step 1: Gather Supplies for Pepper Seed Planting
Before you begin sowing pepper seeds, it’s essential to gather all the necessary supplies. This will ensure that you have everything you need at hand, making the seed planting process smoother and more efficient.
Here’s a list of supplies you’ll need:
- Pepper seeds: Choose high-quality pepper seeds of your preferred variety. You can either save seeds from a previous harvest or purchase them from a reputable seed supplier.
- Seed starting mix: Opt for a well-draining, sterile seed starting mix to provide a healthy environment for the seeds to germinate.
- Seed trays or pots: Use seed trays or small pots that have drainage holes to allow excess water to escape and prevent the seeds from becoming waterlogged.
- Labels: Keep track of the pepper varieties by labeling each tray or pot with the name or type of pepper seeds sown.
- Plastic dome or plastic wrap: Create a mini greenhouse effect by covering the seed trays with a clear plastic dome or plastic wrap to retain moisture and heat.
- Grow lights or fluorescent lights: If you don’t have access to natural sunlight or if you’re starting seeds indoors, invest in grow lights or fluorescent lights to provide adequate lighting for the seedlings.
- Heat mat (optional): To speed up germination, consider using a heat mat underneath the seed trays to provide a warm and consistent temperature.
- Watering can or spray bottle: Use a watering can or spray bottle with a fine mist setting to gently water the seeds without causing any damage or displacement.
- Plant markers: Use plant markers or popsicle sticks to indicate the variety and planting date of each tray or pot.
By gathering these supplies in advance, you’ll have everything you need to successfully sow and nurture your pepper seeds. Once you have these items ready, you can move on to the next step: preparing the seed starting mix.
Step 2: Preparing the Seed Starting Mix
The success of your pepper seedlings starts with the right seed starting mix. This mix provides the necessary nutrients, moisture retention, and drainage for the seeds to germinate and thrive. Here’s how you can prepare your own seed starting mix:
- Start with a sterile container: Use a clean bucket or a large container to mix your seed starting mix. It’s important to use a sterilized container to prevent any potential disease or contamination.
- Combine soilless components: In a ratio of 1:1, mix together two soilless components – peat moss and vermiculite or perlite. Peat moss provides moisture retention, while vermiculite or perlite ensures good drainage.
- Add nutrient-rich compost: Mix in a small amount of well-decomposed compost to provide your seedlings with additional nutrients. This will support their initial growth and development.
- Blend in organic matter: Incorporate a small amount of organic matter, such as coconut coir or finely shredded bark, to improve the overall structure and moisture retention of the seed starting mix.
- Moisten the mix: Gradually add water to the mixture while stirring it. Aim for a damp consistency, where the mix holds its shape when squeezed but doesn’t release excess water.
It’s important to note that commercial seed starting mixes are readily available if you prefer not to make your own mix. These mixes are formulated to provide the ideal balance of nutrients, moisture, and drainage for successful seed germination.
Once your seed starting mix is prepared, fill your seed trays or pots with the mixture, leaving a small space at the top. Gently tamp down the mix to ensure uniform packing and create a flat surface for sowing the pepper seeds.
Now that your seed starting mix is ready, you’re one step closer to sowing the pepper seeds and starting your journey towards growing healthy and vibrant pepper plants.
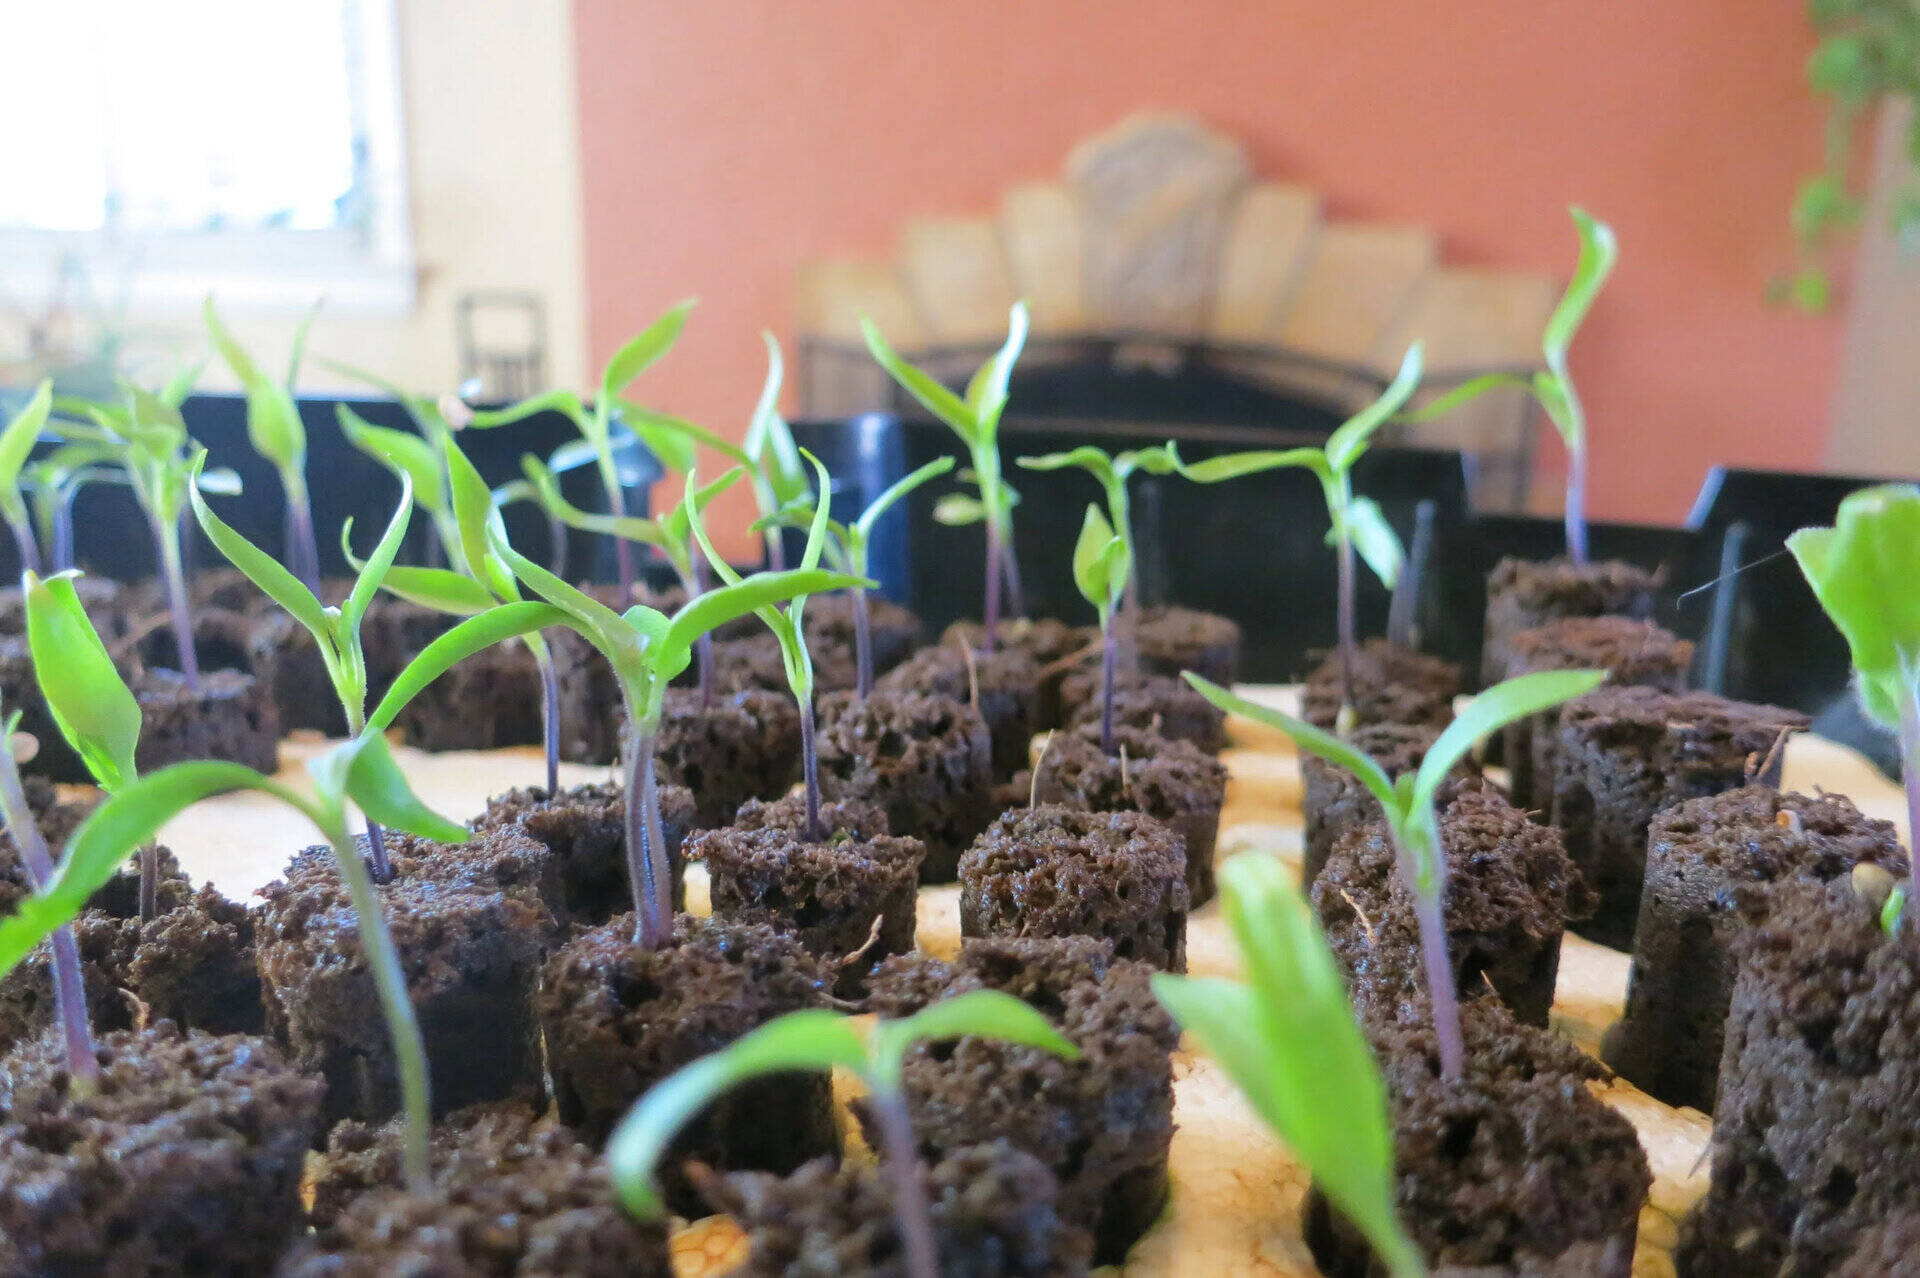
Step 3: Sowing Pepper Seeds
Now that your seed starting mix is prepared, it’s time to sow your pepper seeds. Properly sowing the seeds ensures that they are placed at the correct depth and have enough space to germinate and develop into healthy seedlings.
- Moisten the seed starting mix: Before sowing the seeds, lightly water the seed starting mix to ensure it is evenly moist but not soaked. This provides a conducive environment for seed germination.
- Space the seeds: Depending on the size of your seed trays or pots, space the pepper seeds accordingly. Typically, you can sow multiple seeds in each cell or pot, allowing you to thin out weaker seedlings later.
- Sow at the right depth: Make sure to plant the seeds at the recommended depth for the specific pepper variety. As a general rule of thumb, plant pepper seeds at a depth of around ¼ inch (6mm). Consult the seed packet or online resources for accurate information.
- Cover the seeds: Gently cover the pepper seeds with a thin layer of the seed starting mix. Avoid burying the seeds too deep, as it may hinder their germination and emergence.
- Mist the seeds: Using a spray bottle or a fine mist setting on a watering can, moisten the top layer of the seed starting mix. Aim to keep the seeds and surrounding environment evenly moist, but not waterlogged.
- Label the trays or pots: Place labels or plant markers in each tray or pot to identify the pepper variety and sowing date. This will help you keep track of the progress of your pepper seedlings.
After sowing the pepper seeds, cover the seed trays with a clear plastic dome or plastic wrap to create a mini greenhouse effect. This helps to maintain humidity and warmth, promoting optimal seed germination.
Place the seed trays in a warm location with temperatures between 70-80°F (21-27°C). If needed, you can use a heat mat underneath the trays to maintain a consistent temperature for faster germination.
Now that you have successfully sown your pepper seeds, it’s time to provide them with the right conditions for germination. In the next step, we will discuss the importance of lighting and temperature for your pepper seedlings’ growth.
Step 4: Providing Adequate Lighting and Temperature
After sowing your pepper seeds, it’s crucial to provide them with the right lighting and temperature conditions for optimal growth. These factors play a significant role in ensuring that your pepper seedlings develop into strong and healthy plants.
Lighting:
Pepper seedlings require an ample amount of light to thrive. Inadequate lighting can result in weak, leggy seedlings that struggle to support their own weight. Here are some guidelines for providing adequate lighting:
- Place the seed trays near a south-facing window where they can receive maximum sunlight. This allows the plants to benefit from natural sunlight, which is the best light source.
- If natural sunlight is limited or unavailable, consider using artificial grow lights. LED grow lights, full-spectrum fluorescent lights, or high-output fluorescent lights are suitable options for providing the necessary light intensity.
- Position the lights approximately 2-4 inches (5-10 cm) above the seedlings. As the seedlings grow, adjust the height of the lights to maintain the same distance, ensuring they receive an even distribution of light.
- Keep the lights on for 14-16 hours a day to simulate daylight hours. Using a timer can help automate the lighting schedule and ensure the seedlings receive consistent light exposure.
Temperature:
Pepper seeds require a warm environment for germination, and seedlings thrive in specific temperature ranges. Here are some temperature guidelines for your pepper seedlings:
- Maintain a consistent temperature of around 70-80°F (21-27°C) during germination and seedling growth. This temperature range provides optimal conditions for the seeds to sprout and the seedlings to establish themselves.
- Use a heating mat underneath the seed trays, if necessary, to maintain the desired temperature. Heating mats help create a warm and consistent environment for faster and more uniform germination.
- Avoid exposing the seedlings to extreme temperature fluctuations, which can cause stress and hinder their growth. Keep the seedlings away from drafts or cold areas, as well as excessive heat sources.
By providing your pepper seedlings with adequate light and maintaining the right temperature, you’ll give them the best chance to develop into strong and healthy plants. In the next step, we’ll discuss the importance of proper watering techniques for your pepper seeds.
Read more: How To Grow Banana Peppers From Seeds
Step 5: Watering Pepper Seeds
Proper watering is essential for the successful germination and growth of your pepper seeds. It’s crucial to maintain the right moisture level, as both overwatering and underwatering can harm the seedlings. Here are some guidelines for watering your pepper seeds:
- Water gently: When watering your pepper seeds, use a watering can with a fine mist setting or a spray bottle to deliver a gentle and even amount of water. This prevents the seeds from being displaced or damaged.
- Moisten the soil: Ensure that the seed starting mix is consistently moist. Avoid letting it dry out completely, as this can hinder germination. On the other hand, be cautious not to overwater, as excessive moisture can lead to rot or fungal diseases.
- Monitor moisture levels: Check the moisture level of the seed trays regularly by lightly pressing your finger into the soil. If it feels dry up to your first knuckle, it’s time to water. If it’s still moist, wait a day or two before watering again.
- Avoid waterlogged soil: It’s crucial to maintain proper drainage to prevent waterlogged soil, which can lead to root rot. Choose pots or seed trays with drainage holes and make sure excess water can freely escape.
- Take humidity into account: If you’re using a plastic dome or plastic wrap to maintain humidity, the moisture level may remain higher than normal. In such cases, you may need to adjust your watering frequency to prevent excessive moisture buildup.
Remember, it’s better to slightly underwater than overwater your pepper seeds. Over time, you’ll get a sense of how often and how much water your seedlings require. As the pepper seedlings grow, adjust your watering schedule to accommodate their increasing needs.
By providing your pepper seeds with proper watering techniques, you’ll create a favorable environment for germination and support the growth of healthy seedlings. In the next step, we’ll discuss transferring your pepper seedlings to larger pots as they outgrow their initial containers.
When growing peppers from seed, it’s important to start them indoors 8-10 weeks before the last frost date. Use a seed starting mix, keep the soil consistently moist, and provide plenty of light to help the seeds germinate and grow into healthy seedlings.
Step 6: Transferring Pepper Seedlings to Larger Pots
As your pepper seedlings continue to grow, they will eventually outgrow their initial seed trays or pots. At this stage, it’s important to transfer them to larger pots to provide more space for their roots to spread and establish themselves. Here’s how you can do it:
- Prepare new pots: Select pots that are one or two sizes larger than the current pots. Make sure the new pots have drainage holes to allow excess water to escape.
- Moisten the soil: Before transplanting, water the seedlings in their current pots to ensure their roots are well hydrated. This makes it easier to remove them without causing damage.
- Gently remove the seedlings: Carefully loosen the soil around the seedlings using a fork or a small trowel. Hold the seedling by the leaves, avoiding the delicate stem, and gently lift it out of the pot.
- Fill the new pots with potting mix: Fill the new pots with a quality potting mix, leaving enough space at the top to accommodate the seedling and allow for watering.
- Plant the seedlings: Create a small hole in the center of the potting mix in the new pot. Place the seedling in the hole, ensuring the top of the root ball is level with the surface of the potting mix. Gently firm the soil around the base of the seedling to provide stability.
- Water the transplanted seedlings: After transplanting, water the seedlings thoroughly to help settle the soil and encourage root establishment. Be careful not to overwater, as it can lead to root rot.
- Place the seedlings in a suitable location: Find a location that receives adequate sunlight and provides proper air circulation for the transplanted seedlings. Avoid exposing them to direct hot sun or strong winds initially.
Transplanting pepper seedlings to larger pots allows their roots to have more room to grow and access the nutrients they need for healthy development. It also reduces the risk of root-bound plants, where the roots become tangled and hinder growth.
As your pepper plants continue to thrive in larger pots, you can gradually acclimate them to outdoor conditions in preparation for transplanting them into the garden. This process, known as hardening off, is essential for their successful transition. We’ll discuss hardening off in the next step.
Step 7: Harden Off Seedlings before Transplanting
Before transplanting your pepper seedlings into the garden, it’s important to gradually acclimate them to outdoor conditions. This process, known as hardening off, helps the seedlings adjust to changes in temperature, sunlight, and wind. Here’s how you can harden off your seedlings:
- Choose an appropriate time for hardening off: Wait until the threat of frost has passed and the weather has stabilized to begin the hardening off process. Typically, this is about 1-2 weeks before your intended transplanting date.
- Start with a few hours outdoors: Begin by placing your seedlings outdoors in a sheltered location, such as a porch or partially shaded area, for a few hours each day. Gradually increase the time over the course of a week.
- Expose seedlings to direct sunlight: After a few days of partial sun exposure, gradually introduce your seedlings to direct sunlight. Increase the amount of time spent in direct sunlight each day, building up to a full day of sun exposure.
- Control temperature exposure: During the hardening off process, gradually expose the seedlings to cooler temperatures, especially during the night. Start with milder temperatures and gradually work towards the average outdoor temperatures during the day and night.
- Protect seedlings from extreme weather: Keep a close eye on weather forecasts during the hardening off period. If there’s a possibility of extreme weather, such as strong winds or heavy rainfall, bring the seedlings indoors or provide temporary protection like a cold frame or garden cloche.
- Monitor seedlings for signs of stress: Pay attention to any signs of stress, such as wilting or yellowing leaves. If the seedlings show signs of stress, reduce their exposure to outdoor conditions and extend the hardening off period.
- Water seedlings appropriately: Continue to water the seedlings as needed during the hardening off process. However, be cautious not to overwater, as the seedlings may be more susceptible to root damage in their transitional state.
By gradually acclimating your seedlings to outdoor conditions through the process of hardening off, you’ll minimize the shock of transplanting and increase their chances of thriving in the garden. Once your pepper seedlings have successfully gone through the hardening off process, they are ready to be transplanted into the garden.
In the next step, we’ll discuss the proper techniques for transplanting your pepper seedlings into the garden.
Step 8: Transplanting Pepper Seedlings into the Garden
After hardening off your pepper seedlings, it’s time to transplant them into the garden. Transplanting allows the seedlings to establish roots in the ground and continue their growth towards producing flavorful peppers. Here’s how you can transplant your pepper seedlings:
- Select the right location: Choose a sunny spot in your garden that receives at least six hours of direct sunlight per day. Ensure the soil is well-drained and rich in organic matter.
- Prepare the planting holes: Dig planting holes that are slightly larger and deeper than the root ball of the seedlings. Space the holes according to the recommended spacing for the specific pepper variety.
- Water the seedlings: Before transplanting, give the seedlings a thorough watering to ensure their roots are well-hydrated. This will help ease the transition from the pots to the ground.
- Carefully remove the seedlings: Gently loosen the root ball of each seedling, making sure to handle them by the leaves to avoid damaging the stem. Lift the seedlings out of their pots and place them in a container or tray for easy transportation.
- Place the seedlings in the holes: Set the seedlings into the prepared planting holes, ensuring their top soil level is at the same depth as it was in the pots. Space the seedlings according to their recommended spacing, allowing ample room for growth.
- Backfill the holes: Fill in the holes around the seedlings with the soil, gently firming it to provide support to the plants. Avoid compacting the soil too tightly, as it can hinder root growth and water penetration.
- Water the transplanted seedlings: After transplanting, give the seedlings a deep watering to settle the soil and help them establish their roots in the new environment. Water at the base of the plant, avoiding wetting the foliage as it can invite diseases.
- Provide support (if needed): If you’re growing taller pepper varieties or if your garden is susceptible to strong winds, consider providing stakes or cages to support the plants as they grow.
- Monitor and care for the plants: Regularly monitor your transplanted pepper seedlings and provide them with proper care, including watering, fertilizing, and mulching. Protect them from pests and diseases by practicing good garden hygiene.
Transplanting your pepper seedlings into the garden is a crucial step in their journey towards producing a bountiful harvest. By following these steps and giving your transplanted seedlings the care they need, you’ll be on your way to enjoying delicious homegrown peppers.
In the next step, we’ll explore the essential aspects of caring for your pepper plants, such as watering, fertilizing, and mulching.
Read more: How To Grow Chili Peppers From Seeds
Step 9: Caring for Pepper Plants: Watering, Fertilizing, and Mulching
Once your pepper plants are transplanted into the garden, it’s important to provide them with proper care to promote healthy growth and maximize their potential for producing a bountiful pepper harvest. This step focuses on key aspects of care, including watering, fertilizing, and mulching.
Watering:
- Consistent watering is crucial for pepper plants, especially during dry periods. Water deeply, ensuring the soil is evenly moist, but avoid overwatering that leads to waterlogged soil.
- Water at the base of the plants, directing the water around the drip line rather than wetting the foliage. This helps prevent foliar diseases and encourages deep root growth.
- During periods of drought, increase the frequency and duration of watering to keep the plants hydrated. Be mindful of any water restrictions in your area and adjust accordingly.
- Consider using a soaker hose or drip irrigation system to deliver water directly to the roots. This conserves water and reduces the risk of foliage diseases caused by overhead watering.
Fertilizing:
- Pepper plants benefit from regular fertilization to provide them with the nutrients they need for robust growth and pepper production.
- Apply a balanced fertilizer, such as a 10-10-10 or 14-14-14, at the recommended rate according to the packaging instructions. Alternatively, use organic fertilizers such as compost or well-rotted manure.
- Start fertilizing a few weeks after transplanting, once the plants have settled in. Repeat the application every 4-6 weeks throughout the growing season.
- Avoid overfertilization, as this can lead to excessive foliage growth at the expense of pepper production. Follow the recommended dosage and observe any specific guidelines for your fertilizer type.
Mulching:
- Mulching around pepper plants has several benefits, including conserving soil moisture, suppressing weed growth, and regulating soil temperature.
- Apply a layer of organic mulch, such as straw, shredded bark, or compost, around the base of the plants. Maintain a mulch thickness of approximately 2-3 inches (5-8 cm).
- Avoid piling mulch directly against the plant stems, as it can create a moist environment that encourages rot and pest infestation. Leave a small gap around the stem.
- Monitor the mulch regularly and replenish as needed to maintain the desired thickness and effectiveness.
By providing proper care through watering, fertilizing, and mulching, you’ll create a favorable environment for your pepper plants to thrive and produce abundant peppers. Regularly monitor your plants for any signs of stress, pests, or diseases, and take timely action to address any issues that arise.
In the final step, we’ll discuss how to prevent and manage common problems that may occur with pepper plants.
Step 10: Preventing and Managing Common Pepper Plant Problems
While growing peppers can be a rewarding experience, they can be susceptible to certain problems. By being proactive in preventing and managing these issues, you can ensure the health and productivity of your pepper plants. Here are some common pepper plant problems and how to prevent or manage them:
Pests:
- Aphids: These small, soft-bodied insects can suck sap from pepper plants, causing stunted growth and distorted leaves. Use insecticidal soap or spray with a strong jet of water to control aphids.
- Spider mites: These tiny pests feed on the underside of leaves, causing yellowing and webbing. Regularly spray the undersides of leaves with water to deter spider mites or use an insecticidal soap if necessary.
- Cutworms: These caterpillars can cut through the stems of young pepper plants at soil level. Protect seedlings by placing collars around their base, made from cardboard or plastic cups.
- Slugs and snails: These slimy pests can chew on pepper leaves and stems. Use barriers such as copper tape or diatomaceous earth to prevent them from reaching your plants.
Diseases:
- Fungal diseases: Pepper plants are prone to fungal diseases such as powdery mildew and leaf spot. Provide good air circulation, avoid overhead watering, and apply fungicides if necessary.
- Bacterial diseases: Bacterial leaf spot and bacterial wilt can affect pepper plants. Practice crop rotation, proper sanitation, and remove and destroy infected plants to prevent the spread of bacteria.
- Viral diseases: Viruses like tobacco mosaic virus and pepper mosaic virus can cause mottling and stunted growth in pepper plants. Prevent viruses by using disease-free seeds and controlling aphid populations with insecticides or natural predators.
Weeds:
- Maintain a weed-free garden bed around your pepper plants. Weeds compete for nutrients, water, and light, and can harbor pests and diseases.
- Regularly remove weeds by hand, taking care not to disturb the roots of your pepper plants. Consider using mulch to suppress weed growth and maintain soil moisture.
Environmental Stress:
- Ensure your pepper plants receive adequate sunlight for healthy growth and fruit production.
- Protect your plants from extreme temperatures, such as frost or heatwaves, by covering them when necessary.
- Provide consistent watering and avoid letting the soil become excessively dry or waterlogged.
By being vigilant and taking preventative measures, you can minimize the impact of pests, diseases, weeds, and environmental stress on your pepper plants. Regularly monitor your plants for any signs of problems, and take appropriate action promptly to mitigate issues and promote the continued health and productivity of your pepper plants.
Congratulations! You have successfully learned how to grow peppers from seed and care for the plants. Now it’s time to enjoy the flavorful and colorful peppers that you have nurtured from seed to harvest.
Conclusion
Growing peppers from seed is a rewarding and satisfying experience that allows you to enjoy a variety of flavors and colors in your garden. By following the ten steps outlined in this comprehensive guide, you can successfully grow pepper plants from start to finish.
From gathering the necessary supplies and preparing the seed starting mix to sowing the seeds, providing adequate lighting and temperature, and transferring the seedlings to larger pots, each step plays a crucial role in the growth and development of your pepper plants. It’s important to remember that different pepper varieties may have specific requirements, so be sure to research the needs of your chosen variety.
Throughout the journey, caring for your pepper plants by watering, fertilizing, and mulching is essential to their overall health and productivity. Regularly monitor your plants for signs of pests, diseases, or environmental stress, taking swift action when necessary to protect their well-being.
To maximize your success, it’s important to be mindful of proper gardening techniques, such as hardening off your seedlings before transplanting them into the garden, and preventing and managing common pepper plant problems. By being proactive and attentive to your plants’ needs, you can ensure a bountiful harvest of delicious peppers.
Now armed with the knowledge and skills to grow peppers from seed, it’s time to get out into the garden and start your pepper-growing journey. Experiment with different varieties, enjoy the beauty of the plants, and savor the flavors of your homegrown peppers in your favorite recipes.
Remember, gardening is a continuous learning process, and each season provides new opportunities to refine your skills and expand your garden. So, embrace the joy of gardening and may your pepper plants thrive and bring you countless flavorful harvests year after year.
Frequently Asked Questions about How To Grow Peppers From Seed
Was this page helpful?
At Storables.com, we guarantee accurate and reliable information. Our content, validated by Expert Board Contributors, is crafted following stringent Editorial Policies. We're committed to providing you with well-researched, expert-backed insights for all your informational needs.


0 thoughts on “How To Grow Peppers From Seed”