Home>Garden Essentials>When To Plant Black Eyed Susan Seeds
Garden Essentials
When To Plant Black Eyed Susan Seeds
Modified: August 22, 2024
Looking to add black-eyed susan to your garden? Discover the best time to plant black-eyed susan seeds and create a vibrant and beautiful garden.
(Many of the links in this article redirect to a specific reviewed product. Your purchase of these products through affiliate links helps to generate commission for Storables.com, at no extra cost. Learn more)
Introduction
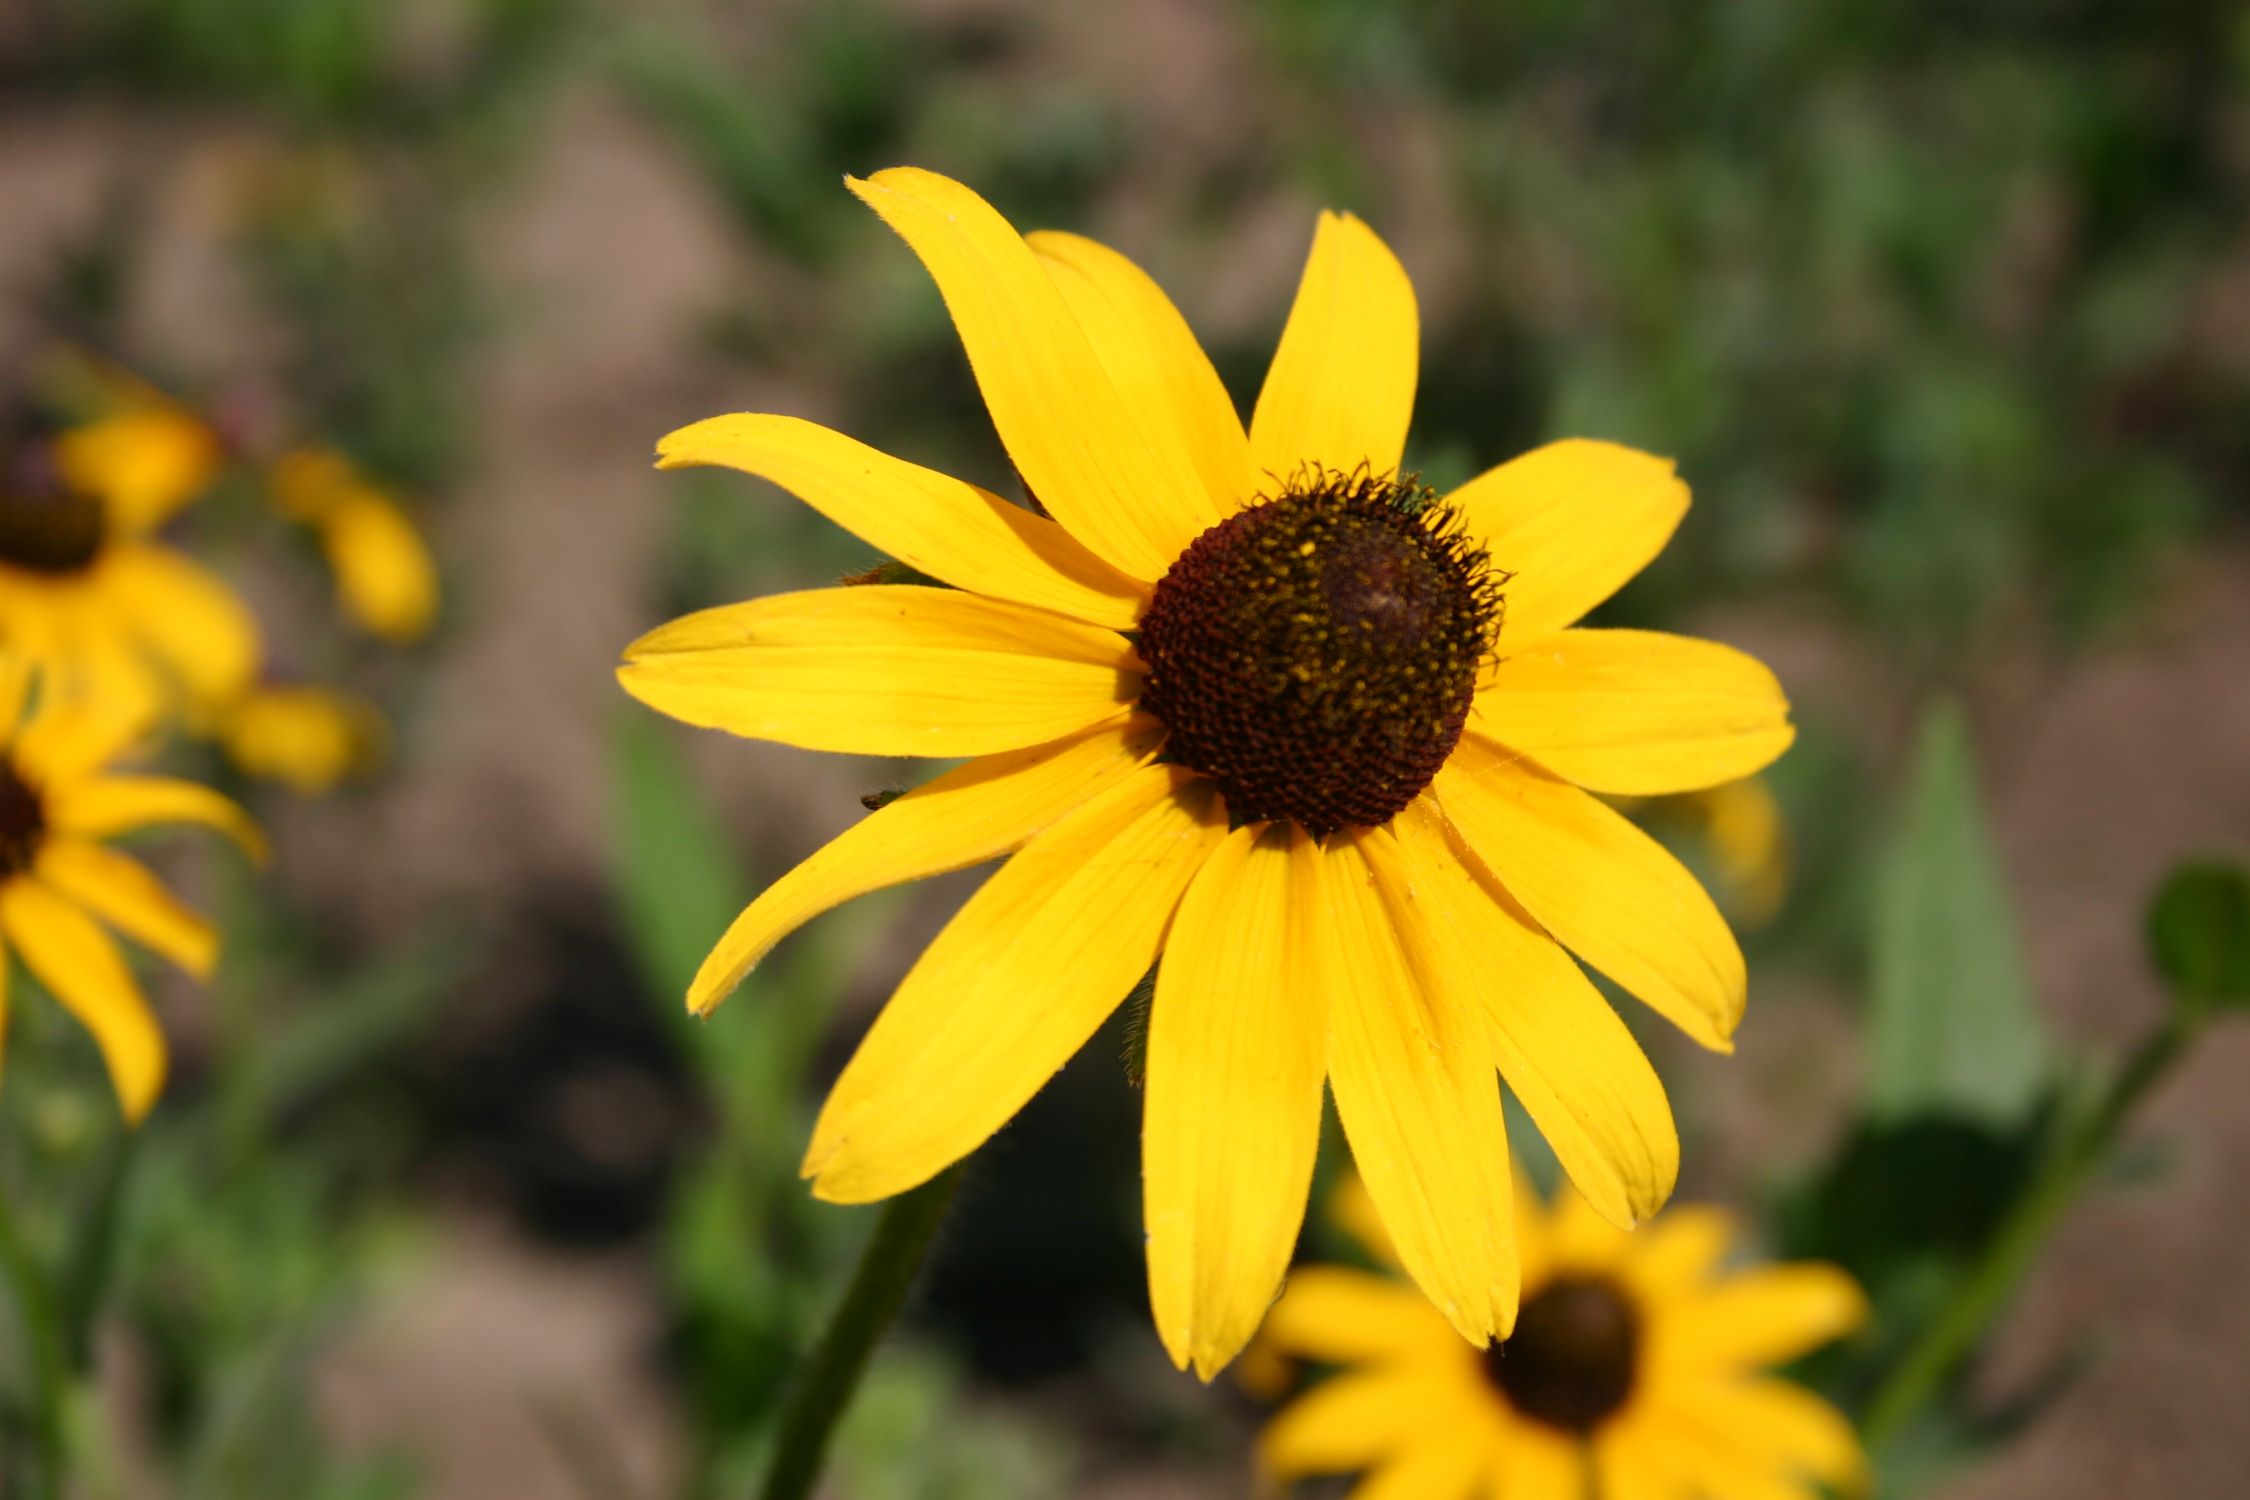
Welcome to your guide on when to plant black-eyed Susan seeds. Whether you’re a gardening enthusiast or a beginner looking to add a splash of vibrant color to your garden, black-eyed Susans are a popular and eye-catching choice. These beautiful yellow and black flowers not only add a burst of color but also attract butterflies and pollinators to your garden. In this article, we’ll delve into the details of when and how to plant black-eyed Susan seeds, as well as provide some tips on caring for these stunning plants.
Before we jump into the specifics of planting black-eyed Susan seeds, let’s take a moment to understand a bit more about these plants. Black-eyed Susans, scientifically known as Rudbeckia hirta, are native to North America and belong to the Asteraceae family. They are highly versatile and can thrive in a variety of climates and soil conditions, making them an excellent choice for both novice and experienced gardeners.
One of the advantages of black-eyed Susans is their ability to self-seed and multiply, creating a beautiful and natural-looking garden over time. Planting their seeds is a cost-effective way to grow these lovely flowers and enjoy their charm year after year.
However, before you rush to sow your black-eyed Susan seeds, there are a few factors to consider to ensure successful germination and growth. These factors will play a significant role in determining the best time to plant your seeds, so let’s explore them in the next section.
Key Takeaways:
- Plant black-eyed Susan seeds in late spring or early summer for vibrant blooms. Provide ample sunlight, well-draining soil, and proper care for healthy growth.
- Harvest and store black-eyed Susan seeds for future planting. Ensure seeds are fully mature, dry, and properly labeled for viability.
Read more: When To Plant Black Oil Sunflower Seeds
Understanding Black Eyed Susan Seeds
Before you begin planting black-eyed Susan seeds, it’s important to have a good understanding of their characteristics and requirements. Black-eyed Susan seeds are small, dark, and slightly oblong in shape. They have a hard outer shell, which protects the embryo inside.
These seeds have a long dormancy period and require certain conditions to break their dormancy and germinate. Understanding these requirements will help you provide the optimal environment for successful seed germination.
One important factor to consider is that black-eyed Susan seeds are best planted directly in the ground rather than starting them indoors and transplanting them later. This is because black-eyed Susans develop long taproots quite early in their growth, making them less adaptable to transplantation.
Black-eyed Susan seeds also need a period of cold stratification to break their dormancy. This mimics the natural winter conditions that the seeds would experience in their native habitats. Cold stratification can be achieved by either planting the seeds in the fall or by artificially simulating winter conditions by refrigerating the seeds before planting.
It’s also worth noting that black-eyed Susan seeds have a relatively low germination rate, typically ranging from 60-70%. This means that not all seeds will successfully germinate, and it’s advisable to sow a few extra seeds to ensure an ample supply of seedlings.
In the next section, we’ll explore the factors you should consider before planting black-eyed Susan seeds to ensure optimal growth and blooming.
Factors to Consider Before Planting
Before planting black-eyed Susan seeds, there are a few important factors to consider to ensure the best possible outcome for your garden. These factors will help determine the ideal location, soil conditions, and overall care to provide for your black-eyed Susan plants.
1. Sunlight: Black-eyed Susans are sun-loving plants and thrive in full sun. They require at least 6-8 hours of direct sunlight each day to grow and bloom to their fullest potential. Ensure that you select a planting location that receives ample sunlight and has minimal shading from trees or structures.
2. Soil Conditions: Black-eyed Susans prefer well-draining soil. Before planting, it’s important to prepare the soil by loosening it and removing any weeds or debris. Incorporating organic matter, such as compost or well-rotted manure, can improve the soil structure and provide essential nutrients for the plants.
3. Watering: Although black-eyed Susans are relatively drought-tolerant, they still require regular watering, especially during the initial stages of growth. Water the plants deeply but infrequently, allowing the soil to dry out slightly between waterings. Avoid overwatering, as excessive moisture can lead to root rot and other fungal diseases.
4. Temperature and Climate: Black-eyed Susans are hardy perennials that can tolerate a wide range of temperatures. However, they generally prefer moderate temperatures, with the optimal range being between 60-75°F (15-24°C). It’s important to choose a planting time that aligns with your local climate to ensure successful growth and blooming.
5. Pest and Disease Control: While black-eyed Susans are relatively resistant to pests and diseases, it’s still important to monitor them for any signs of trouble. Common pests include aphids, slugs, and snails. Consider using organic pest control methods such as companion planting or introducing beneficial insects to keep these pests in check.
6. Space and Support: Black-eyed Susans can grow quite tall, ranging from 1-3 feet (0.3-0.9 meters) in height. When planting, make sure to provide enough space between each plant to allow for proper airflow and prevent overcrowding. Additionally, consider staking or providing support for taller varieties to prevent them from toppling over in strong winds.
By taking these factors into account, you can create the ideal growing conditions for your black-eyed Susan plants. In the next section, we will discuss the best time to plant black-eyed Susan seeds.
Best Time to Plant Black Eyed Susan Seeds
The optimal time to plant black-eyed Susan seeds depends on your location and climate. Generally, it’s best to sow the seeds in late spring or early summer when the soil has warmed up and there is no longer a risk of frost.
If you live in a colder climate with shorter growing seasons, you can start the seeds indoors 6-8 weeks before the last expected frost date in your area. This will give the plants a head start and allow them to develop before being transplanted outdoors once the weather conditions are favorable.
For those in warmer climates, you can directly sow the seeds outdoors once the soil temperature has reached around 70°F (21°C). The warm soil will promote faster germination and seedling growth.
Another important consideration is the timing of the cold stratification period for black-eyed Susan seeds. If you plan to mimic winter conditions by refrigerating the seeds, you should do so for 4-6 weeks before planting. This cold treatment will break the seed dormancy and improve germination rates.
It’s worth mentioning that black-eyed Susan seeds are quite resilient and can sometimes survive harsh climatic conditions. They may even overwinter in the ground and sprout the following spring. However, by planting at the optimal time, you can ensure the best chances of successful germination and growth.
In the next section, we’ll walk you through the steps of planting black-eyed Susan seeds, from soil preparation to sowing techniques.
Steps to Plant Black Eyed Susan Seeds
Planting black-eyed Susan seeds is a relatively straightforward process that can be done by following a few simple steps. By properly preparing the soil and employing the right techniques, you can ensure the best chances of successful germination and healthy growth for your plants.
- Choose the planting location: Select a sunny spot in your garden that receives at least 6-8 hours of direct sunlight per day. Ensure that the area has well-draining soil.
- Prepare the soil: Loosen the soil using a garden fork or tiller to a depth of about 6-8 inches. Remove any weeds or debris. Incorporate organic matter, such as compost or well-rotted manure, to improve soil fertility and drainage.
- Sow the seeds: If you’re planting directly in the ground, scatter the black-eyed Susan seeds over the prepared soil. Aim for a spacing of about 6-8 inches between each seed. Gently press the seeds into the soil, ensuring they are in firm contact but not buried too deeply.
- Water the seeds: After sowing the seeds, water the area gently and thoroughly. Be careful not to overwater, as this can lead to rotting of the seeds. Keep the soil consistently moist but not waterlogged during the germination period.
- Provide support: If you’re planting taller varieties of black-eyed Susans, consider installing stakes or a trellis for support. This will prevent the plants from bending or falling over as they grow.
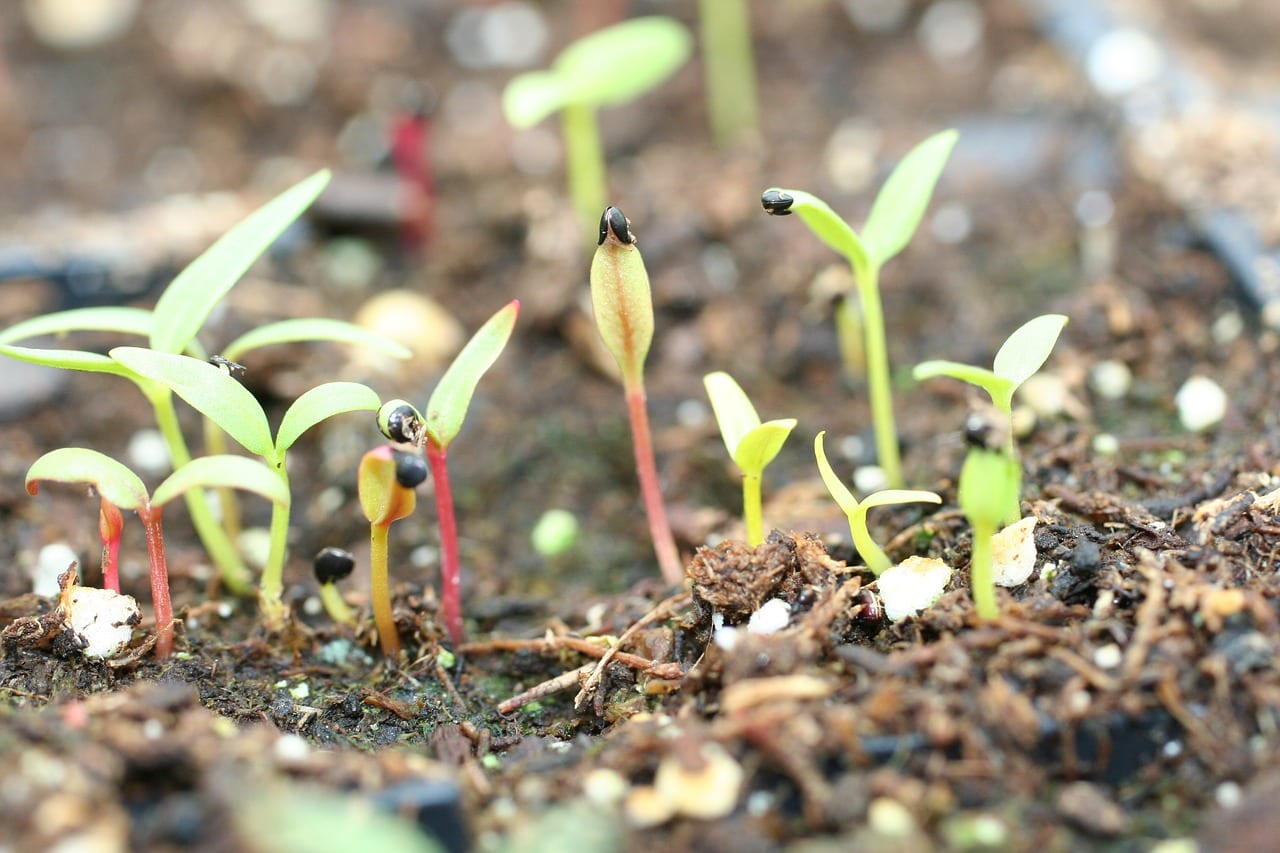
- Keep an eye on germination: Black-eyed Susan seeds typically take 10-20 days to germinate, although this can vary. Monitor the area closely and be patient as the seeds sprout. Keep the soil moist during this period to facilitate germination.
- Thin out the seedlings: Once the seedlings have grown a few inches tall, thin them out to ensure proper spacing. Remove the weaker seedlings, leaving at least 12-18 inches between each plant. This will allow them enough room to grow and thrive.
- Maintain the plants: As the black-eyed Susan plants grow, continue to provide them with regular waterings, especially during dry spells. Regularly remove weeds and provide support if needed. Additionally, consider applying a balanced fertilizer once or twice during the growing season to promote healthy growth and blooming.
By following these steps, you’ll be well on your way to enjoying a stunning display of black-eyed Susans in your garden. In the next section, we’ll discuss some essential tips for caring for black-eyed Susan plants to ensure their long-term health and beauty.
Plant Black Eyed Susan seeds in the spring after the last frost date for your area. Choose a sunny location with well-drained soil and sow the seeds directly into the ground. Keep the soil moist until the seeds germinate.
Read more: When Do Black Walnuts Germinate
Caring for Black Eyed Susan Plants
Once your black-eyed Susan plants have successfully germinated and established, proper care is essential to ensure their continued health and vibrant blooms. Here are some important tips to keep in mind:
- Watering: While black-eyed Susans are relatively drought-tolerant, adequate watering is still crucial, especially during dry periods. Water deeply and infrequently, ensuring that the soil is evenly moist but not waterlogged. Avoid overhead watering, as it can promote the spread of diseases.
- Fertilizing: Black-eyed Susans are generally not heavy feeders, but a light application of balanced fertilizer can help promote healthier growth and more prolific flowering. Apply a slow-release granular fertilizer in spring, following the manufacturer’s instructions, or use a water-soluble fertilizer every 4-6 weeks during the growing season.
- Pruning: Regular deadheading, the removal of spent flowers, can help prolong the blooming period of black-eyed Susans. Cut the flower stalks back to the base once the blooms have faded. Additionally, in late fall or early spring, you can trim the plants back to about 6 inches above the ground to promote bushier growth.
- Support: Tall varieties of black-eyed Susans may benefit from staking or providing support as they grow. This will help prevent the plants from leaning or toppling over in strong winds. Use stakes or a trellis and gently tie the stems as the plants reach taller heights.
- Mulching: Applying a layer of organic mulch around the base of black-eyed Susan plants can help conserve moisture, suppress weed growth, and regulate soil temperature. Use a 2-3 inch layer of mulch, such as wood chips or straw, but be careful not to pile it up against the stems, as this can lead to rotting.
- Dividing: Over time, black-eyed Susan plants can become crowded and may benefit from dividing. This is typically done every 2-3 years in early spring or fall when the plants are dormant. Dig up the clumps and carefully separate them into smaller sections, each with its own set of roots. Replant the divisions in well-prepared soil, ensuring adequate spacing between each new plant.
- Pest and Disease Control: While black-eyed Susans are generally resistant to pests and diseases, occasional issues may arise. Keep an eye out for common pests like aphids, slugs, and snails. Use organic pest control methods such as hand-picking, introducing beneficial insects, or applying natural insecticides if necessary.
By following these care tips, you’ll be able to enjoy a healthy and vibrant display of black-eyed Susan plants in your garden. In the next section, we’ll address some common problems that may arise and provide solutions to help you maintain the beauty of your plants.
Common Problems and Solutions
While black-eyed Susan plants are generally easy to care for, they may encounter a few common problems. Understanding these issues and their solutions will help you maintain the health and beauty of your plants. Let’s explore some of the most common problems and their remedies:
- Powdery Mildew: Powdery mildew is a fungal disease that can affect black-eyed Susans, especially during periods of high humidity. It appears as a white powdery coating on the leaves. To prevent powdery mildew, provide adequate spacing between plants to improve airflow. If the disease does occur, treat it with a fungicide recommended for powdery mildew in ornamental plants.
- Root Rot: Root rot is caused by overwatering or waterlogged soil, leading to the decay of the plant’s roots. To prevent root rot, ensure that the soil is well-draining and avoid overwatering. If root rot occurs, it may be difficult to save the affected plant. Remove the plant from the soil, trim away any rotted roots, and replant it in fresh, well-draining soil.
- Aphid Infestation: Aphids are tiny, sap-sucking insects that can infest black-eyed Susan plants. They usually appear as clusters of small green or black insects on the leaves. To control aphids, you can try using a strong jet of water to wash them off the plants or apply insecticidal soap or neem oil. Introducing beneficial insects like ladybugs or lacewings can also help keep the aphid population in check.
- Slug and Snail Damage: Slugs and snails can feed on black-eyed Susan foliage, leaving behind irregular holes and damage. Avoid overwatering, as damp conditions attract these pests. You can employ various strategies to control slugs and snails, such as handpicking, using traps, or applying organic slug and snail repellents. Creating barriers, such as crushed eggshells or diatomaceous earth, around the base of the plants can also deter them.
- Poor Blooming: If your black-eyed Susans are not blooming as profusely as expected, there may be a few reasons. Insufficient sunlight, improper pruning, and overcrowding can hinder blooming. Ensure that the plants receive adequate sunlight, deadhead faded flowers regularly, divide overcrowded clumps every few years, and provide proper spacing between plants to encourage abundant blooming.
By addressing these common problems and implementing the appropriate solutions, you can keep your black-eyed Susan plants healthy and thriving. In the next section, we’ll discuss how to harvest black-eyed Susan seeds for future planting and enjoyment.
Harvesting Black Eyed Susan Seeds
Harvesting black-eyed Susan seeds allows you to collect and save the seeds for future planting, or even share them with fellow gardeners. Here’s a guide to help you effectively harvest and store black-eyed Susan seeds:
- Wait for seed heads to mature: Allow the black-eyed Susan flowers to naturally mature and fade. The petals will dry up and fall off, and the seed heads will turn brown and become dry and brittle.
- Choose the right time: Timing is crucial for seed harvest. Wait until the seed heads are fully mature and dry, but make sure to harvest before they start to shatter and disperse seeds naturally.
- Prepare a collection container: Place a clean and dry container, such as a paper bag or envelope, underneath the seed head. This will catch the seeds as they fall.
- Gently shake the seed head: Holding the seed head over the container, give it a gentle shake or brush your hand against it to release the seeds. The mature seeds should easily dislodge and fall into the container. Some light tapping or rubbing of the seed head may be required to ensure the release of all the seeds.
- Remove debris: Once you’ve collected the seeds, carefully separate them from any remaining plant debris, such as dried petals or stems. You can do this by gently blowing or using a small sieve or fine-mesh screen.
- Drying and storing: Spread the harvested black-eyed Susan seeds on a clean, dry surface, such as a paper towel or a plate, and allow them to air-dry for about a week. Once completely dry, transfer the seeds to a labeled envelope or airtight container. Store them in a cool, dry place until you’re ready to plant them.
- Labeling: It’s important to properly label your harvested seeds with the plant’s name and the date of collection. This will help you keep track of the seeds and maintain their viability.
- Seed viability and germination rate: Black-eyed Susan seeds can remain viable for several years if stored properly. However, it’s worth noting that their germination rate may decrease over time. To test the viability of stored seeds, you can perform a simple seed germination test by placing a few seeds on a damp paper towel and checking for sprouting after a week or two.
By following these steps, you can successfully harvest and store black-eyed Susan seeds, preserving their genetic material and ensuring a new generation of vibrant flowers for years to come.
With this comprehensive guide on when to plant black-eyed Susan seeds, understanding their characteristics, caring for them, and harvesting their seeds, you are equipped with the knowledge to enjoy the beauty of these lovely flowers in your garden. Get ready to witness the delightful blooms and attract pollinators with the charm of black-eyed Susans!
Do you have any further questions, or is there anything else I can assist you with?
Conclusion
Congratulations! You have now gained a comprehensive understanding of black-eyed Susan seeds, from when to plant them to how to care for the resulting plants. By following the guidelines outlined in this article, you can successfully grow these beautiful and vibrant flowers in your garden.
Remember, black-eyed Susans are versatile and adaptable plants that can thrive in various climates and soil conditions. Their cheery yellow blooms and ability to attract butterflies and pollinators make them a popular choice for gardeners of all levels of experience.
Before planting black-eyed Susan seeds, consider factors such as sunlight, soil conditions, watering needs, and the size of your planting space. Providing the optimal environment for your plants will ensure their healthy growth and abundant blooming.
When it comes to sowing the seeds, follow the steps outlined in this guide. Choosing the right time, preparing the soil, sowing the seeds, and providing proper care during the germination period are crucial for successful seedling establishment.
As your black-eyed Susan plants grow, remember to care for them by watering appropriately, fertilizing when necessary, and providing support for taller varieties. Regular pruning, mulching, and division will also promote healthy growth and a prolonged blooming season.
Be aware of common issues that may affect black-eyed Susan plants, such as powdery mildew, root rot, pests, and poor blooming. By taking prompt action and implementing the suggested solutions, you can prevent and mitigate these problems, ensuring the long-term health and beauty of your plants.
Finally, once your black-eyed Susan plants have matured, consider harvesting the seeds for future planting or sharing with fellow gardeners. Properly drying and storing the seeds will ensure their viability for years to come.
We hope this guide has provided you with the knowledge and inspiration to successfully grow and enjoy the vibrant beauty of black-eyed Susans in your garden. Now, it’s time to put your newfound wisdom into practice and create a stunning display of these charming flowers. Happy gardening!
Frequently Asked Questions about When To Plant Black Eyed Susan Seeds
Was this page helpful?
At Storables.com, we guarantee accurate and reliable information. Our content, validated by Expert Board Contributors, is crafted following stringent Editorial Policies. We're committed to providing you with well-researched, expert-backed insights for all your informational needs.


0 thoughts on “When To Plant Black Eyed Susan Seeds”