Home>Garden Essentials>How To Germinate A Plant

Garden Essentials
How To Germinate A Plant
Modified: March 15, 2024
Learn the step-by-step process of how to germinate a plant in your garden. Get expert tips and guidance to ensure successful growth.
(Many of the links in this article redirect to a specific reviewed product. Your purchase of these products through affiliate links helps to generate commission for Storables.com, at no extra cost. Learn more)
Introduction
Welcome to the wonderful world of gardening! Whether you are a seasoned plant enthusiast or a beginner with a green thumb, understanding the process of germination is essential for successful gardening. Germination is the magical moment when a seed awakens from its dormant state and begins to sprout, eventually growing into a healthy plant. It is the foundation of every plant’s lifecycle, and mastering germination techniques can greatly increase your gardening success.
In this article, we will explore the fascinating process of germination, discuss how to choose the right seeds, guide you through preparing the germination environment, introduce various germination methods, teach you effective germination techniques, share tips for caring for germinating plants, and troubleshoot common germination issues that you may encounter along the way.
So, let’s dive in and unlock the secrets of germination to take your gardening skills to the next level!
Key Takeaways:
- Mastering germination is the key to successful gardening. Understand seed needs, create optimal environments, and care for seedlings to bring your garden to life.
- Choose the right seeds, provide proper care, and troubleshoot common issues to ensure your gardening journey is filled with thriving, vibrant plants.
Read more: How Do Plants Germinate
Understanding Germination
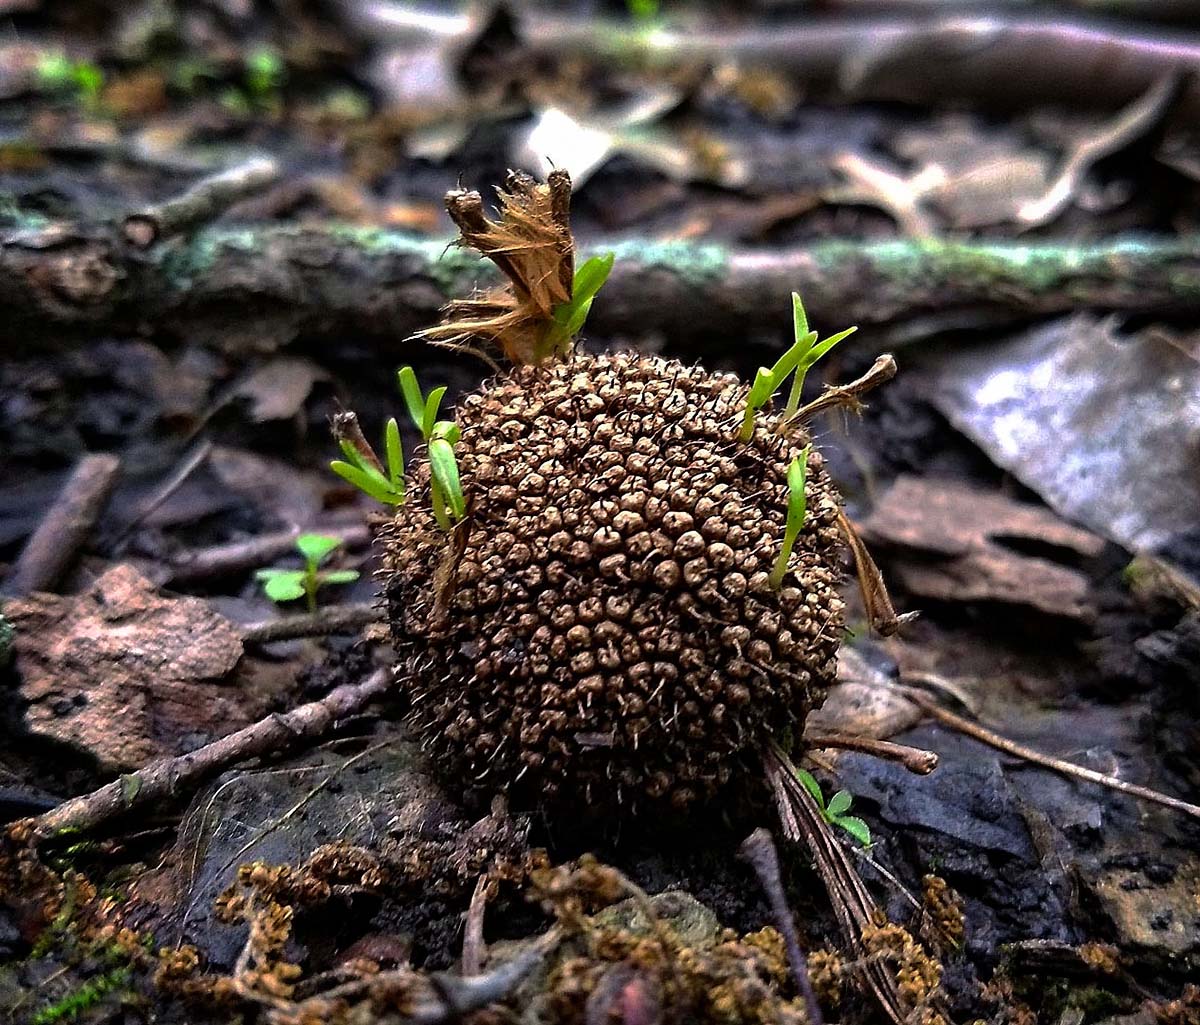
Germination is the process by which a seed transforms into a young seedling. It is a remarkable phenomenon that requires specific conditions to trigger the seeds’ growth. Each seed contains an embryo, the precursor to a new plant, along with stored food reserves that fuel its initial growth. When the seed is exposed to favorable conditions, a series of biochemical reactions occur, leading to the activation of the embryo and the initiation of germination.
There are three essential elements necessary for successful germination: moisture, oxygen, and the right temperature. The seed absorbs water, which softens the protective seed coat and activates enzymes responsible for breaking down stored food reserves. Oxygen is needed to support respiration, allowing the embryo to produce energy for growth. Finally, the seed must be placed in an environment with an optimal temperature range for germination.
It is important to note that different plant species have varying germination requirements. Some seeds need light to germinate, while others require darkness. Some seeds prefer direct contact with the soil, while others benefit from a period of cold stratification or scarification to break their dormancy. Understanding the specific needs of the seeds you are working with is crucial for successful germination.
Furthermore, the length of time it takes for germination to occur varies depending on the plant variety and environmental conditions. Some seeds can germinate in a matter of days, while others may take weeks or even months. Patience is key when it comes to germination; resist the temptation to interfere with the process, as it may disrupt the delicate balance required for successful seed sprouting.
By understanding the basic principles of germination and recognizing the specific needs of different plant species, you can create an optimal environment for seeds to flourish. In the next section, we will explore how to choose the right seeds for your garden.
Choosing the Right Seeds
When it comes to gardening, choosing the right seeds is crucial for a successful and rewarding experience. With the wide variety of plant species and cultivars available, it can be overwhelming to decide which seeds to sow in your garden. Here are some factors to consider when selecting seeds:
Climate: Understanding your local climate is vital in choosing seeds that are well-suited to your growing conditions. Consider factors such as average temperature, humidity, and rainfall patterns. Some plants thrive in cool climates, while others prefer warm or tropical environments.
Space: Assess the available space in your garden and consider the size and spread of the plants you wish to grow. Some plants, such as tomatoes or squash, require more room to sprawl, while others, like lettuce or herbs, can be grown in compact spaces or containers.
Seasonality: Determine whether you want to grow plants that are best suited for spring, summer, fall, or winter. Pay attention to the growing season of each plant and plan your garden accordingly. Some crops can even be grown year-round in milder climates.
Desired Yield: Consider the purpose of your garden. Are you looking to grow vegetables for a bountiful harvest, or are you focused more on growing beautiful flowers to enhance your landscape? Different plants have different growth habits and produce varying yields, so select seeds that align with your gardening goals.
Experience Level: Think about your level of gardening experience. If you are a beginner, it may be wise to start with easy-to-grow plants that are more forgiving and require less maintenance. As you gain confidence and knowledge, you can experiment with more challenging plant varieties.
Taste and Aesthetics: Finally, consider your personal preferences and taste. Are you looking for specific flavors in your fruits and vegetables, or are you drawn to certain colors and shapes in flowers? The joy of gardening is not just in the end result but also in the journey and the satisfaction of growing what you love.
Research, read seed catalogs, consult with experienced gardeners, and visit local garden centers to gather information and make informed decisions. Remember, each seed holds the promise of a unique plant with its own characteristics and requirements. Choose seeds that align with your gardening goals and bring you joy.
Now that we have selected the right seeds for our garden, let’s explore the next step: preparing the germination environment.
Preparing the Germination Environment
The germination environment plays a vital role in the success of seed germination. Creating the right conditions will provide the seeds with the optimal environment to sprout and establish strong seedlings. Here are some key steps to prepare the germination environment:
1. Seed Starting Containers: Select appropriate containers for germinating your seeds. Use trays, pots, or seedling cells that provide good drainage. You can also opt for biodegradable peat pots or seed starting trays, which can be planted directly into the soil once the seedlings are ready.
2. Growing Medium: Choose a high-quality seed-starting mix or make your own by combining equal parts of perlite, vermiculite, and peat moss. Avoid using garden soil alone, as it may contain pests, diseases, or weed seeds that can hinder germination and plant growth.
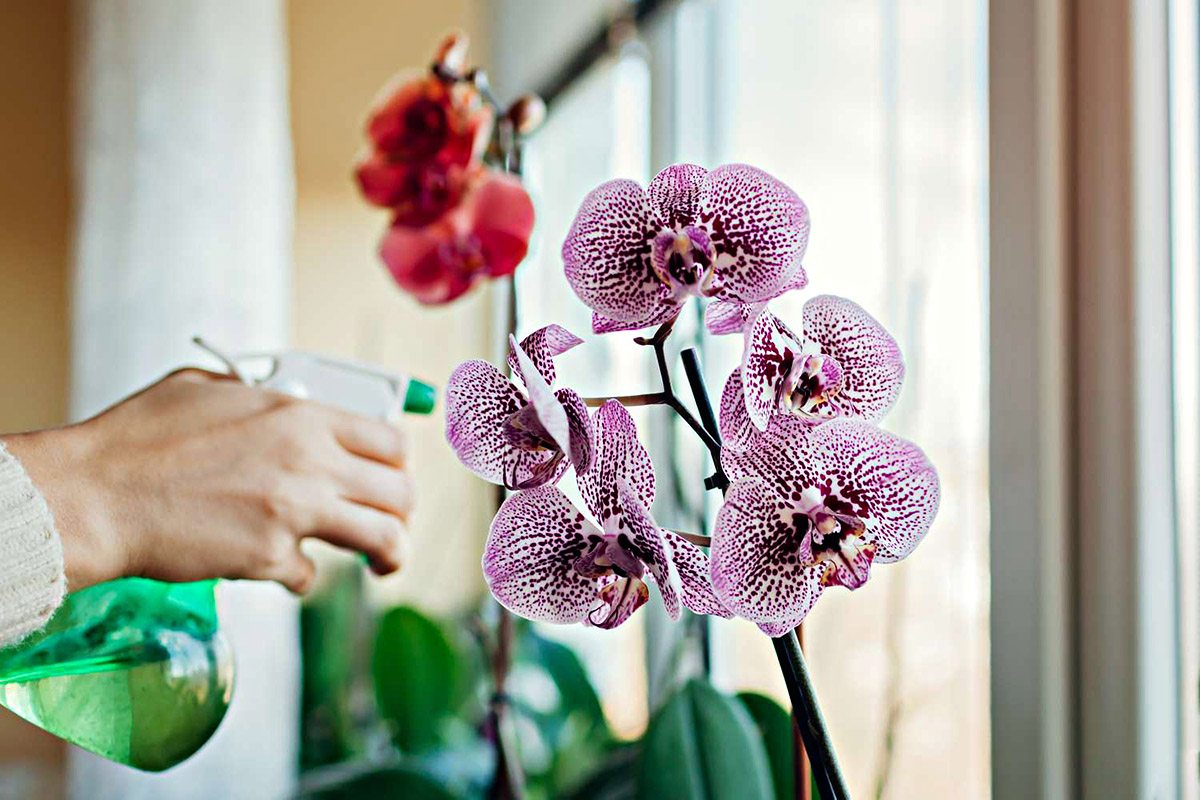
3. Moisture: Proper moisture is crucial for seed germination. Ensure that the growing medium is moist but not waterlogged. Use a spray bottle or a watering can with a fine spray nozzle to avoid excessive water pressure that may displace the seeds or compact the growing medium.
4. Temperature: Most seeds have an optimal germination temperature range. It is essential to provide consistent warmth for successful germination. Use a seedling heat mat or place the seed containers in a warm location, such as on top of a refrigerator or near a heat source, to maintain the desired temperature.
5. Light: While some seeds require darkness to germinate, many benefit from exposure to light. Provide adequate light for your germinating seeds by placing them near a bright window or using fluorescent grow lights. Adjust the distance and duration of light exposure based on the specific needs of your seeds.
6. Humidity: Seeds require a humid environment to germinate, but excessive humidity can lead to mold and fungal issues. Place a plastic dome or cover over the seed containers to create a mini greenhouse effect and retain humidity. Ventilate the containers periodically to prevent excessive moisture buildup.
7. Labeling: To keep track of different seed varieties, labeling is essential. Use plant markers or small labels to identify each seed type. Include the date of sowing, seed variety, and any specific notes you may find helpful throughout the germination and growing process.
By preparing the germination environment with the right containers, growing medium, and attention to moisture, temperature, light, humidity, and labeling, you can provide an optimal start for your seeds. Once the seeds have sprouted, it’s time to learn about different germination methods. Let’s explore them in the next section!
Germination Methods
There are several germination methods you can choose from depending on your preferences, available resources, and the specific requirements of the seeds you are working with. Let’s explore some popular germination methods:
1. Direct Sowing: This method involves sowing the seeds directly into the ground or containers where they will grow. It is suitable for larger seeds that can handle the outdoor conditions from the start. Prepare the soil by removing any weeds and debris, then create small holes or furrows to plant the seeds. Cover them lightly with soil, water gently, and provide appropriate care as the seedlings emerge.
2. Indoor Sowing: Indoor sowing refers to starting your seeds indoors before transplanting them outside once they have developed into healthy seedlings. It is ideal for smaller or delicate seeds that require controlled conditions. Use seedling trays or pots filled with a good-quality seed-starting mix. Sow the seeds at the recommended depth, provide the necessary care, and once the seedlings are sturdy, transplant them to their final location.
3. Stratification: Some seeds, particularly those from plants native to colder climates, require a period of stratification to break dormancy and facilitate germination. Stratification can be achieved by exposing the seeds to a period of cold, mimicking winter conditions. Place the seeds in a damp paper towel or a moist growing medium, seal them in a plastic bag, and refrigerate for the recommended duration. After stratification, sow the seeds using the appropriate method.
4. Scarification: Seeds with hard or impermeable seed coats often benefit from scarification, which is the process of breaking or weakening the seed coat to allow moisture penetration. Scarification methods include gently nicking the seed coat with a file or rubbing them against sandpaper, soaking them in hot water, or exposing them to acid or chemical treatments. Once scarified, follow the recommended germination method for the specific seeds.
5. Water Germination: Certain seeds, such as watermelons or peas, can be germinated directly in water. Place the seeds in a container filled with water and keep them in a warm location. Change the water regularly to prevent stagnation and monitor the progress of the germination. Once the roots and shoots emerge, transplant the germinated seeds to the desired growing medium.
Remember to always follow the specific germination requirements of the seeds you are working with. Each method has its advantages and may be more suitable for certain seeds or gardening conditions. Experiment with different methods to find the ones that work best for you.
Now that you have an understanding of different germination methods, it’s time to explore various germination techniques to ensure successful seed sprouting and growth. Continue reading to discover effective germination techniques in the next section!
Keep the soil consistently moist, but not waterlogged, to help the seeds germinate. Cover the container with plastic wrap to create a greenhouse effect and keep the soil warm and moist.
Read more: What Is The Fastest Plant To Germinate
Germination Techniques
Germination techniques involve specific practices and steps to optimize the germination process and increase the chances of successful seed sprouting. Below are some effective germination techniques to help you achieve successful seed germination:
1. Seed Scarification: As mentioned earlier, scarification can be beneficial for seeds with hard or impermeable seed coats. This technique helps to break the seed coat and promote water absorption. Depending on the seed, you can gently file the seed coat, soak the seeds in hot water, or use a chemical scarification treatment. Follow the recommended scarification method for the specific seeds you are working with.
2. Seed Soaking: Soaking seeds before sowing can help to kickstart the germination process. Place the seeds in a container filled with warm water and let them soak for a specified period, usually between 12 to 24 hours. This technique helps to soften the seed coat and hydrate the embryo, making it easier for the seed to sprout.
3. Pre-germination: Pre-germination involves initiating the germination process before sowing the seeds in their final growing medium. Place the seeds in a damp paper towel, moist growing medium, or a germination tray. Keep them in a warm, dark place and monitor their progress. Once you see signs of germination, such as the emergence of a radicle (primary root), transfer the sprouted seeds to their growing environment.
4. Bottom Heat: Providing bottom heat to the germination environment can promote faster and more uniform germination. Use a seedling heat mat or place the seed containers on a warm surface, such as the top of a refrigerator or near a heating vent. The gentle warmth helps to maintain the optimal temperature needed for seed germination.
5. Moisture Control: Proper moisture control is crucial during germination. Ensure that the growing medium or germination trays remain consistently moist, but not waterlogged. Using a spray bottle or a misting system can help in providing a fine mist of water without disturbing the seeds or compacting the growing medium.
6. Light Management: Light plays a critical role in the germination process for some seeds. Some seeds require exposure to light to germinate, while others prefer darkness. Read the specific germination requirements for each seed variety and provide the appropriate lighting conditions. Adjust the brightness and duration of light exposure accordingly.
7. Ventilation: Proper ventilation is essential to prevent mold and fungal issues during germination. Remove the plastic cover or dome periodically to allow fresh air circulation. This helps to maintain a healthy germination environment and reduce the risk of damping-off disease.
8. Patience and Observation: Finally, be patient and observe the progress of your germinating seeds. Some seeds may sprout quickly, while others may take longer. Avoid the temptation to disturb the seeds or interfere with the germination process. Regularly check for signs of growth, monitor moisture levels, and adjust care as needed.
By implementing these germination techniques, you can significantly increase the likelihood of successful seed sprouting and establish healthy seedlings. Soon, you’ll see your garden filled with vibrant plants that started from tiny seeds.
Now that you have learned about germination methods and techniques, it’s important to understand how to care for germinating plants. Let’s explore the next section to discover effective tips for nurturing your young seedlings!
Caring for Germinating Plants
Germinating plants are delicate and require special care to ensure their healthy and vigorous growth. Proper nurturing during this early stage sets the foundation for thriving plants. Here are some essential tips for caring for germinating plants:
1. Watering: Consistent and careful watering is crucial for germinating plants. Use a spray bottle or a watering can with a gentle shower-like setting to avoid overwatering or displacing the seeds. Water the seedling trays or containers when the growing medium feels dry to the touch. Aim to keep the soil consistently moist, but not waterlogged, as excessive moisture can lead to root rot and other issues.
2. Light: Provide sufficient light for germinating plants to promote healthy growth and prevent them from becoming leggy or weak. If growing indoors, place the seedlings near a bright window or use fluorescent grow lights. Adjust the distance between the light source and the plants as they grow to maintain an optimal light intensity.
3. Temperature: Maintain a consistent temperature in the germination environment to support proper growth. Most seedlings prefer temperatures between 65-75°F (18-24°C). Avoid exposing them to extreme temperature fluctuations or drafts, as this can stress the delicate plants.
4. Air Circulation: Good air circulation is essential for preventing damping-off disease and ensuring sturdy plant development. Use a fan on low or open windows periodically to provide gentle airflow. Be cautious not to direct the airflow directly on the seedlings, as this may cause them to dry out quickly.
5. Fertilization: While young germinating plants already have stored nutrients from the seed, as they begin to grow and develop true leaves, they will benefit from a mild, balanced fertilizer. Dilute a water-soluble fertilizer to half strength and use it during watering once the seedlings have a few sets of true leaves.
6. Transplanting: When the seedlings have developed strong root systems and several sets of true leaves, it is time to transplant them into larger containers or into the ground. Handle the seedlings gently, holding them by the leaves or root ball to avoid damaging the delicate stems. Plant them at the appropriate depth in well-prepared soil or growing medium.
7. Hardening Off: Before transplanting seedlings outdoors, it is crucial to gradually acclimate them to outdoor conditions through a process known as hardening off. Start by placing the seedlings outdoors for short periods in a sheltered spot, gradually increasing the time and exposure to sunlight and wind. This process helps the seedlings adjust to the outdoor environment and prevents shock upon transplanting.
8. Pest and Disease Management: Keep an eye out for any signs of pests or diseases on your germinating plants. Inspect the leaves regularly for pests such as aphids, mites, or fungal issues like damping-off. Promptly address any issues by using organic pest control methods or appropriate treatments to prevent further damage.
By following these caring tips, you can provide the best possible environment for your germinating plants to develop into strong and healthy seedlings. Remember to observe your plants closely and make adjustments as needed to ensure their successful growth.
Now, let’s move on to the next section to troubleshoot common germination issues that you may encounter in your gardening journey.
Troubleshooting Germination Issues
Despite our best efforts, germination issues can sometimes arise during the growing process. It’s important to identify and address these issues promptly to ensure successful seed sprouting. Here are some common germination issues and troubleshooting tips to help you overcome them:
1. Slow or No Germination: If your seeds are taking longer than expected to germinate or not germinating at all, several factors may be at play. Check the temperature and moisture levels to ensure they are within the optimal range for the specific seeds. Also, be sure to check the seed viability, as old or damaged seeds may have a low germination rate. Some seeds, especially those with hard seed coats, may benefit from scarification or pre-soaking to improve germination rates.
2. Damping-Off: Damping-off is a fungal disease that affects seeds and young seedlings, causing them to rot and eventually die. To prevent damping-off, ensure proper air circulation and avoid overwatering. Use sterile planting medium and clean seedling trays to reduce the chances of fungal infection. If damping-off occurs, remove the affected plants, improve ventilation, and adjust watering practices to prevent further spread.
3. Leggy Seedlings: Leggy seedlings appear tall and spindly, with weak stems. This condition is typically caused by insufficient light or inconsistent temperatures. Provide adequate light by placing the seedlings closer to a light source or using supplemental grow lights. Maintain a consistent temperature to encourage compact and sturdy growth. Transplanting the seedlings deeper into the soil when moving them to larger containers can also help promote stronger stems.
4. Mold or Fungal Growth: Excessive moisture or poor ventilation can lead to mold or fungal growth on the surface of the growing medium. To address this issue, improve air circulation by removing the cover or dome periodically. Ensure proper drainage to avoid waterlogged conditions. If mold or fungi appear, gently remove the affected area, improve ventilation, and adjust watering practices to maintain appropriate moisture levels.
5. Seedling Weakness or Yellowing Leaves: Weak or yellowing leaves could indicate nutrient deficiencies or over-fertilization. Use a balanced fertilizer at appropriate concentrations to provide essential nutrients for healthy growth. Ensure proper watering practices to avoid both under and over watering, as both can lead to leaf issues. If necessary, take a soil sample and conduct a nutrient analysis to identify any deficiencies and adjust fertilization accordingly.
6. Pest Infestation: Seedlings are vulnerable to pests such as aphids, spider mites, or fungus gnats. Monitor your plants regularly, checking both the foliage and the soil surface for signs of pests. Utilize natural pest control methods like neem oil, insecticidal soaps, or biological controls to address infestations. Be proactive in managing pests to prevent damage to the tender seedlings.
7. Transplant Shock: When transplanting seedlings into larger containers or into the ground, they may experience shock due to the change in environment. Harden off the seedlings gradually before transplanting, exposing them to increasing periods of outdoor conditions. Ensure that the new growing location provides appropriate sunlight, moisture, and soil conditions to support their continued growth and development.
By recognizing and addressing these common germination issues, you can improve the success rate of your germinating plants and nurture them into healthy, robust specimens. Remember that gardening is a learning process, and every challenge presents an opportunity for growth and knowledge.
Now that we have explored troubleshooting germination issues, let’s conclude this article with a few final thoughts.
Conclusion
Congratulations on reaching the end of this comprehensive guide to germination! By now, you have gained a deeper understanding of the germination process, learned how to choose the right seeds, and discovered effective methods and techniques for successful seed sprouting. You have also learned valuable tips for caring for germinating plants and troubleshooting common germination issues.
Germination is a fundamental step in gardening, and mastering the art of germination opens doors to a world of possibilities in your garden. Whether you are cultivating vibrant flowers, delicious fruits and vegetables, or lush greenery, the germination process sets the stage for healthy growth and abundant yields.
Remember, each plant species has its unique germination requirements, so it’s important to research and understand the specific needs of the seeds you are working with. Take the time to create an optimal germination environment, provide adequate care, and address any challenges that arise along the way.
Gardening is not only a hobby but also a journey of patience, nurturing, and continuous learning. Embrace the joy of watching tiny seeds transform into thriving plants, and delight in the rewards of your efforts. So don’t be afraid to get your hands dirty, experiment with different techniques, and enjoy the process of germination.
Now, armed with the knowledge and skills acquired from this guide, go forth with confidence and bring your garden to life through the magic of germination! Happy gardening!
Frequently Asked Questions about How To Germinate A Plant
Was this page helpful?
At Storables.com, we guarantee accurate and reliable information. Our content, validated by Expert Board Contributors, is crafted following stringent Editorial Policies. We're committed to providing you with well-researched, expert-backed insights for all your informational needs.


0 thoughts on “How To Germinate A Plant”