Home>Home Appliances>Bathroom Appliances>How To Make An Electric Toothbrush
Bathroom Appliances
How To Make An Electric Toothbrush
Published: December 23, 2023
Learn how to make an electric toothbrush at home with simple steps and common bathroom appliances. Save money and customize your own toothbrush today!
(Many of the links in this article redirect to a specific reviewed product. Your purchase of these products through affiliate links helps to generate commission for Storables.com, at no extra cost. Learn more)
Introduction
Welcome to the world of DIY electric toothbrushes! In this comprehensive guide, we'll delve into the fascinating realm of creating your very own electric toothbrush. Imagine the satisfaction of crafting a personalized dental hygiene tool that perfectly suits your preferences. Not only is this an exciting project, but it also offers a deeper understanding of the technology behind electric toothbrushes.
Throughout this tutorial, we will explore the step-by-step process of assembling an electric toothbrush, from gathering the necessary materials to testing and using the final product. By the end, you'll have a functional electric toothbrush that you can proudly call your own.
So, roll up your sleeves, gather your tools, and let's embark on this electrifying journey to craft a customized electric toothbrush that will elevate your oral hygiene routine to new heights!
Key Takeaways:
- Crafting your own electric toothbrush is an exciting DIY project that allows you to personalize your dental hygiene tool and gain a deeper understanding of its technology and assembly process.
- By gathering materials, assembling the circuit, and testing the toothbrush, you can create a functional and unique electric toothbrush that reflects your creativity and technical skills.
Read more: How To Make An Electric Toothbrush Quieter
Materials Needed
Before diving into the exciting process of creating your own electric toothbrush, it’s essential to gather the necessary materials. Here’s a list of items you’ll need to bring your DIY project to life:
- DC Motor: Select a high-quality DC motor with the appropriate power and speed specifications for an effective brushing experience.
- Battery: Choose a rechargeable battery pack or individual rechargeable batteries to power your electric toothbrush.
- Switch: A small on/off switch is essential for controlling the operation of the toothbrush.
- Charger: If you opt for a rechargeable battery pack, a compatible charger is required for recharging the battery.
- Wire: High-quality insulated wire for connecting the components of the toothbrush circuit.
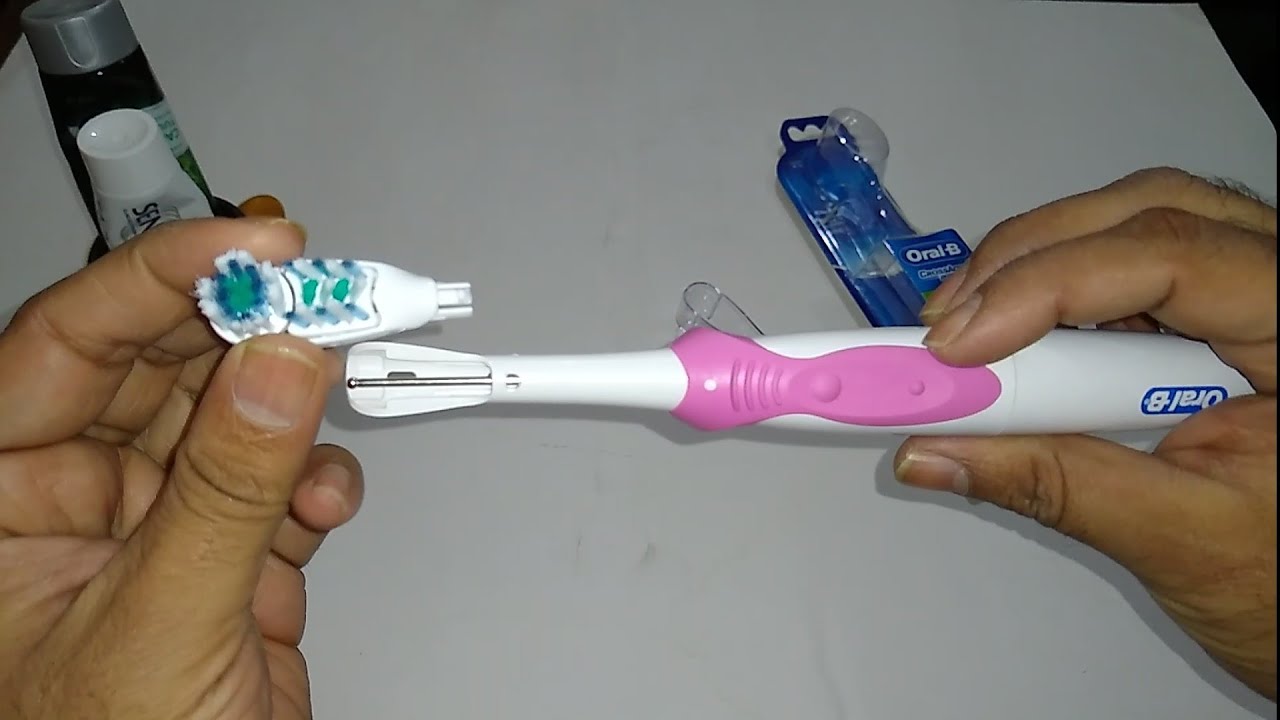
- Bristle Head: The brush head, typically made of nylon bristles, is a crucial component for effective cleaning.
- Plastic or Metal Casing: A casing to house the circuit and motor securely, providing durability and protection.
- Soldering Iron and Solder: These tools are necessary for securely connecting the electrical components.
- Adhesive: A strong adhesive, such as epoxy or hot glue, for securing the motor and other components in place.
- Tools: Various tools, including wire cutters, pliers, and screwdrivers, for assembling the toothbrush.
By ensuring you have all these materials at your disposal, you’ll be well-prepared to embark on the exciting journey of crafting your very own electric toothbrush. With these components in hand, you’re one step closer to achieving a personalized and effective oral care solution that reflects your creativity and technical prowess.
Step 1: Gathering the Components
Embarking on the journey of creating your own electric toothbrush begins with the essential step of gathering all the required components. This phase sets the stage for the exciting process of assembling a personalized dental hygiene tool that aligns with your preferences and technical specifications.
Start by acquiring a high-quality DC motor that meets the power and speed requirements for an effective brushing experience. Ensure that the motor is durable and capable of providing reliable performance for your DIY electric toothbrush. Additionally, select a rechargeable battery pack or individual rechargeable batteries to power the toothbrush, allowing for convenient and sustainable use.
Next, procure a small on/off switch to control the operation of the toothbrush, enabling seamless activation and deactivation as needed. If you opt for a rechargeable battery pack, it’s crucial to obtain a compatible charger to ensure easy recharging of the battery for prolonged use.
High-quality insulated wire is an essential component for connecting the various elements of the toothbrush circuit. It’s important to select wire that is durable and capable of securely transmitting electrical signals to ensure the proper functioning of the toothbrush.
The brush head, typically made of nylon bristles, is a critical component that directly contributes to the effectiveness of the electric toothbrush. Select a brush head that aligns with your oral care preferences, considering factors such as bristle firmness and design for optimal cleaning performance.
Moreover, acquiring a plastic or metal casing to house the circuit and motor is essential for providing durability and protection to the internal components. The casing ensures that the electrical elements are securely housed, safeguarding them from external damage while maintaining the overall integrity of the toothbrush.
Lastly, ensure you have a soldering iron and solder at your disposal for securely connecting the electrical components. These tools are vital for establishing reliable connections within the toothbrush circuit, contributing to its overall functionality and performance.
By meticulously gathering these components, you’ll lay the foundation for a successful and rewarding DIY electric toothbrush project. This initial step sets the stage for the subsequent phases of assembling the toothbrush, culminating in the creation of a personalized oral care solution that reflects your technical acumen and creativity.
Step 2: Assembling the Circuit
With the essential components in hand, the next pivotal step in creating your DIY electric toothbrush is the meticulous assembly of the circuit. This phase involves integrating the various electrical elements to form a cohesive and functional system that powers the toothbrush, enabling it to deliver effective brushing performance.
Begin by carefully connecting the DC motor to the rechargeable battery pack or individual rechargeable batteries using high-quality insulated wire. Ensure that the connections are secure and well-insulated to prevent any electrical mishaps and guarantee consistent power delivery to the motor.
Integrate the on/off switch into the circuit, strategically positioning it to facilitate convenient access for activating and deactivating the electric toothbrush. The switch serves as a crucial control mechanism, allowing you to seamlessly manage the operation of the toothbrush with ease.
Utilize a soldering iron and solder to establish reliable connections within the circuit, ensuring that the electrical components are securely linked to form a cohesive and functional system. Meticulously soldering the connections contributes to the overall stability and performance of the toothbrush, laying the groundwork for its effective operation.
As you assemble the circuit, prioritize precision and attention to detail to guarantee the seamless integration of the electrical components. Thoroughly inspect each connection to verify its integrity and functionality, addressing any potential issues to ensure the optimal performance of the electric toothbrush.
Throughout the assembly process, maintain a methodical approach, carefully organizing the components and their respective connections to create a well-structured and reliable circuit. Attention to detail is paramount, as it ensures the overall functionality and safety of the electric toothbrush, culminating in a meticulously crafted dental hygiene tool.
By methodically assembling the circuit, you’re one step closer to realizing your personalized electric toothbrush. This pivotal phase sets the stage for integrating the motor, battery, and control elements into a cohesive system, laying the groundwork for the subsequent stages of mounting the motor, attaching the brush head, and ultimately testing and using the completed electric toothbrush.
When making an electric toothbrush, make sure to use a small, high-speed motor to create the vibrating motion for effective cleaning. Also, consider using a rechargeable battery for convenience and sustainability.
Step 3: Mounting the Motor
As you progress through the process of creating your DIY electric toothbrush, the next crucial step involves mounting the DC motor within the toothbrush assembly. Properly securing the motor is essential for ensuring its stability and optimal functionality, ultimately contributing to the overall effectiveness of the toothbrush.
Begin by carefully positioning the DC motor within the designated area of the toothbrush casing, ensuring that it is strategically placed to facilitate efficient power transmission to the brush head. Secure the motor in place using a strong adhesive, such as epoxy or hot glue, to guarantee its stability and prevent any potential movement or dislodgment during operation.
Attention to detail is paramount during the motor mounting process, as the precise positioning and secure attachment of the motor directly impact the overall performance and longevity of the electric toothbrush. Verify that the motor is firmly affixed within the casing, minimizing any potential vibrations or instability that could compromise its functionality.
Furthermore, consider the alignment of the motor shaft with the brush head attachment point to ensure a seamless connection that facilitates effective brushing motion. The proper alignment of these components is crucial for achieving optimal brushing performance, enhancing the overall functionality of the electric toothbrush.
Throughout the motor mounting process, prioritize precision and meticulousness to guarantee the secure and stable integration of this critical component within the toothbrush assembly. Thoroughly inspect the motor’s positioning and attachment to verify its stability and alignment, addressing any potential issues to ensure its seamless integration into the overall design.
By effectively mounting the motor within the toothbrush assembly, you’re one step closer to realizing a fully functional electric toothbrush that embodies your technical prowess and creativity. This pivotal phase sets the stage for the subsequent steps of attaching the brush head, testing the toothbrush, and ultimately enjoying the personalized and effective oral care solution you’ve crafted.
Read more: How To Make A Toothbrush
Step 4: Attaching the Bristle Head
As you near the completion of your DIY electric toothbrush project, the next critical step involves attaching the bristle head, a pivotal component that directly contributes to the toothbrush’s cleaning efficacy. The proper attachment of the bristle head is essential for ensuring optimal brushing performance and overall functionality.
Begin by selecting a high-quality bristle head that aligns with your oral care preferences, considering factors such as bristle firmness and design to optimize cleaning effectiveness. The bristle head serves as the primary contact point with the teeth and gums, making its selection and attachment a crucial aspect of the toothbrush assembly process.
Secure the bristle head to the designated attachment point on the electric toothbrush casing, ensuring a firm and stable connection that facilitates effective brushing motion. Utilize a strong adhesive, such as epoxy or hot glue, to affix the bristle head securely, minimizing any potential movement or detachment during use.
Attention to detail is paramount during the bristle head attachment process, as the proper alignment and secure fixation of this component directly impact the toothbrush’s cleaning performance and overall functionality. Verify that the bristle head is firmly affixed, maintaining its position to facilitate consistent and effective contact with the teeth and gums.
Consider the arrangement and distribution of the bristles on the brush head, ensuring an even and uniform layout that optimizes cleaning coverage. The strategic positioning of the bristles contributes to the toothbrush’s ability to effectively remove plaque and debris, enhancing its overall cleaning performance.
Thoroughly inspect the attachment of the bristle head, verifying its stability and alignment within the toothbrush assembly to address any potential issues and ensure its seamless integration. Attention to detail during this phase is crucial for realizing a fully functional electric toothbrush that embodies your personalized design and technical expertise.
By successfully attaching the bristle head, you’re one step closer to completing your DIY electric toothbrush project. This pivotal phase sets the stage for the subsequent step of testing the toothbrush, culminating in the rewarding experience of using the personalized and effective oral care solution you’ve crafted.
Step 5: Testing and Using the Electric Toothbrush
Congratulations on reaching the final phase of your DIY electric toothbrush project! As you approach the culmination of this exciting endeavor, it’s time to put your personalized creation to the test and experience the satisfaction of using a toothbrush crafted to your specifications.
Begin by carefully inspecting the assembled components, ensuring that all connections are secure and that the motor, battery, and bristle head are firmly integrated within the toothbrush assembly. Thoroughly examine the overall construction to verify its structural integrity and functionality, addressing any potential issues to guarantee a seamless testing experience.
Prior to activating the electric toothbrush, double-check the positioning of the on/off switch and ensure that it is easily accessible for convenient operation. This crucial control mechanism allows you to initiate the brushing action and assess the functionality of your personalized toothbrush.
Gently activate the electric toothbrush using the on/off switch, observing the motor’s performance and the brushing motion facilitated by the bristle head. Pay close attention to the brush head’s movement and effectiveness in providing thorough cleaning, assessing its ability to remove plaque and debris from the teeth and gums.
During the testing phase, evaluate the battery’s performance and the overall power delivery to the motor, ensuring consistent and reliable operation. Verify that the toothbrush maintains a steady brushing motion, reflecting the successful integration of the electrical components and the meticulous assembly of the circuit.
As you experience the functionality of your DIY electric toothbrush, take note of its cleaning efficacy and overall performance, assessing its ability to meet your oral care needs and preferences. This firsthand testing provides valuable insights into the functionality and effectiveness of the personalized toothbrush you’ve crafted.
Following a successful testing phase, revel in the satisfaction of using a toothbrush that embodies your technical acumen and creativity. Embrace the personalized and effective oral care solution you’ve created, knowing that it reflects your ingenuity and attention to detail.
By testing and using the electric toothbrush, you’ve completed a rewarding journey of crafting a personalized dental hygiene tool that elevates your oral care routine to new heights. Embrace the pride of creating a functional and effective electric toothbrush that embodies your unique design and technical expertise.
Conclusion
Congratulations on successfully completing the exhilarating journey of creating your very own DIY electric toothbrush! Throughout this comprehensive guide, you’ve embarked on a captivating exploration of crafting a personalized dental hygiene tool that aligns with your preferences and technical specifications. By integrating your creativity and technical prowess, you’ve brought to life a functional and effective electric toothbrush that reflects your ingenuity and attention to detail.
From the initial step of gathering the essential components to meticulously assembling the circuit, mounting the motor, attaching the bristle head, and finally testing and using the electric toothbrush, you’ve demonstrated a remarkable commitment to realizing a personalized oral care solution. Your dedication and meticulousness have culminated in the creation of a truly unique and functional dental hygiene tool.
By embracing the DIY approach to crafting an electric toothbrush, you’ve gained valuable insights into the technology and design considerations behind this essential oral care device. Your hands-on experience has provided a deeper understanding of the intricate components and assembly processes that contribute to the functionality and effectiveness of an electric toothbrush.
As you revel in the satisfaction of using your personalized electric toothbrush, take pride in the embodiment of your technical acumen and creativity. Your DIY creation serves as a testament to your innovative spirit and the rewarding experience of crafting a practical and personalized solution to enhance your daily oral care routine.
With your newfound knowledge and hands-on experience, you’re well-equipped to continue exploring the realm of DIY projects and further honing your skills in crafting personalized solutions. Whether it’s delving into other DIY electronics endeavors or embarking on innovative creations in different domains, your journey in crafting an electric toothbrush has laid a solid foundation for future explorations.
As you reflect on the fulfilling journey of creating your DIY electric toothbrush, remember the joy of bringing a personalized creation to life and the invaluable skills and insights gained along the way. Your electric toothbrush stands as a testament to your creativity, technical proficiency, and unwavering dedication to crafting practical and personalized solutions.
Embrace the pride of creating a functional and effective electric toothbrush that embodies your unique design and technical expertise. Your DIY journey has not only resulted in a personalized oral care tool but has also enriched your understanding of electronics and design, paving the way for future innovative endeavors.
Frequently Asked Questions about How To Make An Electric Toothbrush
Was this page helpful?
At Storables.com, we guarantee accurate and reliable information. Our content, validated by Expert Board Contributors, is crafted following stringent Editorial Policies. We're committed to providing you with well-researched, expert-backed insights for all your informational needs.


0 thoughts on “How To Make An Electric Toothbrush”