Home>Home Maintenance>How To Clean An Arctic King Air Conditioner
Home Maintenance
How To Clean An Arctic King Air Conditioner
Modified: August 27, 2024
Learn how to clean your Arctic King air conditioner with these easy home maintenance tips. Keep your AC unit running efficiently and cool all summer long.
(Many of the links in this article redirect to a specific reviewed product. Your purchase of these products through affiliate links helps to generate commission for Storables.com, at no extra cost. Learn more)
Introduction
Welcome to our comprehensive guide on how to clean an Arctic King air conditioner. Arctic King is a trusted brand known for its high-quality cooling units that bring comfort to homes around the world. Regular maintenance and cleaning of your air conditioner are essential to ensure its optimal performance and longevity.
Over time, dust, dirt, and debris can accumulate in your air conditioner, reducing its efficiency and potentially leading to issues like poor ventilation, unpleasant odors, and even system malfunctions. By following the proper cleaning procedures, you can remove these impurities and maintain a clean and healthy living environment.
In this guide, we will take you through a step-by-step process of cleaning your Arctic King air conditioner. We’ll cover everything from safety precautions to the tools and materials you’ll need, as well as detailed instructions on how to clean the air filter, exterior, coils, drainage system, and fan blades. By the end of this guide, you’ll have the knowledge and confidence to keep your Arctic King air conditioner running smoothly.
Before we begin, it’s important to note that while general cleaning is within the scope of a homeowner’s abilities, more complex maintenance or repairs may require the assistance of a professional HVAC technician. If you are unsure or uncomfortable performing any of the cleaning procedures outlined in this guide, it’s always best to seek professional help.
Now, let’s dive into the process of cleaning your Arctic King air conditioner and ensure it stays in top condition for the years to come!
Key Takeaways:
- Regularly cleaning your Arctic King air conditioner is essential for efficient cooling, healthier air, and a longer lifespan. Follow the step-by-step guide to ensure optimal performance and a comfortable home environment.
- Prioritize safety and use mild cleaning solutions to maintain your Arctic King air conditioner. Keep the unit clean for refreshing, high-quality air and a well-functioning cooling system.
Read more: How To Clean A Lennox Air Conditioner
Safety Precautions
Before you start cleaning your Arctic King air conditioner, it’s essential to prioritize your safety. Follow these safety precautions to ensure that you can clean your unit without any accidents or injuries:
- Turn off the power: Before beginning any cleaning procedures, make sure to turn off the power to your air conditioner. Locate the power switch on the unit or shut off the circuit breaker in your electrical panel. This will prevent any potential electric shocks or accidents.
- Wear protective gear: It’s crucial to protect yourself while cleaning your air conditioner. Wear gloves to protect your hands from any sharp edges or debris. Additionally, wearing safety goggles will protect your eyes from dust, dirt, and any cleaning solutions that may splash.
- Disconnect from the electrical supply: Ensure that your Arctic King air conditioner is completely disconnected from the electrical supply before proceeding with any cleaning. This includes unplugging the unit from the wall socket and ensuring that the power switch is in the “off” position.
- Give the unit time to cool down: Air conditioners can become hot during operation. It’s essential to let your Arctic King air conditioner cool down for at least an hour before attempting to clean it. This will reduce the risk of burns or injuries from hot surfaces.
- Work on a stable surface: Place your Arctic King air conditioner on a stable, flat surface before cleaning it. This will prevent the unit from accidentally falling or tipping over during the cleaning process. Avoid cleaning your air conditioner on a ladder or any unsteady surface.
- Use appropriate cleaning products: When cleaning your air conditioner, use only mild and non-corrosive cleaning solutions recommended by the manufacturer. Avoid using harsh chemicals or abrasive materials that could damage the unit or pose a risk to your health.
- Be cautious with sharp objects: When removing any debris or cleaning the unit, be mindful of any sharp edges or components. Avoid using sharp tools or objects that could damage the coils or other delicate parts of your Arctic King air conditioner.
- Follow the manufacturer’s guidelines: Always refer to the user manual or instructions provided by the manufacturer for specific cleaning guidelines and safety precautions. Each air conditioner model may have unique requirements, so it’s important to follow the manufacturer’s recommendations.
By following these safety precautions, you can ensure a safe and successful cleaning process for your Arctic King air conditioner. Now that you’re equipped with the necessary knowledge, let’s move on to the tools and materials you’ll need for the cleaning process.
Tools and Materials Needed
Before you begin cleaning your Arctic King air conditioner, gather the following tools and materials to ensure a smooth and efficient cleaning process:
- Screwdriver: You’ll need a screwdriver, preferably with multiple heads, to remove any screws holding the casing or panels of the air conditioner in place.
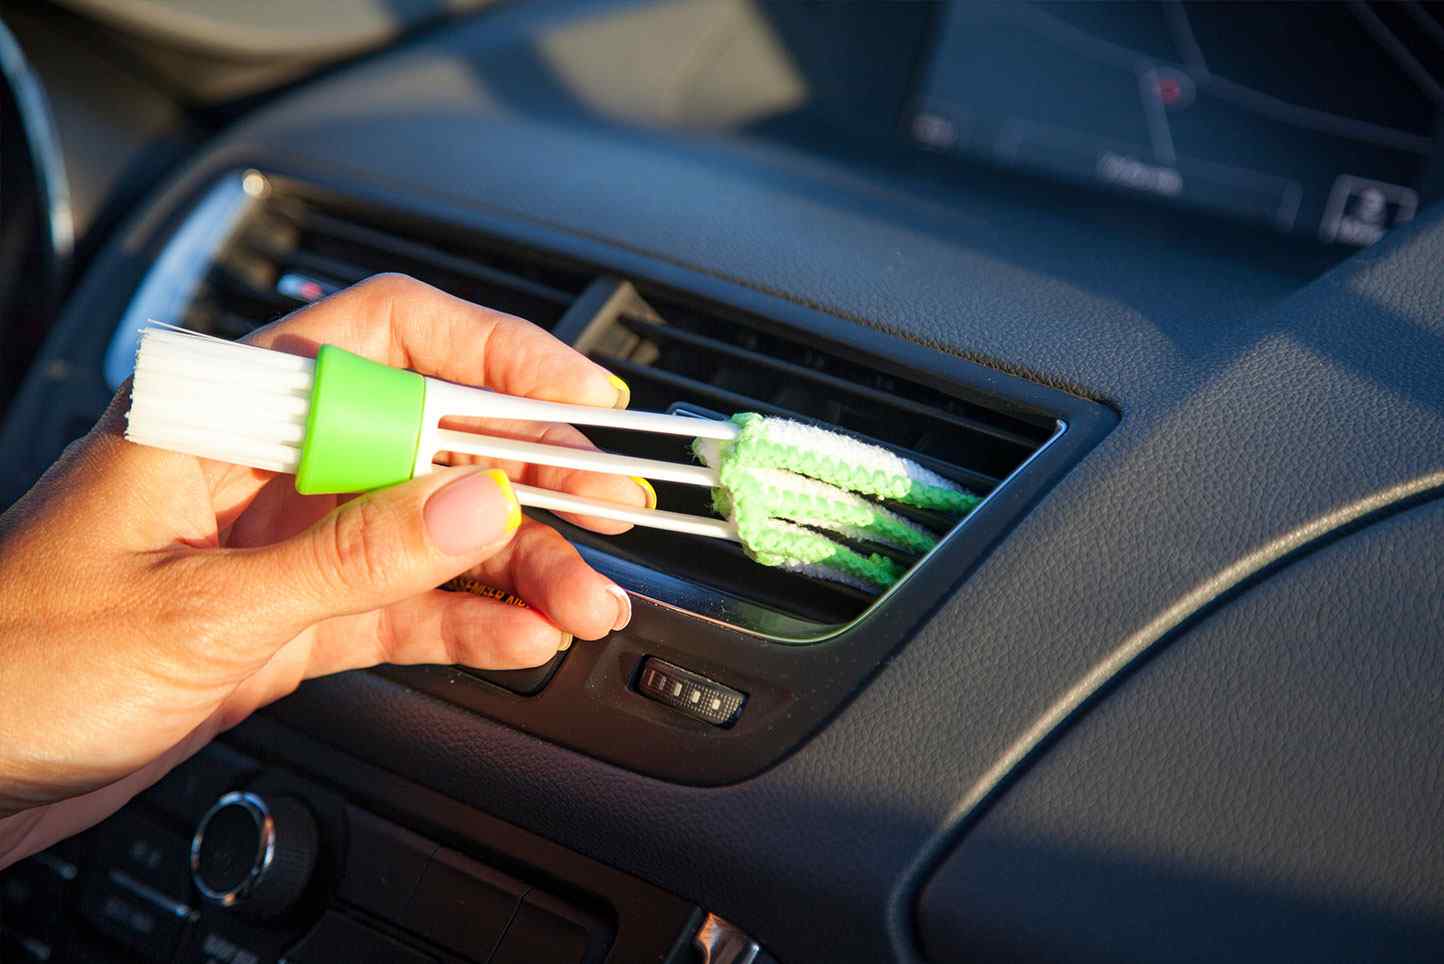
- Soft Brush or Vacuum Cleaner: A soft brush or a vacuum cleaner with a brush attachment will be useful for removing loose dirt, dust, and debris from the air filter, coils, and fan blades.
- Mild Cleaning Solution: Prepare a mild cleaning solution by mixing a few drops of dish soap or a mild detergent with warm water. This solution will be used to clean the exterior of the air conditioner and other components.
- Spray Bottle: Fill a spray bottle with the mild cleaning solution for easy application.
- Clean Cloth or Sponge: Use a clean cloth or sponge to wipe down the exterior surfaces of the air conditioner and other components. Make sure it’s lint-free and non-abrasive.
- Air Filter Cleaner: If the air filter is heavily soiled, consider using a specialized air filter cleaner or a mild solution of warm water and vinegar to remove dirt and debris.
- Bucket or Basin: Prepare a bucket or basin filled with warm water for soaking the air filter.
- Garden Hose: A garden hose with a spray nozzle attachment will be needed to rinse off the coils and other components.
- Gloves and Safety Goggles: Protect your hands with gloves and your eyes with safety goggles to ensure your safety throughout the cleaning process.
- Towels or Absorbent Cloths: Keep a few towels or absorbent cloths handy to dry off the air conditioner after cleaning.
By having these tools and materials ready, you’ll be well-prepared to tackle the cleaning process for your Arctic King air conditioner. Now that you have everything you need, let’s move on to the step-by-step guide on how to clean your air conditioner.
Step-by-Step Guide to Cleaning an Arctic King Air Conditioner
Follow these step-by-step instructions to effectively clean your Arctic King air conditioner:
- Turn Off the Power: Locate the power switch on your Arctic King air conditioner or turn off the circuit breaker in your electrical panel to ensure the unit is completely powered off before cleaning.
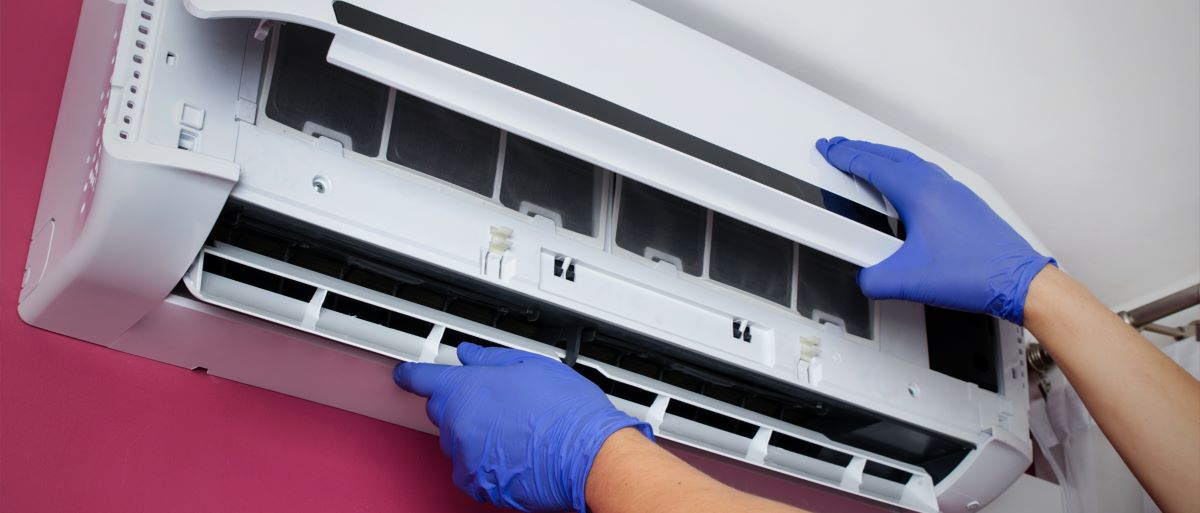
- Remove the Air Filter: Locate the air filter panel on the front or side of your air conditioner. Use a screwdriver to remove any screws securing the panel in place. Once removed, take out the air filter carefully.
- Clean the Air Filter: Prepare a solution of warm water and mild detergent or use a specialized air filter cleaner. Submerge the air filter in the solution and gently agitate it to remove dirt and debris. Rinse the filter under running water until it’s clean and allow it to air dry completely before reinstallation.
- Clean the Exterior: Fill a spray bottle with the mild cleaning solution. Spray the solution onto a clean cloth or sponge and gently wipe down the exterior surfaces of the air conditioner. Pay extra attention to any visible dirt or stains. Use a towel or cloth to dry off the unit after cleaning.
- Clean the Coils: Use a soft brush or vacuum cleaner with a brush attachment to carefully remove any loose dirt or debris from the coils. Then, use a garden hose with a spray nozzle attachment to rinse the coils thoroughly. Be careful not to use excessive water pressure that could damage the coils. Allow the coils to air dry completely.
- Clean the Drainage System: Inspect the drainage system for any blockages or buildup. Clear any obstructions by gently removing them with a brush or by using a mixture of warm water and mild detergent. Ensure that the drainage pipe is clear to allow proper drainage of condensation.
- Clean the Fan Blades: Use a soft brush or vacuum cleaner with a brush attachment to remove any dust or debris from the fan blades. Pay attention to both sides of the blades and clean them thoroughly. Make sure the fan blades are completely dry before reinstallation.
- Reinstall the Air Filter: Once the air filter is completely dry, place it back into the air conditioner in its original position. Secure the air filter panel with the screws using a screwdriver.
Following these steps will help ensure that your Arctic King air conditioner is clean and functioning optimally. Remember to refer to the manufacturer’s instructions for any specific cleaning recommendations.
Now that you’ve completed the cleaning process, you can turn on the power to your Arctic King air conditioner. Enjoy the cool and refreshing air it will provide, knowing that your unit is clean and well-maintained!
Turn Off the Power
Before you begin cleaning your Arctic King air conditioner, it is crucial to turn off the power to ensure your safety. Follow these steps to turn off the power:
- Locate the power switch: Depending on the model of your Arctic King air conditioner, the power switch may be located on the unit itself or on the remote control. Look for a power symbol or switch symbol on the control panel or remote.
- Turn off the power: Once you have located the power switch, slide it to the “off” position or press the power button to turn off the unit. Verify that the display or indicator lights on the unit or remote control have turned off to confirm that the power is off.
- Turn off the circuit breaker: If you are unable to find a power switch on the unit or remote control, you can turn off the power by locating the circuit breaker that supplies electricity to the air conditioner. Open your electrical panel and search for the breaker labeled for the air conditioner. Switch the breaker to the “off” position.
It is essential to turn off the power to your Arctic King air conditioner before cleaning to prevent any risk of electric shock or injury.
Keep in mind that when you turn off the power, the air conditioner will no longer cool your space. Make sure to plan your cleaning time accordingly to avoid discomfort from the lack of cooling during the process.
Once you have successfully turned off the power to your Arctic King air conditioner, you can proceed to the next step of removing the air filter for cleaning. Remember to handle the air conditioner with caution and refer to the manufacturer’s instructions if you have any doubts about the power-off process.
Read more: How To Clean A Frigidaire Air Conditioner
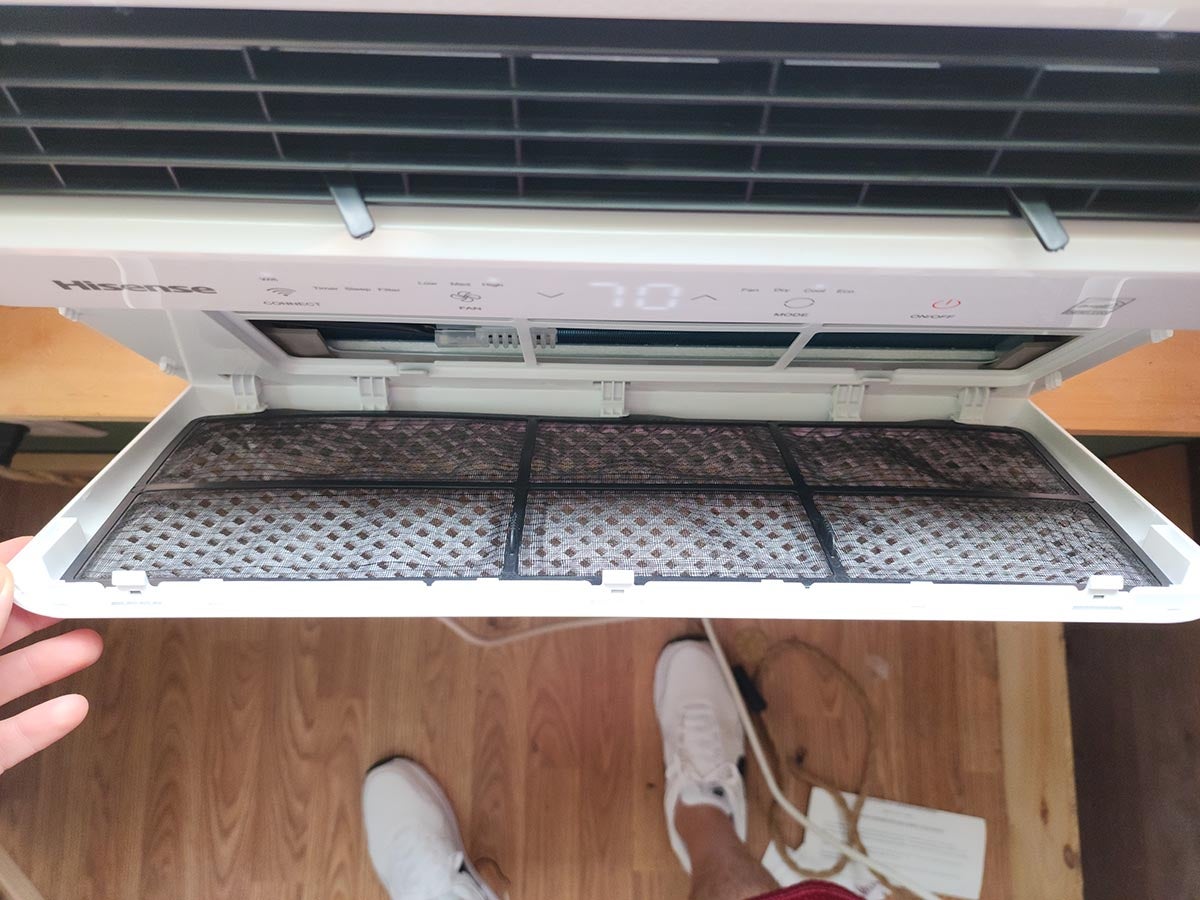
Remove the Air Filter
After turning off the power to your Arctic King air conditioner, the next step in cleaning is to remove the air filter. The air filter plays a vital role in maintaining the air quality and efficiency of your air conditioner. Follow these steps to safely remove the air filter:
- Locate the air filter panel: The air filter panel is typically located on the front or side of your Arctic King air conditioner. It may be secured by screws or latches.
- Prepare your tools: Get a screwdriver that matches the size and type of screws used to secure the air filter panel. Alternatively, if the panel uses latches, make sure you have a firm grip to release them.
- Remove the securing screws or release the latches: Carefully unscrew each screw securing the air filter panel. Place the screws in a safe spot for later reinstallation. If the panel uses latches, push or release them to unlock and open the panel. Be gentle to avoid damaging the panel or the air conditioner.
- Take out the air filter: Once the panel is open, you can see the air filter. Gently pull it out from its designated slot. Note the position and direction in which the filter is installed so that you can reinstall it correctly later.
Removing the air filter allows you to thoroughly clean it and improve the performance of your Arctic King air conditioner. The air filter is usually made of a mesh material that traps dust, dirt, and other particles, preventing them from entering your home. With regular cleaning, you can ensure that the air flowing through the filter remains free from impurities.
Now that you have successfully removed the air filter, you can proceed to the next step of cleaning it thoroughly. Cleaning the air filter is an essential part of maintaining your air conditioner’s efficiency and ensuring clean airflow. In the following step, we will guide you through the process of cleaning the air filter to remove dirt and debris.
Clean the Air Filter
Cleaning the air filter of your Arctic King air conditioner is an important step to ensure efficient airflow and maintain good indoor air quality. Over time, the air filter becomes clogged with dust, dirt, and other particles, hindering its ability to trap impurities and reducing the overall performance of your air conditioner. Follow these steps to clean the air filter effectively:
- Prepare a cleaning solution: Fill a bucket or basin with warm water. You can also add a few drops of mild dish soap or a specialized air filter cleaner if the filter is heavily soiled. Mix the solution gently to create a soapy water mixture.
- Submerge the air filter: Place the air filter into the cleaning solution, making sure it is fully submerged. Allow it to soak for about 15-30 minutes. This soaking process helps loosen the dirt and grime trapped in the filter.
- Gently agitate the filter: After soaking, use your hands or a soft brush to gently agitate the air filter. Gently move it back and forth in the cleaning solution to dislodge any remaining dirt and debris. Be careful not to scrub too vigorously as it may damage the filter material.
- Rinse the filter: Remove the air filter from the cleaning solution and rinse it thoroughly under running water. Make sure to rinse both sides of the filter to remove all the soap and loosened particles. Hold the filter gently and avoid using excessive water pressure that could damage the filter material.
- Allow the filter to air dry: Once rinsed, shake off any excess water and place the air filter on a clean towel or drying rack. Allow it to air dry completely. Avoid using heat sources or direct sunlight to expedite the drying process, as it may cause damage to the filter material.
Cleaning the air filter at regular intervals, such as once every month or as recommended by the manufacturer, helps maintain the efficiency and overall performance of your Arctic King air conditioner. A clean air filter improves airflow, reduces strain on the system, and ensures cleaner air circulation within your home.
Once the air filter is completely dry, you can proceed to the next step of cleaning the exterior surfaces of your air conditioner. Cleaning the exterior helps remove dust and debris accumulated on the outer casing, improving the overall appearance of the unit.
To clean an Arctic King air conditioner, start by turning off the unit and unplugging it. Remove the filter and wash it with warm, soapy water. Use a vacuum to clean the coils and fins. Wipe down the exterior with a damp cloth. Allow all parts to dry completely before reassembling.
Clean the Exterior
After cleaning the air filter, it’s time to clean the exterior surfaces of your Arctic King air conditioner. Dust, dirt, and other particles can accumulate on the outer casing, affecting both the appearance and performance of the unit. Follow these steps to effectively clean the exterior of your air conditioner:
- Prepare a mild cleaning solution: Fill a spray bottle with warm water and add a few drops of mild dish soap or a non-abrasive cleaner. Gently mix the solution to create a soapy mixture.
- Spray the cleaning solution: Spray the cleaning solution onto a clean cloth or sponge. Ensure that the cloth or sponge is damp, not soaking wet, to avoid water seeping into the internal components of the air conditioner.
- Wipe down the exterior surfaces: Starting from the top, gently wipe down the exterior surfaces of the air conditioner. Pay extra attention to any visible dirt, stains, or greasy spots. Use a circular motion or gentle strokes to remove the dirt and grime. Avoid using excessive pressure that could damage the unit.
- Clean the control panel and buttons: Use a cloth or sponge dampened with the cleaning solution to wipe down the control panel and buttons of your air conditioner. Be cautious not to let any liquid seep into the control panel, as it may cause damage.
- Reach difficult areas: For hard-to-reach areas or crevices, use a soft brush or a toothbrush dipped in the cleaning solution. Gently scrub the areas to remove any dirt or debris.
- Rinse with clean water (optional): If you used a soapy cleaning solution, you can rinse the exterior surfaces with clean water. Use a damp cloth or sponge to remove any soap residue.
- Dry the exterior: After cleaning, use a clean towel or cloth to dry off the exterior surfaces of the air conditioner. Ensure that no moisture remains to prevent any water damage or corrosion.
Cleaning the exterior of your Arctic King air conditioner not only improves its appearance but also helps maintain its functionality. By removing dust and debris, you can ensure proper airflow and efficient cooling performance.
With the exterior surfaces cleaned, you can now move on to cleaning the coils of your air conditioner. The coils play a crucial role in cooling the air and should be kept clean to maintain optimal performance. In the next step, we will guide you through the process of cleaning the coils.
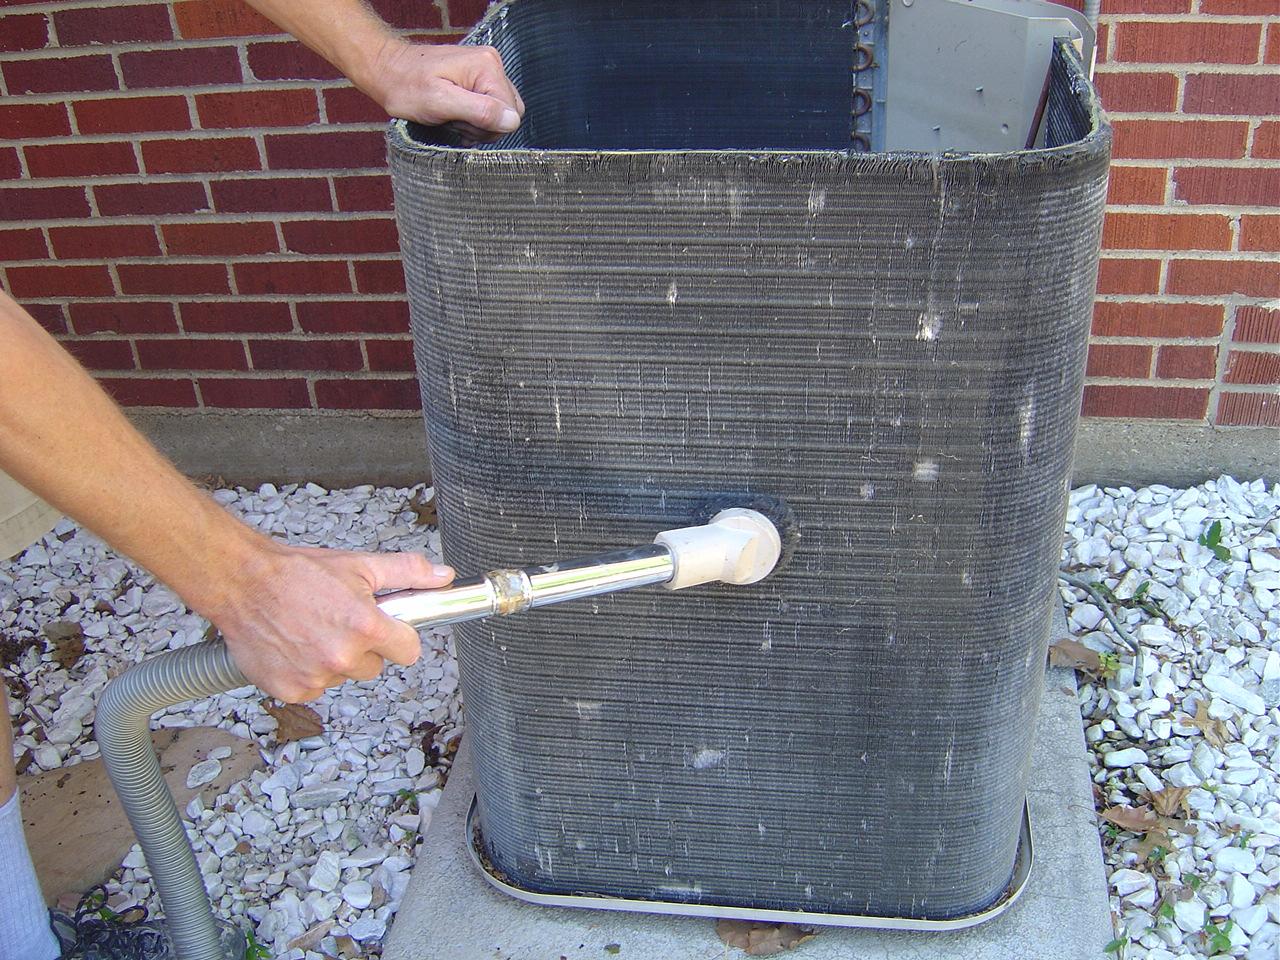
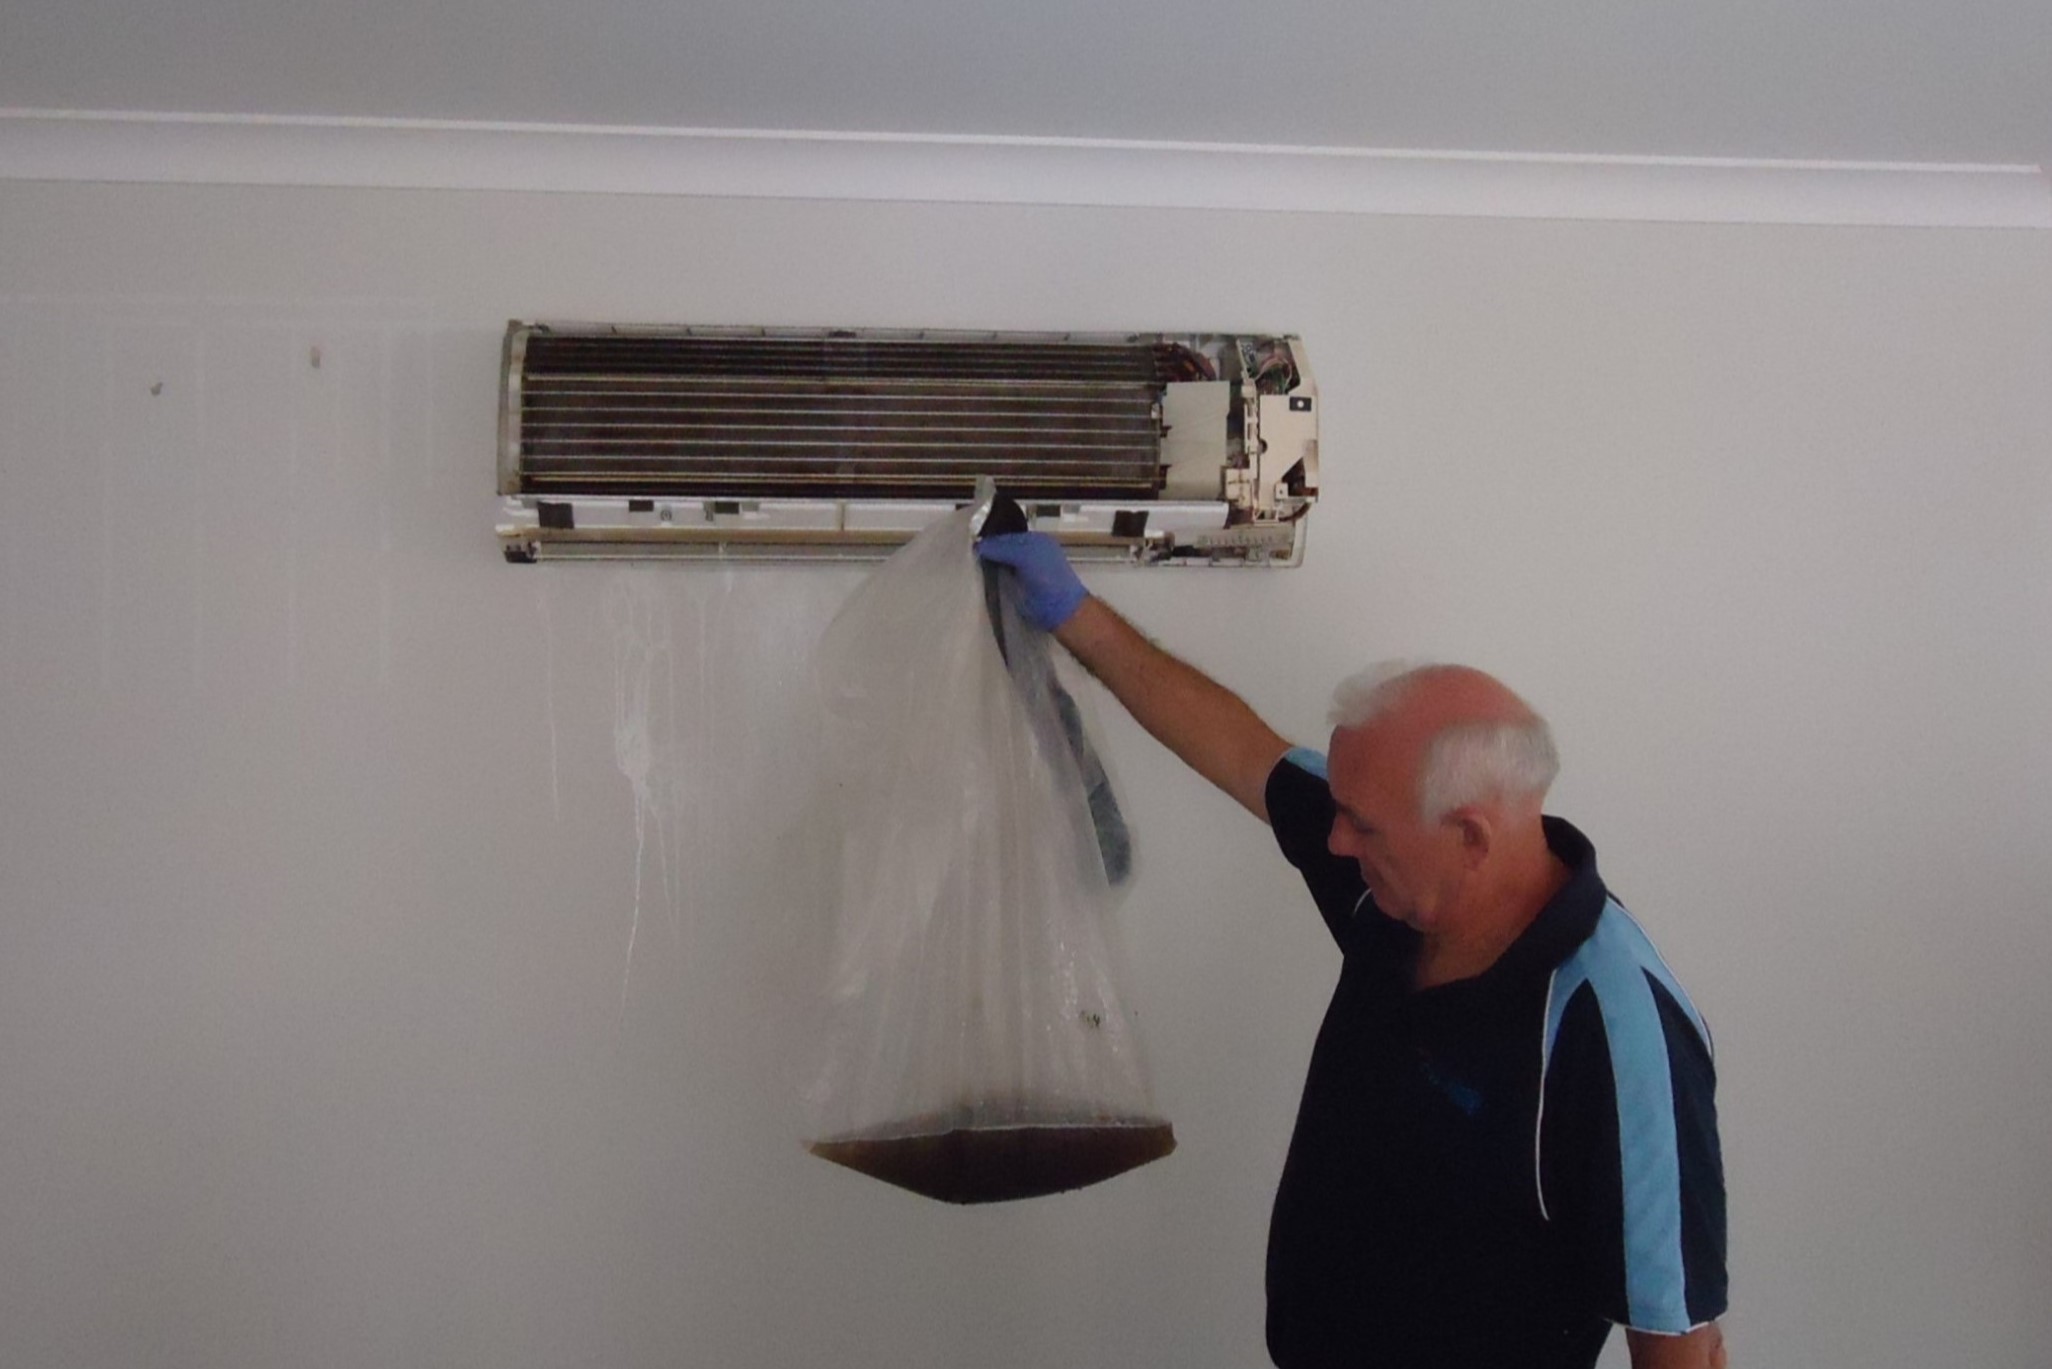
Clean the Coils
The coils in your Arctic King air conditioner are responsible for transferring heat and cooling the air that flows through the unit. Over time, dust, dirt, and debris can accumulate on the coils, reducing their efficiency and impacting the overall performance of your air conditioner. Cleaning the coils is essential to maintain optimal cooling and airflow. Follow these steps to effectively clean the coils:
- Ensure the power is off: Before cleaning the coils, make sure the power to your air conditioner is turned off. Refer to the safety precautions mentioned earlier in this guide to ensure your safety throughout the process.
- Access the coils: Depending on the model of your Arctic King air conditioner, you may need to remove a panel or casing to access the coils. Use a screwdriver to remove the screws securing the panel or follow the manufacturer’s instructions for accessing the coils.
- Remove loose dirt and debris: Use a soft brush or a vacuum cleaner with a brush attachment to carefully remove any loose dirt, dust, or debris from the coils. Gently brush or vacuum both sides of the coils to ensure thorough cleaning.
- Prepare a cleaning solution: Fill a spray bottle with clean water. If the coils are heavily soiled, you can add a mild detergent or a specialized coil cleaner to the water. Be sure to read the manufacturer’s instructions for proper dilution.
- Spray the cleaning solution: Begin spraying the cleaning solution onto the coils. Start from the top and work your way down in a gentle and even motion. Be careful not to saturate the coils and avoid using excessive water pressure, as it may damage the fins or internal components.
- Allow the cleaning solution to penetrate: Once the coils are sprayed with the cleaning solution, let it sit for a few minutes to allow it to penetrate and loosen any grime or dirt on the surface of the coils.
- Rinse the coils: After the cleaning solution has had time to work, use a garden hose with a spray nozzle attachment to rinse off the coils thoroughly. Start from the top and ensure that all the cleaning solution and loosened debris are washed away. Again, be cautious not to use excessive water pressure.
- Allow the coils to dry completely: Once rinsed, let the coils air dry completely before reassembling the panel or casing. Ensure that the coils are completely dry to avoid any moisture-related issues.
By regularly cleaning the coils of your Arctic King air conditioner, you can remove dirt and debris that obstructs efficient airflow and cooling. This helps maintain the performance and energy efficiency of your unit.
After cleaning the coils, it’s important to clean the drainage system of your air conditioner to ensure proper functioning. In the next step, we will guide you through the process of cleaning the drainage system.
Read more: How To Clean An RV Air Conditioner
Clean the Drainage System
The drainage system of your Arctic King air conditioner is responsible for removing condensation and excess moisture from the unit. Over time, the drainage system can become clogged with dirt, debris, or algae, leading to poor drainage and potential water damage. Cleaning the drainage system is crucial to ensure proper functioning and prevent any issues. Follow these steps to effectively clean the drainage system:
- Locate the drainage system: The drainage system is typically located at the bottom of your Arctic King air conditioner. It consists of a drainage pan and a small pipe or tube that allows water to drain.
- Inspect for blockages: Thoroughly examine the drainage pan and pipe for any visible blockages or debris. Common obstructions include dirt, dust, algae, or even small insects. If you notice any blockages, it’s important to clear them to restore proper drainage.
- Remove debris: Use a soft brush or a cloth to remove any visible debris from the drainage pan and pipe. Gently scrub the surfaces to dislodge the obstructions without causing damage to the unit.
- Flush the drainage system: Flush the drainage system with a mixture of warm water and mild detergent. Carefully pour the solution into the drainage pan and allow it to flow through the pipe. This will help remove any remaining dirt or algae that may be obstructing the drainage system.
- Use a pipe cleaner (if necessary): If you encounter stubborn clogs, you can use a pipe cleaner or a small wire brush to gently clear the blockage. Insert the pipe cleaner or brush into the drainage pipe and carefully maneuver it back and forth to dislodge the obstruction.
- Rinse with clean water: After flushing and clearing any blockages, rinse the drainage system with clean water. Pour water into the drainage pan and allow it to flow through the pipe to flush out any remaining detergent or debris.
- Observe proper drainage: After cleaning, turn on your air conditioner and observe the drainage system for proper functioning. There should be a steady flow of water from the drainpipe. If you notice any water backup or slow drainage, it may indicate a persistent blockage that requires further attention.
Regularly cleaning the drainage system of your Arctic King air conditioner helps prevent water damage and ensures efficient removal of condensation. By maintaining a clear and functioning drainage system, you can avoid issues such as leaks, water overflow, or even mold growth.
Now that you have cleaned the drainage system, it’s time to move on to cleaning the fan blades, which play a crucial role in circulating the air within your air conditioner. In the next step, we will guide you through the process of cleaning the fan blades.
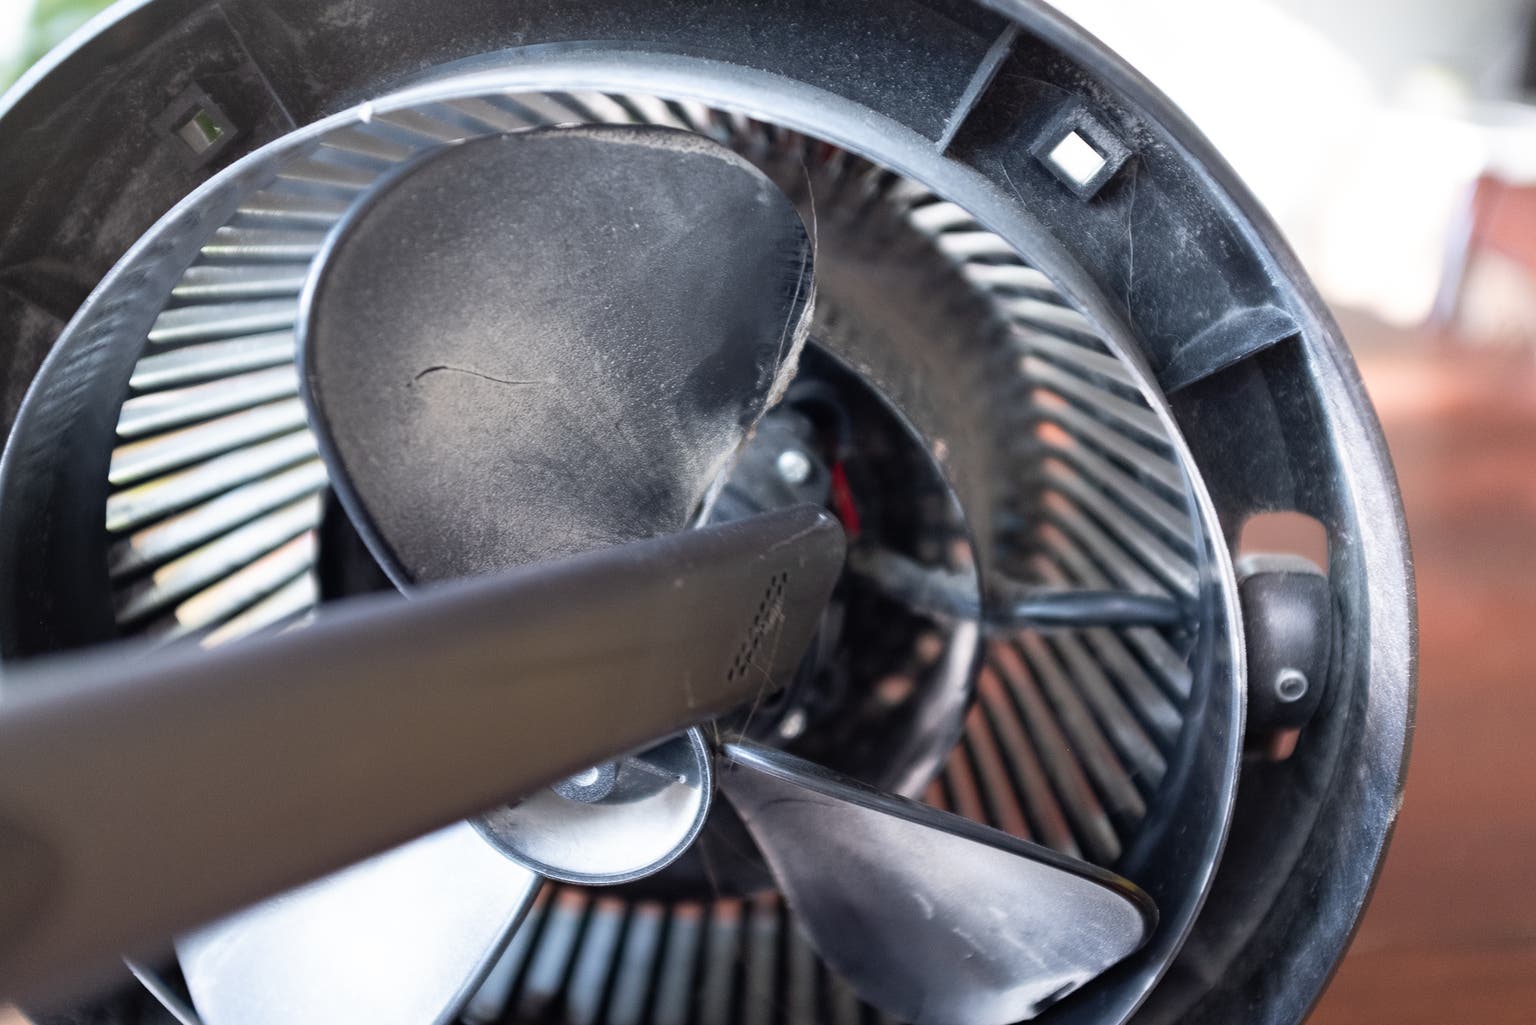
Clean the Fan Blades
The fan blades of your Arctic King air conditioner are responsible for circulating the air and ensuring proper airflow throughout the unit. Over time, dust, dirt, and debris can accumulate on the fan blades, leading to reduced airflow and decreased cooling efficiency. Cleaning the fan blades is vital to maintain optimal performance and airflow. Follow these steps to effectively clean the fan blades:
- Ensure the power is off: Before cleaning the fan blades, make sure the power to your air conditioner is turned off. Remember to prioritize your safety by following the safety precautions mentioned earlier in this guide.
- Locate the fan blades: The fan blades are typically located behind a cover or grille on the inside of your Arctic King air conditioner. Remove any screws or fasteners holding the cover or grille in place to access the fan blades.
- Remove loose dirt and debris: Use a soft brush or a vacuum cleaner with a brush attachment to carefully remove any loose dirt, dust, or debris from the fan blades. Gently brush or vacuum both sides of the fan blades, ensuring that all visible dirt and debris are removed. Be cautious not to apply excessive pressure or force while cleaning to avoid damaging the blades.
- Clean hard-to-reach areas: If there are hard-to-reach areas or crevices on the fan blades, use a soft brush or a toothbrush dipped in a mild cleaning solution to scrub those areas. Be gentle yet thorough in your cleaning to ensure all areas of the fan blades are clean.
- Wipe down the fan blades: After removing loose dirt and scrubbing any difficult areas, use a damp cloth or sponge to wipe down the fan blades. Ensure that the cloth or sponge is only slightly damp, as excessive moisture can seep into the motor or other components. Gently wipe each blade to remove any remaining dirt and cleaning solution.
- Dry the fan blades: Use a clean cloth or towel to dry off the fan blades completely. Ensure that no moisture remains on the blades to prevent any issues when the air conditioner is turned back on.
- Reinstall the fan cover or grille: Once the fan blades are clean and dry, securely reattach the cover or grille that was removed earlier. Make sure all screws or fasteners are tightened properly to ensure a secure fit.
Cleaning the fan blades of your Arctic King air conditioner is essential for proper airflow and efficient cooling. By removing dirt and debris, you can ensure that air is circulated effectively, allowing for optimal cooling performance.
With the fan blades cleaned and the air conditioner fully assembled, you can now proceed to the final step of reinstalling the air filter. In the next step, we will guide you through the process of reinstalling the air filter.
Reinstall the Air Filter
After completing the cleaning process for your Arctic King air conditioner, it’s time to reinstall the air filter. The air filter plays a crucial role in trapping dust, dirt, and other particles, ensuring clean and healthy air circulation. Follow these steps to reinstall the air filter:
- Inspect the air filter: Before reinstalling the air filter, take a moment to inspect it for any signs of damage or excessive wear. If the filter is damaged or torn, it’s important to replace it with a new one to maintain optimal performance.
- Identify the correct orientation: Note the correct orientation and direction in which the air filter was originally installed. This information is typically indicated by arrows or markings on the filter itself or within the air filter compartment.
- Position the filter: Gently slide the air filter back into its designated slot, ensuring it fits snugly and securely. Align the filter according to the arrows or markings to ensure proper airflow.
- Secure the air filter panel: If the air filter is located behind a removable panel, position the panel back into place. Use a screwdriver to reinstall any screws that were removed earlier, fastening the panel securely. Ensure that the panel is tightly sealed to prevent any air leaks.
- Turn on the power: Now that the air filter is installed, you can turn on the power to your Arctic King air conditioner. Refer to the manufacturer’s instructions for turning on the unit properly. Once the power is restored, your air conditioner will be ready to cool your space efficiently.
Reinstalling the air filter is a simple yet important step in the cleaning process, as it ensures that the air passing through your Arctic King air conditioner is filtered properly. A clean air filter helps maintain a healthy indoor environment by trapping allergens, dust, and other particles.
Remember to clean or replace the air filter regularly, as recommended by the manufacturer, to ensure the continued efficient operation of your air conditioner.
Congratulations! You have successfully cleaned and reinstalled the air filter in your Arctic King air conditioner. By following these steps and performing regular maintenance, you can enjoy the benefits of a clean and well-functioning air conditioning system.
If you have any further questions or concerns about maintaining your Arctic King air conditioner or any other home maintenance topics, don’t hesitate to consult the manufacturer’s instructions or seek assistance from a qualified HVAC professional.
Thank you for taking the time to care for your Arctic King air conditioner and for prioritizing clean and comfortable air in your home.
Conclusion
Congratulations on successfully cleaning your Arctic King air conditioner! By following this comprehensive guide, you have learned how to properly clean and maintain your unit, ensuring optimal performance and a healthier indoor environment. Regular cleaning and maintenance of your air conditioner are essential to prevent issues such as reduced efficiency, poor airflow, and potential system malfunctions.
Throughout this guide, we covered essential steps to clean various components of your Arctic King air conditioner. We started by emphasizing safety precautions to protect yourself and prevent any accidents. Then, we discussed the tools and materials you would need for the cleaning process.
We walked you through a step-by-step process, including turning off the power, removing and cleaning the air filter, cleaning the exterior surfaces, cleaning the coils, cleaning the drainage system, cleaning the fan blades, and finally, reinstalling the air filter.
Each step was explained in detail, and we encouraged you to refer to the manufacturer’s instructions for specific guidelines. Remember, if you’re unsure or uncomfortable performing any cleaning procedures, it’s always best to consult a professional HVAC technician.
By regularly cleaning your Arctic King air conditioner, you will ensure efficient cooling, improve air quality, and extend the lifespan of your unit. It’s important to make cleaning your air conditioner a part of your regular home maintenance routine.
We hope this guide has provided you with the necessary knowledge and confidence to clean your Arctic King air conditioner effectively. By taking care of your air conditioner, you can enjoy a cool and comfortable living space.
Thank you for investing the time and effort into maintaining your Arctic King air conditioner. We hope you enjoy the benefits of a clean and well-maintained cooling system for years to come!
After mastering how to keep your Arctic King air conditioner spotless, why stop there? Your journey to efficient home appliance use continues with our guide on selecting the perfect Arctic King 5.0 Cu Ft Chest Freezer, Black. Whether you're upgrading your kitchen or optimizing space for frozen goods, understanding which model suits your needs best will ensure you make the most informed decision. Don't miss out on optimizing your home efficiency with our detailed insights into the finest models available for the upcoming year.
Frequently Asked Questions about How To Clean An Arctic King Air Conditioner
Was this page helpful?
At Storables.com, we guarantee accurate and reliable information. Our content, validated by Expert Board Contributors, is crafted following stringent Editorial Policies. We're committed to providing you with well-researched, expert-backed insights for all your informational needs.