Home>Home Security and Surveillance>How To Change Wireless Security Settings On Windows 10

Home Security and Surveillance
How To Change Wireless Security Settings On Windows 10
Modified: March 6, 2024
Learn how to change wireless security settings on Windows 10 for enhanced home security and surveillance.
(Many of the links in this article redirect to a specific reviewed product. Your purchase of these products through affiliate links helps to generate commission for Storables.com, at no extra cost. Learn more)
Introduction
In today’s modern world, the security of our homes and loved ones has become a top priority. With advancements in technology, home security and surveillance systems have become more accessible and affordable than ever before. One crucial aspect of securing your home is ensuring that the wireless security settings on your devices are properly configured.
Windows 10, being one of the most widely used operating systems, offers various options to customize and adjust the wireless security settings. In this article, we will guide you through the process of changing the wireless security settings on your Windows 10 device to ensure the highest level of protection for your home network.
Whether you want to change the encryption type, set a strong password, or enable additional security features, these steps will help you make the necessary adjustments. So, let’s dive into the process, step by step, and learn how to change the wireless security settings on Windows 10.
Key Takeaways:
- Customize your Wi-Fi security on Windows 10 by choosing a strong encryption type like WPA2 or WPA3 and setting a complex network security key to protect your home network from unauthorized access.
- Regularly review and update your wireless security settings to stay ahead of potential vulnerabilities and security threats, ensuring a secure online experience for your loved ones.
Step 1: Open the Network & Internet Settings
The first step in changing the wireless security settings on your Windows 10 device is to access the Network & Internet settings. To do this, follow these simple steps:
- Click on the Windows Start menu located at the bottom left corner of your screen.
- From the list of options, select “Settings”.
- In the Settings window, click on “Network & Internet”.
By following these steps, you will now have the Network & Internet settings window open and ready for further configuration.
Step 2: Select the Wi-Fi Network
Once you have accessed the Network & Internet settings on your Windows 10 device, you need to select the specific Wi-Fi network for which you want to change the wireless security settings. Follow these instructions:
- In the Network & Internet settings window, click on the “Wi-Fi” tab located on the left-hand side.
- Under the Wi-Fi tab, you will see a list of available Wi-Fi networks. Locate and select the network that you wish to modify the security settings for.
By selecting the desired Wi-Fi network, you are now prepared to make changes to its wireless security settings and ensure a higher level of protection for your network.
Step 3: Change the Network Profile
After selecting the Wi-Fi network for which you want to change the wireless security settings, the next step is to change the network profile. Follow these easy steps:
- In the Network & Internet settings window, under the Wi-Fi tab, click on “Advanced options”.
- Scroll down to the “Network profile” section.
- You will find that the network profile is set to either “Public” or “Private”. Public networks have more restricted access and are suitable for public places like coffee shops or airports, while private networks offer more flexibility and are ideal for home or office use. Click on the drop-down menu and select the appropriate network profile.
By changing the network profile, you can customize the security settings according to your specific needs, ensuring the appropriate level of protection for your Wi-Fi network.
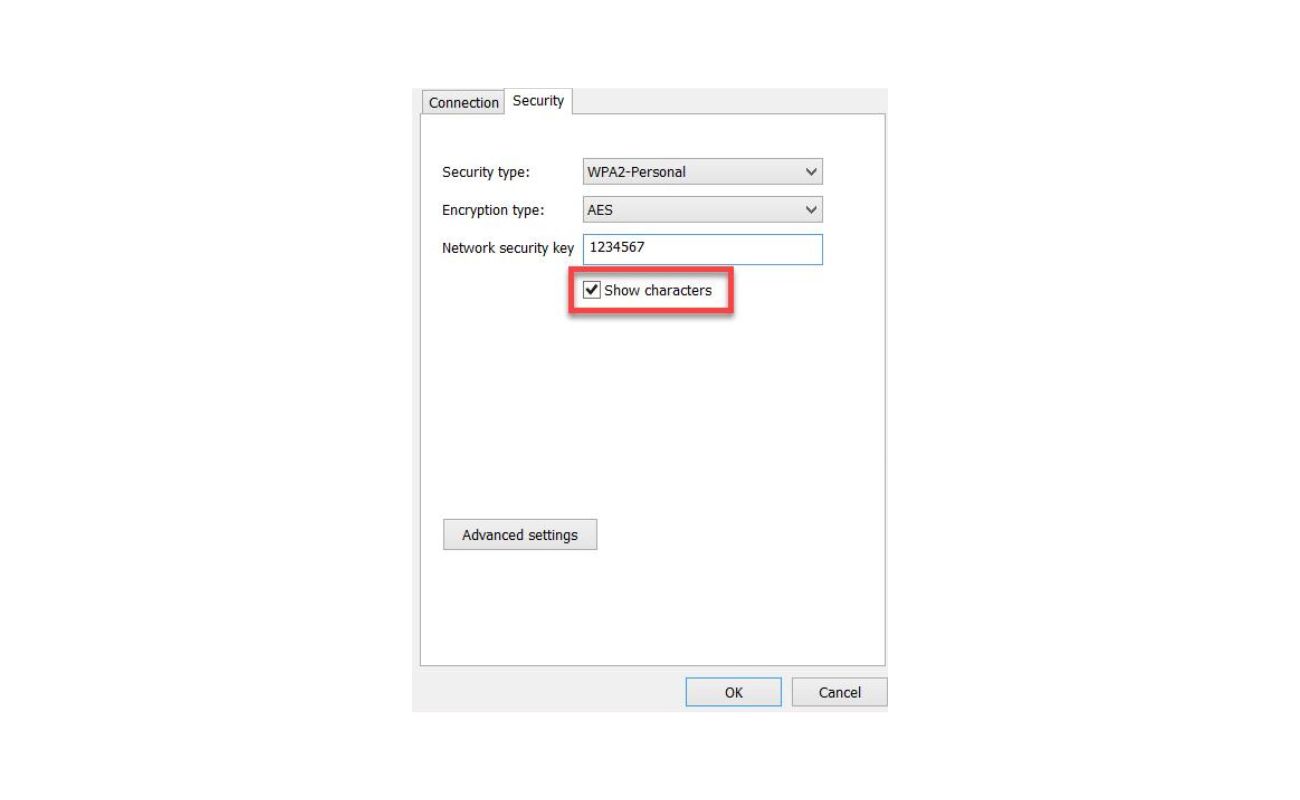
To change wireless security settings on Windows 10, go to the Network and Sharing Center, select your network, click on Wireless Properties, go to the Security tab, and then choose your desired security type and enter the new password.
Step 4: Change the Wireless Security Settings
Now that you have selected the Wi-Fi network and adjusted the network profile, it’s time to change the wireless security settings for your Windows 10 device. Follow these steps:
- In the Network & Internet settings window, under the Wi-Fi tab, click on “Advanced options”.
- Scroll down to the “Properties” section, where you will find various options to customize the wireless security settings.
- One of the most crucial settings is the “Security type”. Click on the drop-down menu and select the desired security type for your network. The available options may include WEP, WPA, WPA2, or even the latest WPA3 encryption.
- Next, you can set a strong and unique “Network security key” or password. Ensure that your password is complex, combining uppercase and lowercase letters, numbers, and special characters. This will enhance the security of your network and protect it from unauthorized access.
- Additionally, you may have other advanced security options available, such as enabling MAC address filtering, which only allows devices with specific MAC addresses to connect to your network.
By configuring the wireless security settings according to your preferences, you can greatly enhance the security of your Wi-Fi network and protect your personal information from potential threats.
Read more: How To Turn Off Windows 10 Wireless Security
Step 5: Save the Changes
After making the necessary adjustments to the wireless security settings for your Windows 10 device, it’s important to save the changes. Follow these final steps:
- Once you have finished configuring the security settings, click on the “Save” or “Apply” button to save the changes.
- Depending on your device and the specific Wi-Fi adapter, you may need to disconnect and reconnect to the Wi-Fi network for the changes to take effect.
- If prompted, enter the new network security key or password that you have set.
By saving the changes, you ensure that the newly configured wireless security settings are applied to your Wi-Fi network, providing a higher level of protection against potential threats.
Conclusion
Securing your home network is essential in today’s digital age, and changing the wireless security settings on your Windows 10 device is a crucial step in achieving that. By following the steps outlined in this article, you can customize and enhance the security of your Wi-Fi network, ensuring the protection of your personal information and preventing unauthorized access.
Remember to choose a strong security type, such as WPA2 or WPA3, and set a unique and complex network security key. Utilizing additional security options like MAC address filtering can further tighten the security of your network.
Regularly reviewing and updating your wireless security settings is also recommended to stay ahead of potential vulnerabilities and security threats. Keep in mind that each device on your network should have its own secure settings to maintain optimal security.
By taking these steps, you can have peace of mind knowing that your home network is safeguarded and your loved ones can enjoy a secure and protected online experience. So, don’t delay any further – follow these steps and make the necessary changes to your Windows 10 device today!
Frequently Asked Questions about How To Change Wireless Security Settings On Windows 10
Was this page helpful?
At Storables.com, we guarantee accurate and reliable information. Our content, validated by Expert Board Contributors, is crafted following stringent Editorial Policies. We're committed to providing you with well-researched, expert-backed insights for all your informational needs.