Home>Home Security and Surveillance>How To Change Wireless Security Key
Home Security and Surveillance
How To Change Wireless Security Key
Modified: August 16, 2024
Learn how to change your wireless security key at home for enhanced home security and surveillance. Follow our step-by-step guide for a secure network setup.
(Many of the links in this article redirect to a specific reviewed product. Your purchase of these products through affiliate links helps to generate commission for Storables.com, at no extra cost. Learn more)
Introduction
Welcome to our comprehensive guide on how to change your wireless security key. In today’s digital era, where the majority of homes and businesses rely on wireless networks for internet connectivity, ensuring the security of your network is of utmost importance. A wireless security key, also known as a Wi-Fi password or passphrase, acts as a barrier to protect your network from unauthorized access.
In this article, we will delve into the world of wireless security keys, the reasons why you may need to change them, and guide you through the step-by-step process of changing your wireless security key. Whether you want to enhance the security of your network or simply want to update your password, we have got you covered.
Before we proceed, let’s first gain a better understanding of what wireless security keys are and why they play a crucial role in maintaining the integrity and privacy of your network.
Key Takeaways:
- Regularly changing your wireless security key enhances network protection and prevents unauthorized access, maintaining a safer digital environment for personal and business needs.
- Before changing your wireless security key, prepare by accessing router settings, backing up current configurations, and notifying connected devices for a smooth transition to the new key.
Understanding Wireless Security Keys
A wireless security key, also referred to as a Wi-Fi password or passphrase, is a combination of characters that ensures the security of your wireless network. It acts as a barrier preventing unauthorized access to your network, keeping your data and devices safe.
Wireless security keys come in different types, the most common being the Wi-Fi Protected Access (WPA) and Wi-Fi Protected Access 2 (WPA2) protocols. These protocols provide encryption and authentication mechanisms to secure your network.
When you set up your wireless network, you are prompted to choose a wireless security key. This key is then used to authenticate devices that want to connect to your network. Without the correct key, devices are unable to join your network, helping to prevent hackers and unauthorized users from gaining access to your sensitive information.
The strength of your wireless security key is a critical factor in safeguarding your network. It is recommended to choose a strong, complex passphrase consisting of a combination of uppercase and lowercase letters, numbers, and special characters. This will make it more difficult for hackers to guess or crack your wireless security key.
It’s important to note that the wireless security key is different from the network name, also known as the Service Set Identifier (SSID). While the SSID is the name of your network that is visible to other devices, the wireless security key is the password required to join that network.
Why Change Your Wireless Security Key?
Changing your wireless security key periodically is a vital step in maintaining the security of your network. Here are some reasons why you may consider changing your wireless security key:
- Enhanced Security: As technology advances, so do hacking methods. Changing your wireless security key regularly helps to stay one step ahead of potential threats. It prevents unauthorized devices from accessing your network and protects your sensitive information.
- Compromised Key: If you suspect that your wireless security key has been compromised or shared with unauthorized individuals, it is crucial to change it immediately. This may occur if a guest or a former employee had access to your network and you want to revoke their privileges.
- Network Breach: If you experience a network breach or suspect that someone has gained unauthorized access to your network, changing the wireless security key is a necessary step to remove any potential vulnerabilities and prevent further unauthorized access.
- Employee Changes: In a business environment, when an employee with network access leaves the company or changes their role, it is recommended to change the wireless security key to ensure that they no longer have access to the network.
- Network Performance: Over time, your network may become crowded with devices, causing reduced performance. Changing the wireless security key can effectively disconnect unwanted devices from your network, optimizing its performance.
By changing your wireless security key regularly, you can protect your network and maintain a safer digital environment for your personal or business needs.
Preparing to Change Your Wireless Security Key
Before diving into the process of changing your wireless security key, it’s important to adequately prepare. Here are some essential steps to take before making any changes:
- Access Your Router’s Settings: To change your wireless security key, you need to access your router’s settings. Locate the IP address of your router, which is typically printed on the router itself or can be found in the user manual or manufacturer’s website. Enter this IP address in a web browser to access the router’s settings page.
- Documentation: Before making any changes, it’s wise to have all the necessary documentation at hand. This includes your router’s login credentials (username and password), as well as any other important information such as the current wireless security key and network configurations.
- Backup Your Current Settings: It’s always a good idea to backup your current router settings before making any changes. This can be done by accessing the router’s settings page and looking for a backup or save option. It ensures that if anything goes wrong during the process, you can restore your network to its previous state.
- Notify Connected Devices: Inform all devices connected to your network about the upcoming change. This includes laptops, smartphones, tablets, smart home devices, and any other devices that rely on your wireless network for internet access. Let users know that they will need to update their Wi-Fi settings once the new wireless security key is implemented.
- Choose a Strong New Key: Settle on a strong, unique, and memorable new wireless security key. Avoid using common phrases or easily guessable patterns. Opt for a combination of uppercase and lowercase letters, numbers, and special characters to create a strong password.
By completing these preparatory steps, you’ll be ready to proceed with changing your wireless security key efficiently and effectively. Remember to keep your documentation and backup in a safe place as a precautionary measure.
Step 1: Accessing Your Router’s Settings
To change your wireless security key, you need to access your router’s settings. This can be done by following these steps:
- Connect to Your Router: Ensure that you are connected to your router’s network either through a wired Ethernet connection or via Wi-Fi. This step is crucial as it allows you to communicate with your router and access its settings page.
- Find Your Router’s IP Address: Open a web browser on your computer or mobile device and type in the IP address for your router. This IP address is unique to your router and is used to access its settings page. Common router IP addresses are 192.168.0.1 or 192.168.1.1, but it may vary depending on your router model.
- Enter Login Credentials: Once you enter the router’s IP address, you will be prompted to enter your login credentials. This typically consists of a username and password. If you haven’t changed these credentials before, check the router’s documentation or use the default login credentials provided by the manufacturer. If you have changed them, use the updated credentials.
- Access the Settings Page: After entering the correct login credentials, you should be granted access to the router’s settings page. This page allows you to modify various router settings, including the wireless security key.
If you encounter any issues accessing the router’s settings page, ensure that you have entered the IP address correctly and that you are using the appropriate login credentials. If problems persist, consult your router’s user manual or contact your router’s manufacturer for further assistance.
Once you have successfully accessed your router’s settings page, you are ready to proceed to the next step: locating the wireless security key settings.
To change your wireless security key, log into your router’s settings using a web browser. Navigate to the wireless security section and update the key. Be sure to save your changes before exiting.
Read more: What Are Wireless Security Pre-shared Keys
Step 2: Locating the Wireless Security Key Settings
After accessing your router’s settings page, you will need to locate the specific section or menu where the wireless security key settings are located. The steps to find this may vary depending on your router’s make and model, but here are some general guidelines to help you:
- Wireless Settings: Look for a tab or menu labeled “Wireless Settings” or “Wi-Fi Settings.” This is where you will find all the configurations related to your wireless network.
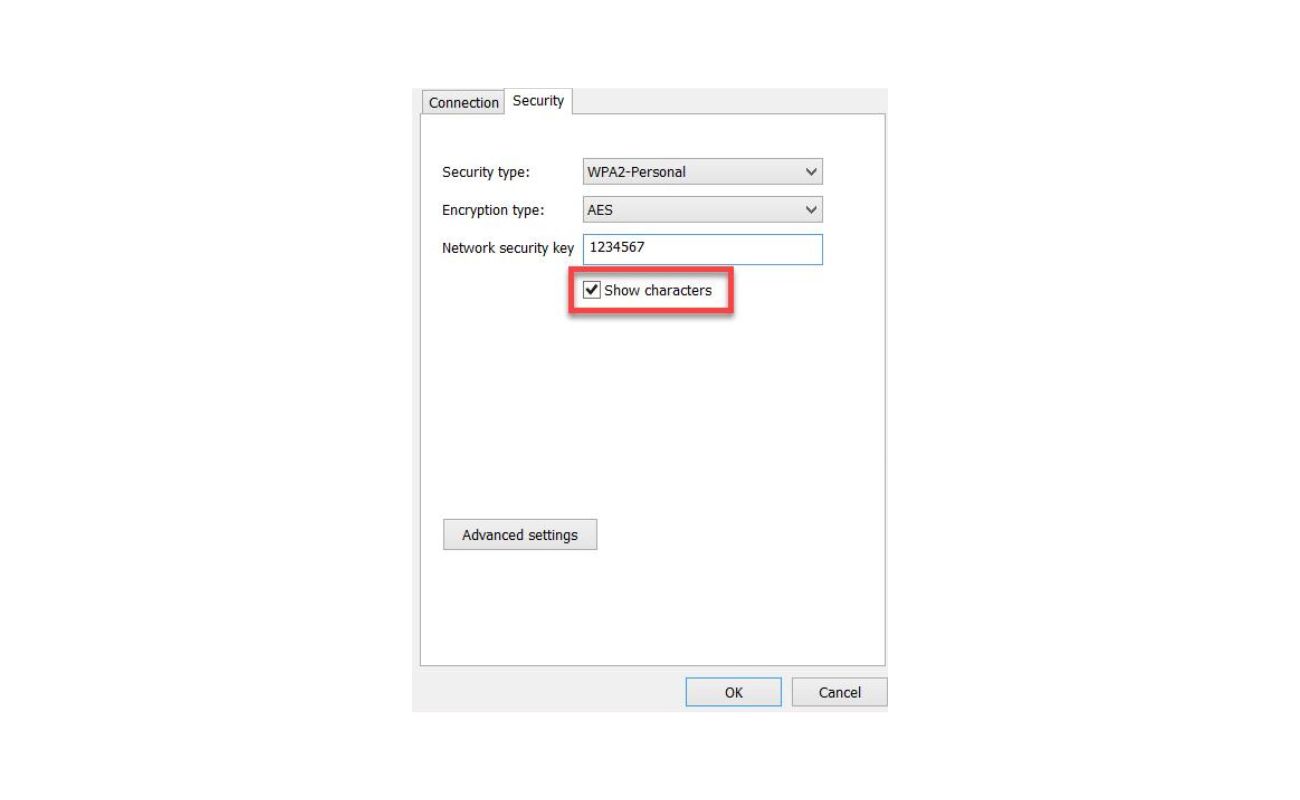
- Security Options: Within the Wireless Settings menu, search for a sub-menu or section dedicated to wireless security. It might be named “Security,” “Encryption,” or something similar.
- Wireless Security Key: Once you are in the wireless security settings, you should see a field or option labeled “Wireless Security Key,” “Passphrase,” or “Password.” This is where you can modify or update your current wireless security key.
If you are having difficulty finding the wireless security key settings, refer to your router’s user manual, as it will provide specific instructions for your particular model. Additionally, you can visit the manufacturer’s website or customer support for guidance.
Take note of the current wireless security key before proceeding to the next step. It’s important to have this information on hand in case you need to revert to the previous key or update connected devices.
Now that you have located the wireless security key settings, you are ready to move on to the next step: changing the wireless security key.
Step 3: Changing the Wireless Security Key
Now that you have accessed the wireless security key settings, you can proceed with changing your key. Follow these steps to update your wireless security key:
- Choose a New Security Key: Select a strong and unique password for your wireless network. Ensure that your new security key meets the recommended criteria, including a combination of uppercase and lowercase letters, numbers, and special characters. This will improve the security of your network.
- Enter the New Key: In the wireless security key field, replace the existing key with your newly chosen password. Take care to accurately enter the characters to avoid any issues when connecting to your network later on.
- Save or Apply the Changes: Look for a “Save,” “Apply,” or “Save Changes” button within the settings page. Click on it to save the new wireless security key and apply the changes to your router’s configuration.
Once you have saved the changes, your router will update the wireless security key for your network. It is important to note that changing the wireless security key will cause all devices currently connected to your network to disconnect. They will need to be manually updated with the new key before they can reconnect to your network.
It’s also a good practice to copy the new security key and store it in a secure location. This will come in handy when updating connected devices or if you need to reference it in the future.
Now that you have successfully changed your wireless security key, you are ready to proceed to the final step: updating connected devices with the new key.
Step 4: Updating Connected Devices with the New Key
After changing the wireless security key on your router, you will need to update the connected devices to ensure they can successfully reconnect to your network. Follow these steps to update the key on your devices:
- Disconnect from the Network: On each device, disconnect from your current Wi-Fi network. This can usually be done by going to the Wi-Fi settings menu on your device and selecting “Forget” or “Disconnect” for the network you were previously connected to.
- Search for Available Networks: Once disconnected, search for available Wi-Fi networks on your device. It should now detect your network with the updated wireless security key.
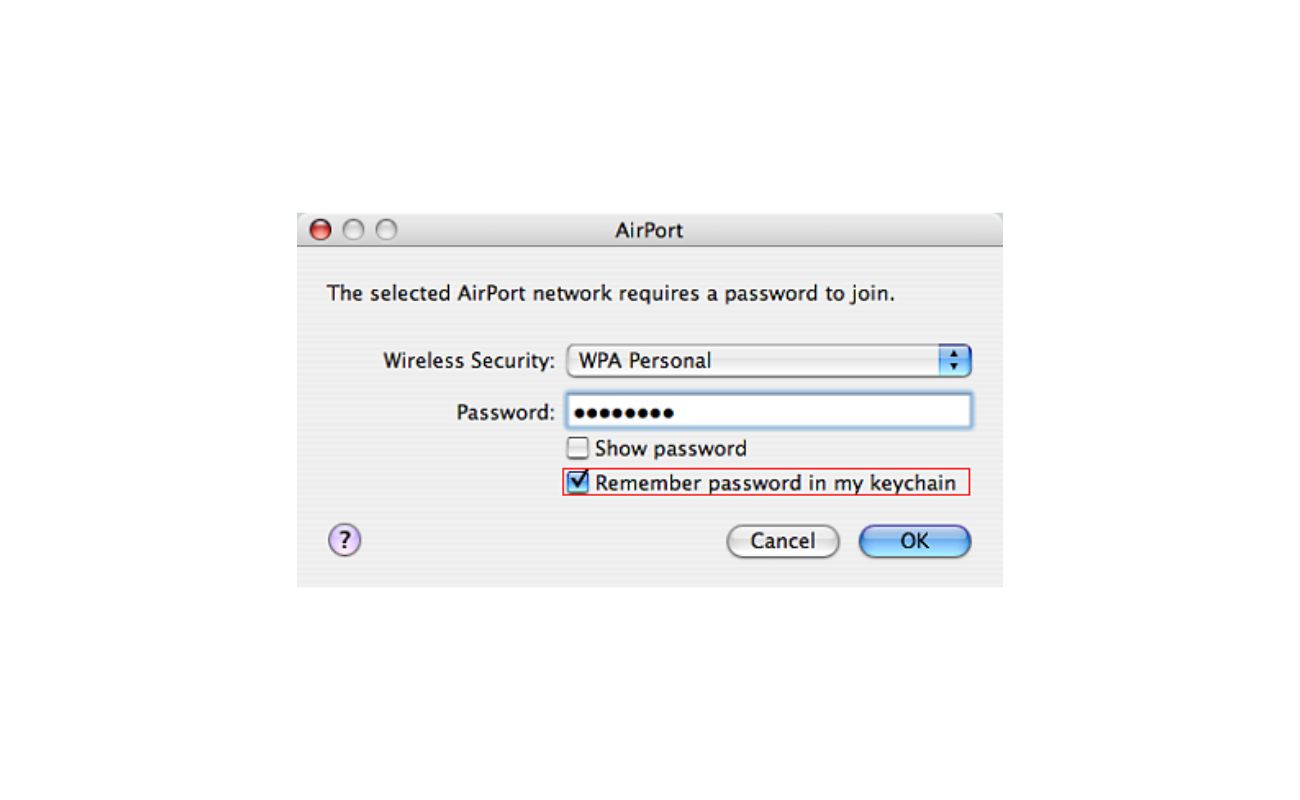
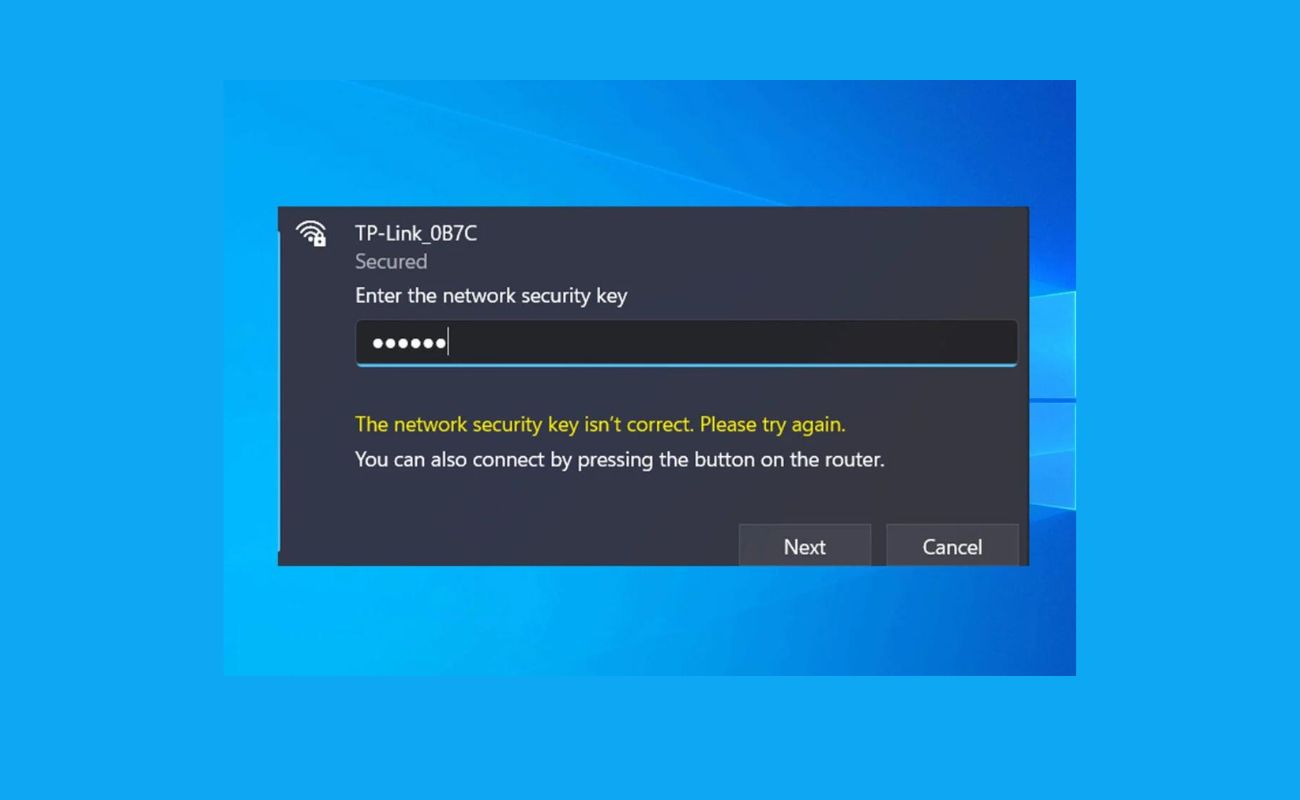
- Enter the New Key: Select your network from the list of available networks and click on it to connect. You will be prompted to enter the new wireless security key. Carefully enter the new key that you set on your router.
- Connect to the Network: After entering the new key, click on “Connect” or “Join” on your device to establish a connection with your updated network. Your device should now be connected to the network using the new wireless security key.
Repeat these steps on each device that was previously connected to your network. This includes laptops, smartphones, tablets, smart home devices, and any other devices that rely on your wireless network for internet access.
If you encounter any issues during the process or have difficulty connecting your devices to the network with the new key, make sure you have entered the key correctly. Double-check that the key matches the one you saved during the previous step. If problems persist, try restarting your devices or contacting the device’s manufacturer support for further assistance.
By updating the wireless security key on all your connected devices, you ensure that they are using the latest key to securely connect to your network.
Congratulations! You have successfully changed your wireless security key and updated the connected devices. Your network is now more secure and ready to be used with the new key.
Troubleshooting Tips
While changing your wireless security key is a relatively straightforward process, you may encounter some challenges along the way. Here are some troubleshooting tips to help you overcome common issues:
- Double-Check the Key: One common mistake is mistyping the new wireless security key. Ensure that you have entered the key correctly on both your router and all connected devices.
- Restart Your Router: If you are experiencing connectivity issues after changing the key, try restarting your router. Unplug the power source, wait for a few seconds, and then plug it back in. Allow the router to reboot and see if the issue resolves.
- Update Device Software: Make sure that your devices are running the latest software updates. Outdated software can sometimes cause connectivity issues. Check for any available updates and install them if necessary.
- Reset Router to Factory Settings: If all else fails, you may need to reset your router to its factory settings. This should be your last resort, as it will reset all the configurations and settings. Refer to your router’s user manual for instructions on how to reset it.
- Contact Manufacturer Support: If you continue to experience problems or need further assistance, don’t hesitate to reach out to the customer support of your router manufacturer. They will be able to provide specific guidance based on your router model.
Remember to exercise caution and back up your router’s settings before proceeding with any troubleshooting steps that may reset or restore your router to its factory settings.
By following these troubleshooting tips, you can overcome common issues and ensure a smooth transition to your new wireless security key.
Read more: What Is My Verizon Wireless Security Key
Conclusion
Changing your wireless security key is a crucial step in maintaining the security and privacy of your network. By periodically updating your key, you can enhance the protection against unauthorized access and potential security breaches. We hope this comprehensive guide has provided you with the knowledge and confidence to change your wireless security key effectively.
We began by understanding the importance of wireless security keys and their role in safeguarding your network. We explored the reasons why you might need to change your key, such as enhancing security, dealing with compromised keys, addressing network breaches, managing employee changes, and optimizing network performance.
During the preparation phase, we discussed the necessary steps to take before changing your key, including accessing your router’s settings, gathering documentation, and backing up your current settings. We then guided you through the step-by-step process of accessing your router’s settings, locating the wireless security key settings, changing the key, and updating connected devices.
In addition, we provided troubleshooting tips to help you overcome any issues you may encounter during the process. By double-checking the key, restarting your router, updating device software, and seeking manufacturer support if needed, you can troubleshoot common challenges effectively.
Remember, changing your wireless security key on a regular basis is an essential part of network maintenance and security. It’s crucial to choose a strong and unique key and update all connected devices with the new key to maintain a secure network environment.
Thank you for taking the time to read our comprehensive guide. We hope it has empowered you to confidently change your wireless security key and keep your network safe. Happy networking!
Frequently Asked Questions about How To Change Wireless Security Key
Was this page helpful?
At Storables.com, we guarantee accurate and reliable information. Our content, validated by Expert Board Contributors, is crafted following stringent Editorial Policies. We're committed to providing you with well-researched, expert-backed insights for all your informational needs.