Home>Home Security and Surveillance>How To Change Router Wireless Security Type
Home Security and Surveillance
How To Change Router Wireless Security Type
Modified: August 16, 2024
In this guide, learn how to easily change your router's wireless security type for enhanced home security and surveillance. Follow these steps to protect your network.
(Many of the links in this article redirect to a specific reviewed product. Your purchase of these products through affiliate links helps to generate commission for Storables.com, at no extra cost. Learn more)
Introduction
Welcome to our comprehensive guide on how to change the wireless security type on your router. Protecting your home network is of utmost importance to safeguard your personal information and keep intruders out. By changing the security type, you can ensure that only authorized devices can connect to your network, enhancing your home security and surveillance system. In this article, we will walk you through the step-by-step process of changing the wireless security type on your router.
As technology continues to advance, so do the security risks associated with online activities. Hackers and cybercriminals are constantly finding new ways to exploit vulnerabilities, making it crucial to stay one step ahead. Fortunately, routers come with various security options to prevent unauthorized access and keep your network secure.
Before we dive into the steps, it’s essential to understand the different wireless security types available:
- WEP (Wired Equivalent Privacy): While WEP was the initial encryption method, it is considered outdated and insecure. It is highly recommended to avoid using WEP as it can be easily bypassed by hackers.
- WPA (Wi-Fi Protected Access): WPA provides better security than WEP. There are two versions – WPA and WPA2. Choose WPA2 whenever possible, as it offers stronger encryption and security.
- WPA3: The latest wireless security protocol available, offering enhanced protection and improved encryption. However, not all routers support WPA3 yet.
Now that we have a basic understanding of the wireless security types, let’s proceed to the step-by-step process of changing the security type on your router. Before making any changes, make sure you have the necessary login credentials and access to the router settings page.
Key Takeaways:
- Changing your router’s wireless security type to WPA2 or WPA3 can keep your home network safe from hackers. Follow the steps in this guide to protect your personal information and devices.
- After changing the security type, set a strong Wi-Fi password and test the connection to ensure everything works smoothly. Stay updated and enjoy a secure home network for all your online activities.
Step 1: Accessing the Router Settings Page
Before you can change the wireless security type on your router, you need to access the router settings page. To do this, follow these steps:
- Connect your computer or laptop to the router using an Ethernet cable or via a Wi-Fi connection.
- Open a web browser on your device (such as Chrome, Firefox, or Safari).
- In the address bar, enter the default IP address of your router. Typically, this is 192.168.1.1 or 192.168.0.1, but it can vary depending on the router manufacturer. If you’re unsure about the default IP address, check the router’s manual or search online for the specific model.
- Press Enter to access the router’s login page.
- Enter the username and password for your router. If you haven’t changed the default login details, you can find them in the router’s manual or on the manufacturer’s website.
- Once you’ve entered the correct credentials, click on the Login or Sign In button to proceed.
After successfully logging into the router settings page, you will have access to various options and configurations to customize your router’s settings. Now, let’s move on to the next step and locate the wireless security settings.
Step 2: Locating the Wireless Security Settings
Once you have accessed the router settings page, it’s time to locate the wireless security settings. Follow these instructions to find the correct options:
- Look for a tab or menu option labeled “Wireless” or “Wireless Settings.” This is where you will find all the wireless-related configurations.
- Within the Wireless menu, you should see a submenu called “Security” or “Security Settings.” Click on this option to access the wireless security settings.
- Depending on the router’s interface, you may find a drop-down menu or a list of security types. Look for options such as “Security Mode” or “Encryption Type.”
- Some routers may also have separate settings for the 2.4GHz and 5GHz frequency bands. Make sure to locate the security settings for the desired frequency band you want to modify.
It’s important to note that the layout and organization of router settings can vary depending on the manufacturer and model. If you are having trouble locating the wireless security settings, refer to the router’s manual or visit the manufacturer’s website for specific instructions.
Now that you have found the wireless security settings, you can move on to the next step and change the security type according to your preferences.
Step 3: Changing the Security Type
Now that you have located the wireless security settings on your router, it’s time to change the security type. Follow these steps to update the security settings:
- Review the available security types and select the desired option. As mentioned earlier, it is highly recommended to choose WPA2 or WPA3 for better security.
- If there are separate settings for the 2.4GHz and 5GHz frequency bands, make sure to change the security type for both bands if necessary.
- Once you have selected the desired security type, click on the “Apply” or “Save” button to save the changes.
- Wait for the router to apply the new security settings. This usually takes a few seconds to a minute.
Keep in mind that changing the security type may require all connected devices to re-enter the Wi-Fi password and reconnect to the network. Make sure to inform all authorized users about the change to avoid any interruptions.
It’s important to note that some older routers may have limitations on the available security types. In such cases, it’s recommended to consider upgrading your router to ensure better security and compatibility with the latest security protocols.
Now that you have successfully changed the security type, let’s move on to the next step and configure the new security settings.
To change your router’s wireless security type, log into the router’s settings, navigate to the wireless security section, and select the desired security type (e.g. WPA2). Save the changes and reconnect your devices using the new security type.
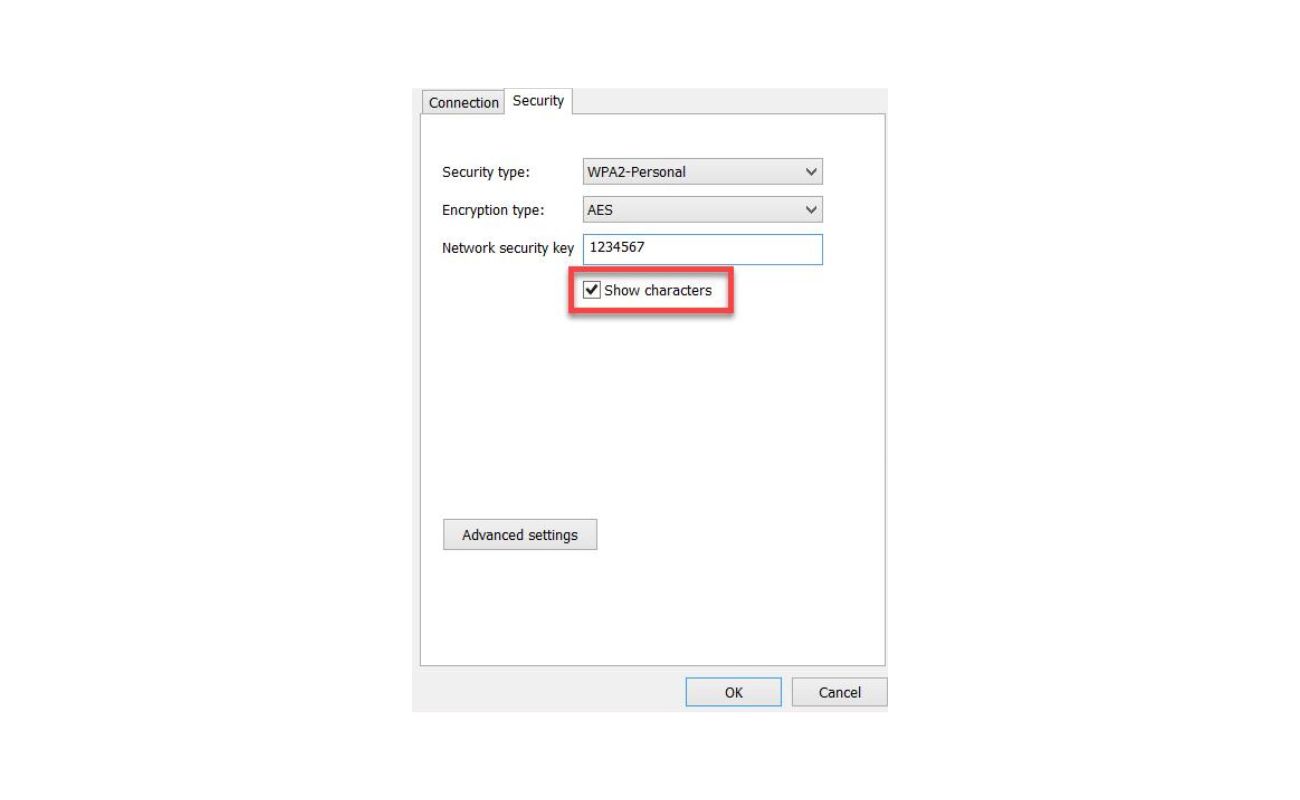
Step 4: Configuring the New Security Settings
After changing the security type on your router, it’s essential to configure the new security settings to ensure optimal protection for your wireless network. Follow these steps to configure the new security settings:
- Within the wireless security settings menu, locate the field for the Wi-Fi password. This field may be labeled as “Passphrase” or “Security Key.”
- Enter a strong and unique password for your Wi-Fi network. A strong passphrase typically consists of a combination of uppercase and lowercase letters, numbers, and special characters.
- Make sure to write down the new Wi-Fi password in a safe place or use a password manager to securely store it.
- Consider enabling additional security options such as enabling MAC address filtering or disabling SSID broadcasting. These extra measures can further enhance the security of your wireless network.
- Once you have finished configuring the new security settings, click on the “Apply” or “Save” button to save the changes.
- Allow the router a few moments to apply the new settings. During this time, your wireless network may temporarily disconnect and reconnect.
It’s important to regularly update the Wi-Fi password and check for firmware updates for your router to maintain the highest level of security for your network. Additionally, it’s recommended to periodically review and adjust other router settings to ensure optimal performance and security.
Now that you have successfully configured the new security settings, let’s proceed to the final step and test the wireless network connection.
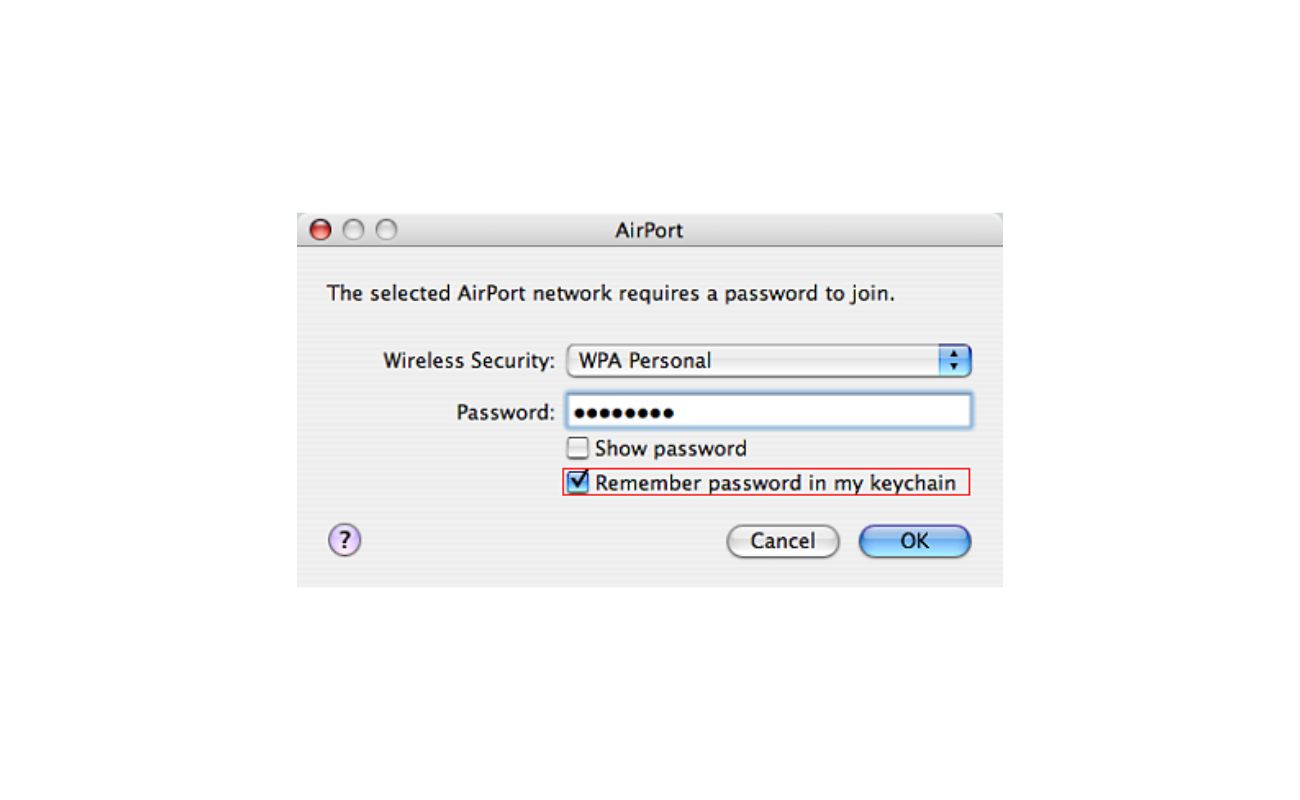
Step 5: Testing the Wireless Network Connection
After making changes to the wireless security settings on your router, it’s essential to test the wireless network connection to ensure everything is functioning correctly. Follow these steps to test your wireless network connection:
- On your device (computer, laptop, smartphone, etc.), locate the Wi-Fi icon in the system tray or settings menu.
- Click on the Wi-Fi icon to view the available networks.
- Select your wireless network from the list of available networks.
- Enter the new Wi-Fi password that you configured in the previous step.
- Wait for your device to establish a connection with the network.
- Once connected, test the wireless network connection by opening a web browser and visiting a website to ensure internet connectivity.
- If you are able to access the internet without any issues, your wireless network connection is functioning correctly.
If you encounter any difficulties in establishing a connection or experience internet connectivity problems, try the following troubleshooting steps:
- Ensure that the Wi-Fi password is correctly entered with the proper capitalization and special characters.
- Restart your router and device to refresh the network connection.
- Verify that your device is within the range of the router’s signal.
- Update the Wi-Fi drivers on your device.
- Contact your internet service provider or router manufacturer for further assistance if the issues persist.
Congratulations! You have successfully changed the wireless security type on your router and tested the wireless network connection. By taking these steps, you have improved the security of your home network and enhanced your home security and surveillance system.
Remember to periodically review and update your wireless security settings to stay protected against evolving security threats. Stay vigilant and enjoy the peace of mind that comes with a secure and reliable home network.
—
Note: The exact steps for changing the wireless security type may vary slightly depending on your router model and firmware version. Always refer to the router’s manual or consult the manufacturer’s website for specific instructions related to your device.
Conclusion
In conclusion, changing the wireless security type on your router is a crucial step in enhancing your home security and surveillance system. By doing so, you can ensure that only authorized devices can connect to your network, protecting your personal information and keeping intruders at bay.
Throughout this comprehensive guide, we have covered the step-by-step process of changing the wireless security type on your router. We started by accessing the router settings page and locating the wireless security settings. Then, we proceeded to change the security type to a more secure option such as WPA2 or WPA3. After that, we configured the new security settings, including setting a strong Wi-Fi password. Finally, we tested the wireless network connection to confirm that everything is working correctly.
It’s important to remember that maintaining a secure home network goes beyond changing the security type on your router. Regularly updating the Wi-Fi password, checking for firmware updates, and reviewing other router settings are all essential for maintaining optimal network security.
By following the steps outlined in this guide and staying vigilant, you can ensure that your home network remains secure and protected. Protecting your personal information and preventing unauthorized access are critical in the digital age we live in.
We hope this guide has provided you with the knowledge and confidence to change the wireless security type on your router. Remember to consult the router’s manual or the manufacturer’s website for specific instructions related to your device, as the steps may slightly vary depending on the router model and firmware version.
Thank you for taking the time to improve the security of your home network. With a well-protected network, you can enjoy a safe and secure online experience for all your home surveillance and browsing needs.
Frequently Asked Questions about How To Change Router Wireless Security Type
Was this page helpful?
At Storables.com, we guarantee accurate and reliable information. Our content, validated by Expert Board Contributors, is crafted following stringent Editorial Policies. We're committed to providing you with well-researched, expert-backed insights for all your informational needs.