Home>Interior Design>20 Things You Can Clean With A Steamer: For Quick, Easy Hygiene
Interior Design
20 Things You Can Clean With A Steamer: For Quick, Easy Hygiene
Modified: October 19, 2024
Discover 20 easy and quick ways to achieve impeccable hygiene with a steamer. Perfect for interior design enthusiasts.
(Many of the links in this article redirect to a specific reviewed product. Your purchase of these products through affiliate links helps to generate commission for Storables.com, at no extra cost. Learn more)
Introduction
Welcome to the wonderful world of steam cleaning! If you’re looking for a quick and easy way to maintain a hygienic environment in your home, a steamer is your new best friend. Steam cleaning is a chemical-free and eco-friendly method that uses the power of hot vapor to penetrate and sanitize various surfaces. From bathroom tiles to kitchen appliances, and even your precious wardrobe, a steamer can do it all.
Steam cleaning not only eliminates dirt, grime, and stains, but it also kills bacteria, viruses, and allergens, making your living space healthier and safer. Plus, it saves you time and effort by providing a fast and effective cleaning solution. So, let’s dive into the 20 things you can clean with a steamer, and discover the versatility and convenience this amazing tool brings to your housekeeping routine.
Key Takeaways:
- Steam cleaning is a versatile and eco-friendly method that effectively removes dirt, grime, and bacteria from a wide range of surfaces, including bathroom tiles, kitchen appliances, mattresses, and children’s toys.
- Regular steam cleaning not only maintains a fresh and hygienic environment but also extends the lifespan of household items, such as carpets, upholstered furniture, and stainless steel appliances, ensuring a clean and inviting living space.
Read more: Surprising Things You Can Clean With Vodka
Bathroom Tiles
Bathroom tiles are notorious for accumulating dirt, soap scum, and mildew. When regular cleaning methods fail to remove stubborn stains and grime, a steamer comes to the rescue. The high-temperature steam helps loosen and dissolve dirt, making it easier to wipe away.
To clean bathroom tiles with a steamer, start by removing any loose debris or hair using a broom or vacuum. Next, fill the steamer with water and allow it to heat up. Once it reaches the desired temperature, attach the appropriate nozzle for tile cleaning.
Hold the steamer nozzle close to the tiles and slowly move it across the surface, focusing on one area at a time. The hot steam will penetrate the grout lines, dissolving any built-up dirt and mold. Use a microfiber cloth or mop to wipe away the loosened dirt as you go. For stubborn stains, you may need to go over the area a few times or use a scrub brush to agitate the dirt before wiping it away.
Remember, different types of tiles may require different steam settings. Consult the manufacturer’s guidelines or test a small inconspicuous area before proceeding. Once you’ve cleaned the tiles, give them a final wipe down with a clean, damp cloth to remove any residue. Your bathroom tiles will be left sparkling clean and germ-free.
Regular steam cleaning of bathroom tiles not only ensures a pristine appearance but also helps prevent the growth of harmful bacteria and mold. By incorporating steam cleaning into your cleaning routine, you’ll maintain a fresh and hygienic bathroom environment for you and your family.
Shower Grout
Shower grout can quickly become a breeding ground for mold and mildew due to the damp and humid conditions in the bathroom. Cleaning it can be a tedious and challenging task. However, with a steamer, you can effortlessly tackle stubborn grime and restore the shine to your shower grout.
Before starting, ensure that the shower area is free of any personal items to avoid any accidental damage. Fill your steamer with water and let it heat up. Once ready, attach the appropriate nozzle for grout cleaning.
Hold the steamer nozzle close to the grout lines and slowly move it along the surface. The high-temperature steam will penetrate the porous grout, loosening dirt, mold, and stains. As you steam, use a brush with stiff bristles, like a grout brush, to agitate the grout and help remove the loosened debris.
Take your time, focusing on one small section at a time. Steam and brush until the grout appears clean and free from stains. For extra stubborn stains, you may need to repeat the process or use a specialized grout cleaner in conjunction with the steamer.
Once you’ve cleaned the shower grout, wipe away any excess moisture with a clean, dry cloth. It’s essential to keep the grout dry to prevent future mold growth. If necessary, you can use a fan or open a window to facilitate drying.
Regular steam cleaning of shower grout not only keeps it looking fresh and clean, but it also eliminates bacteria, mold, and mildew. By incorporating steam cleaning into your bathroom maintenance routine, you’ll enjoy a sparkling shower area that is hygienic and welcoming.
Toilet Seat and Bowl
The toilet seat and bowl are notorious for harboring germs and bacteria. Maintaining proper hygiene in this area is crucial for a clean and healthy bathroom. Fortunately, a steamer can help you effectively sanitize and refresh your toilet seat and bowl.
To start, ensure that the toilet seat and bowl are free from any debris or waste. Fill your steamer with water and allow it to heat up. While waiting, you can use a toilet brush and a mild cleaning solution to scrub away any visible dirt or stains.
Once the steamer is ready, attach the appropriate nozzle for toilet cleaning. Hold the steamer nozzle a few inches above the toilet seat and bowl, and slowly move it across the surface. The high-temperature steam will penetrate and disinfect the surfaces, killing germs and eliminating odors.
For the toilet seat, pay extra attention to hinges and hard-to-reach areas. Make sure to steam all angles to ensure thorough cleaning. As you go, use a damp cloth or sponge to wipe away any loosened dirt or grime. You can also use a clean, soft brush to scrub stubborn stains, if needed.
When cleaning the inside of the toilet bowl, hold the steamer nozzle near the waterline and move it around to reach all areas. The heat from the steam will help loosen and dissolve any mineral deposits or stains. After steaming, use a toilet brush to scrub the bowl, ensuring you clean under the rim and in the trapway.
Once you’ve finished steaming and scrubbing, flush the toilet to remove any residual dirt or debris. Give the toilet seat and bowl a final wipe down with a clean, damp cloth to ensure all traces of dirt and cleaning solution are gone.
Regular steam cleaning of your toilet seat and bowl not only keeps them looking fresh, but it also ensures that they are free from harmful germs and bacteria. By incorporating steaming into your bathroom cleaning routine, you’ll maintain a clean, hygienic, and odor-free toilet area.
Sink and Faucets
The sink and faucets in your bathroom and kitchen can quickly accumulate soap residue, water stains, and bacteria. Keeping these areas clean not only improves their appearance but also ensures proper hygiene. With a steamer, you can effortlessly remove dirt and grime from your sinks and faucets, leaving them sparkling and sanitized.
Start by removing any items from the sink area and rinse off any loose debris. Fill your steamer with water and allow it to heat up. While waiting, you can use a mild cleaning solution and a cloth or sponge to wipe down the surface of the sink and the faucets.
Once the steamer is heated, attach the appropriate nozzle for surface cleaning. Hold the steamer nozzle close to the sink and slowly move it across the surface, focusing on one area at a time. The high-temperature steam will penetrate and dissolve tough stains and grime.
As you steam, use a cloth or sponge to wipe away the loosened dirt and residue. Pay extra attention to the edges and corners of the sink. For hard-to-reach areas or stubborn stains, you can use a soft brush or toothbrush to agitate the dirt before wiping it away.
When cleaning the faucets, direct the steam onto each faucet separately, including the handles and any crevices. The steam will help loosen and remove any mineral deposits or soap scum. Wipe the faucets clean with a cloth or sponge as you go.
After steaming, rinse the sink and faucets with warm water to remove any residual dirt or cleaning solution. Give them a final wipe down with a clean, dry cloth to ensure a streak-free finish. Your sink and faucets will shine like new and be free from bacteria and grime.
Regular steam cleaning of your sink and faucets not only keeps them looking pristine, but it also eliminates bacteria and ensures a hygienic environment in your bathroom and kitchen. Incorporate steam cleaning into your cleaning routine to maintain a clean and sparkling sink area.
Read more: What Can You Clean With A Steamer
Mirrors and Glass Surfaces
Mirrors and glass surfaces can easily accumulate fingerprints, smudges, and streaks, diminishing their clarity and shine. Cleaning them with traditional methods often leaves behind lint and streaks, making them look even more unsightly. Fortunately, a steamer can provide a hassle-free solution for achieving crystal-clear mirrors and glass surfaces.
To get started, ensure that the mirror or glass surface is free from any dust or debris. Fill your steamer with water and let it heat up. While waiting, you can prepare a cleaning solution by mixing equal parts of water and vinegar or using a commercial glass cleaner.
Once the steamer is ready, attach the appropriate nozzle for glass cleaning. Hold the steamer nozzle a few inches away from the surface and slowly move it across, starting from top to bottom. The high-temperature steam will loosen and dissolve any dirt or residue on the glass.
While the steam is still active, quickly spray the glass cleaner or vinegar solution onto the surface. Use a lint-free microfiber cloth or a squeegee to wipe away the loosened dirt and cleaning solution in a vertical or horizontal motion. Make sure to overlap each stroke slightly to avoid streaks.
For difficult stains or spots, you can direct the steam onto the specific area and gently scrub it with a soft brush or sponge before wiping it clean. Pay extra attention to corners and edges of the mirror or glass surface.
To ensure a streak-free finish, use a dry microfiber cloth to buff the glass surface gently. This will remove any remaining moisture and leave the mirror or glass looking clear and glossy.
Regular steam cleaning of mirrors and glass surfaces not only keeps them sparkling clean but also eliminates bacteria and germs. By incorporating steam cleaning into your routine, you’ll enjoy a crystal-clear reflection and a hygienic environment in your home.
Countertops and Vanities
Countertops and vanities are used daily and can easily accumulate dirt, stains, and bacteria. Whether it’s in your kitchen or bathroom, keeping these surfaces clean and sanitized is essential. With a steamer, you can efficiently eliminate dirt and grime from countertops and vanities, leaving them fresh and hygienic.
Start by clearing off any items from the surface and wiping away loose debris. Fill your steamer with water and allow it to heat up. While waiting, you can prepare a mild cleaning solution by mixing water and a gentle all-purpose cleaner.
Once the steamer is ready, attach the appropriate nozzle for surface cleaning. Hold the steamer nozzle a few inches above the countertop or vanity and slowly move it across the surface. The high-temperature steam will penetrate and dissolve tough stains, grease, and dirt.
As you steam, use a cloth or sponge to wipe away the loosened dirt and residue. Pay extra attention to any visible stains or stubborn spots. For textured surfaces or grout lines, use a soft brush to gently agitate the dirt before wiping it clean.
When cleaning delicate or sealed surfaces, such as marble or granite, use caution and adjust the steam intensity to avoid any potential damage. Always refer to the manufacturer’s guidelines for recommended steam settings.
After steaming, rinse the surface with warm water to remove any residual dirt or cleaning solution. Wipe it down with a clean, dry cloth to ensure a streak-free finish. For added shine, you can use a granite or surface-specific polish, following the manufacturer’s instructions.
Regular steam cleaning of countertops and vanities not only keeps them looking pristine, but it also eliminates bacteria and ensures a hygienic surface for food preparation or personal grooming. Incorporate steam cleaning into your cleaning routine to maintain a clean and healthy environment in your kitchen and bathroom.
Shower Curtains and Glass Doors
Shower curtains and glass doors in the bathroom can quickly accumulate soap scum, mildew, and stains. Cleaning them regularly is essential for maintaining a fresh and hygienic showering environment. With a steamer, you can effortlessly remove dirt and grime from shower curtains and glass doors, restoring their cleanliness and transparency.
To begin, remove the shower curtain or glass doors from the shower area, if possible. This will make the cleaning process more convenient. Fill your steamer with water and allow it to heat up. While waiting, you can prepare a cleaning solution by mixing equal parts of water and vinegar.
If you’re cleaning a shower curtain, you can start by shaking off any loose debris or mold. Hang the curtain outside or in a well-ventilated area for steam cleaning. For glass doors, place them on a suitable surface for cleaning.
Once the steamer is ready, attach the appropriate nozzle for surface cleaning. Hold the steamer nozzle a few inches away from the shower curtain or glass doors and slowly move it across the surface. The high-temperature steam will penetrate and loosen the stubborn stains, soap scum, and mildew.
As you steam, use a cloth or sponge to wipe away the loosened dirt and residue. For textured shower curtains, you can gently scrub the fabric with a soft brush before wiping it clean. For glass doors, use a squeegee or a microfiber cloth to remove the steam and debris.
If you encounter tough stains or mold, direct the steam onto the specific area and let it sit for a few moments to further loosen the dirt. Then, scrub the area using a soft brush or sponge before wiping it clean.
After steam cleaning, rinse the shower curtains under warm water to remove any remaining dirt or cleaning solution. For glass doors, wipe them down with a damp cloth to remove any remaining residue. Allow the shower curtains or glass doors to dry completely before rehanging them in the shower area.
Regular steam cleaning of shower curtains and glass doors not only keeps them clean and fresh, but it also eliminates bacteria and prevents the growth of mold and mildew. By incorporating steam cleaning into your routine, you’ll maintain a hygienic and inviting showering experience.
Window Blinds and Curtains
Window blinds and curtains can accumulate dust, pet hair, and allergens, diminishing their appearance and potentially impacting indoor air quality. Cleaning them can be a daunting task, especially if they are delicate or intricate in design. Fortunately, a steamer can provide a quick and effective solution for refreshing and sanitizing window blinds and curtains.
Start by ensuring that the blinds are in the fully closed position or the curtains are hanging freely. This will allow you to clean each slat or fabric panel thoroughly. Fill your steamer with water and let it heat up. While waiting, you can prepare a mild cleaning solution by diluting a small amount of gentle detergent in water.
Once the steamer is ready, attach the appropriate nozzle for fabric or surface cleaning, depending on the type of blinds or curtains you have. Hold the steamer nozzle a few inches away from the slats or fabric and slowly move it across, starting from the top and working your way down.
For blinds, steam each slat individually, focusing on one section at a time. The steam will help loosen and dissolve dirt and grime, making it easier to wipe away. Use a microfiber cloth or a sponge to wipe the slats clean as you go.
For curtains, hold the steamer nozzle in front of the fabric and allow the steam to penetrate. Move the steamer from top to bottom, ensuring that all areas receive the steam treatment. Depending on the fabric type, you may need to adjust the steam intensity to avoid damaging delicate materials.
As you steam, use a clean cloth or sponge to wipe away any loosened dirt and residue. For stubborn stains, gently blot the affected area with a cloth dampened in the mild cleaning solution. Avoid rubbing vigorously, as this can lead to fraying or distortion of the fabric.
Once you’ve steam cleaned and wiped down the blinds or curtains, allow them to air dry completely before opening the blinds or rehanging the curtains. This will ensure that no moisture is trapped, preventing the growth of mold or mildew.
Regular steam cleaning of window blinds and curtains helps maintain their cleanliness and removes allergens from your living space. By incorporating steam cleaning into your cleaning routine, you’ll enjoy fresh-looking window coverings that contribute to a healthier and more inviting home environment.
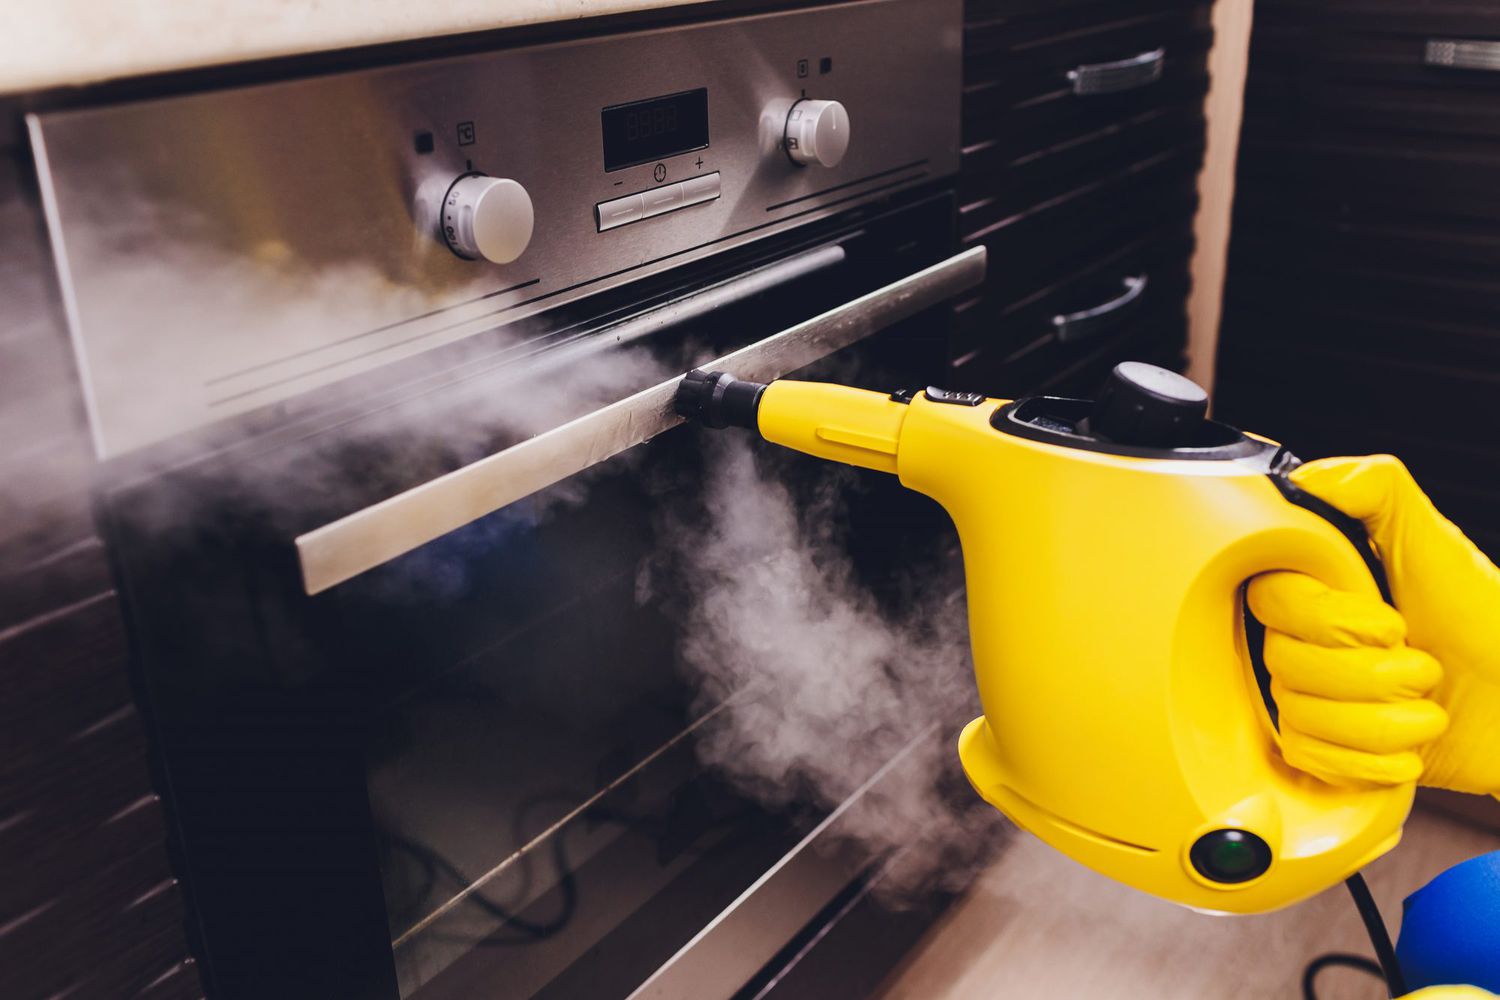
Oven and Stove
The oven and stove are commonly used appliances in the kitchen and can accumulate stubborn grease, food residue, and baked-on stains over time. Cleaning these surfaces can be a challenging task, but with the power of steam, you can effortlessly tackle the grime and restore the sparkle to your oven and stove.
Before you begin, ensure that the oven and stove are cool and free from any food debris. Fill your steamer with water and allow it to heat up. While waiting, you can remove any oven racks or burner grates and soak them in warm soapy water.
Once the steamer is ready, attach the appropriate nozzle for surface cleaning. Hold the steamer nozzle close to the oven surfaces or stove burners and slowly move it across, focusing on one area at a time. The high-temperature steam will help loosen and dissolve tough grease and stains.
For the oven, pay extra attention to the interior walls, racks, and glass door. Move the steamer nozzle across these surfaces, allowing the steam to penetrate and soften the grime. Once steamed, use a sponge or cloth to wipe away the loosened dirt and grease.
For stove burners, steam each burner individually, directing the steam onto the burner grates and stovetop surfaces. The steam will help break down the hardened residues. As you go, use a brush or sponge to scrub away loosened dirt and stains.
If you encounter stubborn, baked-on stains, you may need to repeat the steaming process or use a scraper or scrub brush to assist with removal. Be cautious not to scratch the surfaces, especially on glass-top stoves.
Once you have finished steaming and scrubbing, rinse the oven racks or burner grates that were soaking in warm soapy water. Dry them thoroughly before placing them back in the oven or on the stove.
For the oven and stove surfaces, wipe them down with a damp cloth to remove any residual dirt or cleaning solution. Ensure they are completely dry before using the oven or stove again.
Regular steam cleaning of your oven and stove not only keeps them looking clean and spotless but also eliminates stubborn grease and improves their efficiency. By incorporating steam cleaning into your kitchen maintenance routine, you’ll enjoy a pristine cooking area that is in top-notch condition.
Refrigerator and Freezer
The refrigerator and freezer are essential appliances in the kitchen, but they can easily accumulate spills, food residue, and unpleasant odors over time. Cleaning these areas is crucial to maintain food safety and prevent the growth of bacteria. With the help of a steamer, you can effectively sanitize and refresh your refrigerator and freezer.
Before you begin, empty the refrigerator and freezer of its contents, placing perishable items in a cooler with ice to keep them at a safe temperature. Remove any removable shelves, drawers, and trays for separate cleaning. Fill your steamer with water and allow it to heat up while you prepare cleaning solutions.
For the interior surfaces, such as the walls and shelves, you can create a mild cleaning solution by mixing equal parts water and vinegar. For tougher stains or odors, you can add a small amount of baking soda to the solution.
Once the steamer is ready, attach the appropriate nozzle for surface cleaning. Start with the refrigerator compartment, holding the steamer nozzle close to the surfaces and slowly moving it across. The high-temperature steam will help loosen spills, dried-on food, and stains.
As you steam, use a cloth or sponge to wipe away the loosened dirt and residue. Pay extra attention to grooves, corners, and seals of the refrigerator. For tricky spots or stubborn stains, you can use a soft brush or toothbrush to gently scrub the surface before wiping it clean.
For the freezer, utilize the steamer to remove any ice buildup on the walls or shelves. The steam will melt the ice, making it easier to wipe away. Be careful not to direct the steam onto the freezer coils or any electrical components.
Once you have finished steaming and wiping down the interior surfaces, move on to cleaning the shelves, drawers, and trays that you removed earlier. Use the same mild cleaning solution or soapy water to clean these items, rinsing them thoroughly before placing them back inside the refrigerator and freezer.
After cleaning, ensure that all surfaces are dry before returning the food items to their respective places in the refrigerator and freezer.
Regular steam cleaning of your refrigerator and freezer not only keeps them clean and odor-free, but also ensures a hygienic environment for your food storage. By incorporating steam cleaning into your kitchen maintenance routine, you’ll enjoy a fresh and bacteria-free refrigerator and freezer that help extend the lifespan of your perishable items.
When using a steamer to clean, always start with the highest temperature setting for the surface being cleaned, and work your way down if necessary to avoid damaging delicate materials.
Microwave
The microwave is a convenient kitchen appliance that is used daily, but it can quickly become dirty and accumulate food splatters, grease, and lingering odors. Cleaning the microwave is essential not only for its appearance but also for food safety and optimal performance. With the power of steam, you can easily and effectively clean your microwave.
To begin, remove any removable parts, such as the turntable and microwave plate. These can be cleaned separately using warm, soapy water. Fill your steamer with water and allow it to heat up. While waiting, you can prepare a cleaning solution by mixing equal parts water and vinegar.
Once the steamer is heated, attach the appropriate nozzle for surface cleaning. Place a microwave-safe bowl filled with the vinegar-water solution inside the microwave. The steam generated from the solution will help loosen and soften hardened food particles and stains.
Start the microwave and let it run for a few minutes, allowing the steam to fill the interior. This process will help dislodge the grime and make it easier to clean. After a few minutes, carefully remove the bowl using oven mitts or heat-resistant gloves. Be cautious as the bowl and the steam emitted will be hot.
Using a cloth or sponge, wipe down the interior surfaces of the microwave, paying extra attention to areas with stubborn stains or residue. The softening effect of the steam will make it easier to remove the grime. For tough stains or food particles, you can use a soft brush or toothbrush to gently scrub the surface.
For the exterior of the microwave, use the steamer nozzle or a cloth to wipe away any dirt or spillages. Be sure to clean the control panel and buttons as well.
Once you have finished cleaning, dry the interior and exterior surfaces of the microwave using a clean, dry cloth. Return the turntable and microwave plate to their original positions.
Regular steam cleaning of your microwave not only keeps it looking clean and fresh but also eliminates bacteria and ensures a hygienic environment for your food. By incorporating steam cleaning into your kitchen maintenance routine, you’ll enjoy a spotless microwave that is ready to handle your cooking needs.
Dishwasher
The dishwasher is a time-saving appliance that helps keep your dishes clean and sanitized. However, over time, it can accumulate grease, food particles, and mineral deposits, resulting in an unpleasant odor and reduced performance. Cleaning your dishwasher regularly will not only improve its efficiency but also prolong its lifespan. With the power of steam, you can effectively clean and refresh your dishwasher.
Start by removing any dishes or utensils from the dishwasher racks. Inspect the drain and remove any large food particles or debris that may have accumulated. Fill your steamer with water and allow it to heat up.
Once the steamer is ready, attach the appropriate nozzle for surface cleaning. Hold the steamer nozzle close to the interior walls, door, and racks of the dishwasher, moving it across the surfaces. The high-temperature steam will help loosen and dissolve grease and food residues.
As you steam, use a cloth or sponge to wipe away the loosened dirt and residue. Pay extra attention to the areas around the spray arms, door gasket, and utensil holders. For stubborn stains or built-up mineral deposits, you can use a soft brush or toothbrush to gently scrub the surfaces.
Next, focus on cleaning the dishwasher filter. Remove the filter according to the manufacturer’s instructions. Using warm, soapy water, clean the filter thoroughly, removing any trapped debris or residue. Rinse it well and place it back in the dishwasher.
To remove any residue or odors from the dishwasher, you can create a vinegar solution by mixing equal parts water and white vinegar. Pour the solution into a dishwasher-safe container, such as a glass or bowl, and place it on the top rack of the empty dishwasher.
Run a short cycle on your dishwasher, using the hottest water temperature available. The steam generated by the vinegar solution will help remove any remaining buildup and eliminate odors.
Once the cycle is complete, wipe down the interior surfaces of the dishwasher with a clean, dry cloth. Check the spray arms for any clogs or debris, and use a toothpick or small brush to clean out any obstructions.
Regular steam cleaning of your dishwasher not only keeps it clean and odor-free but also ensures optimal performance and prolongs its lifespan. By incorporating steam cleaning into your kitchen maintenance routine, you’ll enjoy sparkling clean dishes and a reliable dishwasher for years to come.
Read more: 15 Things You Can Clean With Baking Soda
Kitchen Cabinets and Drawers
Your kitchen cabinets and drawers are key storage areas for your cookware, utensils, and ingredients. Over time, they can accumulate dust, grease, and food residue, making them appear dull and dirty. Cleaning your kitchen cabinets and drawers is crucial not only for their aesthetics but also to maintain a hygienic cooking environment. With the power of steam, you can easily and effectively clean your kitchen cabinets and drawers.
Before you begin, empty the cabinets and drawers of their contents, taking the opportunity to declutter and organize. Fill your steamer with water and allow it to heat up. While waiting, you can prepare a mild cleaning solution by mixing a small amount of dish soap or all-purpose cleaner with warm water.
Once the steamer is ready, attach the appropriate nozzle for surface cleaning. Start with the cabinets, holding the steamer nozzle close to the surface and slowly moving it across, focusing on one area at a time. The high-temperature steam will help loosen and dissolve grease, dirt, and grime.
As you steam, use a cloth or sponge to wipe away the loosened dirt and residue. Pay extra attention to areas near the handles, edges, and hinges, as these tend to accumulate more dirt and grease. For grooved or textured surfaces, use a soft brush or toothbrush to gently agitate the dirt before wiping it clean.
For drawers, remove them from the cabinet and steam their interior and exterior surfaces. Wipe away any dirt or residue with a cloth or sponge. Don’t forget to clean the drawer runners or slides before placing the drawers back into the cabinet.
After steaming and wiping down the cabinets and drawers, if any surfaces feel sticky or have stubborn stains, you can use a small amount of the mild cleaning solution on a cloth or sponge to give them an extra scrub. Rinse the surfaces with a clean, damp cloth to remove any cleaning solution residue.
Once the surfaces are dry, you can reorganize and place clean items back into the cabinets and drawers.
Regular steam cleaning of your kitchen cabinets and drawers not only keeps them clean and fresh but also ensures a hygienic storage space for your cookware and ingredients. By incorporating steam cleaning into your kitchen maintenance routine, you’ll enjoy a clean and organized kitchen that inspires your culinary adventures.
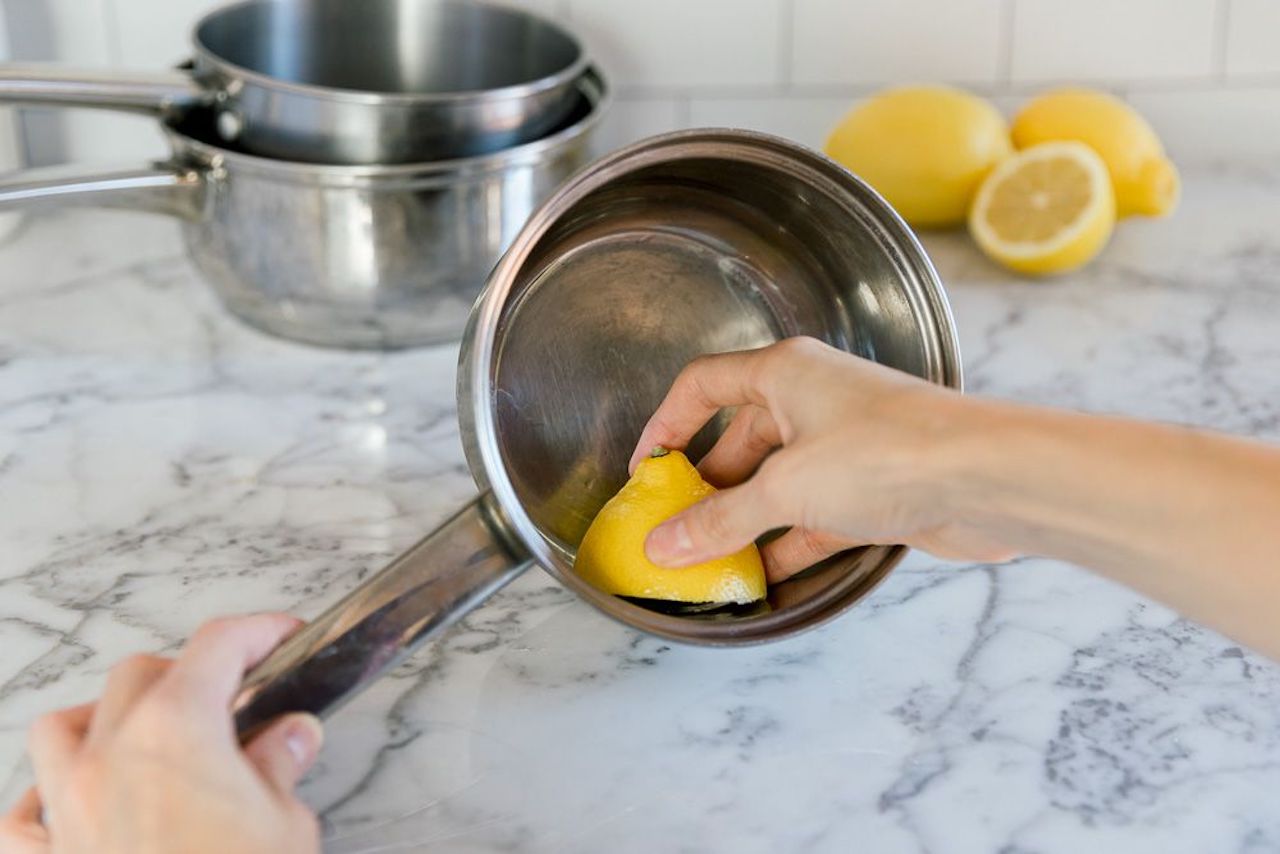
Cutting Boards and Utensils
Cutting boards and utensils are essential tools in the kitchen that come into direct contact with food. Keeping them clean and sanitary is crucial for food safety. Over time, cutting boards can develop stains, odors, and microscopic cuts that can harbor bacteria. Utensils, such as knives and spatulas, can also become dirty and dull. With the power of steam, you can effectively sanitize and refresh your cutting boards and utensils.
Start by rinsing the cutting boards and utensils with warm water to remove any food particles or debris. Fill your steamer with water and allow it to heat up. While waiting, you can prepare a cleaning solution by mixing equal parts water and vinegar or using a mild dish soap.
Once the steamer is ready, attach the appropriate nozzle for surface cleaning. Hold the steamer nozzle close to the cutting boards or utensils and slowly move it across, focusing on one item at a time. The high-temperature steam will help kill bacteria and loosen any stuck-on residue.
As you steam, use a cloth or sponge to wipe away the loosened dirt and residue. Pay extra attention to any stains or grooves on the cutting boards. For stubborn stains, you can apply a paste made of baking soda and water, let it sit for a few minutes, and then scrub with a brush or sponge.
For utensils, particularly knives, use caution while cleaning with steam. Hold the steamer nozzle a safe distance away to avoid direct contact with the sharp blades. Wipe the utensils clean as you steam, focusing on the handle areas as well.
Once you’ve steam cleaned and wiped down the cutting boards and utensils, rinse them with warm water to remove any residual cleaning solution or steam residue.
To remove any lingering odors from cutting boards, you can rub them with a lemon wedge or sprinkle them with baking soda. Allow them to sit for a few minutes before rinsing them clean. For wooden cutting boards, you can also apply a thin layer of food-grade mineral oil to keep the wood moisturized and prevent cracking.
Allow the cutting boards and utensils to air dry completely before storing them in a dry and clean area.
Regular steam cleaning of your cutting boards and utensils helps keep them clean and eliminates bacteria that can cause foodborne illnesses. By incorporating steam cleaning into your kitchen maintenance routine, you’ll ensure a safe and hygienic food preparation environment for you and your loved ones.
Stainless Steel Appliances
Stainless steel appliances add a sleek and modern touch to any kitchen. However, they are prone to smudges, fingerprints, and water stains, which can make them appear dull and dirty. Cleaning stainless steel surfaces requires special care to maintain their shine and prevent scratches. With the power of steam, you can effectively clean and restore the luster of your stainless steel appliances.
Before you begin, ensure that the appliance is unplugged and cool to the touch. Fill your steamer with water and allow it to heat up. While waiting, you can prepare a cleaning solution by combining warm water and a gentle dish soap.
Once the steamer is ready, attach the appropriate nozzle for surface cleaning. Hold the steamer nozzle a few inches away from the stainless steel surface and slowly move it across, focusing on one area at a time. The high-temperature steam will help loosen dirt, debris, and fingerprints.
As you steam, use a microfiber cloth or sponge to wipe away the loosened dirt and residues. Follow the grain of the stainless steel to avoid leaving streaks or scratches. For stubborn stains or fingerprints, you can use a soft brush or toothbrush to gently scrub the area.
If there are any water stains or mineral deposits, you can rub the stainless steel with a cloth dampened in vinegar or lemon juice. Rinse the area with clean water and wipe it dry to remove any acidic residue.
For a polished finish, you can apply a small amount of stainless steel cleaner or a solution of water and rubbing alcohol. Use a clean cloth to buff the surface in circular motions, ensuring an even and shiny appearance.
Remember to avoid using abrasive cleaners, scrub brushes, or steel wool on stainless steel appliances, as these can scratch the surface. Always test any cleaning solution on a small, inconspicuous area before applying it to the entire appliance.
Regular steam cleaning of your stainless steel appliances helps maintain their shine and cleanliness. By incorporating steam cleaning into your kitchen maintenance routine, you’ll enjoy stainless steel appliances that gleam with elegance and sophistication.
Mattresses and PillowsOur mattresses and pillows are essential for a good night’s sleep, but over time they can accumulate allergens, dust mites, and stains. Cleaning and maintaining them regularly is important not only for hygiene but also for extending their lifespan. With the power of steam, you can effectively sanitize and refresh your mattresses and pillows.
To clean your mattress, start by removing all bedding and vacuuming the surface to remove any loose debris. Fill your steamer with water and allow it to heat up. While waiting, you can sprinkle baking soda over the mattress to help eliminate odors.
Once the steamer is ready, attach the appropriate nozzle for surface cleaning. Hold the steamer nozzle close to the mattress and slowly move it in a sweeping motion, covering the entire surface. The high-temperature steam will penetrate deep into the fabric, killing dust mites and removing stains.
As you steam, pay extra attention to any visible stains or areas with odors. Use a cloth or sponge to blot and wipe away any dirt, excess moisture, or remaining residue. For stubborn stains, you can pre-treat them with a mixture of water and mild detergent before using the steam cleaner.
After steam cleaning, allow the mattress to dry completely before placing clean bedding back on top. You can speed up the drying process by opening windows, using fans, or utilizing the air circulation in the room.
For pillows, check the care label to ensure they are suitable for steam cleaning. If so, remove the pillowcases and place the pillows in the steamer. Steam each side of the pillow, focusing on areas that may have absorbed sweat or body oils. Allow the pillows to dry completely before using them again.
Regular steam cleaning of your mattresses and pillows helps eliminate dust mites, allergens, and odors, creating a cleaner and healthier sleep environment. By incorporating steam cleaning into your bedding maintenance routine, you’ll enjoy a more refreshing and rejuvenating sleep experience.
Read more: 10 Things You Can Clean With The Pink Stuff
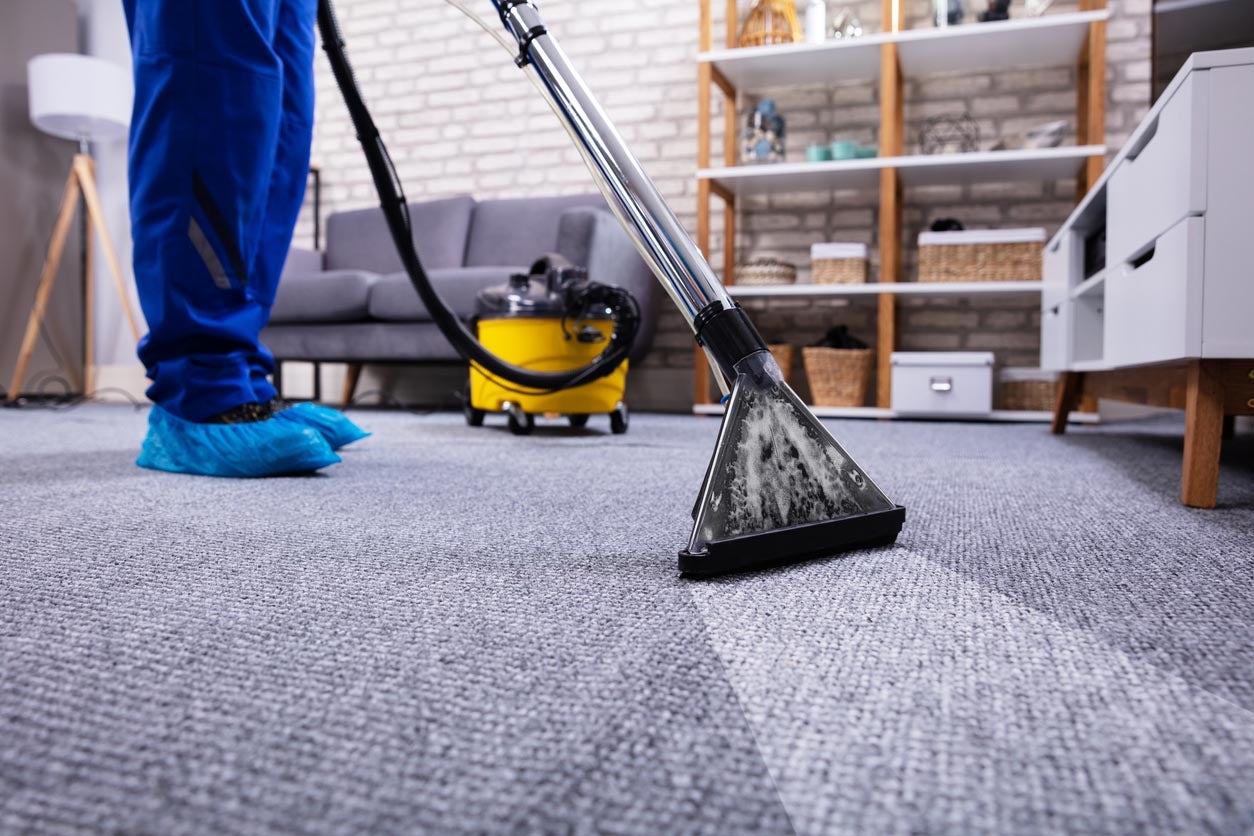
Carpets and Rugs
Carpets and rugs add warmth and comfort to our homes, but they can also trap dirt, allergens, and pet dander over time, making them look dull and causing potential health issues. Cleaning and maintaining carpets and rugs is crucial for a clean and healthy living space. With the power of steam, you can effectively deep clean and refresh your carpets and rugs.
Before you begin, remove any furniture or objects from the area to be cleaned. Vacuum the carpets or rugs thoroughly to remove loose dirt and debris. Fill your steamer with water and allow it to heat up. While waiting, you can sprinkle baking soda over the carpets or rugs to help eliminate odors.
Once the steamer is ready, attach the appropriate nozzle for carpet and rug cleaning. Start with a small, inconspicuous area to test the steam settings and ensure that the material is steam-safe. If all is well, proceed to steam the rest of the carpet or rug.
Hold the steamer nozzle close to the surface and move it in slow, overlapping passes to ensure thorough cleaning. The high-temperature steam will penetrate deep into the fibers, loosening dirt and stains. As you steam, you may notice some moisture being released, but it should evaporate quickly.
After steaming, use a clean cloth or towel to blot away any excess moisture or residue on the carpet or rug. Allow it to dry completely before walking on it or placing furniture back in the area. You can speed up the drying process by opening windows, using fans, or using a dehumidifier if necessary.
For stubborn stains, you can pre-treat them with a mixture of water and mild detergent before using the steam cleaner. Alternatively, you can use a steam cleaner with a built-in carpet cleaning solution dispenser for a more efficient cleaning process.
Regular steam cleaning of your carpets and rugs not only removes dirt and stains but also eliminates allergens and odors, making your living space cleaner and healthier. By incorporating steam cleaning into your regular carpet maintenance routine, you’ll enjoy fresh and revitalized carpets and rugs that liven up your home.
Upholstered Furniture
Upholstered furniture, such as sofas, chairs, and ottomans, adds comfort and style to our living spaces. However, they can also accumulate dirt, stains, and odors over time. Cleaning and maintaining upholstered furniture is essential to ensure their longevity and keep them looking fresh and inviting. With the power of steam, you can effectively clean and refresh your upholstered furniture.
Before you begin, check the manufacturer’s guidelines or care label to ensure that your upholstered furniture is steam-safe. Remove any loose cushions and vacuum the furniture to remove surface dirt and debris. Fill your steamer with water and let it heat up. While waiting, you can mix a small amount of gentle upholstery cleaner with water in a spray bottle.
Once the steamer is ready, attach the appropriate nozzle for upholstery cleaning. Hold the steamer nozzle a few inches away from the fabric surface and begin steam cleaning. Move the nozzle across the upholstery in slow, overlapping passes, focusing on one section at a time. The high-temperature steam helps to loosen dirt, stains, and odors without saturating the fabric.
As you steam, you can simultaneously use the upholstery cleaner spray to target any specific stains or heavily soiled areas. Allow the steam to penetrate the fabric for a few seconds, then use a clean cloth or sponge to blot away the loosened dirt and residue. Work in gentle circular motions, being careful not to excessively rub the fabric.
For textured or creviced upholstery, you can use a soft brush or toothbrush to gently agitate the fabric while steam cleaning. This helps to dislodge dirt and break up any stubborn stains. Make sure to blot away the moisture and residue afterward with a clean cloth or sponge.
Once you have steam cleaned the entire upholstered furniture piece, allow it to air dry completely before using or replacing any cushions. To speed up the drying process, you can use fans or open windows to increase air circulation in the room.
Regular steam cleaning of your upholstered furniture not only removes dirt and stains but also eliminates allergens and refreshes the fabric, breathing new life into your furniture. By incorporating steam cleaning into your upholstery maintenance routine, you’ll enjoy clean and inviting furniture that enhances the comfort and beauty of your living space.
Clothing and Fabrics
Our clothing and fabrics come into contact with our bodies and can easily accumulate dirt, odors, and stains. Proper cleaning and care are essential not only for maintaining the appearance of our garments but also for prolonging their lifespan. With the power of steam, you can effectively freshen up and sanitize your clothing and fabrics.
Before you begin, check the care label on each clothing item to ensure that it is safe for steam cleaning. Sort your garments based on fabric type and color to avoid any potential damage or color bleeding. Fill your steamer with water and allow it to heat up. While waiting, you can prepare a mild cleaning solution by diluting a small amount of gentle laundry detergent in water.
Start by hanging the clothes on a garment hanger or placing them on a flat surface. Hold the steamer nozzle a few inches away from the fabric and gently move it across the garment, applying steam to each section. The high-temperature steam helps to remove wrinkles, refresh the fabric, and eliminate odors.
As you steam, smooth out the fabric with your hands or a gentle brush to help release any embedded dirt or particles. Pay special attention to areas with stains or heavy odors. For delicate fabrics, use a lower steam setting to ensure gentle treatment.
For fabrics with stubborn stains, you can apply the mild cleaning solution directly to the affected area before steaming. Allow the cleaning solution to penetrate the fabric for a few minutes, then use a clean cloth or sponge to gently blot away the stain.
Once you have steam cleaned all your garments, allow them to dry completely before wearing or storing them. Hanging the clothes in a well-ventilated area or using a drying rack will help speed up the drying process.
It’s important to note that steam cleaning is not suitable for all fabrics and clothing items. Delicate or sensitive materials, such as silk, velvet, or items with glued embellishments, may not be suitable for steam cleaning. Always check the care label and perform a patch test in an inconspicuous area before steam cleaning.
Regular steam cleaning of your clothing and fabrics not only removes odors and freshens them up but also helps sanitize the surfaces. By incorporating steam cleaning into your laundry routine, you’ll enjoy clean and refreshed garments that look and feel their best.
Children’s Toys
Children’s toys provide hours of fun and entertainment, but they can also harbor dirt, germs, and allergens. Regularly cleaning and sanitizing your children’s toys is crucial for their health and safety. With the power of steam, you can effectively clean and sterilize their toys without the use of harsh chemicals.
Before you begin, assess the toys to ensure they are steam-safe. Check for any loose parts, batteries, or electronic components that may be damaged by steam. For toys that are not suitable for steam cleaning, you can use other cleaning methods, such as wiping them down with a mild disinfectant or washing them in soapy water.
For steam-safe toys, fill your steamer with water and allow it to heat up. While waiting, you can prepare a mixture of water and mild dish soap in a spray bottle to aid in cleaning. Alternatively, you can use a small amount of vinegar mixed with water for a natural sanitizing solution.
Once the steamer is ready, attach the appropriate nozzle for surface cleaning. Hold the steamer nozzle close to the surface of the toys and slowly move it across, covering all areas. The high-temperature steam will penetrate the toy’s surfaces, loosening dirt, grime, and killing bacteria and germs.
As you steam, use a clean cloth or sponge to wipe away the loosened dirt and residue. Pay extra attention to any crevices or textured areas of the toys where dirt might accumulate. To sanitize specific areas, you can spray the mild dish soap or vinegar-water solution directly onto the surface before steaming.
For plush toys, hold the steamer nozzle a few inches away from the fabric and gently move it around to sanitize the surface. Avoid saturating the fabric excessively with steam to prevent damage. Allow the plush toys to air dry completely before giving them back to your children.
After steam cleaning, thoroughly rinse the toys with clean water and wipe them dry with a clean cloth. Inspect the toys for any remaining dirt or grime, paying attention to small toy parts that might be more difficult to clean.
Regular steam cleaning of your children’s toys not only removes dirt and germs but also provides a safe and chemical-free method of sanitization. By incorporating steam cleaning into your toy maintenance routine, you’ll ensure a hygienic play environment for your children.
Frequently Asked Questions about 20 Things You Can Clean With A Steamer: For Quick, Easy Hygiene
Was this page helpful?
At Storables.com, we guarantee accurate and reliable information. Our content, validated by Expert Board Contributors, is crafted following stringent Editorial Policies. We're committed to providing you with well-researched, expert-backed insights for all your informational needs.


0 thoughts on “20 Things You Can Clean With A Steamer: For Quick, Easy Hygiene”