Home>Maintenance & Safety>Home Maintenance Checklists>How To Build A Trash Can Enclosure
Home Maintenance Checklists
How To Build A Trash Can Enclosure
Modified: August 27, 2024
Learn how to build a sturdy and attractive trash can enclosure for your home with our comprehensive home maintenance checklist. Keep your outdoor space organized and tidy.
(Many of the links in this article redirect to a specific reviewed product. Your purchase of these products through affiliate links helps to generate commission for Storables.com, at no extra cost. Learn more)
Introduction
Welcome to the ultimate guide on how to build a trash can enclosure! If you're tired of unsightly trash cans cluttering up your outdoor space, then this step-by-step tutorial is just what you need. Building a trash can enclosure not only enhances the visual appeal of your property but also helps keep your garbage bins secure and organized. Whether you're a seasoned DIY enthusiast or a novice looking to embark on your first outdoor project, this guide will provide you with all the essential information and tips to make your trash can enclosure a success.
In this comprehensive guide, we'll cover everything from planning and preparation to selecting materials, building the frame, adding the siding, installing the roof, and adding the finishing touches. By the end of this tutorial, you'll have the knowledge and confidence to construct a durable and aesthetically pleasing enclosure that perfectly complements your outdoor space.
So, roll up your sleeves, gather your tools, and get ready to embark on a rewarding DIY journey. Let's dive into the planning and preparation phase to set the stage for creating a practical and visually appealing trash can enclosure that will elevate the functionality and aesthetics of your outdoor area.
Key Takeaways:
- Planning and preparation are crucial for building a trash can enclosure. Consider location, measurements, and materials to ensure a successful and visually appealing outcome for your outdoor space.
- Building a sturdy frame, adding durable siding and a weather-resistant roof, and incorporating finishing touches are essential steps in creating a functional and attractive trash can enclosure.
Read more: 20 Best Trash Can Enclosure You Can Buy
Planning and Preparation
Before diving into the construction of your trash can enclosure, thorough planning and preparation are essential for a successful outcome. Start by assessing your outdoor space to determine the most suitable location for the enclosure. Consider factors such as accessibility, proximity to your home, and the overall visual impact on your property.
Next, take precise measurements of your trash cans to ensure that the enclosure will accommodate them comfortably. Additionally, check local building codes and regulations to ensure compliance with any relevant guidelines pertaining to outdoor structures. This step is crucial for avoiding potential issues in the future.
Once you have a clear understanding of the space and regulatory considerations, create a detailed blueprint or sketch of your intended enclosure. This will serve as a visual guide and help you determine the necessary materials and dimensions for the project. Consider whether you want a simple, utilitarian design or a more decorative enclosure that complements your outdoor aesthetic.
With the planning phase complete, it’s time to gather the necessary tools and materials. A typical list of tools may include a saw, drill, level, measuring tape, and a hammer, among others. As for materials, pressure-treated lumber is a popular choice due to its durability and resistance to outdoor elements. Additionally, you may need hardware such as hinges, screws, and nails to assemble the enclosure.
Lastly, consider the overall aesthetic of your outdoor space and choose materials that harmonize with your existing landscaping and architecture. Whether you opt for a rustic wooden enclosure or a modern, sleek design, ensuring that the finished product complements its surroundings will elevate the overall appeal of your property.
With meticulous planning and thorough preparation, you’re now ready to bring your vision to life by constructing a functional and visually appealing trash can enclosure. Next, we’ll delve into the process of choosing the perfect location for your enclosure.
Choosing the Location
When selecting the ideal location for your trash can enclosure, several factors come into play. First and foremost, convenience and accessibility are paramount. Consider a location that allows easy access to the enclosure for both adding and removing trash cans, while also being convenient for regular maintenance and cleaning.
Furthermore, the visual impact of the enclosure on your outdoor space is a key consideration. You’ll want to choose a location that minimizes the visibility of the trash cans from prominent areas of your property, such as your front yard or main outdoor living spaces. Concealing the bins while maintaining their accessibility is the ultimate goal.
Privacy is another aspect to keep in mind. If your property borders neighboring homes or public spaces, positioning the enclosure to provide a degree of privacy for your waste management area can contribute to a more harmonious outdoor environment for both you and your neighbors.
Additionally, take into account the terrain and ground conditions when choosing the location. A level, well-drained area is preferable for the placement of the enclosure. This will ensure the stability and longevity of the structure while preventing potential issues such as water pooling around the trash cans.
Finally, consider the impact of sunlight and weather patterns on the chosen location. While some exposure to sunlight can aid in drying out any accumulated moisture, excessive exposure to harsh weather conditions may accelerate wear and tear on the enclosure. Striking a balance that provides adequate ventilation and sunlight without subjecting the enclosure to unnecessary weathering is essential.
By carefully considering these factors, you can select a location that optimizes convenience, aesthetics, privacy, and functionality for your trash can enclosure. With the location chosen, you’re ready to move on to the next crucial step: selecting the materials for your project.
Selecting Materials
Choosing the right materials for your trash can enclosure is vital to ensure its durability, functionality, and visual appeal. Pressure-treated lumber is a popular choice for constructing the frame of the enclosure due to its resistance to rot and decay, making it ideal for outdoor applications. Cedar and redwood are also excellent options known for their natural resistance to insects and weathering, along with their attractive appearance.
When it comes to the siding of the enclosure, consider materials that strike a balance between durability and aesthetics. Treated plywood or composite panels are practical choices that offer both weather resistance and a clean, finished look. Alternatively, if you prefer a more rustic or natural appearance, consider using horizontal slats or lattice panels to create a visually appealing enclosure.
For the roof of the enclosure, corrugated metal panels or polycarbonate sheets are popular options due to their weather resistance and ease of installation. These materials provide protection from the elements while allowing for adequate ventilation to prevent moisture buildup inside the enclosure.
In addition to the primary structural and cladding materials, you’ll need a range of hardware to assemble the enclosure. Stainless steel or galvanized screws and nails are recommended for their resistance to corrosion, ensuring the longevity of the structure. Hinges and latches for the door(s) of the enclosure should also be durable and weather-resistant to withstand frequent use and outdoor conditions.
Consider incorporating decorative elements into the design, such as trim pieces, lattice accents, or decorative hardware, to enhance the visual appeal of the enclosure. These details can elevate the overall aesthetic and seamlessly integrate the enclosure into your outdoor space.
Lastly, ensure that the materials you select align with any local building codes and regulations. Some areas may have specific requirements for outdoor structures, particularly in terms of materials used and overall design. By choosing materials that comply with these guidelines, you can avoid potential issues and ensure that your enclosure is built to last.
With the materials carefully chosen, you’re now prepared to commence the construction process by building the frame of the trash can enclosure.
Building the Frame
The construction of a sturdy and well-structured frame forms the foundation of a durable trash can enclosure. Begin by laying out the dimensions of the enclosure on the chosen site, ensuring that the area is level and well-drained. The frame can be constructed using pressure-treated lumber, which offers resilience against outdoor elements and prolongs the lifespan of the enclosure.
Start by assembling the four vertical corner posts, securing them firmly into the ground using post anchors or by setting them in concrete footings. These posts will serve as the primary supports for the frame and provide stability for the enclosure. Use a level to ensure that the posts are perfectly upright and aligned with the intended dimensions of the enclosure.
Next, connect the vertical posts with horizontal beams to form the top and bottom sections of the frame. These beams will establish the structure’s rigidity and provide the framework for attaching the siding and roof. It’s crucial to secure these connections with galvanized or stainless steel hardware to prevent corrosion and ensure the longevity of the frame.
If your enclosure includes a hinged door for easy access to the trash cans, this is the stage to frame the opening for the door. Ensure that the door frame is sturdy and well-aligned to facilitate smooth operation and a secure closure. Additionally, consider adding diagonal bracing within the frame to enhance its strength and stability, particularly for larger enclosures.
Throughout the construction of the frame, periodically check for squareness and alignment to maintain the structural integrity of the enclosure. This step is essential for ensuring that the subsequent installation of siding and roofing materials proceeds smoothly and results in a well-finished and cohesive structure.
Once the frame is fully assembled and secured, take a moment to inspect the connections and overall stability of the structure. Making any necessary adjustments at this stage will contribute to the overall durability and functionality of the enclosure. With the frame in place, you’re ready to move on to the next phase: adding the siding to enclose the frame and create a visually appealing exterior for the enclosure.
Consider using durable and weather-resistant materials such as cedar or vinyl for your trash can enclosure to ensure it can withstand the elements and last for years to come.
Read more: How To Build An Outdoor Cat Enclosure
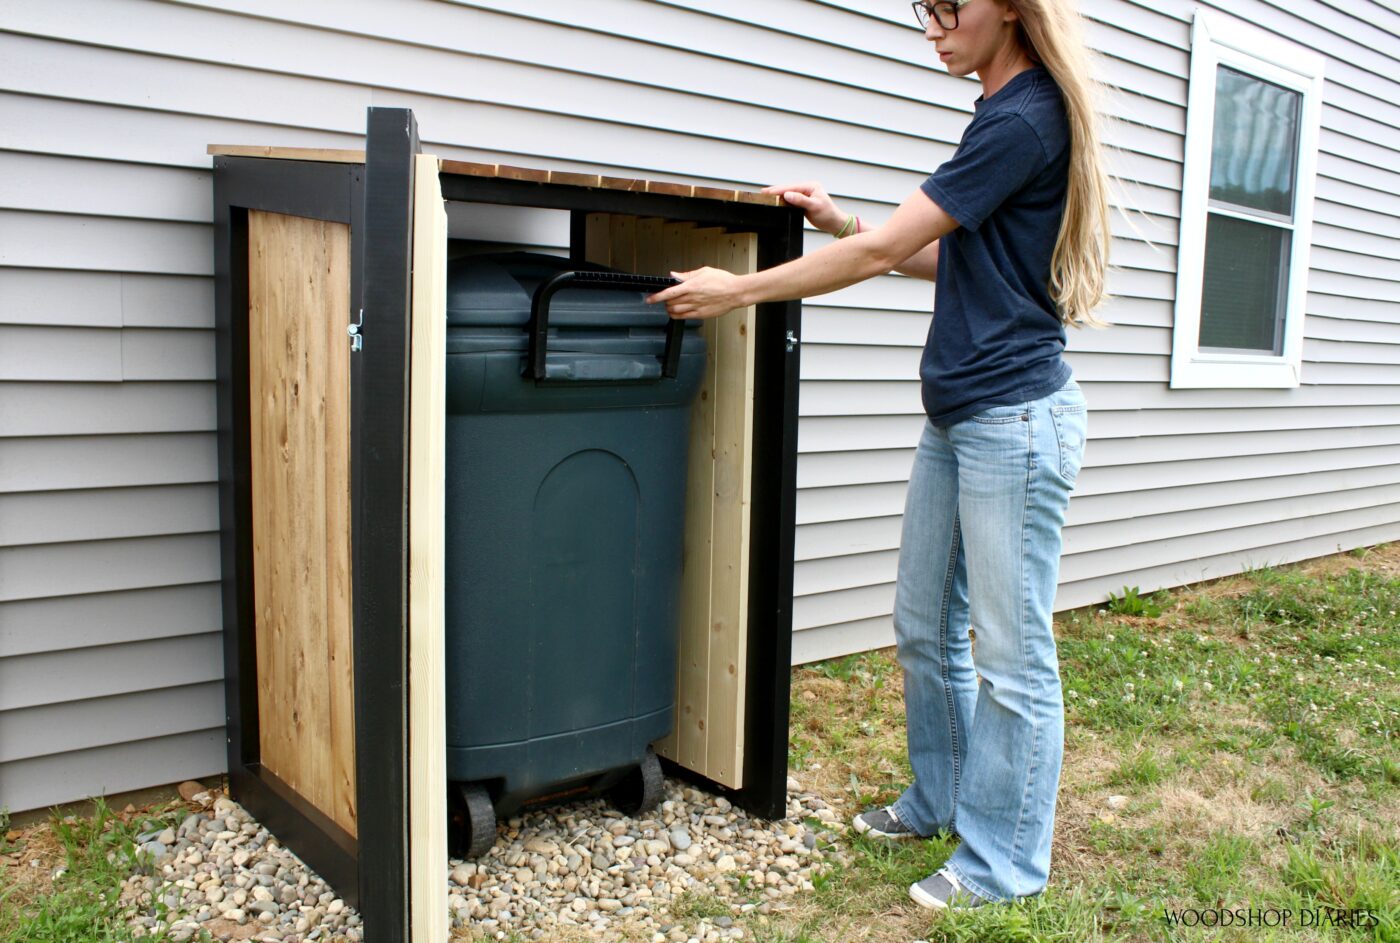
Adding the Siding
Adding the siding to your trash can enclosure not only enhances its visual appeal but also provides protection from the elements and ensures the privacy of your waste management area. Treated plywood or composite panels are popular choices for siding due to their durability and weather resistance. These materials offer a clean, finished look while effectively shielding the contents of the enclosure.
Start by measuring and cutting the siding material to fit the dimensions of the frame. Ensure precise cuts to achieve a seamless and professional appearance. Attach the siding to the frame using galvanized or stainless steel screws, spaced at regular intervals to secure the panels firmly in place. This step is crucial for maintaining the structural integrity of the enclosure and preventing warping or shifting of the siding over time.
If you opt for a more decorative or natural aesthetic, consider using horizontal slats or lattice panels for the siding. These materials can add a touch of visual interest to the enclosure while allowing for adequate ventilation, which is essential for preventing moisture buildup inside the structure.
When installing the siding, pay close attention to the corners and edges to ensure a seamless and polished finish. Properly aligning the panels and maintaining consistent spacing between them will contribute to the overall visual appeal and functionality of the enclosure. Additionally, consider incorporating trim pieces or molding along the edges of the siding to create a refined and cohesive look.
If your enclosure includes a hinged door, ensure that the siding accommodates the door’s operation and provides a secure and weather-resistant closure. Properly aligning the siding around the door frame is essential for maintaining the enclosure’s integrity and functionality.
Throughout the installation of the siding, periodically step back to assess the visual impact and overall cohesiveness of the enclosure. Making any necessary adjustments during this phase will ensure that the finished product seamlessly integrates into your outdoor space while effectively concealing the trash cans.
With the siding securely in place, the next step in the construction process is installing the roof to provide protection from the elements and complete the enclosure’s functional and aesthetic features.
Installing the Roof
Installing a well-designed and sturdy roof on your trash can enclosure is essential for providing protection from the elements and ensuring the longevity of the structure. When selecting roofing materials, consider options that offer durability, weather resistance, and adequate ventilation to prevent moisture buildup inside the enclosure.
Corrugated metal panels and polycarbonate sheets are popular choices for enclosure roofs due to their resilience and ease of installation. These materials effectively shield the contents of the enclosure from rain, snow, and debris while allowing for sufficient airflow to prevent condensation and maintain a dry interior environment.
Begin by measuring and cutting the roofing material to fit the dimensions of the enclosure. Ensure precise cuts to achieve a snug and secure fit that effectively covers the frame. When attaching the roofing material, use weather-resistant screws and washers to secure the panels in place, ensuring a tight seal that prevents water infiltration and protects the contents of the enclosure.
If your enclosure features a sloped roof, ensure that the panels are properly aligned to facilitate water runoff and prevent pooling on the roof surface. Proper drainage is crucial for maintaining the structural integrity of the roof and preventing water-related damage over time.
For enclosures with flat roofs, consider incorporating a slight slope to facilitate water drainage and prevent water accumulation, which can lead to premature deterioration of the roofing material. Additionally, sealing the seams and edges of the roofing panels with weather-resistant caulk or sealant will further enhance the enclosure’s weatherproofing capabilities.
If you opt for a more decorative or natural aesthetic, consider using wooden shingles or shakes for the roof. These materials can add a touch of rustic charm to the enclosure while providing effective weather protection. Properly installing and sealing the shingles or shakes is essential for ensuring the roof’s resilience and longevity.
Throughout the installation of the roof, pay close attention to the alignment and secure attachment of the roofing material to the frame. Periodically inspect the roof to ensure that it effectively covers the enclosure and provides the necessary protection from the elements.
With the roof securely in place, the next step in the construction process is adding the finishing touches to the enclosure to enhance its functionality and visual appeal.
Adding the Finishing Touches
As you near the completion of your trash can enclosure project, adding the finishing touches will elevate its functionality and visual appeal. These final details contribute to a polished and cohesive appearance that seamlessly integrates the enclosure into your outdoor space while ensuring ease of use and maintenance.
One of the essential finishing touches is the addition of a secure and easy-to-operate door for accessing the trash cans. Whether you opt for a single or double door design, ensure that the hinges and latches are robust and weather-resistant to withstand frequent use and outdoor conditions. Additionally, consider installing a latch or lock to secure the door and prevent unauthorized access to the enclosure.
For enclosures with solid siding, incorporating ventilation openings near the top and bottom of the structure will promote airflow and prevent the buildup of odors and moisture inside the enclosure. These strategically placed vents contribute to a more hygienic and pleasant environment for storing your trash cans.
Consider adding a durable and weather-resistant handle to the door(s) to facilitate effortless opening and closing. A well-designed and ergonomic handle enhances the functionality of the enclosure while adding a touch of convenience to your waste management routine.
To further enhance the visual appeal of the enclosure, consider incorporating decorative elements such as trim pieces, lattice accents, or a decorative roof ridge. These details can elevate the overall aesthetic and seamlessly integrate the enclosure into your outdoor space, creating a cohesive and harmonious appearance.
For added convenience, you may choose to install a hook or holder inside the enclosure to secure trash bags or recycling bins, keeping them organized and easily accessible. This thoughtful addition contributes to a more efficient waste management system while maintaining a tidy and clutter-free interior.
Finally, take the time to inspect the entire enclosure, ensuring that all elements are securely in place and functioning as intended. Making any necessary adjustments at this stage will contribute to the overall durability and functionality of the finished structure.
With the finishing touches in place, your trash can enclosure is now ready to serve as a practical and visually appealing addition to your outdoor space. Whether you’ve opted for a simple, utilitarian design or a more decorative enclosure, these final details will ensure that your project is a resounding success.
Conclusion
Congratulations on completing the construction of your trash can enclosure! By following this comprehensive guide, you’ve gained the knowledge and confidence to create a durable, functional, and visually appealing structure that enhances the aesthetics of your outdoor space while providing practical utility.
Throughout the process, you’ve navigated the essential steps of planning and preparation, choosing the ideal location, selecting high-quality materials, constructing the frame, adding the siding, installing the roof, and incorporating the finishing touches. Each phase of the project was carefully executed to ensure the structural integrity and visual harmony of the enclosure.
With the enclosure in place, you’ve successfully concealed your trash cans while maintaining convenient access and ensuring protection from the elements. The thoughtful design and meticulous construction have transformed a utilitarian necessity into an attractive and functional outdoor feature.
As you admire the completed enclosure, take pride in the craftsmanship and attention to detail that have culminated in a structure that seamlessly integrates into your outdoor environment. Whether you’ve opted for a simple and practical design or a more decorative enclosure, the finished product reflects your dedication to enhancing your outdoor space.
Moving forward, you can enjoy the benefits of a tidy and organized waste management system, free from the visual clutter of exposed trash cans. Your new enclosure not only adds value to your property but also contributes to a more aesthetically pleasing and harmonious outdoor setting.
As you embark on future DIY projects, may the skills and insights gained from this experience continue to inspire and empower you. Whether it’s a garden shed, a deck, or other outdoor enhancements, the knowledge and proficiency you’ve acquired will serve as a solid foundation for your future endeavors.
Thank you for joining us on this journey to create a functional and visually appealing trash can enclosure. We hope this guide has provided you with valuable insights and inspiration for your outdoor projects. Here’s to the successful completion of your DIY endeavor and the many enjoyable moments in your enhanced outdoor space!
Frequently Asked Questions about How To Build A Trash Can Enclosure
Was this page helpful?
At Storables.com, we guarantee accurate and reliable information. Our content, validated by Expert Board Contributors, is crafted following stringent Editorial Policies. We're committed to providing you with well-researched, expert-backed insights for all your informational needs.


0 thoughts on “How To Build A Trash Can Enclosure”