Home>Furniture>Outdoor Furniture>How To Build A Patio Enclosure
Outdoor Furniture
How To Build A Patio Enclosure
Modified: March 7, 2024
Discover the steps to build a stunning patio enclosure to enjoy outdoor furniture all year round. Enhance your outdoor living space with this comprehensive guide.
(Many of the links in this article redirect to a specific reviewed product. Your purchase of these products through affiliate links helps to generate commission for Storables.com, at no extra cost. Learn more)
Introduction
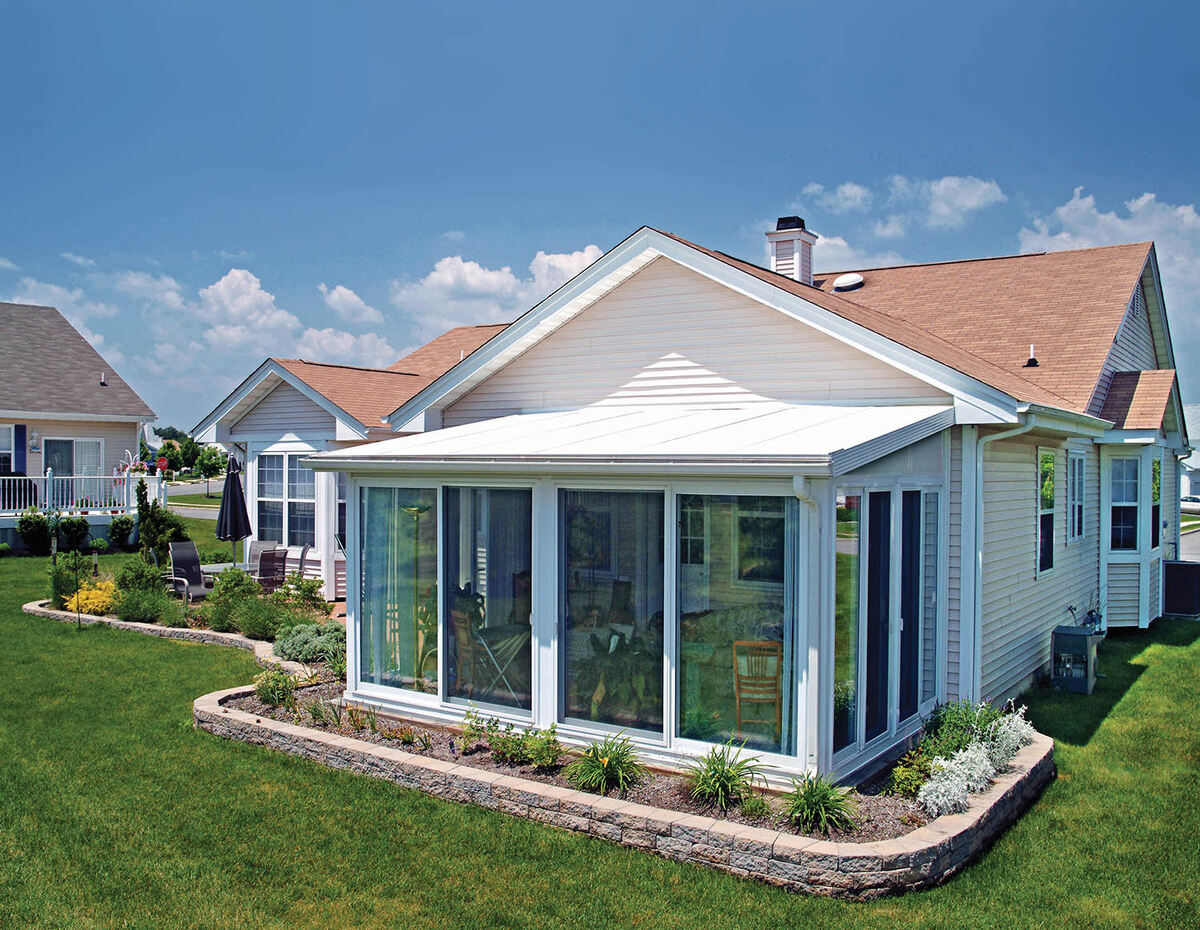
Welcome to our comprehensive guide on how to build a patio enclosure. If you’re looking to add an extra living space to your home, a patio enclosure is an excellent option. Not only does it provide protection from the elements, but it also allows you to enjoy the beauty of the outdoors while staying comfortable indoors. Whether you want a cozy sunroom or a spacious screened-in patio, this step-by-step guide will walk you through the process of successfully constructing your own patio enclosure.
Before we dive into the details, it’s important to note that building a patio enclosure is a significant undertaking that requires careful planning and preparation. It’s essential to have a clear vision of what you want to achieve and obtain any necessary permits and approvals from your local authorities.
In this guide, we’ll cover everything from the initial planning stages to the final finishing touches. By following these steps and guidelines, you’ll be well on your way to creating a beautiful and functional patio enclosure that you can enjoy for years to come.
So, grab your tools and let’s get started on this exciting project!
Key Takeaways:
- Planning and Design
Careful planning is essential when building a patio enclosure. Consider space, orientation, materials, and permits to create a functional and beautiful outdoor living space that meets your needs and local regulations. - Finishing Touches
Adding personal touches like furniture, lighting, and plants transforms a patio enclosure into a cozy oasis. Pay attention to details, keep it clean, and enjoy your extended outdoor living space.
Read more: How To Build A Brick Mailbox Enclosure
Step 1: Planning and Design
The first step in building a patio enclosure is to carefully plan and design your space. This involves considering factors such as the size and layout, as well as any specific features or requirements you have in mind. Here’s a breakdown of the key considerations:
- Space and Size: Evaluate the available space in your yard and determine the size of your patio enclosure. Consider the activities you plan to do in the space, such as dining, entertaining, or relaxing, and ensure you have enough room for furniture and movement.
- Orientation and Sun Exposure: Take note of the direction of the sun to maximize natural light and control heat. Consider the position of windows and doors to maximize airflow and take advantage of the surrounding views.
- Materials and Style: Decide on the materials you want to use for your patio enclosure. Options include glass, screen, or a combination of both. Consider the style that matches your home’s architecture and your personal preferences.
- Utilities and Wiring: If you plan to add lighting, heating, or electrical outlets, make sure to plan their locations during the design phase. Consult with an electrician if needed to ensure proper installation.
- Permits and Regulations: Research and obtain any necessary permits or approvals from your local building department. Familiarize yourself with the building codes and regulations that apply to patio enclosures in your area.
During the planning and design stage, it’s beneficial to create a detailed sketch or use design software to visualize your patio enclosure. This will help you make informed decisions and communicate your vision to contractors or builders if you decide to hire professional help.
Remember, the key to successful planning and design is to prioritize functionality, aesthetics, and compliance with local regulations. Invest time in this initial step to ensure a smoother construction process and a finished patio enclosure that meets your needs and exceeds your expectations.
Step 2: Obtaining Permits and Approvals
Before you start building your patio enclosure, it’s crucial to obtain the necessary permits and approvals from your local building department or municipality. This step ensures that your construction adheres to safety standards and complies with local regulations. Here’s what you need to consider:
- Research Local Regulations: Take the time to research and understand the specific regulations and building codes that apply to patio enclosures in your area. Consulting with your local building department or zoning board can provide you with the necessary guidelines and requirements.
- Permit Application: Contact your local building department to inquire about the permit application process. Gather all the required documentation, including blueprints, design plans, and other relevant information about your patio enclosure project.
- Submit Your Application: Fill out the permit application thoroughly, ensuring all details are accurate. Include any necessary fees and submit the application along with all supporting documentation to the building department. Some municipalities may require multiple copies of the application and plans.
- Review and Approval: Once your application is submitted, it will undergo a review process. The building department will assess your plans for compliance with regulations and safety standards. This review may take several weeks, depending on the workload of the department.
- Inspections: After your application is approved, you will need to schedule inspections throughout the construction process. These inspections ensure that your patio enclosure is being built according to the approved plans and adhere to all safety requirements. Typical inspection points include the foundation, electrical work, and insulation.
- Final Approval and Certificate of Occupancy: Once all inspections are passed, you will receive final approval and, in some cases, a certificate of occupancy. This certificate verifies that your patio enclosure is in compliance with all regulations and is safe for use.
It’s important to note that the permit and approval process may vary depending on your location. It’s crucial to familiarize yourself with the specific requirements in your area and to follow them diligently. Failure to obtain the necessary permits and approvals can result in costly fines and delays in your project.
By taking the time to navigate the permit and approval process correctly, you can ensure that your patio enclosure is built to code, meets safety standards, and provides you with a comfortable and enjoyable space for years to come.
Step 3: Gathering Materials and Tools
Now that you have planned your patio enclosure and obtained the necessary permits, it’s time to gather the materials and tools required for construction. Having everything you need on hand will make the building process smoother and more efficient. Here’s what you’ll need:
- Materials: The materials you’ll need will depend on the design and type of patio enclosure you’re building. Common materials include framing lumber, roofing material, siding, windows, and doors. If you’re unsure about the specific materials required, consult your design plans or seek advice from a local building supply store.
- Tools: Here are some essential tools you’ll need for constructing a patio enclosure:
- Measuring tape and level: For accurate measurements and ensuring everything is straight and level during installation.
- Hammers, screwdrivers, and drills: For fastening materials together firmly.
- Saw: Whether a circular saw, miter saw, or reciprocating saw, having a reliable saw will be essential for cutting materials to size.
- Nail gun or screw gun: These power tools can save you time and effort when attaching materials.
- Safety Equipment: It’s crucial to prioritize safety during construction. Make sure to have safety goggles, gloves, a hard hat, and sturdy footwear. Additionally, consider using ear protection if you’ll be working with loud power tools.
- Additional Supplies: Depending on your specific project, you may need additional supplies such as sealant, insulation, electrical wiring, and lighting fixtures. Consult your design plans and make a list of any additional items required.
Before you begin the construction process, take inventory of all the materials and tools you have gathered. Double-check that you have everything you need to avoid unnecessary delays during construction. It may be helpful to organize your materials and tools in a designated workspace to keep everything easily accessible and well-organized.
Lastly, ensure that you have a secure and weatherproof storage area for your materials. Protecting your supplies from moisture and the elements will help prevent damage and prolong their lifespan.
By taking the time to gather all the necessary materials and tools in advance, you’ll be well-prepared to tackle the construction of your patio enclosure efficiently and effectively.
Step 4: Preparing the Area
Before you can start building your patio enclosure, it’s essential to properly prepare the area where it will be constructed. This step ensures a solid foundation and sets the stage for a successful construction process. Here’s what you need to do to prepare the area:
- Clear the space: Remove any existing structures, vegetation, or debris from the area where your patio enclosure will be built. This includes plants, trees, rocks, and any other obstacles that may hinder the construction process.
- Level the ground: Use a shovel or a garden rake to level the ground where your patio enclosure will be located. Remove any uneven patches or debris to ensure a smooth and even surface. It’s crucial to have a level base to prevent any structural issues in the future.
- Mark the layout: Use stakes and string to mark the boundaries of your patio enclosure. This will help you visualize the size and shape of the structure, making it easier to plan and construct the frame.
- Consider drainage: Take into account the natural drainage patterns in your yard. If necessary, install a French drain or make adjustments to ensure proper water drainage away from your patio enclosure. This helps prevent water from pooling and causing damage to the structure.
- Check for utility lines: Before you start digging or excavating, contact your local utility companies to locate any underground utility lines like gas, electricity, or water. This will prevent any accidents or disruptions during construction.
- Prepare for the foundation: Depending on the design and construction method of your patio enclosure, you may need to prepare for a foundation. This can involve digging footings, installing concrete pads, or using precast piers. Refer to your design plans or consult with a professional if you’re unsure about the specific foundation requirements.
Properly preparing the area before building your patio enclosure ensures a stable and durable structure. It allows for a smooth construction process and reduces the likelihood of encountering issues or delays along the way.
Take the time to complete this step carefully, paying attention to details and following any specific instructions outlined in your design plans. By doing so, you’ll be well on your way to creating a sturdy foundation for your patio enclosure.
Read more: How To Build An Outdoor Cat Enclosure
Step 5: Building the Foundation
Building a solid foundation is a crucial step in constructing your patio enclosure. A well-built foundation provides stability and ensures the long-term durability of your structure. Here’s a step-by-step guide on how to build the foundation for your patio enclosure:
- Determine the foundation type: Depending on your design plans and local building codes, you may choose from a variety of foundation options. Common options include concrete footings, concrete slabs, or precast piers. Consult your plans or seek guidance from a professional to determine the most suitable foundation type for your project.
- Excavation: If your chosen foundation requires excavation, use a shovel, a backhoe, or hire a professional excavation service to dig the holes or trenches to the required depth and size. Ensure that the excavation is level and aligns with your marked layout.
- Install formwork: For concrete foundations, construct formwork using wooden boards or metal stakes and panels. The formwork should outline the shape and dimensions of the foundation. It will hold the concrete in place as it cures. Use a level to ensure the formwork is even and straight.
- Reinforcement: Depending on the size and type of your foundation, it may be necessary to reinforce the concrete with steel rebar. Consult your design plans to determine the reinforcement requirements and install the rebar accordingly.
- Pour and finish the concrete: Mix the concrete according to the manufacturer’s instructions, or hire a professional concrete contractor for this task. Pour the concrete into the formwork, ensuring it fills all the spaces evenly. Use a shovel and a trowel to smooth the surface and remove any air pockets. Allow the concrete to cure as per the recommended timeframe.
- Remove the formwork (if applicable): Once the concrete has cured, remove the formwork carefully. Use a pry bar or hammer to gently loosen the formwork from the concrete, taking care not to damage the foundation.
- Foundation inspection: Depending on local regulations, you may need to schedule a foundation inspection to ensure compliance with building codes. Contact your local building department to arrange for an inspection.
Building a proper foundation is essential for the structural integrity of your patio enclosure. Take the time to follow the steps carefully and consult with professionals if you have any doubts or questions. With a solid foundation in place, you can move on to the next steps of framing and constructing your patio enclosure.
When building a patio enclosure, make sure to use weather-resistant materials and consider adding a roof for protection from the elements. This will help to create a comfortable and durable outdoor space.
Step 6: Framing the Patio Enclosure
With the foundation in place, it’s time to move on to framing your patio enclosure. The framing provides the structure and support for your enclosure, allowing it to withstand the elements and stand strong for years to come. Here’s a step-by-step guide on how to frame your patio enclosure:
- Review the design plans: Consult your design plans to familiarize yourself with the specific measurements and dimensions for your patio enclosure. Be sure to understand the layout, wall heights, and any openings or cutouts required.
- Start with the walls: Begin by framing the walls of your patio enclosure. Measure and cut the vertical studs and horizontal plates according to your design plans. Use a level to ensure plumb and level walls, and secure the pieces together using nails or screws.
- Add door and window openings: If your patio enclosure includes doors or windows, frame the openings accordingly. Follow the measurements and guidelines provided in your design plans to ensure accurate placement and sizing.
- Secure the walls to the foundation: Once the walls are framed, securely attach them to the foundation using anchor bolts, screws, or brackets. This provides stability and ensures that the walls are securely connected to the ground.
- Construct the roof frame: Measure and cut the roof rafters according to your design plans. Use a level to ensure proper alignment, and secure the rafters in place using nails or screws. Install any additional framing members required to support the roof structure.
- Install support beams: Depending on the size of your patio enclosure and design plans, you may need to install additional support beams or posts. These provide extra stability and reinforcement for the roof structure. Follow the measurements and guidelines to properly place and secure these beams.
- Complete the framing details: Once the walls and roof frame are in place, complete any additional framing details as required by your design plans. This may include adding wall studs for interior partitions or framing for skylights or other desired features.
During the framing process, it’s crucial to double-check measurements, use a level for accuracy, and ensure proper connections and fastening. Taking the time to frame your patio enclosure correctly will result in a sturdy and well-built structure.
Remember to refer to your design plans frequently and consult with professionals if you have any questions or concerns. With the framing complete, you’re ready to move on to the next steps of installing the roofing and siding for your patio enclosure.
Step 7: Installing the Roofing and Siding
With the framing of your patio enclosure complete, it’s time to move on to installing the roofing and siding. The roofing and siding materials not only provide protection from the elements but also contribute to the overall aesthetics of your patio enclosure. Here’s a step-by-step guide on how to install the roofing and siding:
- Select the roofing material: Choose a roofing material that suits your design, budget, and climate. Popular options include shingles, metal roofing, or polycarbonate panels. Consider factors such as durability, maintenance requirements, and aesthetics.
- Prepare the roof: Ensure that the roof frame is ready to receive the roofing material. Repair any damaged or uneven portions of the frame and ensure that it is free from any debris or obstructions.
- Install the underlayment: Lay down a layer of roofing underlayment on the roof frame. This acts as a moisture barrier and provides additional protection against leaks. Secure the underlayment using roofing nails or staples.
- Install the roofing material: Follow the manufacturer’s instructions to install the chosen roofing material. Whether it requires nailing, screwing, or interlocking, ensure that each piece is properly aligned and securely attached.
- Select the siding material: Choose a siding material that complements the overall design of your patio enclosure. Options include wood, vinyl, fiber cement, or composite siding. Consider factors such as durability, maintenance requirements, and visual appeal.
- Prepare the walls: Make sure that the wall framing is prepared to receive the siding. Repair any damaged portions, apply a waterproof barrier if necessary, and ensure the walls are clean and free from debris.
- Install the siding: Follow the manufacturer’s instructions to properly install the chosen siding material. Whether it requires nailing, screwing, or snapping into place, ensure that each piece is properly aligned and securely attached. Pay attention to any specific requirements for corner pieces or trim.
- Complete finishing touches: Once all the roofing and siding materials are installed, take the time to inspect the work and make any necessary adjustments. Check for proper alignment, secure any loose pieces, and ensure that all edges are properly finished.
During the installation process, pay attention to any specific guidelines or recommendations provided by the manufacturer for your chosen roofing and siding materials. Take extra care to properly align and secure each piece to ensure a professional and well-finished result.
With the roofing and siding installed, your patio enclosure is now taking shape. The next steps will involve adding doors, windows, insulation, and finishing touches to complete the transformation of your outdoor living space.
Step 8: Adding Doors and Windows
Now that your patio enclosure is taking form with the roofing and siding in place, it’s time to focus on adding the doors and windows. Doors provide access to your patio enclosure, while windows bring in natural light and allow for ventilation. Here’s a step-by-step guide on how to add doors and windows to your patio enclosure:
- Plan door and window placement: Review your design plans and determine the optimal locations for doors and windows in your patio enclosure. Consider factors such as functionality, aesthetics, and the direction of natural light.
- Measure and prepare the openings: Take accurate measurements of the door and window openings. Cut or frame the openings according to the manufacturer’s recommendations and the specific dimensions provided in your design plans.
- Install the door frames: Begin by installing the frames for your doors. Follow the manufacturer’s instructions to ensure proper alignment and secure attachment to the surrounding framing. Use shims and a level to ensure the door frame is plumb and level.
- Hang the doors: Install the doors into the frames, ensuring they fit snugly and open and close smoothly. Follow the manufacturer’s instructions for attaching the hinges, handles, and any other hardware. Make any necessary adjustments to ensure proper alignment and a secure fit.
- Install window frames: Similar to the door frames, install the frames for your windows according to the manufacturer’s instructions. Ensure that they fit securely in the prepared openings, and use shims and a level to ensure proper alignment. Seal any gaps between the frame and the opening to prevent drafts and water infiltration.
- Insert the windows: Install the windows into the frames, following the manufacturer’s instructions for your specific type of windows. Secure them properly and ensure they open and close smoothly. Seal any gaps around the windows to provide insulation and weatherproofing.
- Test and adjust: Open and close the doors and windows to test their functionality. Make any necessary adjustments to hinges, latches, or weatherstripping to ensure a proper fit and airtightness.
Adding doors and windows to your patio enclosure not only enhances its functionality but also creates a seamless integration with the outdoors. Take the time to carefully install and adjust each door and window to ensure proper operation and a beautiful finished appearance.
With doors and windows added, your patio enclosure is nearing completion. The next step involves insulating and weatherproofing to ensure comfort and protection in your new outdoor living space.
Read more: How To Build An Outdoor Tv Enclosure
Step 9: Insulating and Weatherproofing
Insulating and weatherproofing your patio enclosure is a crucial step to ensure comfort, energy efficiency, and protection from the elements. Proper insulation helps maintain a comfortable temperature inside the enclosure, while weatherproofing prevents water infiltration and air leaks. Here’s a step-by-step guide on how to insulate and weatherproof your patio enclosure:
- Choose insulation materials: Select insulation materials suitable for your climate and the construction of your patio enclosure. Common options include fiberglass batts, rigid foam boards, or spray foam insulation. Consult your local building codes and manufacturers’ recommendations.
- Install insulation: Carefully install insulation in the walls, ceiling, and any other areas as per the manufacturer’s instructions. Pay attention to proper insulation coverage, avoiding gaps and compressions that could reduce effectiveness. Ensure insulation extends to the edges and corners of the enclosure.
- Seal air leaks: Use caulk, weatherstripping, or expanding foam to seal any gaps or cracks in the framing or around windows and doors. Pay close attention to areas where air may leak in, such as corners, joints, and penetrations. This will help improve energy efficiency and reduce drafts.
- Install vapor barrier: If recommended for your climate, install a vapor barrier on the warm side (interior) of the walls to prevent moisture diffusion. This barrier helps protect against condensation and moisture-related issues.
- Weatherproof windows and doors: Apply weatherstripping or caulking around windows and doors to create a tight seal and prevent water infiltration. Ensure that windows and doors have proper flashing and drip edges to promote drainage and keep water away from the framing.
- Consider roof insulation: If your patio enclosure has a solid roof, consider insulating the roof as well. This can help regulate temperatures and reduce heat transfer from the outside. Consult with professionals if you’re unsure about the best insulation options for your specific roof type.
- Check for any additional insulation needs: Assess your patio enclosure for any areas that may require additional insulation, such as corners, transition points, or exposed walls. Address these areas accordingly to ensure thorough insulation coverage.
Taking the time to properly insulate and weatherproof your patio enclosure provides several benefits, including improved energy efficiency, enhanced comfort, and protection against moisture and weather-related damage. It’s an essential step to make your enclosed space functional and enjoyable year-round.
With insulation and weatherproofing complete, your patio enclosure is almost ready for final touches and decoration. The next step involves adding those finishing touches to transform your newly built structure into a cozy and inviting outdoor living space.
Step 10: Finishing Touches and Decoration
Congratulations! You’ve reached the final step of building your patio enclosure. Now it’s time to add the finishing touches and inject your personal style with decoration. These details will truly make your patio enclosure feel like an inviting and comfortable outdoor living space. Here’s how to complete this step:
- Flooring: Choose a flooring material that suits your design aesthetic and functional needs. Options include concrete, tile, wood, or outdoor carpeting. Ensure that the flooring is durable, easy to clean, and suitable for outdoor use.
- Paint or stain: Consider painting or staining the walls and framing of your patio enclosure to enhance its appearance and protect the materials. Use paint or stain appropriate for outdoor use that complements your design and matches the overall style of your home.
- Furniture and seating: Select comfortable and weather-resistant furniture for your patio enclosure. Consider the space available and how you plan to use it. Options include sofas, chairs, dining sets, and loungers. Add cushions and pillows for added comfort and style.
- Lighting: Install outdoor lighting to create a warm and inviting ambiance in the evenings. Options include string lights, lanterns, solar-powered lights, or recessed lighting. Strategically place lighting fixtures to highlight specific areas or create a cozy atmosphere.
- Window treatments: If you have windows in your patio enclosure, consider adding window treatments for privacy and sun control. Options include blinds, shades, curtains, or decorative film. Choose materials that are resistant to moisture, sunlight, and temperature fluctuations.
- Plants and greenery: Introduce plants and greenery to your patio enclosure to bring life and a refreshing atmosphere. Select plants that thrive in the lighting conditions and temperatures of your enclosure. Consider potted plants, hanging baskets, or a vertical garden to maximize space.
- Accessories and décor: Add personal touches and decorative elements to make your patio enclosure feel like an extension of your home. Consider outdoor rugs, artwork, outdoor-friendly accessories, and decorative accents that reflect your style and personality.
- Entertainment options: If desired, include entertainment options such as a sound system, television, or outdoor speakers. Ensure that these are designed for outdoor use and properly protected from the elements.
- Keep it clean and maintained: Regularly clean and maintain your patio enclosure to keep it in top shape. Remove debris, wash surfaces, check for any needed repairs, and keep furniture and accessories clean and well-maintained.
By paying attention to the details and adding your personal touch, you can transform your patio enclosure into a cozy and inviting outdoor oasis. Enjoy spending time in this extended living space, whether it’s for relaxation, entertaining guests, or simply enjoying the beauty of the outdoors.
With the finishing touches and decoration complete, you have successfully built your patio enclosure from start to finish. Congratulations on creating a functional and beautiful space that adds value to your home and enhances your outdoor living experience!
Conclusion
Building a patio enclosure is an exciting project that can greatly enhance your outdoor living experience. By following the step-by-step guide outlined in this article, you’ve learned how to plan, design, and construct your own patio enclosure. From obtaining permits and gathering materials to framing, roofing, and adding the finishing touches, each step is essential in creating a beautiful and functional space.
Throughout the process, it’s important to prioritize safety, adhere to local regulations, and consult professionals when needed. Proper planning, careful execution, and attention to detail will ensure that your patio enclosure is structurally sound and built to last.
Additionally, don’t forget to infuse your personal style and creativity into the design and decoration of your patio enclosure. Selecting the right materials, furniture, lighting, and accessories will make your space feel inviting, comfortable, and reflective of your unique taste.
Once your patio enclosure is complete, be sure to maintain it regularly and keep it clean. This will help preserve its beauty and functionality over time. Enjoy your new outdoor living space, whether it’s for relaxation, hosting gatherings, or simply enjoying the natural beauty of your surroundings.
Remember, building a patio enclosure requires careful planning, proper execution, and attention to detail. If you feel overwhelmed or unsure about certain aspects of the project, don’t hesitate to consult with professionals or seek guidance from experienced individuals.
Now that you have the knowledge and guidance, it’s time to embark on this exciting endeavor and create the perfect patio enclosure that will bring joy and functionality to your outdoor spaces for years to come.
Frequently Asked Questions about How To Build A Patio Enclosure
Was this page helpful?
At Storables.com, we guarantee accurate and reliable information. Our content, validated by Expert Board Contributors, is crafted following stringent Editorial Policies. We're committed to providing you with well-researched, expert-backed insights for all your informational needs.


0 thoughts on “How To Build A Patio Enclosure”