Home>Storage Ideas>Bedroom Storage>How To Get Ink Out Of A Dryer
Bedroom Storage
How To Get Ink Out Of A Dryer
Modified: August 24, 2024
Learn how to effectively remove ink stains from your dryer with these simple and practical tips. Keep your bedroom-storage space clean and free from unwanted stains.
(Many of the links in this article redirect to a specific reviewed product. Your purchase of these products through affiliate links helps to generate commission for Storables.com, at no extra cost. Learn more)
Introduction
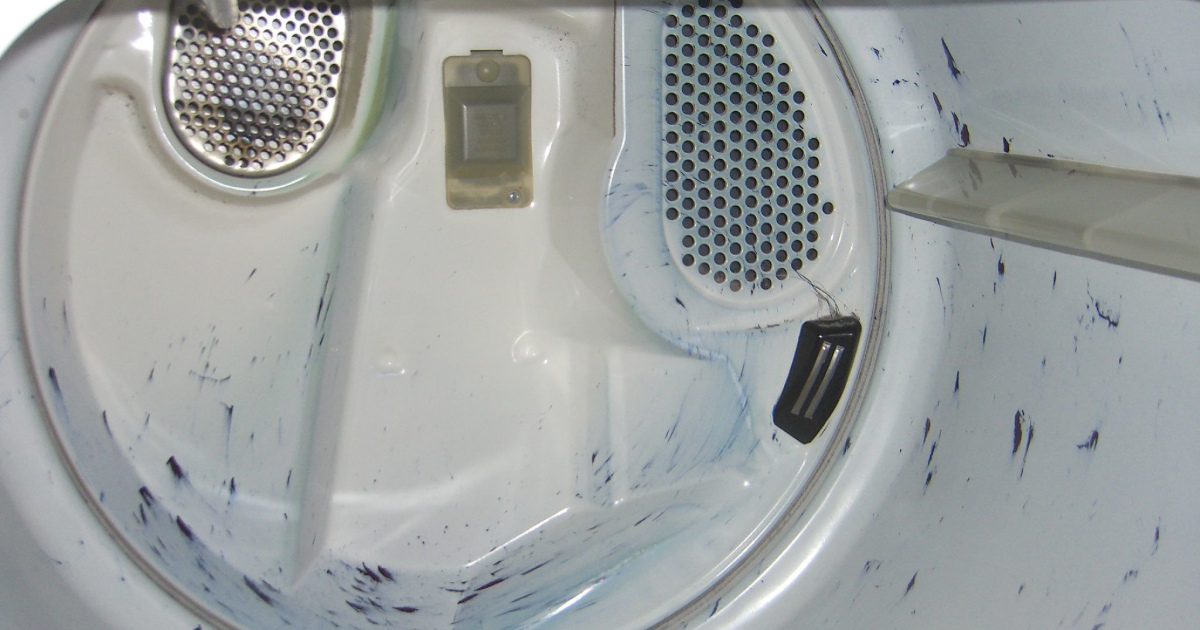
Welcome to this comprehensive guide on how to effectively remove ink stains from a dryer. We’ve all experienced the frustration of discovering a forgotten pen or marker in the laundry, resulting in unsightly ink stains on our clothes and even worse, on the interior of our dryer. Fortunately, with the right materials and techniques, you can successfully remove these stubborn ink stains and restore your dryer to its pristine condition.
Dealing with ink stains can be a daunting task, but don’t panic. With a little patience and the proper cleaning methods, you can effectively tackle the problem. In this article, we will guide you through the step-by-step process of removing ink stains from your dryer, ensuring that you can get rid of this pesky problem and prevent it from happening again in the future.
It’s important to note that different types of ink stains may require slightly different approaches for removal. However, the methods outlined in this guide are versatile and can generally be applied to remove various types of ink stains from your dryer. So, let’s dive in and discover how to restore your dryer to its original state!
Key Takeaways:
- Say goodbye to ink stains in your dryer by using rubbing alcohol, mild dish soap, and warm water. Follow the step-by-step process to restore your dryer’s pristine condition and enjoy fresh, clean laundry.
- Prioritize safety, act quickly, and be patient when removing ink stains from your dryer. Follow the additional tips to prevent future stains and maintain your dryer’s longevity and functionality.
Read more: How To Get Ink Out Of Clothes
Removing Ink Stains from a Dryer
When it comes to removing ink stains from a dryer, it’s crucial to act quickly. The longer the ink sits on the surfaces, the more difficult it becomes to remove. Here are the steps you need to follow:
- Gather the necessary materials: Before starting the cleaning process, gather the following materials: rubbing alcohol, clean cloths or microfiber towels, cotton balls or cotton pads, an old toothbrush, mild dish soap, and warm water.
- Safety precautions: Before working on your dryer, make sure to unplug it from the power source. This step ensures your safety and prevents any accidental activation of the dryer during the cleaning process.
- Cleaning solution preparation: In a small bowl, mix equal parts rubbing alcohol and warm water. This solution will serve as the primary cleaning agent for removing the ink stains.
- Applying the cleaning solution: Dip a clean cloth or cotton ball into the cleaning solution. Gently dab the ink-stained areas in the dryer, ensuring full coverage. Avoid scrubbing vigorously as this may spread the ink further.
- Gentle scrubbing: For more resistant ink stains, use an old toothbrush dipped in the cleaning solution to gently scrub the affected areas. Be careful not to apply too much pressure, as it may damage the surfaces of your dryer.
- Wiping the dryer interior: Take a clean cloth or microfiber towel and moisten it with warm water. Wipe down the interior of the dryer, focusing on the areas where the cleaning solution was applied. This step helps to remove any residual ink and cleaning solution.
- Removing excess cleaning solution: Dampen a cloth or cotton pad with clean water and use it to remove any excess cleaning solution from the dryer surfaces.
- Final cleaning: To ensure there is no residue left, use a mild dish soap mixed with warm water. Dip a clean cloth or sponge into the soapy water and wipe down the interior of the dryer. Rinse with a damp cloth afterwards to remove any remaining soap and dry thoroughly.
By following these steps, you can effectively remove ink stains from your dryer without causing any damage to its surfaces. However, it’s important to note that some ink stains may require multiple cleaning attempts, especially if they have been sitting for a long time. Don’t get discouraged if the stains are not fully removed on the first try.
Materials Needed
Before you start the process of removing ink stains from your dryer, it’s important to gather the necessary materials. Here’s what you’ll need:
- Rubbing Alcohol: This will be the main cleaning agent for removing the ink stains. Look for a rubbing alcohol with a concentration of at least 70%.
- Clean Cloths or Microfiber Towels: These will be used to apply the cleaning solution and wipe down the dryer surfaces.
- Cotton Balls or Cotton Pads: These small absorbent materials are useful for applying the cleaning solution to smaller ink-stained areas.
- Old Toothbrush: A soft-bristled toothbrush will come in handy for gently scrubbing more stubborn ink stains.
- Mild Dish Soap: This will be used for the final cleaning of the dryer interior to ensure all the ink and cleaning solution residue is removed.
- Warm Water: Warm water will be needed for various steps in the cleaning process, such as diluting the rubbing alcohol and rinsing off cleaning solution and soap.
These materials are readily available and inexpensive, making it easy for you to gather them before starting the ink stain removal process. It’s important to note that using the right materials will help ensure the effectiveness of the cleaning process while protecting the surfaces of your dryer from damage.
Once you have gathered all the necessary materials, you can proceed with the step-by-step process of removing ink stains from your dryer. Remember to follow the instructions carefully and take the necessary safety precautions to avoid any accidents while working on your appliance.
Step 1: Safety Precautions
Before you begin the process of removing ink stains from your dryer, it’s crucial to prioritize safety. By taking the following precautions, you can ensure a safe and effective cleaning experience:
- Unplug the Dryer: Start by disconnecting your dryer from the power source. This step eliminates the risk of accidental activation of the appliance while you’re working on it.
- Protective Gloves: Put on a pair of protective gloves to shield your hands from any potential chemicals or cleaning agents that may come into contact with your skin during the cleaning process.
- Well-Ventilated Area: Make sure you are working in a well-ventilated area. Open windows or turn on fans to ensure proper air circulation. This helps to minimize the inhalation of fumes from the cleaning agents.
- Protective Eyewear: Consider wearing protective eyewear, such as safety goggles, to shield your eyes from splatters or potential splashes of cleaning agents.
- Read and Follow the Instructions: Carefully read the labels and instructions on the cleaning agents you will be using. Follow the recommended dilution ratios and safety guidelines to avoid any accidents.
- Avoid Harsh Chemicals: Stick to using mild cleaning agents and avoid harsh chemicals that may damage the surfaces of your dryer. Opt for substances like rubbing alcohol and mild dish soap, which are effective yet gentle on your appliance.
- No Smoking: Avoid smoking or exposing any open flames near the cleaning area, as some cleaning agents are highly flammable.
By following these safety precautions, you can ensure that you’re taking the necessary steps to protect yourself, your appliance, and your surroundings. Safety should always be the top priority when working with cleaning agents and appliances.
Now that you’ve taken the necessary safety measures, you’re ready to move on to the next step: preparing the cleaning solution to remove the ink stains from your dryer.
Step 2: Cleaning Solution Preparation
Now that you’ve taken the necessary safety precautions, it’s time to prepare the cleaning solution that will effectively remove the ink stains from your dryer. Follow these steps to create the cleaning solution:
- Gather the Required Materials: For preparing the cleaning solution, you will need rubbing alcohol, warm water, and a small bowl or container.
- Mix the Rubbing Alcohol and Warm Water: In the small bowl or container, combine equal parts rubbing alcohol and warm water. The rubbing alcohol acts as a solvent, breaking down the ink stains for easier removal.
- Stir the Mixture: Use a spoon or stirrer to thoroughly mix the rubbing alcohol and warm water. The goal is to create a well-blended solution that will effectively tackle the ink stains.
It’s important to note that the ratio of rubbing alcohol to warm water can vary depending on the severity of the ink stains. For lighter stains, you can opt for a slightly higher ratio of water to rubbing alcohol. However, for more stubborn stains, a higher concentration of rubbing alcohol may be necessary.
The cleaning solution you’ve prepared is a powerful and versatile agent that will help break down the ink stains on the surfaces of your dryer. It’s now time to move on to the next step: applying the cleaning solution to the ink-stained areas of the dryer.
Step 3: Applying the Cleaning Solution
With the cleaning solution prepared, it’s time to apply it to the ink-stained areas of your dryer. Follow these steps to effectively apply the solution:
- Gather Clean Cloths or Cotton Balls: Retrieve clean cloths or cotton balls to use for applying the cleaning solution. These materials will help distribute the solution evenly and prevent any excess liquid from dripping.
- Dip the Cloth or Cotton Ball into the Cleaning Solution: Submerge the cloth or cotton ball into the cleaning solution until it is fully saturated. Make sure to wring out any excess liquid to avoid dripping.
- Dab the Ink-Stained Areas: Gently dab the ink-stained areas of the dryer with the saturated cloth or cotton ball. Ensure that the solution fully covers the ink stains. Take care not to rub or scrub vigorously, as this can spread the ink further.
- Continue Applying the Solution: If necessary, dip the cloth or cotton ball back into the cleaning solution to ensure a consistent application. Reapply to any remaining ink stains until all affected areas are covered.
By following these steps, you are effectively using the cleaning solution to break down the ink stains and prepare them for removal. The rubbing alcohol in the solution acts as a solvent, loosening the ink and making it easier to remove.
Remember, it’s important to be gentle during this process to avoid damaging the dryer’s surfaces. Avoid using excessive force or scrubbing too vigorously, as this can cause scratches or further spread the ink stains.
Once you have applied the cleaning solution to the ink-stained areas, it’s time to move on to the next step: gently scrubbing the stains for deeper penetration and removal.
To remove ink from a dryer, try using rubbing alcohol or nail polish remover on a cotton ball to gently wipe away the stain. Make sure to ventilate the area and wipe down with a damp cloth afterwards.
Step 4: Gentle Scrubbing
After applying the cleaning solution to the ink-stained areas of your dryer, it’s time to gently scrub the stains for deeper penetration and removal. Follow these steps to ensure effective scrubbing:
- Retrieve an Old Toothbrush: Get an old toothbrush with soft bristles that you have set aside specifically for cleaning purposes. Using a dedicated toothbrush helps prevent cross-contamination.
- Dip the Toothbrush into the Cleaning Solution: Dip the bristles of the toothbrush into the cleaning solution, ensuring they are saturated. Take care not to overload the toothbrush, as an excess amount of solution may drip onto other parts of the dryer.
- Gently Scrub the Ink-Stained Areas: Using gentle circular motions, scrub the ink-stained areas of the dryer. Focus on areas where the stains are particularly stubborn. Applying slight pressure with the bristles will help dislodge the ink from the surface.
- Avoid Scratching the Surface: Be cautious not to scrub too aggressively or use a toothbrush with hard bristles, as this can scratch or damage the surface of your dryer. The goal is to loosen and remove the ink stains, not damage the appliance.
Gentle scrubbing allows the cleaning solution to penetrate deeper into the ink stains, helping to break them down and remove them from the dryer’s surface. Remember, patience and a delicate touch are key to successfully removing the stains without causing any harm.
If you encounter more resistant ink stains, continue scrubbing gently with the toothbrush, occasionally reapplying the cleaning solution as needed. However, refrain from excessive scrubbing, as it may cause the ink to spread or embed further into the surface.
Once you have gently scrubbed the ink-stained areas, it’s time to move on to the next step: wiping down the interior of the dryer to remove the loosened ink and cleaning solution residue.
Step 5: Wiping the Dryer Interior
After gently scrubbing the ink-stained areas of your dryer, it’s time to wipe down the interior to remove the loosened ink and cleaning solution residue. Follow these steps to ensure a thorough cleaning:
- Get a Clean Cloth or Microfiber Towel: Retrieve a clean cloth or microfiber towel that is specifically designated for this task. A soft and absorbent material will effectively wipe away the loosened ink and cleaning solution.
- Moisten the Cloth or Towel: Dampen the cloth or towel with warm water. Ensure it is moist but not dripping wet. Excess water may cause unnecessary mess or damage to the dryer.
- Wipe Down the Interior: Use the damp cloth or towel to wipe down the interior of the dryer, focusing on the areas where the cleaning solution was applied. Gently scrub any remaining ink stains while ensuring thorough coverage of the entire interior.
- Pay Attention to Corners and Crevices: Don’t forget to clean hard-to-reach corners and crevices where residual ink or cleaning solution may have accumulated. Ensure that every nook and cranny is wiped down for a complete cleaning.
- Change the Cloth or Towel if Necessary: If the cloth or towel becomes heavily soiled during the wiping process, consider replacing it with a fresh one. This ensures that you are effectively cleaning the interior without spreading any ink residue.
Wiping down the interior of the dryer with a damp cloth helps remove any residual ink, cleaning solution, or loosened debris. The warm water aids in breaking down and lifting the remaining stain and cleaning agent.
Take your time and be thorough when wiping down the interior, as this step plays a crucial role in the overall cleaning process. Once you have finished wiping the dryer interior, it’s time to move on to the next step: removing any excess cleaning solution from the surfaces.
Step 6: Removing Excess Cleaning Solution
After wiping down the interior of your dryer, it’s important to remove any excess cleaning solution that may have accumulated on the surfaces. Follow these steps to ensure all residue is thoroughly removed:
- Get a Clean Cloth or Cotton Pad: Retrieve a fresh and clean cloth or cotton pad for this step. Ensure that it is free from any previous ink or cleaning solution residue.
- Dampen the Cloth or Pad: Moisten the cloth or cotton pad with clean water. It should be slightly damp but not excessively wet to avoid spreading excess moisture.
- Gently Wipe the Surfaces: Use the damp cloth or pad to gently wipe the surfaces of the dryer, paying close attention to the areas where the cleaning solution was applied. This step helps remove any residual cleaning solution remaining on the surfaces.
- Change the Cloth or Pad if Necessary: If the cloth or pad becomes saturated with cleaning solution or ink residue, replace it with a clean one. This ensures that you’re effectively removing any remaining residue without transferring it back onto the dryer.
Removing excess cleaning solution is essential to prevent any potential damage or stains on your dryer. It also ensures that the surfaces are left clean and ready for further cleaning or future use.
Take your time and be thorough during this step, ensuring that you have removed all traces of the cleaning solution. By eliminating excess solution, you minimize the risks of it drying on the surfaces and causing further staining or residue.
Once you have successfully removed the excess cleaning solution, it’s time to move on to the final cleaning step to ensure a pristine dryer interior.
Step 7: Final Cleaning
Now that you have removed the excess cleaning solution from your dryer, it’s time to perform a final cleaning to ensure a pristine interior. Follow these steps to complete the process:
- Mix Mild Dish Soap with Warm Water: In a small bowl or container, mix a small amount of mild dish soap with warm water. This gentle cleaning solution will help remove any remaining residue and leave your dryer fresh and clean.
- Dip a Clean Cloth or Sponge into the Soapy Water: Wet a clean cloth or sponge with the soapy water solution. Ensure that it is well saturated but not dripping.
- Wipe Down the Interior of the Dryer: Use the soapy cloth or sponge to wipe down the interior of the dryer. Pay attention to any areas that may still show signs of residue or staining.
- Rinse with a Damp Cloth: After wiping down the interior with the soapy cloth, rinse it with a damp cloth to remove any remaining soap residue. Ensure that you remove all traces of soap to prevent any potential residue from transferring onto your clothes during future use.
- Dry Thoroughly: To complete the final cleaning, be sure to dry the interior of the dryer thoroughly. Use a clean, dry cloth or allow the dryer to air dry naturally before using it again.
The final cleaning step ensures that your dryer is not only free from ink stains but also thoroughly cleaned and ready for use. This step helps eliminate any residual cleaning agents or soap that may have been left behind during the previous steps.
Take your time while performing the final cleaning step to ensure that you cover all areas of the interior. Wiping down with the soapy water solution and rinsing with a damp cloth leaves your dryer fresh, clean, and ready for your next load of laundry.
Congratulations! You have successfully completed the process of removing ink stains from your dryer. By following these steps, you can restore your dryer’s interior to its original clean and pristine state.
Before using your dryer again, be sure to check that there are no remaining ink stains or residue. Doing so will help maintain the quality of your clothes and prevent any further staining or damage.
Remember, prevention is always better than cure. To avoid future ink stains, ensure that you thoroughly check your pockets and remove any pens or markers before placing your clothes in the dryer.
With a little effort and the right techniques, you can keep your dryer in optimal condition and enjoy fresh, clean laundry every time!
Additional Tips and Precautions
While following the above steps will help you effectively remove ink stains from your dryer, here are some additional tips and precautions to keep in mind:
- Act Quickly: The sooner you address the ink stains, the easier they will be to remove. If you discover an ink stain, try to clean it as soon as possible to prevent the ink from setting and becoming more challenging to remove.
- Test in an Inconspicuous Area: Before using any cleaning solutions or techniques on your dryer’s interior, it’s a good idea to test them in a small, inconspicuous area. This ensures that they do not cause any damage or discoloration to the surfaces.
- Patience is Key: Removing ink stains from a dryer can be a time-consuming process. It may require multiple attempts and some persistence. Be patient and allow the cleaning solutions and techniques to work their magic.
- Avoid Abrasive Cleaning Tools: When cleaning your dryer, avoid using abrasive cleaning tools, such as steel wool or harsh brushes. These can scratch or damage the surfaces. Stick to soft cloths, microfiber towels, and soft-bristled toothbrushes.
- Keep the Dryer Vent Clean: Regularly clean the dryer vent to ensure proper airflow. A clogged vent can increase the risk of fire and reduce the efficiency of your dryer. Follow the manufacturer’s recommendations for maintenance and cleaning.
- Follow Manufacturer’s Guidelines: Always refer to the manufacturer’s guidelines and instructions for proper cleaning and maintenance of your specific dryer model. These guidelines may have specific recommendations or cautionary notes to keep in mind.
- Monitor the Drying Process: After cleaning your dryer, run a few cycles of empty loads to ensure that any residual cleaning solution or ink stains are completely removed. Monitor the drying process to ensure there are no unusual smells or signs of leftover substances.
- Prevent Future Ink Stains: To prevent future ink stains, check all pockets thoroughly before placing clothes in the dryer. Keep writing instruments away from your laundry area and develop a habit of taking them out of your pockets before doing laundry.
By following these additional tips and precautions, you can ensure a successful and safe ink stain removal process while maintaining the longevity and functionality of your dryer.
Remember, if you’re uncertain about tackling stubborn or extensive ink stains yourself, it’s best to consult a professional appliance repair service for assistance.
With proper care and regular maintenance, your dryer will continue to provide efficient and reliable performance, giving you clean and fresh laundry for years to come!
Conclusion
Removing ink stains from a dryer can be a challenging task, but with the right materials, techniques, and a bit of patience, it is definitely achievable. By following the step-by-step process outlined in this guide, you can effectively eliminate ink stains and restore your dryer’s interior to its original pristine condition.
Remember to prioritize safety throughout the cleaning process, taking precautions such as unplugging the dryer, wearing protective gloves and eyewear, and working in a well-ventilated area. Additionally, it’s important to use the right materials and follow the manufacturer’s guidelines to avoid causing damage to your dryer’s surfaces.
The key steps involved in removing ink stains from a dryer include preparing a cleaning solution using rubbing alcohol and warm water, applying the solution to the stained areas, gently scrubbing with an old toothbrush, and wiping down the interior with a clean cloth or microfiber towel. It’s essential to remove any excess cleaning solution and perform a final cleaning using mild dish soap and warm water to leave your dryer spotless.
Throughout the process, these additional tips and precautions will help ensure successful stain removal and prevent future incidents. Acting quickly, testing cleaning solutions in inconspicuous areas, and maintaining a clean dryer vent are just a few practices to keep in mind.
By incorporating these strategies into your laundry routine, you can minimize the risk of ink stains and maintain the cleanliness and functionality of your dryer. Remember, prevention is key, so always double-check your pockets before loading clothes into the dryer to avoid any potential mishaps.
In conclusion, with a little know-how and the right approach, you can tackle ink stains and keep your dryer in excellent condition. Now, armed with this comprehensive guide, you’re ready to confidently tackle any ink stains that may come your way and enjoy fresh, clean laundry every time.
Frequently Asked Questions about How To Get Ink Out Of A Dryer
Was this page helpful?
At Storables.com, we guarantee accurate and reliable information. Our content, validated by Expert Board Contributors, is crafted following stringent Editorial Policies. We're committed to providing you with well-researched, expert-backed insights for all your informational needs.


0 thoughts on “How To Get Ink Out Of A Dryer”