Articles
How Long Does It Take To Install Blinds
Modified: August 28, 2024
Looking for information on how long it takes to install blinds? Check out our comprehensive articles on the subject for expert tips and advice.
(Many of the links in this article redirect to a specific reviewed product. Your purchase of these products through affiliate links helps to generate commission for Storables.com, at no extra cost. Learn more)
Introduction
Installing blinds in your home can be an excellent way to enhance privacy, regulate sunlight, and add a touch of style to your windows. However, before you embark on this project, it is crucial to understand how long it typically takes to install blinds and the various factors that can influence the installation process.
While the actual time can vary depending on several factors such as the type of blinds, the number of windows, and your level of experience, this article will provide you with a comprehensive guide to help you estimate the time required for installing blinds effectively.
By knowing what to expect, you can better plan your project and ensure that the installation is completed efficiently, allowing you to enjoy the benefits of your new blinds as soon as possible.
Key Takeaways:
- Factors such as the number of windows, type of blinds, and mounting surface can influence the time it takes to install blinds. Careful planning and consideration of these factors are crucial for an efficient installation process.
- Prioritize safety, take accurate measurements, and follow manufacturer’s instructions to avoid common mistakes during blinds installation. Patience and attention to detail are key to a successful and hassle-free installation experience.
Read more: How Long Does Carpet Installation Take
Factors that Affect Installation Time
Several factors can influence the time it takes to install blinds in your home. By understanding these factors, you can better assess how long the installation process may take for your specific project. Here are some key factors to consider:
1. Number of Windows:
The more windows you have, the longer it will take to install blinds. Each window requires measuring, drilling, and mounting the blinds, which can add significant time to the overall installation process.
2. Type of Blinds:
The type of blinds you choose can also impact the installation time. Some blinds, such as roller blinds or cellular shades, are relatively simple to install and require minimal time and effort. On the other hand, more complex blinds like Roman shades or motorized blinds may require additional steps and specialized tools, thus increasing the installation time.
3. Window Size and Shape:
The size and shape of your windows can affect the installation time. Standard-sized rectangular windows are usually easier to work with and install blinds, while windows with unconventional shapes or sizes can require more precise measurements and adjustments, thus taking longer to install.
4. Mounting Surface:
The type of mounting surface also plays a role in the installation time. Installing blinds on wood or drywall is generally easier and quicker compared to mounting them on concrete, tile, or metal surfaces. Specialized tools and techniques may be needed for non-traditional mounting surfaces, which can prolong the installation process.
5. Experience Level:
Your level of experience with DIY projects and blinds installation can significantly affect the time it takes to complete the task. If you are a beginner, you may need more time to familiarize yourself with the process, whereas experienced individuals may be able to complete the installation more swiftly.
It is important to take these factors into account when estimating the time required for installing blinds in your home. By considering these variables, you can better prepare for the installation process and allocate the necessary time and resources for a successful outcome.
Types of Blinds
Blinds come in various styles and materials, each offering unique benefits and aesthetic appeal. Understanding the different types of blinds can help you choose the right option for your windows and determine the complexity of the installation process. Here are some common types of blinds:
1. Venetian Blinds:
Venetian blinds consist of horizontal slats that can be tilted to control light and privacy. They are usually made of aluminum, wood, or faux wood materials. The installation of Venetian blinds is generally straightforward and can be done with basic tools.
2. Vertical Blinds:
Vertical blinds consist of vertical slats that can be rotated to allow light in or block it completely. These blinds are commonly used for large windows or sliding glass doors. The installation of vertical blinds can vary depending on the design and mounting options.
3. Roller Blinds:
Roller blinds are made of a single piece of fabric that can be rolled up or down to control light and privacy. They are easy to install and are available in a wide range of colors and patterns, making them a popular choice for many homeowners.
4. Roman Blinds:
Roman blinds are soft fabric shades that fold up in horizontal pleats when raised. They add an elegant touch to any room but may require more complex installation due to the need for precise measurements and mounting hardware.
5. Cellular Shades:
Cellular shades, also known as honeycomb shades, are energy-efficient blinds with insulating properties. They feature a unique cellular construction that traps air, providing better insulation for your windows. The installation of cellular shades is generally straightforward, although the delicate nature of the blinds requires careful handling.
6. Motorized Blinds:
Motorized blinds allow for convenient control and automation. These blinds can be operated using a remote control, smartphone app, or even integrated with smart home systems. The installation of motorized blinds may require additional expertise and electrical work depending on the specific model and integration.
Keep in mind that each type of blind may have unique installation requirements. It is essential to read the manufacturer’s instructions carefully and, if needed, consult with professionals or experienced individuals for guidance to ensure a successful and efficient installation.
Tools and Materials Needed
Before you begin the installation process, it is important to gather all the necessary tools and materials. Having the right equipment on hand will ensure a smoother and more efficient installation. Here are some common tools and materials you may need:
1. Tape Measure:
A tape measure is essential for accurately measuring the dimensions of your windows and blinds, ensuring a proper fit.
2. Screwdriver:
You may need both a flathead and a Phillips head screwdriver to remove or install screws during the blinds installation process.
3. Drill:
A power drill can be used to create holes for screws or brackets, making the installation process quicker and more seamless.
4. Level:
A level is necessary to ensure that your blinds are straight and properly aligned. This tool will help you achieve a professional-looking installation.
5. Pencil:
Use a pencil to mark measurement points or any other necessary markings on your walls or window frames.
6. Ladder or Step Stool:
Depending on the height of your windows, you may need a ladder or step stool to reach and install blinds at higher levels safely.
7. Mounting Hardware:
This can include brackets, screws, and anchors needed to secure the blinds to your windows or walls. Check the manufacturer’s instructions for the specific mounting hardware required for your blinds.
8. Blinds:
Of course, you will need the blinds themselves. Ensure that you have the correct size and type of blinds for each window before starting the installation process.
9. Safety Equipment:
While not directly related to the installation process, it is important to prioritize your safety. You may want to wear safety goggles, gloves, or other protective gear when using power tools or handling sharp objects.
Having these tools and materials readily available before starting the installation will save you time and frustration during the process. It is always a good idea to double-check the manufacturer’s instructions or consult with professionals if you have any doubts about the specific tools and materials needed for your blinds installation.
When installing blinds, make sure to measure the window accurately before purchasing the blinds. This will help ensure a smooth and efficient installation process.
Step-by-Step Guide to Blinds Installation
Now that you have gathered all the necessary tools and materials, it’s time to proceed with the installation of your blinds. Follow these step-by-step instructions to ensure a successful installation:
1. Measure and Mark:
Start by measuring your window’s width and length. Use a tape measure to determine the exact dimensions for your blinds. Make sure to measure both inside the window frame and outside if necessary. Mark the mounting points on the walls or window frame using a pencil.
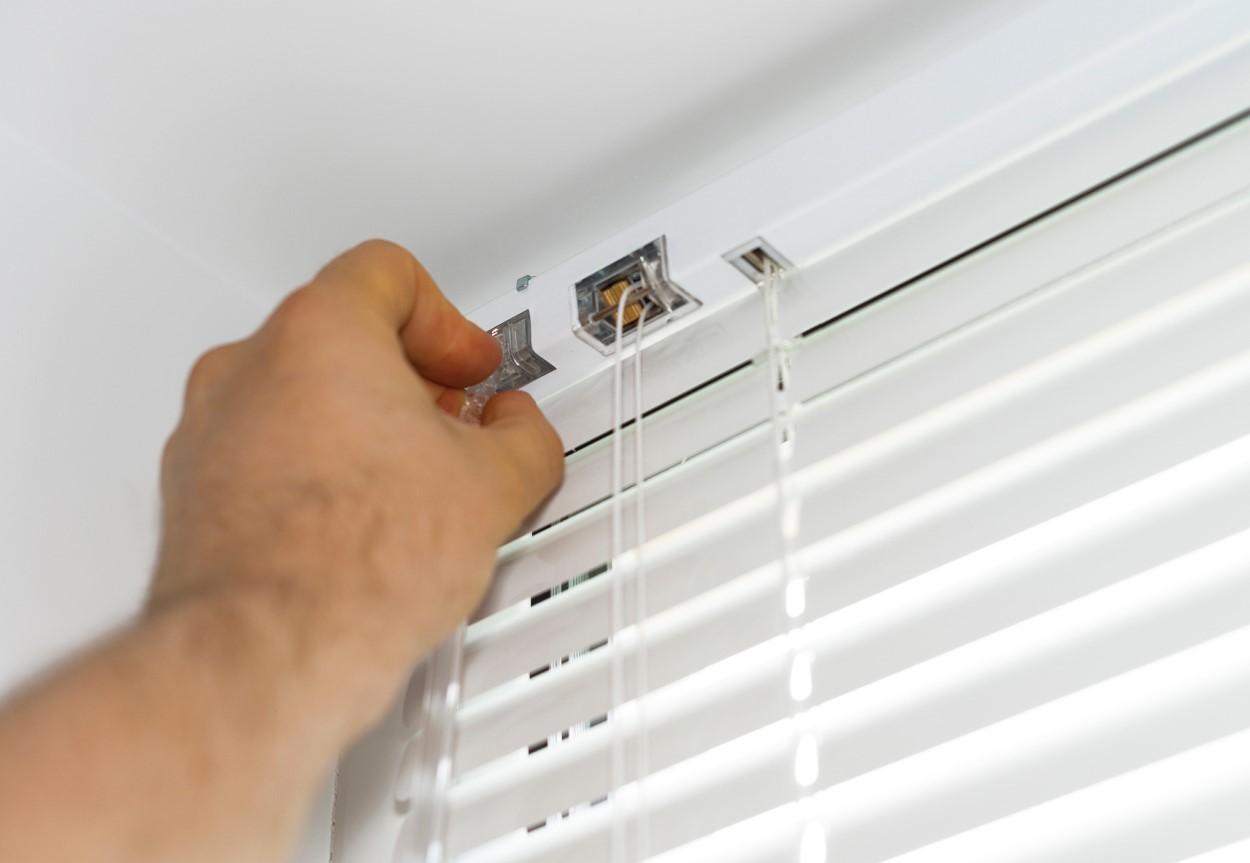
2. Install Brackets:
Based on your measurements, position the mounting brackets according to the manufacturer’s instructions. Use a level to ensure that the brackets are straight. Once aligned, use a drill and screws to secure the brackets in place.
3. Attach Valance or Headrail:
If your blinds have a valance or headrail, attach it to the brackets using the provided clips or brackets. Make sure it sits securely and evenly on top of the blinds.
4. Mount Blinds:
Place the blinds into the brackets, making sure they fit snugly. Depending on the type of blinds, you may need to push or snap them into the brackets or use a locking mechanism. Double-check that the blinds are level and aligned properly.
5. Test Operation:
Test the functionality of the blinds by pulling the cord or using any other control mechanism. Ensure that the blinds open, close, and tilt smoothly without any obstructions or issues.
6. Adjust and Secure:
If necessary, make any adjustments to the blinds’ length or alignment. Trim the excess cord length if needed and secure it out of reach, especially if there are children or pets in the house.
7. Clean and Finish:
Finally, give your blinds a quick clean to remove any dust or debris that may have accumulated during the installation process. This will ensure they look their best once they’re in place.
Remember, these are general instructions and may vary depending on the type and brand of blinds you are installing. Always reference the manufacturer’s instructions for specific installation guidelines and any additional steps. If you encounter any difficulties or uncertainties, it’s best to consult a professional for assistance.
Read more: How Long Does Insulation Take To Install
Tips and Tricks for Faster Installation
While installing blinds may seem like a daunting task, there are several tips and tricks that can help you complete the installation process more efficiently. Here are some helpful tips to make your blinds installation faster and smoother:
1. Read the Instructions:
Before starting the installation, carefully read and understand the manufacturer’s instructions. Familiarize yourself with the specific steps, tools required, and any additional precautions or tips provided.
2. Get Organized:
Arrange all the tools and materials needed for the installation in one place. This will save you time from searching for items during the process. Use small containers or trays to keep screws and other small parts organized and easily accessible.
3. Measure Twice:
Double-check your measurements to ensure accuracy before making any cuts or drilling holes. This will help prevent costly mistakes and the need for rework.
4. Pre-Drill Holes:
If you’re installing blinds on a hard surface like concrete or metal, pre-drilling pilot holes can make the installation process faster and smoother. This helps to prevent splitting or cracking the material when inserting screws.
5. Use Power Tools:
If you have access to power tools such as a drill or electric screwdriver, use them to speed up the installation process. Power tools can help drive screws quickly and save you time and effort.
6. Recruit Assistance:
Installing blinds can be a two-person job, especially if you’re dealing with larger or heavier blinds. Having an extra set of hands can make the process faster and safer.
7. Work systematically:
Install blinds on one window at a time rather than jumping between windows. This allows you to maintain focus and ensures a consistent and efficient installation process.
8. Take Breaks:
Blinds installation can be physically demanding, especially if you’re working on multiple windows. Take short breaks to rest and recharge, which will help maintain your efficiency throughout the process.
Remember, practicing patience and attention to detail is crucial to achieving a successful and efficient blinds installation. If you encounter any difficulties or challenges, don’t hesitate to seek professional help to ensure proper and speedy installation.
Common Mistakes to Avoid
When it comes to installing blinds, there are some common mistakes that people often make. These mistakes can lead to unnecessary setbacks, damage to your blinds or windows, and a longer installation time. Avoiding these mistakes will help ensure a smooth and successful installation process. Here are some common mistakes to watch out for:
1. Not Measuring Accurately:
One of the biggest mistakes is not measuring your windows correctly. This can result in blinds that are either too large or too small for the window frame, causing them to not fit properly. Always double-check your measurements and follow the manufacturer’s guidelines for precise measurements.
2. Rushing Through the Installation:
It’s important to take your time during the installation process. Rushing through the steps can lead to mistakes, improper alignment, and even damage to the blinds or surrounding areas. Follow the instructions carefully and proceed with caution.
3. Not Using a Level:
Using a level to ensure that your blinds are straight is essential. Failing to do so can result in an uneven appearance or blinds that don’t function properly. Take the time to check the alignment with a level before securing brackets or mounting hardware.
4. Over-tightening Screws:
While it’s important to secure the blinds properly, over-tightening screws can lead to stripped holes or damage to the mounting surface. Use just enough force to ensure stability, but be mindful not to overdo it.
5. Neglecting Safety Precautions:
Always prioritize safety when installing blinds. Wear necessary protective gear such as safety goggles or gloves when using power tools. Be cautious when working at heights and use proper equipment, such as a stable ladder or step stool.
6. Skipping the Instruction Manual:
Each blind may have specific installation instructions and recommendations provided by the manufacturer. Skipping the instruction manual can lead to confusion and mistakes. Take the time to thoroughly read and understand the instructions before starting the installation process.
7. Not Testing the Blinds:
After the installation is complete, it’s crucial to test the functionality of the blinds. Check if the blinds open, close, and tilt smoothly without any issues. This will help you identify and fix any potential problems before fully completing the installation.
Avoiding these common mistakes can save you time, frustration, and potential damage during the blinds installation process. By taking the necessary precautions and following the instructions carefully, you can ensure a successful and hassle-free installation of your blinds.
Conclusion
Installing blinds in your home is a rewarding project that can enhance privacy, control sunlight, and add aesthetic appeal to your windows. By understanding the factors that affect installation time, knowing the different types of blinds available, and having the right tools and materials, you can successfully complete the installation process.
Throughout the article, we discussed the importance of accurate measurements, following instructions, and prioritizing safety. Taking the time to properly measure your windows, read the manufacturer’s instructions, and use the recommended tools and equipment will significantly contribute to a smooth and efficient installation.
It’s also vital to consider factors such as the number and size of windows, the type of blinds, and the mounting surface when estimating the time required for installation. Adjustments may be needed based on these factors, so it’s important to plan accordingly.
By following the step-by-step guide provided and implementing the tips and tricks mentioned, you can expedite the installation process and achieve a professional outcome. However, remember not to rush through the installation, as patience and attention to detail are essential for successful blinds installation.
Lastly, we discussed common mistakes to avoid such as inaccurate measurements, rushing through the installation, and neglecting safety precautions. Being aware of these mistakes can help prevent setbacks and ensure a smooth and hassle-free installation experience.
In conclusion, installing blinds in your home can be a worthwhile endeavor. With the right knowledge, tools, and preparation, you can confidently tackle this project, adding both functionality and style to your windows. Enjoy the benefits of your newly installed blinds and relish in the transformed atmosphere of your living space.
Frequently Asked Questions about How Long Does It Take To Install Blinds
Was this page helpful?
At Storables.com, we guarantee accurate and reliable information. Our content, validated by Expert Board Contributors, is crafted following stringent Editorial Policies. We're committed to providing you with well-researched, expert-backed insights for all your informational needs.