Articles
How Long Does Kitchenaid Ice Cream Maker Take
Modified: October 20, 2024
Discover how long it takes KitchenAid ice cream maker to churn out delicious frozen treats. Read our informative articles on ice cream making process and timing.
(Many of the links in this article redirect to a specific reviewed product. Your purchase of these products through affiliate links helps to generate commission for Storables.com, at no extra cost. Learn more)
Introduction
Ice cream is a beloved treat enjoyed by people of all ages. Making homemade ice cream allows you to experiment with flavors, create custom recipes, and enjoy the satisfaction of creating a frozen treat from scratch. If you own a Kitchenaid stand mixer, you have the option to use the Kitchenaid ice cream maker attachment. This attachment is a convenient and efficient way to make homemade ice cream.
In this article, we will explore how long it takes to make ice cream with the Kitchenaid ice cream maker attachment. We will also discuss the factors that can affect the ice cream making time and provide tips for speeding up the process.
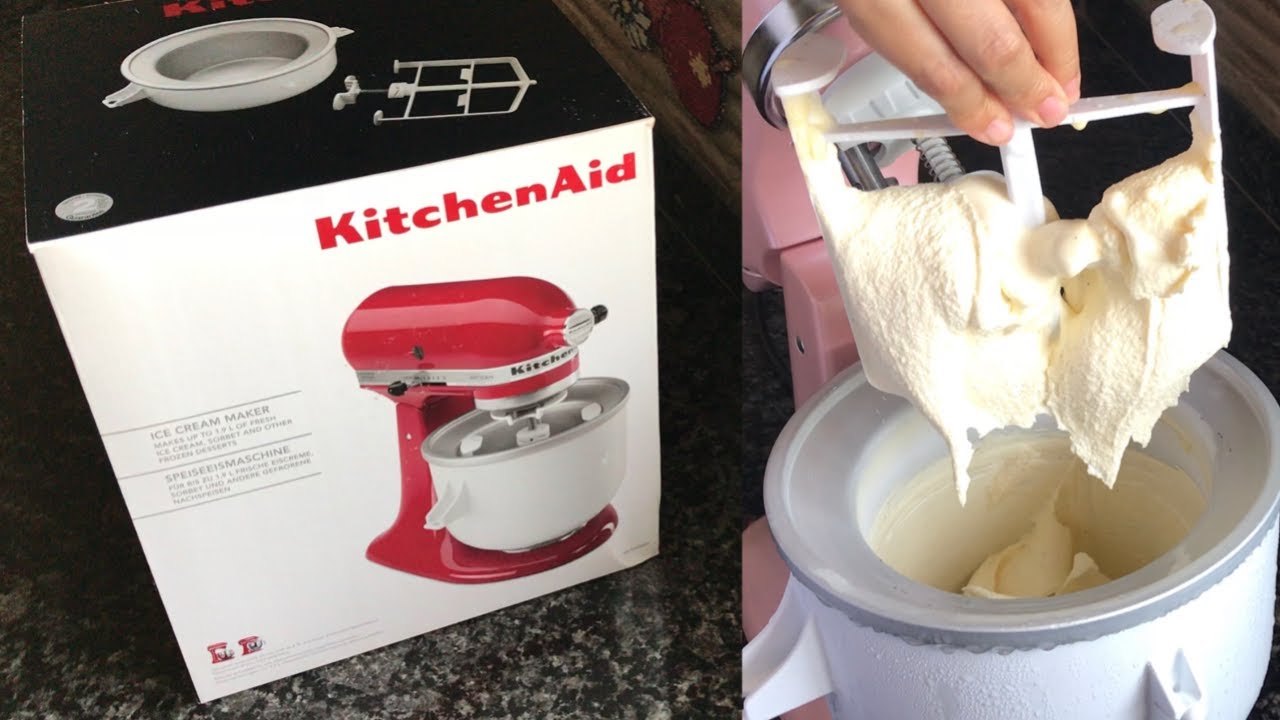
The Kitchenaid ice cream maker attachment is a versatile tool that turns your stand mixer into an ice cream machine. It consists of a freezer bowl, a dasher, and a drive assembly. To use it, you need to freeze the bowl for at least 15 hours prior to making the ice cream. This allows the bowl to reach the optimal temperature for freezing the ice cream mixture.
It is important to note that the actual time it takes to make ice cream with the Kitchenaid ice cream maker attachment can vary depending on several factors. These factors include the temperature and consistency of the ice cream base, the ambient room temperature, and the desired level of firmness for the final ice cream.
The freezing process plays a crucial role in determining the ice cream making time. When you pour the chilled ice cream base into the frozen bowl and start the mixer, the dasher churns the mixture while the bowl freezes it. The freezing time can range from 20 to 30 minutes, depending on the factors mentioned earlier.
Before making the ice cream, it is essential to have a well-chilled ice cream base. This base is typically a mixture of cream, milk, sugar, and flavorings. It needs to be chilled in the refrigerator for a few hours or overnight to ensure that it is thoroughly cold. This step helps the ice cream maker attachment to freeze the mixture effectively.
After preparing and chilling the ice cream base, it is time to assemble the Kitchenaid ice cream maker attachment. Simply attach the freezer bowl to the stand mixer and secure it with the drive assembly. Ensure that everything is properly locked in place to prevent any mishaps while the mixer is running.
Key Takeaways:
- Enjoy faster homemade ice cream by pre-freezing the bowl longer, using cold ingredients, and breaking up mix-ins. Optimize the process for creamy delights in less time with your Kitchenaid ice cream maker attachment.
- Create delightful frozen treats quicker by chilling the base thoroughly, keeping the room cool, and assembling the attachment properly. Speed up the ice cream making process and savor delicious homemade creations with ease.
Read more: How Long Does Cuisinart Ice Cream Maker Take
The Kitchenaid Ice Cream Maker Attachment
The Kitchenaid ice cream maker attachment is a popular accessory for Kitchenaid stand mixers. It allows you to easily make homemade ice cream, sorbet, and other frozen treats right in your own kitchen. This attachment is designed to fit all Kitchenaid stand mixer models and offers a convenient and hassle-free way to indulge in delicious frozen delights.
The attachment consists of three main components: the freezer bowl, the dasher, and the drive assembly. The freezer bowl is a double-walled container that needs to be pre-frozen before use. It is filled with a special coolant that freezes when placed in the freezer, ensuring that the ice cream mixture is evenly and thoroughly frozen.
The dasher is the mixing paddle that is attached to the drive assembly. It is responsible for churning and mixing the ice cream mixture as it freezes. The unique design of the dasher ensures that the mixture is evenly distributed, resulting in smooth and creamy ice cream.
The drive assembly is the connection between the stand mixer and the attachment. It allows the dasher to rotate and mix the ice cream mixture inside the freezer bowl. The drive assembly securely locks the attachment onto the stand mixer, ensuring stability and preventing any mishaps during the ice cream making process.
Using the Kitchenaid ice cream maker attachment is simple and straightforward. The first step is to freeze the freezer bowl for a minimum of 15 hours (or as per the manufacturer’s instructions) before making the ice cream. Once the bowl is properly frozen, it is ready to be used.
Next, prepare the ice cream base according to your chosen recipe. This is where you can get creative and experiment with different flavors and ingredients. The base typically consists of cream, milk, sugar, and any additional flavorings or mix-ins you desire. Once the base is prepared, it needs to be chilled in the refrigerator until it is thoroughly cold.
Once the base is chilled, attach the frozen bowl to the stand mixer and secure it with the drive assembly. Pour the chilled ice cream base into the freezer bowl and start the mixer on a low speed. The dasher will begin to churn and mix the mixture, while the freezer bowl freezes it. The amount of time it takes to freeze the ice cream can vary depending on the recipe and the desired consistency.
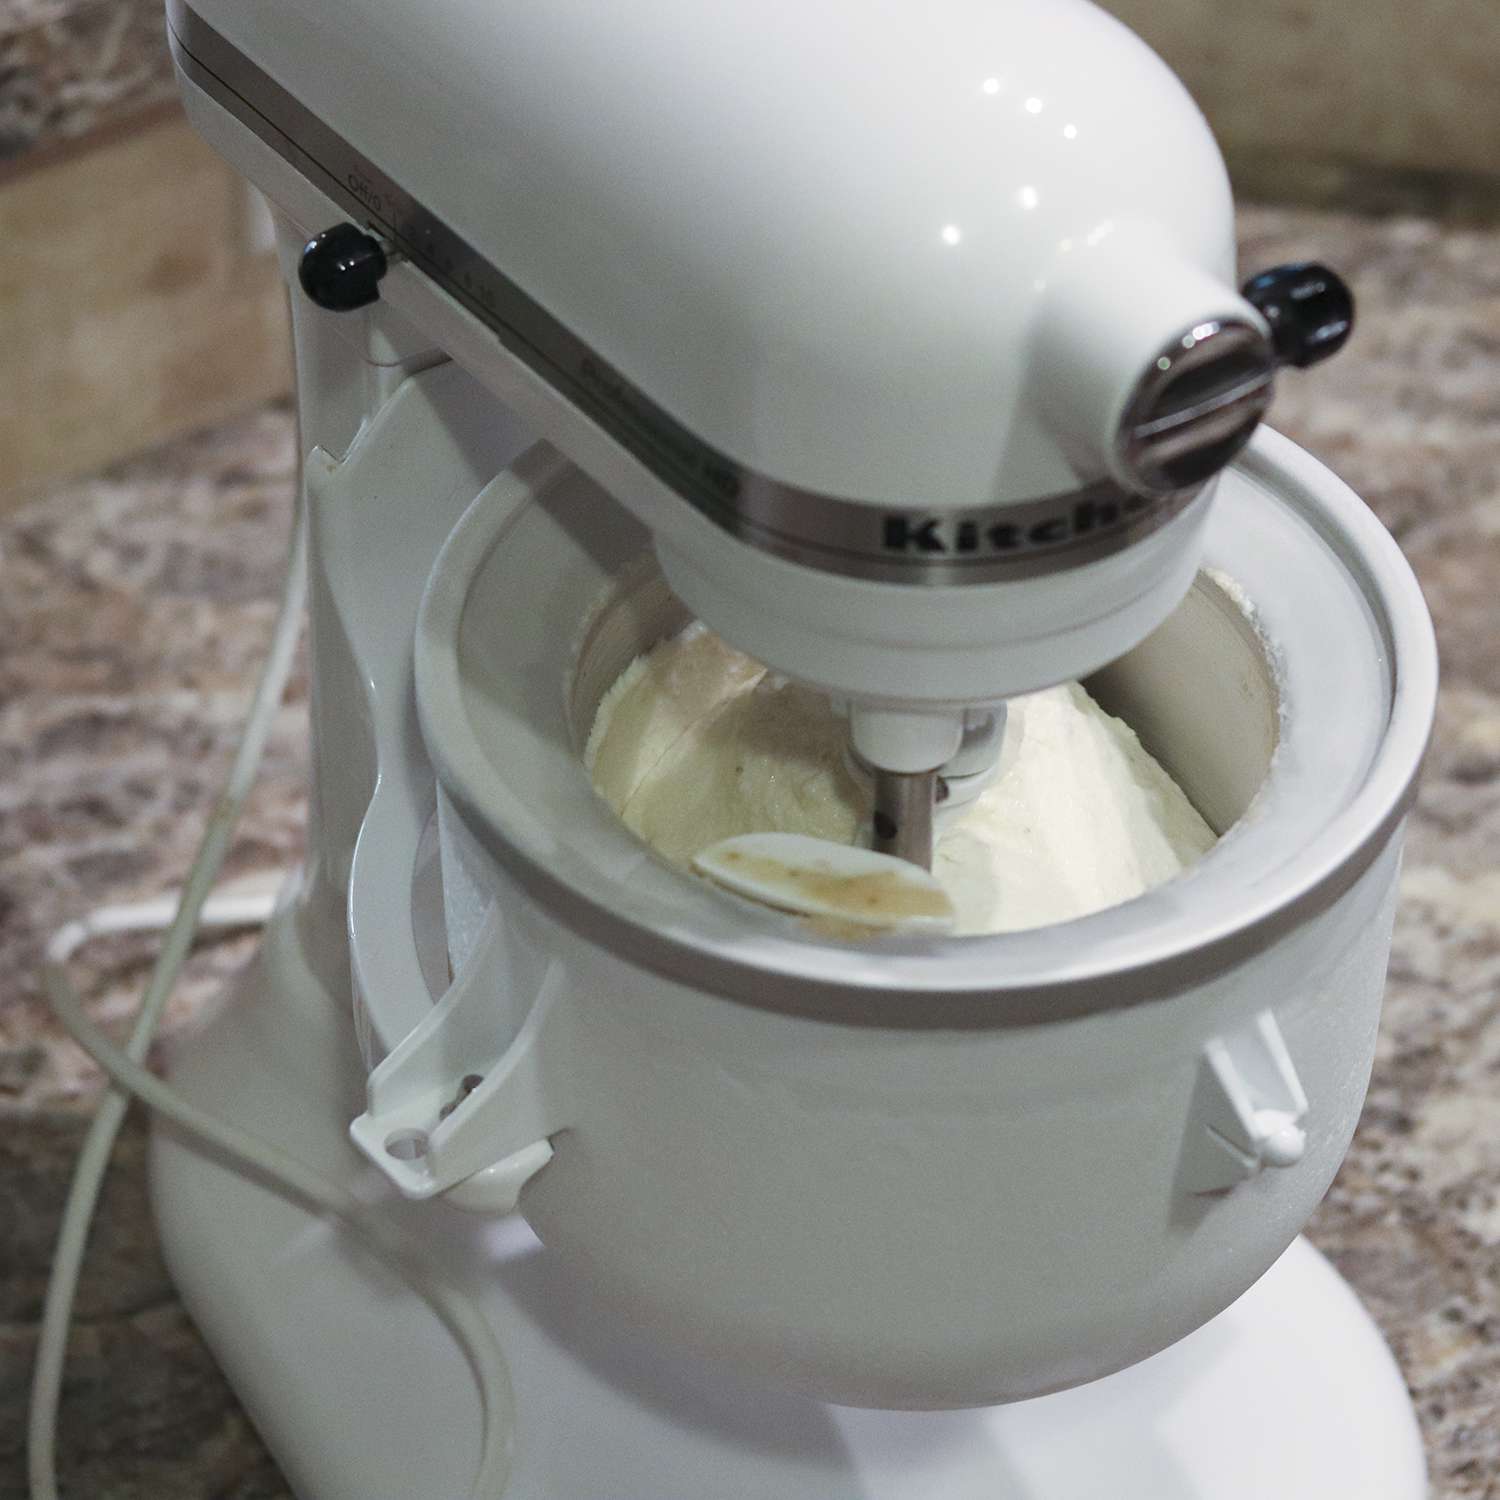
Throughout the churning process, it is important to monitor the ice cream’s progress. You can check the firmness by stopping the mixer and lifting the dasher. The ice cream should have a thick and creamy consistency. Once the desired firmness is achieved, turn off the mixer and transfer the ice cream to an airtight container to further harden in the freezer.
The Kitchenaid ice cream maker attachment is a versatile and convenient tool that allows you to create homemade frozen treats with ease. Whether you prefer classic vanilla or want to try out unique flavor combinations, this attachment provides endless possibilities for satisfying your ice cream cravings.
Factors Affecting Ice Cream Making Time
The time it takes to make ice cream with the Kitchenaid ice cream maker attachment can vary based on several factors. Understanding these factors will help you better anticipate and manage the ice cream making process to achieve the desired results. Here are some key factors that can affect ice cream making time:
- Ice Cream Base Temperature: The temperature of the ice cream base when it is poured into the freezer bowl plays a significant role in determining the freezing time. It is recommended to chill the ice cream base thoroughly in the refrigerator before using it. A colder ice cream base will freeze faster and result in a shorter ice cream making time.
- Ambient Room Temperature: The temperature of the room or kitchen where you are making the ice cream can impact the freezing process. If the room is warmer, it may take longer for the ice cream to freeze. It is recommended to make ice cream in a cool and well-ventilated space to optimize the freezing time.
- Freezer Bowl Temperature: The temperature of the freezer bowl is crucial for freezing the ice cream mixture. The bowl needs to be pre-frozen for a minimum of 15 hours to achieve the optimal temperature for freezing. It is important to follow the manufacturer’s instructions for freezing the bowl and ensure that it is properly frozen before using it.
- Desired Firmness: The level of firmness you desire for your ice cream will also impact the overall making time. If you prefer a softer, more creamy consistency, it may take less time to freeze. However, if you like a firmer, scoopable texture, it may require more time in the ice cream maker attachment.
- Mix-ins and Flavorings: Adding mix-ins, such as chocolate chips, nuts, or fruit, can also affect the ice cream making time. These additions may introduce additional moisture and bulk to the mixture, potentially lengthening the freezing time. If you plan to include mix-ins, ensure that they are evenly distributed throughout the ice cream base.
It is important to note that while these factors can influence the ice cream making time, the actual time can vary from recipe to recipe. Some recipes may call for longer freezing times to achieve the desired consistency and texture. It is always recommended to follow the specific instructions provided in your chosen recipe to ensure the best results.
By being mindful of these factors and adjusting accordingly, you can optimize the ice cream making process and enjoy delicious homemade ice cream in less time. Experimenting with different variables and techniques will help you find the perfect balance to create your ideal frozen treat.
The Freezing Process
The freezing process is a crucial step in making ice cream with the Kitchenaid ice cream maker attachment. It is during this process that the ice cream mixture transforms into a frozen and creamy dessert. Understanding the details of the freezing process will help you achieve the perfect texture and consistency for your homemade ice cream. Here’s a breakdown of the freezing process:
1. Pre-freezing the Freezer Bowl: Before making the ice cream, the freezer bowl needs to be pre-frozen. This process involves placing the bowl in the freezer for a minimum of 15 hours (or as instructed by the manufacturer). The freezer bowl is filled with a special coolant that freezes, creating a cold environment for the ice cream mixture to freeze. Make sure the bowl is properly frozen before proceeding to the next step.
2. Chilling the Ice Cream Base: While the freezer bowl is pre-freezing, it’s important to prepare the ice cream base. This typically involves combining ingredients like cream, milk, sugar, and flavorings. Once the base is mixed together, it needs to be chilled in the refrigerator until it reaches a thoroughly cold temperature. Chilling the base helps the ice cream freeze faster and ensures a smoother texture.
3. Assembling the Ice Cream Maker Attachment: Once the ice cream base is chilled and the freezer bowl is properly frozen, it’s time to assemble the ice cream maker attachment. Attach the bowl to the stand mixer and secure it with the drive assembly. Ensure that everything is properly locked in place before proceeding.
4. Adding the Ice Cream Base: Pour the chilled ice cream base into the freezer bowl. It’s important not to overfill the bowl to allow room for expansion as the mixture freezes. You can start the mixer on a low speed before adding the mixture to prevent any splattering. Once the base is in the bowl, start the mixer at the recommended speed (as stated in your recipe) for the freezing process to begin.
5. Churning and Freezing: As the mixer runs, the dasher begins churning and mixing the ice cream base. Simultaneously, the freezer bowl freezes the mixture. The continuous motion of the dasher ensures that the ice crystals are evenly distributed and prevents the formation of large ice crystals, resulting in a smoother texture. The freezing process typically takes around 20-30 minutes, but this can vary depending on factors such as the temperature of the room and the consistency of the ice cream base.
6. Monitoring the Ice Cream: It’s important to monitor the ice cream throughout the freezing process. You can stop the mixer and lift the dasher to check the consistency. The ice cream should have a thick and creamy texture. If it is still too soft, continue freezing for a few more minutes. Be careful not to overmix, as it can result in a grainy texture.
7. Transferring and Hardening: Once the desired consistency is achieved, turn off the mixer and transfer the ice cream to an airtight container. Place the container in the freezer to allow the ice cream to harden further. This step helps the ice cream reach its optimal texture and makes it easier to scoop and serve.
By following these steps and understanding the freezing process, you can create homemade ice cream with the perfect creamy texture and delicious flavor. Experiment with different recipes, mix-ins, and flavors to customize your frozen creations and enjoy the satisfaction of making ice cream from scratch.
Preparing the Ice Cream Base
The ice cream base is the foundation of any delicious homemade ice cream. It is the mixture of ingredients that gives the ice cream its flavor, texture, and creaminess. Preparing the ice cream base properly is essential for creating a delectable frozen treat. Here’s a guide on how to prepare the ice cream base for your Kitchenaid ice cream maker attachment:
1. Gather the Ingredients: Before you start preparing the ice cream base, gather all the necessary ingredients according to your chosen recipe. The basic components of an ice cream base typically include cream, milk, sugar, and flavorings. However, you can also experiment with alternative ingredients like non-dairy milk, sweeteners, and extracts to suit your dietary preferences and taste.
2. Measure and Mix: Once you have your ingredients ready, measure them accurately according to the recipe. The exact measurements are crucial for achieving the desired balance of flavors and textures. In a mixing bowl, combine the cream, milk, and sugar. Whisk or stir the mixture until the sugar is fully dissolved. This step helps to ensure a smooth and consistent base.
3. Add Flavorings and Mix-Ins: After the cream, milk, and sugar are well combined, it’s time to add the flavorings and mix-ins. This is where you can get creative with your favorite flavors, such as vanilla extract, chocolate, fruit puree, or coffee. Add the flavorings gradually, tasting along the way to adjust the intensity to your liking. If you want to include mix-ins like chocolate chips, nuts, or cookie crumbles, add them at this stage as well.
4. Adjust Sweetness and Flavor: Once you’ve added the flavorings and any desired mix-ins, taste the ice cream base and make any necessary adjustments. If you prefer a sweeter base, you can add a little more sugar. If you want a stronger flavor of your chosen ingredient, such as vanilla or cocoa powder, you can add a bit more to enhance the taste. Remember to make these adjustments gradually, tasting as you go, to ensure you achieve the perfect balance.
5. Chill the Ice Cream Base: After you’ve prepared the ice cream base, it’s important to chill it thoroughly in the refrigerator. This step allows the flavors to meld together and ensures that the base is cold before it goes into the ice cream maker attachment. Place the mixture in a covered container and refrigerate it for at least a couple of hours or overnight. Chilling the base also helps to expedite the freezing process when you start making the ice cream.
By following these steps, you can prepare a delicious and well-balanced ice cream base for your Kitchenaid ice cream maker attachment. Feel free to experiment with different flavor combinations and ingredients to create unique and exciting flavors. Whether you prefer classic vanilla, rich chocolate, or innovative mix-ins, the key is to have fun and unleash your creativity in the preparation process.
Read more: How Long Does An Ice Cream Maker Take
Chilling the Ice Cream Base
Chilling the ice cream base is a crucial step in the ice cream making process. It ensures that the mixture is thoroughly cold before it goes into the Kitchenaid ice cream maker attachment, allowing for faster and more effective freezing. Properly chilling the ice cream base also enhances the texture and flavor of the final product. Here’s a guide on how to chill the ice cream base for optimal results:
1. Prepare the Ice Cream Base: Before chilling the ice cream base, make sure you have prepared the mixture according to your chosen recipe. The base typically consists of cream, milk, sugar, and flavorings. Mix the ingredients together thoroughly to ensure they are well combined. This step is important for achieving a smooth and consistent base.
2. Cover the Ice Cream Base: Once the base is prepared, transfer it to a container with a tight-fitting lid or cover it securely with plastic wrap. Properly sealing the base prevents any flavors from being lost and protects it from absorbing any odors in the refrigerator.
3. Refrigerate the Ice Cream Base: Place the covered container in the refrigerator and allow the ice cream base to chill for at least a couple of hours, or ideally overnight. Chilling the base for an extended period allows the flavors to meld together and develop a richer taste. It also ensures that the base is sufficiently cold, promoting faster and more efficient freezing in the Kitchenaid ice cream maker attachment.
4. Consider Using an Ice Bath: If you’re short on time and need to chill the ice cream base quickly, you can use an ice bath. Fill a large bowl or basin with ice cubes and water. Place the covered container with the ice cream base into the ice bath, making sure it is stable and won’t tip over. Stir the base occasionally to evenly distribute the cold temperature. The ice bath will hasten the chilling process, but be cautious not to let any water or ice cubes get into the base.
5. Be Patient: Chilling the ice cream base is a waiting game, but it’s worth the time and patience. The cold temperature is essential for the ice cream maker attachment to freeze the mixture properly and create a creamy texture. While it may be tempting to rush the process, allowing the base to chill for the recommended time ensures the best results.
By properly chilling the ice cream base, you set the stage for a successful ice cream making experience. The cold temperature allows the ingredients to meld together, intensifying the flavor and ensuring a smooth and creamy texture. Remember to plan ahead and give the base sufficient time to chill, or consider using an ice bath for a quicker chilling process. With a thoroughly chilled ice cream base, you’ll be well on your way to creating delicious homemade ice cream with your Kitchenaid ice cream maker attachment.
The KitchenAid ice cream maker attachment typically takes about 20-30 minutes to churn ice cream, but freezing the bowl beforehand can speed up the process.
Assembling the Ice Cream Maker Attachment
Assembling the Kitchenaid ice cream maker attachment is a straightforward process that prepares it for the ice cream making journey. Taking a few moments to properly set up the attachment ensures a smooth and efficient ice cream making experience. Here’s a step-by-step guide on how to assemble the ice cream maker attachment:
1. Freeze the Freezer Bowl: Before assembling the ice cream maker attachment, make sure the freezer bowl has been pre-frozen for a minimum of 15 hours. The freezer bowl needs to be thoroughly frozen to create the necessary temperature for freezing the ice cream mixture.
2. Ensure the Bowl and Dashers are Clean: Before using the attachment, inspect the freezer bowl and dasher to ensure they are clean. Rinse them with water and mild dish soap, then dry them thoroughly. Any residue or debris can affect the freezing process and impact the quality of the ice cream.
3. Attach the Drive Assembly to the Stand Mixer: Place the Kitchenaid ice cream maker attachment on a stable surface, such as a countertop. Align the drive assembly with the power hub of your Kitchenaid stand mixer. Insert the drive assembly into the power hub and rotate it clockwise until it locks securely in place. Ensure that it is properly attached to prevent any accidents while the mixer is running.
4. Secure the Freezer Bowl: Lift the freezer bowl by its handle and position it over the drive assembly. Align the bowl’s tabs with the notches on the drive assembly. Gently press down on the bowl until it locks into place securely. Ensure that the bowl is sitting flat and stable, with no wobbling or movement.
5. Double-Check the Assembly: Once you have assembled the ice cream maker attachment, give it a final check. Ensure that everything is locked in place and that there are no loose parts or connections. Make sure the attachment is securely attached to the stand mixer and that the freezer bowl is correctly aligned.
6. Prepare the Ice Cream Base: With the ice cream maker attachment assembled, you’re ready to prepare the ice cream base. Ensure that you have already chilled the base in the refrigerator before assembling the attachment. Having the base cold and ready will help facilitate efficient freezing and faster ice cream creation.
With the ice cream maker attachment assembled and the ice cream base prepared, you’re all set to start creating homemade ice cream. The proper assembly of the attachment ensures stability, allowing the dasher to churn and freeze the ice cream mixture effectively. By following these simple steps, you’ll be on your way to enjoying delicious, homemade ice cream with your Kitchenaid ice cream maker attachment.
Churning the Ice Cream
Churning the ice cream is the exciting process where the Kitchenaid ice cream maker attachment comes to life, transforming your chilled ice cream base into a luscious and creamy treat. Understanding the steps involved in churning helps ensure that you achieve the perfect consistency and texture. Here’s a guide on how to effectively churn your ice cream:
1. Assemble and Pre-Chill: Before starting the churning process, make sure you have assembled the Kitchenaid ice cream maker attachment according to the manufacturer’s instructions. Ensure that the ice cream base has been chilled thoroughly and that the freezer bowl is properly frozen.
2. Add the Ice Cream Mixture: Pour the chilled ice cream base into the freezer bowl of the ice cream maker attachment. Avoid overfilling the bowl to allow room for expansion as the mixture freezes. Slowly add the base while the mixer is running on a low speed to prevent splattering. The amount of base you add depends on the capacity of your ice cream maker attachment, so refer to the manual for guidance.
3. Commence Churning: Once you have added the ice cream base, increase the speed of the mixer to the recommended setting for churning. The dasher inside the freezer bowl starts rotating, ensuring the mixture churns and freezes evenly. The time it takes for the ice cream to churn can vary depending on factors such as the consistency of the base and the desired level of firmness.
4. Monitor the Churning Process: Keep an eye on the ice cream as it churns. You can periodically pause the mixer and lift the dasher to check the consistency of the ice cream. It should be thick, creamy, and have a soft-serve-like texture. Be cautious not to leave the ice cream churning for too long, as over-churning can result in a grainy texture.
5. Use Your Senses: During the churning process, engage your senses to determine when the ice cream is ready. Listen for changes in the sound of the mixer’s motor; it may become quieter or change in pitch as the ice cream thickens. You can also observe the appearance of the ice cream, looking for a smooth and creamy consistency. Trust your instincts and experience to determine the optimal churning time.
6. Stop the Mixer and Assess: Once the ice cream has reached the desired consistency, turn off the mixer and assess the ice cream. It should be thick and creamy, with a texture similar to soft-serve ice cream. If it is still too soft, you can continue to churn for a few more minutes. Remember that the ice cream will firm up further during the hardening process in the freezer.
7. Transfer and Store the Ice Cream: Once the ice cream is churning complete, transfer it from the freezer bowl to an airtight container. Use a rubber spatula to scrape the ice cream out, ensuring you get every last delicious bit. Seal the container tightly and place it in the freezer to allow the ice cream to harden further and reach its optimum texture.
By following these steps, you can churn your ice cream to perfection using the Kitchenaid ice cream maker attachment. Keep in mind that the churning time may differ based on various factors, including the recipe you’re using and your desired level of firmness. Experiment with different recipes and techniques to create your favorite homemade ice cream flavors.
Monitoring the Ice Cream Making Time
Monitoring the ice cream making time is crucial to ensure that your homemade ice cream turns out just right. While the Kitchenaid ice cream maker attachment takes care of the freezing process, keeping an eye on the timing helps you achieve the desired consistency and prevent any mishaps. Here’s how you can effectively monitor the ice cream making time:
1. Refer to the Recipe: Start by consulting the recipe you’re using for guidance on the estimated ice cream making time. Recipes generally provide a rough estimation based on the specific ingredients and ratios they recommend. However, it’s important to remember that these times are approximate and can vary depending on factors like the temperature of the room and the specific machine you’re using.
2. Timing the Freezing Process: Once you start the Kitchenaid ice cream maker attachment, use a timer or keep an eye on the clock to track the freezing process. The freezing time typically ranges between 20 to 30 minutes, but it can vary based on your specific recipe and preferences.
3. Visually Assess the Consistency: As the ice cream churns, observe its consistency through the transparent lid or by pausing the mixer and lifting the dasher. The ice cream should gradually thicken and become smooth and creamy. Look for a soft-serve-like consistency, keeping in mind that it will firm up further during the hardening process in the freezer.
4. Listen to the Sound: Pay attention to the sound of the mixer as it churns the ice cream. Initially, you may hear a slushy sound as the mixture starts to freeze. As it thickens, the sound may change to a smoother and quieter one. This change in sound can be an indicator that the ice cream is reaching its desired consistency.
5. Scoop and Taste Test: To get a better sense of the ice cream’s readiness, you can occasionally pause the mixer and scoop out a small amount. Take a taste test to evaluate the texture and flavor. The ice cream should be thick, smooth, and creamy. If it feels too soft or lacks the desired consistency, continue churning for a few more minutes until you reach the desired texture.
6. Be Mindful of Over-churning: It’s important to be cautious of over-churning the ice cream. If you continue to churn well beyond the recommended time, the ice cream can become grainy and lose its desirable texture. Keep a close eye on the timing and check the ice cream regularly to prevent over-churning.
7. Trust Your Judgment: While the recipe may provide a general timeframe, it’s essential to trust your own judgment and experience. Factors such as the ingredients used, the desired level of firmness, and personal preferences can all affect the ideal ice cream making time. Adjusting the churning time based on your observations and taste preferences will help you achieve the perfect ice cream consistency.
By actively monitoring the ice cream making time, you can create a delicious and perfectly textured homemade ice cream with your Kitchenaid ice cream maker attachment. Pay attention to visual cues, employ your senses, and trust your judgment to achieve the ideal ice cream consistency every time.
Read more: How Long Does Dash Ice Cream Maker Take
Tips for Faster Ice Cream Making
If you’re looking to enjoy your homemade ice cream sooner rather than later, there are several tips and tricks to speed up the ice cream making process with your Kitchenaid ice cream maker attachment. By following these suggestions, you can minimize waiting time and indulge in your frozen treat more quickly. Here are some tips for faster ice cream making:
- Pre-freeze the Freezer Bowl for Longer: To ensure the freezer bowl reaches the optimal freezing temperature, consider pre-freezing it for more than the minimum recommended time. Extending the pre-freezing time to 24 hours or more can help the bowl get even colder, enhancing the freezing process and reducing the ice cream making time.
- Chill the Ice Cream Base Thoroughly: Before pouring the ice cream base into the frozen bowl, make sure it is properly chilled. This step ensures that the mixture is already cold, allowing the ice cream maker attachment to freeze it more efficiently. Consider placing the base in the freezer for a short period before transferring it to the pre-chilled bowl.
- Use Cold Ingredients: When preparing the ice cream base, use ingredients that are already chilled. Refrigerate the cream and milk beforehand, ensuring they are cold before incorporating them into the base. Using cold ingredients can expedite the freezing process and help achieve faster results.
- Keep the Room Temperature Cool: Ice cream making can be affected by the ambient temperature in the room or kitchen. To speed up the freezing process, ensure that the environment is cool. Turn on the air conditioning, open windows, or use fans to maintain a lower temperature, allowing the freezer bowl to freeze the ice cream more quickly.
- Break up Larger Mix-ins: If you plan to add larger mix-ins like chunks of chocolate or fruit, consider breaking them into smaller pieces. Smaller mix-ins freeze more rapidly, reducing the overall freezing time of the ice cream. This technique ensures that the mix-ins are properly incorporated into the ice cream while speeding up the freezing process.
- Keep the Ice Cream Maker Attachment Clean: Regularly cleaning the freezer bowl, dasher, and drive assembly ensures optimal performance. Any residue or build-up can inhibit the freezing process and lead to longer ice cream making times. Thoroughly clean and dry the attachment components after each use to maintain efficiency.
- Don’t Overfill the Freezer Bowl: It is essential not to overfill the freezer bowl with the ice cream base. Leave room for expansion as the mixture freezes. Overfilling can hinder the freezing process and result in longer ice cream making times. Follow the recommended maximum capacity indicated by the manufacturer.
- Create Thinner Ice Cream Base: If you’re looking for a quicker freeze time, consider adjusting the ratio of cream to milk in your ice cream base. A higher proportion of milk can result in a thinner base that freezes more rapidly. However, be aware that this may affect the overall richness and creaminess of the ice cream.
By incorporating these tips into your ice cream making process, you can significantly reduce the time it takes to churn out a delightful batch of homemade ice cream. Experiment with these suggestions, finding the balance that works best for your preferences and desired results. Enjoy the journey of creating delicious ice cream in a shorter span of time with your Kitchenaid ice cream maker attachment!
Conclusion
Making homemade ice cream with the Kitchenaid ice cream maker attachment is a delightful and rewarding experience. By understanding the various steps involved and implementing some tips and tricks, you can optimize the ice cream making process and enjoy delicious frozen treats more quickly.
We began by introducing the Kitchenaid ice cream maker attachment as a convenient and versatile tool that transforms your stand mixer into an ice cream machine. We discussed the important factors that can affect ice cream making time, such as the temperature of the ice cream base, the ambient room temperature, and the desired firmness of the ice cream.
Next, we explored the steps involved in preparing the ice cream base, emphasizing the importance of proper measurement, mixing, and chilling. Chilling the ice cream base thoroughly ensures that it is already cold before freezing, facilitating faster and more effective freezing in the ice cream maker attachment.
We then discussed the assembly of the Kitchenaid ice cream maker attachment, ensuring that the freezer bowl and dasher are clean and properly attached to the stand mixer. Proper assembly guarantees stability and optimal performance during the ice cream making process.
The churning process was explained, highlighting the importance of monitoring and assessing the ice cream’s consistency and texture. By using visual cues, listening to the sound of the mixer, and occasionally scooping and tasting the ice cream, you can determine when it is ready for further hardening in the freezer.
To expedite the ice cream making process, we provided valuable tips such as pre-freezing the freezer bowl for longer, chilling the ice cream base thoroughly, using cold ingredients, maintaining a cool room temperature, breaking up larger mix-ins, and ensuring the cleanliness of the ice cream maker attachment.
In conclusion, making homemade ice cream with the Kitchenaid ice cream maker attachment is a fun and creative endeavor. By following the steps, monitoring the process, and implementing the tips provided, you can create delicious and creamy ice cream in less time. Enjoy the satisfaction of indulging in your homemade frozen treats and delight your friends and family with your flavorful creations.
So, go ahead and unleash your inner ice cream artist with your Kitchenaid ice cream maker attachment, and let the delightful journey of homemade ice cream begin!
Frequently Asked Questions about How Long Does Kitchenaid Ice Cream Maker Take
Was this page helpful?
At Storables.com, we guarantee accurate and reliable information. Our content, validated by Expert Board Contributors, is crafted following stringent Editorial Policies. We're committed to providing you with well-researched, expert-backed insights for all your informational needs.


0 thoughts on “How Long Does Kitchenaid Ice Cream Maker Take”