Articles
How Does The Ninja Ice Cream Maker Work
Modified: August 27, 2024
Learn how the Ninja Ice Cream Maker works with our informative articles. Discover tips and techniques to create delicious homemade frozen treats.
(Many of the links in this article redirect to a specific reviewed product. Your purchase of these products through affiliate links helps to generate commission for Storables.com, at no extra cost. Learn more)
Introduction
Welcome to the world of ice cream making, where you can create your favorite frozen treats right in the comfort of your own home. And if you’re looking for a versatile and efficient ice cream maker, then the Ninja Ice Cream Maker might just be what you need.
When it comes to making ice cream, the Ninja Ice Cream Maker stands out from the crowd. It not only provides a convenient and quick way to make delicious homemade ice cream, but it also offers a range of features that make it a top choice among ice cream enthusiasts.
In this article, we will take a closer look at how the Ninja Ice Cream Maker works and why it has become a favorite among ice cream lovers. So, let’s dive in and explore the world of frozen delight!
With its sleek and modern design, the Ninja Ice Cream Maker adds a touch of elegance to any kitchen countertop. But what sets it apart is its advanced freezing technology and mixing mechanism that allows you to create creamy and smooth ice cream with minimal effort.
So, whether you’re craving classic flavors like chocolate and vanilla or want to experiment with unique combinations like mint chocolate chip or strawberry cheesecake, the Ninja Ice Cream Maker has got you covered.
In the following sections, we will delve into the different components of the Ninja Ice Cream Maker, explore its cutting-edge freezing technology, understand its mixing and churning mechanism, learn how to use it effectively, and discover some tips and tricks to achieve the best results. So, let’s embark on this frozen journey and unleash our inner ice cream maestro!
Key Takeaways:
- The Ninja Ice Cream Maker offers a convenient and efficient way to make homemade ice cream with its advanced freezing technology, powerful mixing mechanism, and user-friendly design, allowing for endless flavor possibilities.
- By following the step-by-step guide for using the Ninja Ice Cream Maker and incorporating tips and tricks, you can elevate your ice cream-making skills and unleash your creativity to create delicious and unique frozen treats.
Read more: How To Use Ninja Ice Cream Maker
Overview of the Ninja Ice Cream Maker
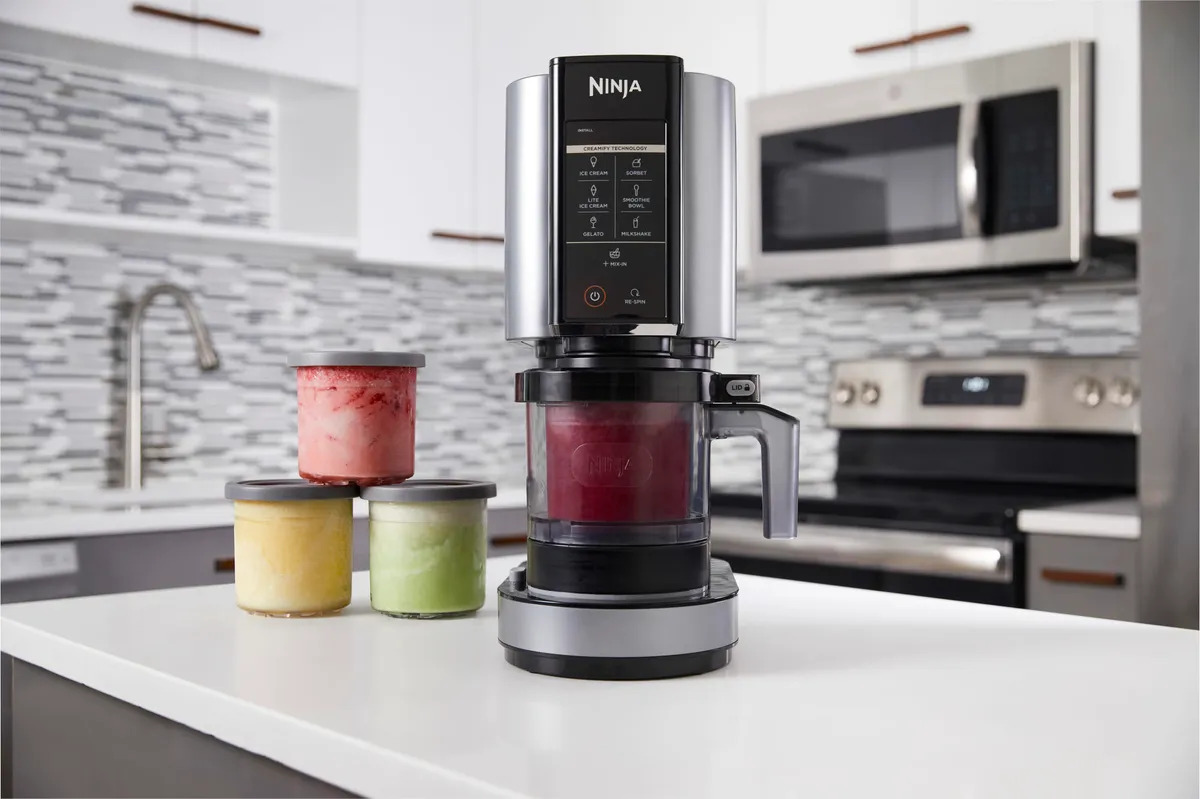
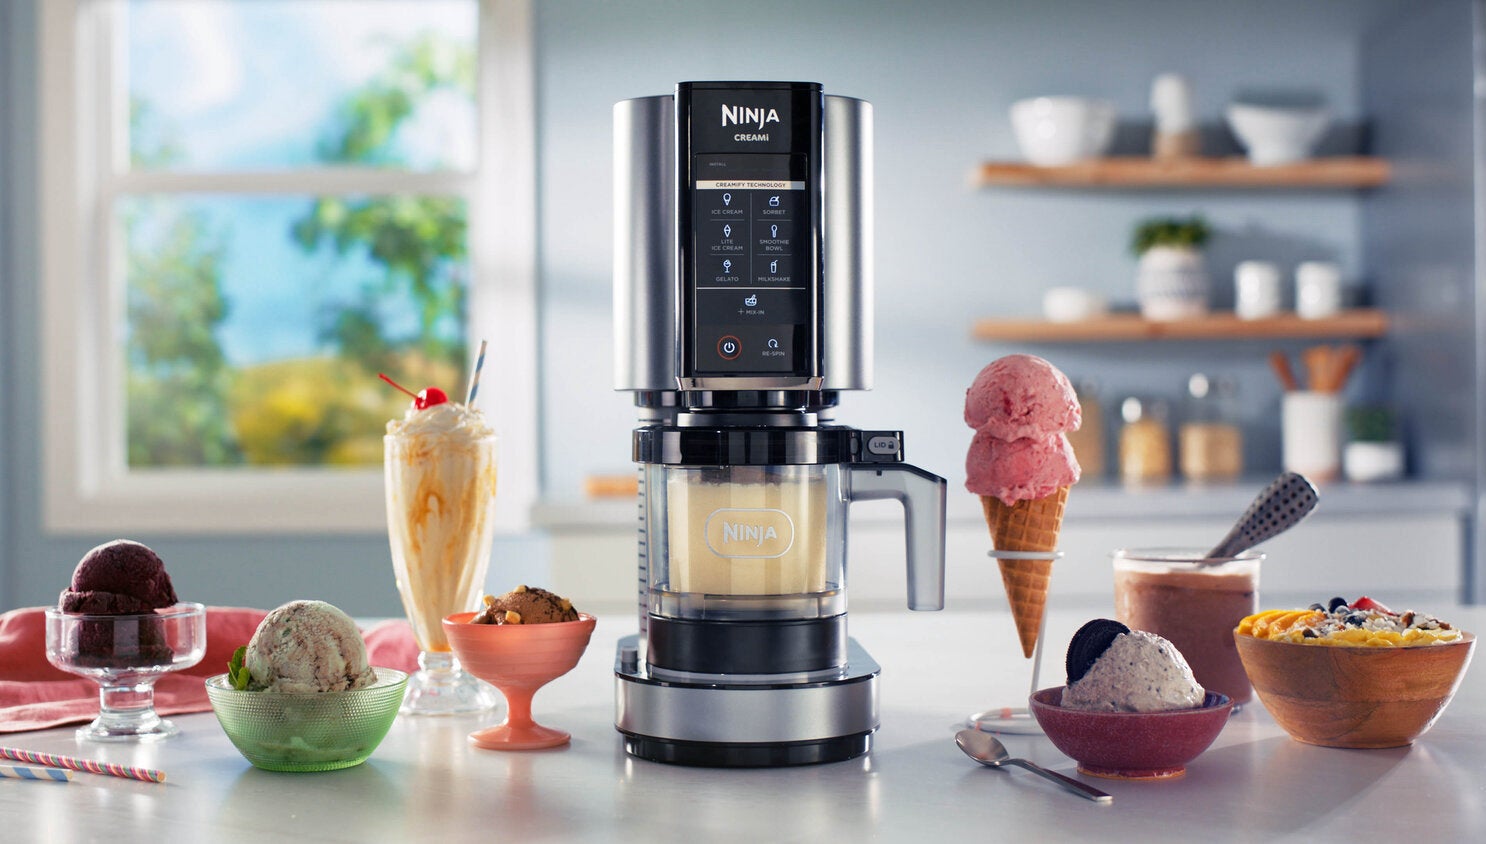
The Ninja Ice Cream Maker is a versatile countertop appliance designed to simplify the process of making homemade ice cream. It offers a wide range of features that make it a popular choice for ice cream enthusiasts of all levels of experience.
One of the standout features of the Ninja Ice Cream Maker is its compact and modern design. It takes up minimal space on your countertop, allowing you to easily store it when not in use. Its sleek and stylish appearance adds a touch of elegance to any kitchen.
Unlike traditional ice cream makers that require pre-freezing of bowls or use of ice and salt, the Ninja Ice Cream Maker utilizes its own freezing technology to quickly and efficiently freeze the ice cream mixture. This means you can make ice cream whenever you want, without the need to plan ahead or wait for hours for the bowl to freeze.
The Ninja Ice Cream Maker is equipped with a powerful motor that ensures smooth and consistent churning of the ice cream mixture. This results in a creamy and velvety texture, similar to that of store-bought ice cream. The mixing mechanism is designed to evenly distribute the cold air, ensuring that the ice cream freezes uniformly and doesn’t develop ice crystals.
Another advantage of the Ninja Ice Cream Maker is its versatility. In addition to making traditional ice cream flavors, it can also be used to create sorbets, frozen yogurts, and even gelato. This allows you to experiment with different recipes and flavors, catering to your personal preferences and dietary restrictions.
The Ninja Ice Cream Maker also offers a range of controls and settings to customize the ice cream-making process. It allows you to adjust the churning speed, control the consistency of the ice cream, and set various pre-programmed modes depending on the type of dessert you’re making.
Cleaning and maintenance of the Ninja Ice Cream Maker is a breeze. The parts of the machine are removable and dishwasher-safe, making it easy to keep the appliance clean after each use. This ensures that you can enjoy your homemade ice cream without any lingering flavors from previous batches.
Overall, the Ninja Ice Cream Maker is a reliable and efficient appliance that simplifies the process of making homemade ice cream. Its innovative features, sleek design, and versatility make it a top choice for ice cream enthusiasts and those who love to experiment with different flavors and textures.
Components of the Ninja Ice Cream Maker
The Ninja Ice Cream Maker is designed with several key components that work together to create delicious homemade ice cream. Understanding these components will help you make the most out of your ice cream-making experience. Let’s take a closer look:
- Freezing Canister: The freezing canister is the heart of the Ninja Ice Cream Maker. It is a double-walled container that is specially designed to freeze the ice cream mixture. The canister is filled with a cooling solution that freezes when the ice cream maker is activated. It is important to pre-freeze the canister before making ice cream to ensure that it is at the optimal temperature for freezing the mixture.
- Mixing Paddle: The mixing paddle is responsible for churning the ice cream mixture during the freezing process. It is attached to the motor and rotates at a consistent speed, ensuring that the mixture is evenly mixed and frozen. The paddle is designed to create aeration in the ice cream, resulting in a creamy and smooth texture.
- Motor Base: The motor base houses the motor that drives the mixing paddle. It provides the power necessary to rotate the paddle and churn the ice cream mixture. The motor base also contains the control panel, where you can adjust the settings and monitor the progress of the ice cream-making process.
- Lid: The lid of the Ninja Ice Cream Maker fits securely onto the freezing canister, preventing any liquid or ice cream mixture from leaking out during the freezing process. It also helps to maintain the optimal temperature inside the canister, ensuring that the ice cream freezes properly.
- Spout: The spout is located on the side of the freezing canister and allows you to add mix-ins or additional ingredients while the ice cream is being made. This feature enables you to create customized flavors and add fun and exciting elements to your ice cream.
- Control Panel: The control panel is located on the motor base and provides a range of settings and options for making ice cream. It allows you to set the desired churning speed, adjust the freezing time, and choose specific pre-programmed modes, depending on the type of dessert you’re making. The control panel also displays the current temperature and the remaining time for the ice cream to freeze.
Understanding the components of the Ninja Ice Cream Maker will help you utilize its features effectively and create delicious homemade ice cream with ease. Now that you’re familiar with the components, let’s dive into the innovative freezing technology that sets the Ninja Ice Cream Maker apart from other ice cream makers.
Freezing Technology in the Ninja Ice Cream Maker
The Ninja Ice Cream Maker incorporates advanced freezing technology to quickly and efficiently freeze the ice cream mixture, resulting in smooth and creamy homemade ice cream. Let’s explore the innovative freezing technology that sets the Ninja Ice Cream Maker apart:
The freezing canister of the Ninja Ice Cream Maker is equipped with a double-walled design. The space between the walls is filled with a cooling solution that freezes when the ice cream maker is activated. This cooling solution helps to lower the temperature inside the canister rapidly, ensuring that the ice cream mixture freezes evenly and quickly.
Unlike traditional ice cream makers that require pre-freezing the canister in the freezer for several hours beforehand, the Ninja Ice Cream Maker eliminates the need for this step. The cooling solution in the canister is specially formulated to freeze within a short amount of time, allowing you to make ice cream on-demand without the need for pre-planning.
Once you have prepped your ice cream mixture, you simply pour it into the freezing canister and attach the lid securely. The motor base contains a built-in compressor that activates the freezing process. The cooling solution in the canister starts to freeze, rapidly lowering the temperature and creating the perfect environment for freezing the ice cream mixture.
The mixing paddle, which is attached to the motor, rotates at a consistent speed, ensuring that the ice cream mixture is continuously churned and mixed as it freezes. This constant movement helps to incorporate air into the mixture, creating a light and creamy texture.
As the ice cream mixture is churned, the cold air is evenly distributed within the canister, preventing any ice crystals from forming. This process ensures that the ice cream freezes uniformly, resulting in a smooth and velvety texture.
The Ninja Ice Cream Maker also allows you to control the freezing time, depending on the desired consistency of your ice cream. The control panel provides options for adjusting the freezing duration, allowing you to make soft-serve or hard ice cream, depending on your preferences.
Thanks to its innovative freezing technology, the Ninja Ice Cream Maker offers a quick and efficient way to make homemade ice cream. No more waiting for hours for the canister to freeze or dealing with messy ice and salt. With the Ninja Ice Cream Maker, you can enjoy freshly made ice cream in a matter of minutes.
Now that we’ve learned about the freezing technology of the Ninja Ice Cream Maker, let’s move on to exploring its mixing and churning mechanism.
Mixing and Churning Mechanism
The mixing and churning mechanism of the Ninja Ice Cream Maker is designed to ensure that your homemade ice cream comes out with a smooth and creamy texture. Let’s take a closer look at how this mechanism works:
At the core of the Ninja Ice Cream Maker is the mixing paddle. The mixing paddle is attached to the motor base and rotates at a consistent speed during the freezing process. This rotation ensures that the ice cream mixture is continuously mixed and churned, preventing the formation of ice crystals and creating a creamy texture.
The paddle is specifically designed to incorporate air into the ice cream mixture as it churns, resulting in a light and airy consistency. This aeration process adds volume to the ice cream and contributes to the overall smoothness and creaminess of the final product.
As the ice cream mixture is churned, the freezing canister rapidly freezes the mixture. The combination of constant churning and freezing helps to evenly distribute the cold air throughout the mixture, preventing any ice crystals from forming. This even freezing process ensures that the ice cream turns out silky and smooth.
The Ninja Ice Cream Maker offers various churning speeds that you can adjust to achieve different results. For a softer and creamier texture, you can select a slower churning speed. On the other hand, if you prefer a firmer and denser ice cream, you can opt for a faster churning speed.
In addition to the mixing and churning mechanism, the Ninja Ice Cream Maker allows you to customize your ice cream by adding mix-ins or additional ingredients. The machine is equipped with a spout on the side of the freezing canister, which enables you to easily incorporate various flavors, such as chocolate chips, fruit chunks, or cookie crumbles, into your ice cream. Simply pour in the mix-ins through the spout while the ice cream is churning, and they will be evenly distributed throughout the mixture.
It’s worth noting that the timing and sequence of adding mix-ins can vary depending on the recipe and the desired outcome. Some mix-ins may need to be added towards the end of the churning process to prevent them from sinking to the bottom, while others may be added at the beginning to ensure they are evenly distributed. Following the instructions of your specific recipe will help you achieve the best results.
The mixing and churning mechanism of the Ninja Ice Cream Maker works in harmony to create delicious, creamy, and well-incorporated ice cream. Whether you prefer classic flavors or enjoy experimenting with unique combinations, the Ninja Ice Cream Maker ensures that your frozen treat is perfectly mixed and churned to perfection.
Now that we understand how the Ninja Ice Cream Maker mixes and churns the ice cream, let’s move on to the next step: using the Ninja Ice Cream Maker.
When using the Ninja Ice Cream Maker, make sure to freeze the bowl for at least 24 hours before using it. This will ensure that the ice cream mixture freezes properly and results in a creamy texture.
Using the Ninja Ice Cream Maker
The Ninja Ice Cream Maker is designed to be user-friendly, allowing you to easily create delicious homemade ice cream. Whether you’re a novice ice cream maker or an experienced enthusiast, the following steps will guide you on how to use the Ninja Ice Cream Maker:
- Pre-freeze the Freezing Canister: Before you begin, make sure the freezing canister is pre-frozen. Place the canister in the freezer for the recommended amount of time as stated in the instruction manual. This step ensures that the canister is at the optimal temperature for freezing the ice cream mixture.
- Prepare the Ice Cream Mixture: While the freezing canister is pre-freezing, prepare your ice cream mixture according to your desired recipe. Be creative and experiment with different flavors and ingredients to make your own unique creations. Remember to chill the mixture in the refrigerator before pouring it into the freezing canister.
- Assemble the Ninja Ice Cream Maker: Once the freezing canister is pre-frozen and the ice cream mixture is prepared, assemble the Ninja Ice Cream Maker. Attach the mixing paddle to the motor base and place the freezing canister on top. Ensure that the paddle is securely in place and the lid of the canister is tightly closed. The machine should be properly assembled before moving on to the next step.
- Pour the Ice Cream Mixture: Carefully pour the prepared ice cream mixture into the freezing canister. Be mindful not to overfill the canister, as the mixture will expand during the churning and freezing process. Leave some space at the top to allow room for the mixture to churn and incorporate air.
- Set the Churning Speed: Depending on your desired texture, use the control panel to select the churning speed. If you prefer a softer and creamier ice cream, choose a slower churning speed. For a firmer and denser texture, opt for a faster churning speed.
- Start the Freezing Process: Once the mixture is poured and the churning speed is set, it’s time to start the freezing process. Press the appropriate button on the control panel to activate the machine. The motor will start rotating the mixing paddle, and the freezing canister will begin freezing the ice cream mixture.
- Monitor and Adjust as Necessary: Throughout the freezing process, monitor the consistency and texture of the ice cream. Some recipes may require additional mix-ins or adjustments to the freezing time. If adding mix-ins, pour them through the spout on the side of the canister while the ice cream is churning. Follow your recipe instructions for the optimal timing and sequence of adding mix-ins.
- Check for Desired Consistency: After the recommended freezing time has passed, check the ice cream for the desired consistency. If it has reached your desired texture, you can stop the machine and remove the freezing canister. If you prefer a firmer consistency, you can continue to churn the ice cream for a little longer, making sure not to over-churn.
- Serve and Enjoy: Once you have achieved the desired consistency, scoop the freshly made ice cream from the freezing canister and serve it in bowls or cones. Garnish with your favorite toppings, such as sprinkles or chocolate sauce, and enjoy your homemade ice cream creation!
Remember to follow the specific instructions provided in the Ninja Ice Cream Maker’s user manual for optimal results. Each machine may have slight variations in operation and recommended freezing times.
Now that you know how to use the Ninja Ice Cream Maker, let’s move on to the next step: cleaning and maintenance.
Cleaning and Maintenance
Proper cleaning and maintenance of your Ninja Ice Cream Maker are crucial to ensure optimal performance and longevity of the machine. Regular maintenance will also help keep your ice cream tasting fresh and prevent any lingering flavors from previous batches. Here are some guidelines to follow:
- Unplug and Disassemble: Before cleaning, make sure to unplug the Ninja Ice Cream Maker from the power source. Disassemble the parts, including the freezing canister, mixing paddle, and lid.
- Wipe Down the Motor Base: Use a damp cloth or sponge to wipe down the motor base, taking care to remove any spills or drips. Avoid submerging the motor base in water, as it contains electrical components.
- Clean the Freezing Canister and Lid: Wash the freezing canister and lid with warm soapy water. Scrub gently with a sponge or non-abrasive brush to remove any residue. Rinse thoroughly, ensuring all soap is removed. Allow them to air dry or dry with a clean towel.
- Remove Ice Cream Build-up: If there is any ice cream residue or build-up on the mixing paddle or inside the freezing canister, use a plastic or silicone spatula to gently scrape it away. Be careful not to damage the paddle or canister while doing so.
- Dishwasher-Safe Parts: Check the instruction manual to see if the freezing canister, mixing paddle, and lid are dishwasher-safe. If they are, feel free to place them on the top rack of the dishwasher for a thorough cleaning.
- Hand-Wash Non-Dishwasher-Safe Parts: If any parts are not dishwasher-safe, wash them by hand using warm soapy water. Be sure to rinse off all soap residue and dry them properly before reassembling the machine.
- Reassemble and Store: Once all parts are clean and dry, reassemble the Ninja Ice Cream Maker. Ensure that the mixing paddle is securely attached to the motor base and the lid fits tightly on the freezing canister. Store the machine in a cool and dry place.
- Regular Maintenance: To keep your Ninja Ice Cream Maker in top condition, regularly inspect the machine for any signs of wear or damage. If you come across any issues, refer to the instruction manual or contact customer support for assistance.
- Deep Cleaning: Occasionally, you may want to perform a deep cleaning of the freezing canister and paddle to remove any stubborn build-up. Follow the instructions in the user manual to safely and effectively clean these parts.
By following these cleaning and maintenance guidelines, you can keep your Ninja Ice Cream Maker in excellent condition and enjoy many batches of delicious homemade ice cream for years to come!
Now that you’re familiar with cleaning and maintenance, let’s move on to some tips and tricks for achieving even better results with your Ninja Ice Cream Maker.
Tips and Tricks for Better Results
To elevate your ice cream-making game with the Ninja Ice Cream Maker, here are some tips and tricks that will help you achieve even better results:
- Pre-chill Ingredients: For faster and more efficient freezing, it is recommended to pre-chill the ingredients of your ice cream mixture. This helps the freezing process to kick-start and results in smoother ice cream.
- Experiment with Flavors: Don’t be afraid to get creative with your flavor combinations. Try adding extracts, spices, or mix-ins like chocolate chips, nuts, or fruits to create unique and delicious ice cream flavors.
- Use High-Quality Ingredients: The quality of your ingredients will greatly impact the flavors and texture of your ice cream. Opt for fresh and high-quality ingredients to achieve the best results.
- Chill the Mixture: Before pouring the ice cream mixture into the freezing canister, it’s a good idea to chill it in the refrigerator. This helps in achieving a faster freeze and better consistency.
- Don’t Overfill: Avoid overfilling the freezing canister to prevent the ice cream mixture from overflowing during the churning process. Leave some space for the mixture to expand as it freezes and churns.
- Add Mix-Ins at the Right Time: Depending on the recipe, some mix-ins like chocolate chips or cookie crumbs should be added towards the end of the churning process to avoid sinking to the bottom. Follow your recipe instructions for the optimal timing.
- Allow for Proper Churning Time: The recommended churning time may vary depending on the recipe and desired texture. Be patient and allow the ice cream maker to churn for the recommended duration for the best results.
- Prevent Ice Crystals: To minimize the formation of ice crystals, make sure to properly chill the ice cream mixture, use high-fat ingredients, and ensure that the canister is pre-frozen at the recommended temperature.
- Experiment with Sweeteners: Explore different sweeteners like honey, maple syrup, or alternative sweeteners for a unique taste. Keep in mind that the sweetness may vary, so adjust the amount accordingly.
- Serve Immediately or Harden in the Freezer: With the Ninja Ice Cream Maker, you can enjoy soft-serve ice cream right after churning. If you prefer a firmer texture, transfer the freshly made ice cream to an airtight container and place it in the freezer for a few hours to harden.
By incorporating these tips and tricks into your ice cream-making process, you can take your Ninja Ice Cream Maker creations to the next level. Remember, don’t be afraid to experiment and have fun exploring new flavors and techniques.
Now that you’re armed with these tips, it’s time to wrap up our journey with the Ninja Ice Cream Maker. Let’s summarize everything we have covered so far.
Conclusion
The Ninja Ice Cream Maker is a versatile and efficient appliance that brings the joy of homemade ice cream right into your kitchen. With its innovative freezing technology, powerful mixing and churning mechanism, and user-friendly design, it offers a convenient and enjoyable ice cream-making experience for all levels of enthusiasts.
We started our journey by exploring the components of the Ninja Ice Cream Maker, understanding how each part plays a crucial role in creating delicious ice cream. We then delved into the advanced freezing technology that allows for quick and efficient freezing of the ice cream mixture, resulting in a smooth and creamy texture.
The mixing and churning mechanism of the Ninja Ice Cream Maker ensures that the ice cream is perfectly mixed and aerated, achieving a delightful consistency. We also learned how to use the Ninja Ice Cream Maker, following a step-by-step process to create our own customized ice cream flavors.
Cleaning and maintenance are essential to keep the Ninja Ice Cream Maker in top condition, ensuring optimal performance and longevity. We discovered the importance of proper cleaning practices and how to maintain the machine for years of ice cream-making enjoyment.
Furthermore, we explored various tips and tricks to enhance our ice cream-making skills with the Ninja Ice Cream Maker. From pre-chilling ingredients to experimenting with flavors and mix-ins, these tips provide endless possibilities for creating delectable frozen treats.
The Ninja Ice Cream Maker brings the joy of homemade ice cream into our lives, allowing us to unleash our creativity and indulge in delicious flavors. So, grab your favorite ingredients, follow the steps we’ve covered, and let the Ninja Ice Cream Maker transform your kitchen into an ice cream paradise!
Remember to refer to the instruction manual of your specific Ninja Ice Cream Maker model for detailed usage instructions and safety guidelines.
Now it’s time to unleash the ice cream chef within you and enjoy the delightful creations made with the Ninja Ice Cream Maker!
Frequently Asked Questions about How Does The Ninja Ice Cream Maker Work
Was this page helpful?
At Storables.com, we guarantee accurate and reliable information. Our content, validated by Expert Board Contributors, is crafted following stringent Editorial Policies. We're committed to providing you with well-researched, expert-backed insights for all your informational needs.


0 thoughts on “How Does The Ninja Ice Cream Maker Work”