Articles
How To Use The Kitchenaid Ice Cream Maker
Modified: October 20, 2024
Learn the art of making delicious ice cream with the Kitchenaid Ice Cream Maker. Check out our articles for tips and tricks to create a perfect frozen treat.
(Many of the links in this article redirect to a specific reviewed product. Your purchase of these products through affiliate links helps to generate commission for Storables.com, at no extra cost. Learn more)
Introduction
Welcome to the delicious world of homemade ice cream! There’s nothing quite like the creamy, cold, and refreshing taste of ice cream straight from your own kitchen. And with the Kitchenaid Ice Cream Maker, you can easily create a wide variety of frozen treats right at home.
The Kitchenaid Ice Cream Maker is an attachment for your Kitchenaid stand mixer that allows you to make ice cream, sorbet, and other frozen desserts with ease. Whether you’re a novice or an experienced home cook, this handy gadget will elevate your dessert-making game to new heights.
In this article, we will walk you through the use of the Kitchenaid Ice Cream Maker, from understanding its components to cleaning and maintenance. So, let’s get started and learn how to create delectable frozen treats right in your own kitchen!
Note: Before using the Kitchenaid Ice Cream Maker, make sure you have read the instruction manual that comes with it. It contains important information about safety guidelines and proper usage.
Key Takeaways:
- Indulge in the delightful world of homemade ice cream with the Kitchenaid Ice Cream Maker, offering versatility, convenience, and endless flavor possibilities. Elevate your dessert game and create personalized frozen treats with ease.
- Embrace your culinary creativity and enjoy the satisfaction of crafting perfectly creamy homemade ice cream. With the Kitchenaid Ice Cream Maker, troubleshoot challenges, add mix-ins, and savor the joy of creating delightful frozen delights.
What is the Kitchenaid Ice Cream Maker?
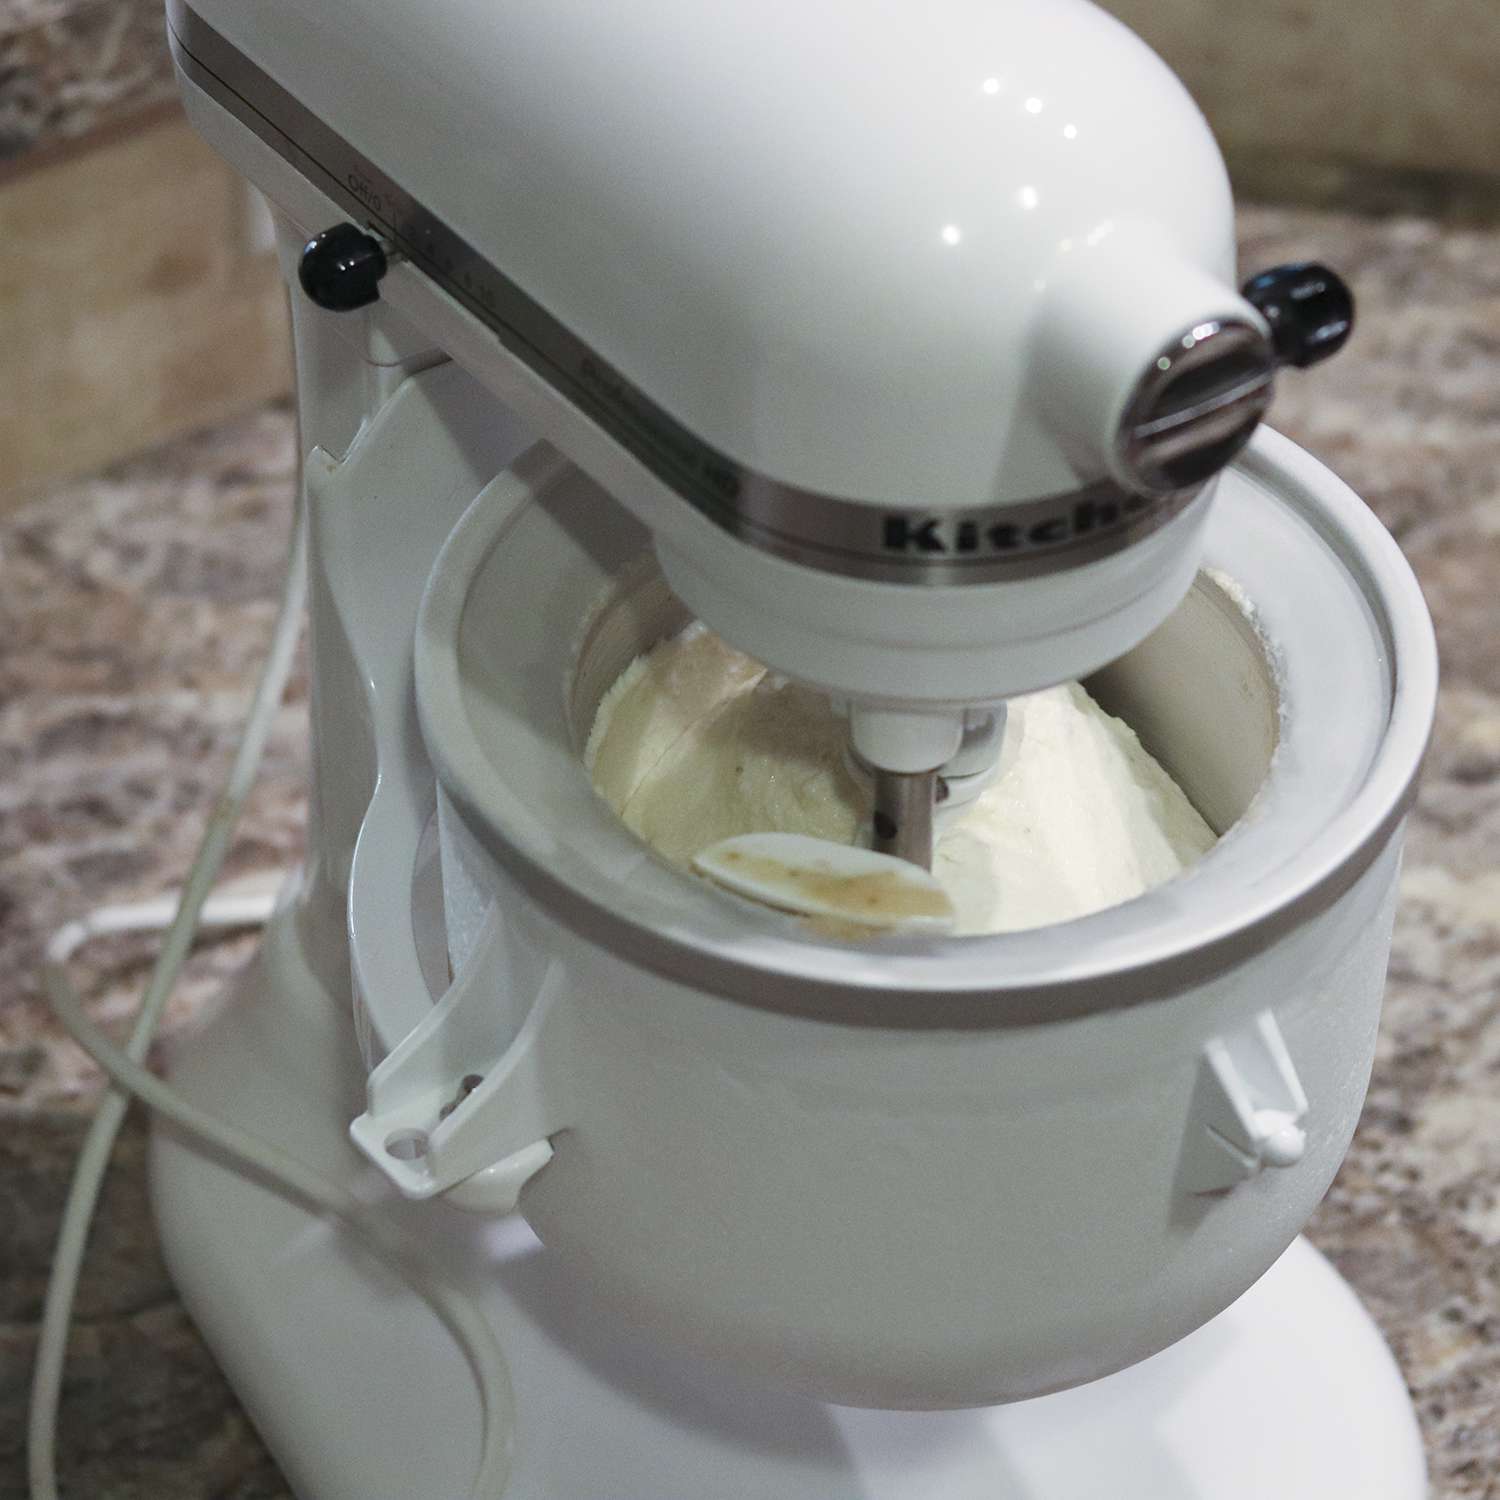
The Kitchenaid Ice Cream Maker is an attachment for your Kitchenaid stand mixer that allows you to effortlessly whip up homemade ice cream, sorbet, gelato, and other frozen treats. It is specifically designed to work with all Kitchenaid stand mixer models and is a popular accessory among home cooks and dessert enthusiasts.
This handy attachment consists of several components that work together to create perfectly smooth and creamy ice cream. The main components include the freeze bowl, the dasher, and the drive assembly. The freeze bowl is filled with a liquid coolant, which helps freeze the ice cream mixture evenly and efficiently. The dasher is the paddle-like accessory that mixes and churns the ice cream mixture inside the freeze bowl. The drive assembly connects the attachment to the power hub of the Kitchenaid stand mixer, allowing it to be operated smoothly.
One of the great advantages of the Kitchenaid Ice Cream Maker is its versatility. It allows you to experiment with various flavors, ingredients, and mix-ins, so you can create customized frozen treats to suit your taste buds. Whether you prefer classic vanilla, rich chocolate, fruity sorbets, or exotic flavors, the Kitchenaid Ice Cream Maker makes it easy to explore a wide range of recipes without the need for a separate ice cream machine.
Another notable feature of the Kitchenaid Ice Cream Maker is its user-friendly design. The attachment is simple to assemble and disassemble, which makes it convenient to use and clean. Additionally, it is compact and easy to store, taking up minimal space in your kitchen. With its durable construction and high-quality materials, the Kitchenaid Ice Cream Maker is built to last, ensuring countless batches of delicious frozen desserts for years to come.
Now that you have an understanding of what the Kitchenaid Ice Cream Maker is, let’s explore its various components and learn how to prepare it for use in the next section.
Components of the Kitchenaid Ice Cream Maker
The Kitchenaid Ice Cream Maker attachment consists of several key components that work together to create the perfect batch of homemade ice cream. Understanding each component is essential for proper usage and achieving the best results. Let’s take a closer look at the main components:
- Freeze Bowl: The freeze bowl is the main container of the Kitchenaid Ice Cream Maker. It is made of double-walled stainless steel and contains a special liquid coolant between the walls. This coolant must be frozen before use, and it is this frozen coolant that helps freeze the ice cream mixture as it churns. The freeze bowl should be placed in the freezer for at least 15 hours prior to making ice cream.
- Dasher: The dasher is the paddle-like accessory that fits into the freeze bowl. Its primary function is to mix and churn the ice cream mixture. The dasher is specially designed to create a smooth and creamy texture by evenly incorporating air into the mixture while it freezes. It is important to ensure that the dasher is securely attached to the drive assembly before use.
- Drive Assembly: The drive assembly connects the Kitchenaid Ice Cream Maker attachment to the power hub of your Kitchenaid stand mixer. It consists of a plastic housing that holds the freeze bowl and the dasher in place. The drive assembly spins the dasher while it mixes and churns the ice cream mixture. It is simple to attach and detach from the power hub, making it convenient for use and cleaning.
- Lid: The Kitchenaid Ice Cream Maker also comes with a lid that fits securely onto the freeze bowl. The lid helps to keep the mixture contained and prevents any spillage as it churns. It also helps to maintain the low temperature inside the freeze bowl, ensuring proper freezing of the ice cream mixture.
- Additional Accessories: Some Kitchenaid Ice Cream Maker models may come with additional accessories, such as recipe books or extra dashers. These accessories can provide inspiration for new flavor combinations and offer handy tips for creating the perfect frozen treats.
By familiarizing yourself with the components of the Kitchenaid Ice Cream Maker, you will be ready to prepare it for use and start making your favorite frozen desserts. In the next section, we will guide you through the process of preparing the Kitchenaid Ice Cream Maker for optimal performance.
Preparing the Kitchenaid Ice Cream Maker
Before you can start making delicious ice cream with the Kitchenaid Ice Cream Maker, it’s important to properly prepare the attachment for optimal performance. This involves chilling the freeze bowl to the right temperature and ensuring that all the components are clean and ready for use. Let’s break down the steps for preparing the Kitchenaid Ice Cream Maker:
- Clean the freeze bowl: Start by washing the freeze bowl, dasher, lid, and drive assembly with warm, soapy water. Rinse them thoroughly and dry them completely. Ensure that there are no soap residue or water droplets left on any of the components.
- Freeze the freeze bowl: Place the cleaned freeze bowl in the freezer for a minimum of 15 hours. It is recommended to keep it in the freezer at all times so that it is always ready for use whenever you decide to make ice cream.
- Prepare the ice cream mixture: While the freeze bowl is chilling, prepare your ice cream mixture. Follow a recipe of your choice or get creative and experiment with flavors. Make sure to have all the necessary ingredients ready before starting the churning process.
- Assemble the Kitchenaid Ice Cream Maker: Once the freeze bowl is adequately frozen, remove it from the freezer. Attach the dasher to the drive assembly and place them both into the freeze bowl. Ensure that the dasher is securely fitted onto the drive assembly to avoid any mishaps during the churning process.
- Attach the freeze bowl to the stand mixer: With the assembled Kitchenaid Ice Cream Maker in hand, carefully attach it to the power hub of your Kitchenaid stand mixer. Ensure that it is firmly in place and securely attached.
- Turn on the mixer: Start the Kitchenaid stand mixer at a low speed to allow the dasher to begin mixing the ice cream mixture. Gradually increase the speed as needed, depending on the consistency of the mixture and the instructions in your recipe.
- Add the ice cream mixture: Pour the prepared ice cream mixture into the freeze bowl through the opening in the lid. Be cautious not to overfill the bowl, as the ice cream will expand as it churns. Leave some space for the mixture to expand and incorporate air.
By following these preparatory steps, you will be well on your way to creating delicious homemade ice cream with your Kitchenaid Ice Cream Maker. In the next section, we will guide you through the churning process and share tips for adding mix-ins to your frozen treats.
Chilling the Ice Cream Bowl
Chilling the ice cream bowl is a crucial step in the ice cream-making process. The freeze bowl of the Kitchenaid Ice Cream Maker needs to be properly chilled to a specific temperature before it can effectively freeze the ice cream mixture. Here are the steps to chilling the ice cream bowl:
- Clean the ice cream bowl: Before chilling the freeze bowl, ensure it is clean. Wash it with warm, soapy water, rinse thoroughly, and towel dry.
- Place the bowl in the freezer: Once cleaned, place the ice cream bowl in the freezer. It is recommended to leave it in the freezer for at least 15 hours, or as per the instructions provided by the manufacturer. This extended period allows the coolant between the double walls of the bowl to freeze completely, ensuring efficient freezing of the ice cream mixture.
- Check the bowl’s temperature: After the recommended time has passed, check that the bowl is properly chilled. The inner walls of the freeze bowl should feel extremely cold to the touch. If the bowl does not feel adequately cold, leave it in the freezer for a bit longer until it reaches the desired temperature.
- Prepare the ice cream mixture: While the freeze bowl is chilling, prepare your ice cream mixture. Follow a recipe or experiment with your own flavors and ingredients. Having the mixture ready will allow you to quickly transfer it to the chilled bowl once it’s time to churn.
It’s important to note that the freeze bowl should always be stored in the freezer so that it’s ready for use whenever you have a craving for homemade ice cream. By keeping the bowl consistently chilled, you’re able to create frozen treats on-demand without any delay.
Remember, the freeze bowl acts as the tool that cools and freezes the ice cream mixture, so ensuring it is properly chilled is essential for achieving the desired creamy consistency. Once the bowl is sufficiently cold, it’s time to move on to making the ice cream mixture and using the Kitchenaid Ice Cream Maker to churn your frozen concoctions.
Read more: How To Use Ninja Ice Cream Maker
Making the Ice Cream Mixture
The ice cream mixture is the heart and soul of any homemade ice cream. It’s where you get to unleash your creativity and experiment with flavors to create a personalized dessert experience. Here are the steps to making the perfect ice cream mixture:
- Gather your ingredients: Start by gathering all the ingredients you’ll need for your ice cream recipe. This typically includes cream, milk, sugar, eggs (if making a custard-based ice cream), and any flavorings or extracts you desire.
- Measure and mix: Follow your chosen recipe or create your own flavor combination. Measure out and combine your ingredients in a mixing bowl, ensuring accurate measurements for a well-balanced mixture. Use a whisk or electric mixer to thoroughly blend all the ingredients together until the sugar is fully dissolved.
- Cool the mixture: Once the ingredients are mixed, it’s important to cool the ice cream mixture before churning. Place the mixture in the refrigerator for about 2-4 hours, or as directed by your recipe. Cooling the mixture allows the flavors to meld together and results in a smoother texture.
- Flavor variations: Don’t be afraid to get creative with your ice cream flavors! You can add inclusions like chocolate chips, fruit chunks, nuts, or swirls of caramel or fudge. Add these mix-ins during the churning process or towards the end to create beautiful ribbons and pockets of flavor throughout your ice cream.
- Straining the mixture (optional): If you prefer a smoother ice cream texture, you can strain the chilled mixture through a fine-mesh sieve to remove any lumps, fine ice crystals, or egg bits. This step is optional, depending on your preference.
Once you’ve prepared your ice cream mixture, it’s time to move on to the assembly and usage instructions, where we’ll guide you on properly using the Kitchenaid Ice Cream Maker to churn your ice cream to perfection.
Before using the KitchenAid Ice Cream Maker, make sure the freezer bowl is completely frozen for at least 15 hours. This will ensure the best results when making ice cream.
Assembly and Usage Instructions
Now that you have your ice cream mixture ready, it’s time to assemble the Kitchenaid Ice Cream Maker and start churning. Follow these step-by-step instructions to ensure a smooth and successful ice cream-making process:
- Attach the freeze bowl: Start by securely attaching the freeze bowl to the power hub of your Kitchenaid stand mixer. Ensure that it clicks into place and is firmly attached.
- Insert the dasher: Next, insert the dasher into the freeze bowl. Make sure it fits snugly into the drive assembly. It should be able to spin freely without obstruction.
- Add the ice cream mixture: Pour your chilled ice cream mixture into the freeze bowl through the opening in the lid. Be careful not to overfill the bowl, as the mixture will expand as it churns. Leave some space for the ice cream to grow and incorporate air.
- Secure the lid: Place the lid on top of the freeze bowl, ensuring it locks securely. The lid helps to keep the mixture contained and prevents any spillage during the churning process.
- Start the mixer: Turn on your Kitchenaid stand mixer and set it to a low speed to begin churning the ice cream mixture. You can gradually increase the speed as needed, depending on the consistency of the mixture and the instructions in your recipe.
- Monitor the process: As the mixture churns, pay attention to its texture and consistency. It should gradually thicken and increase in volume as it freezes. The churning process typically takes 20-30 minutes, but the exact time may vary depending on your specific recipe and preferences.
- Check for doneness: After about 20 minutes of churning, check the ice cream for doneness. It should have a soft-serve consistency at this stage. If you prefer a firmer texture, continue churning for a few more minutes until desired consistency is achieved.
- Transfer and store: Once the ice cream has reached the desired consistency, stop the mixer and carefully remove the freeze bowl from the Kitchenaid stand mixer. Transfer the freshly churned ice cream to a lidded container and place it in the freezer for a few hours to firm up even more.
By following these assembly and usage instructions, you’ll be able to churn your ice cream to perfection with the Kitchenaid Ice Cream Maker. In the next section, we’ll explore the possibilities of adding mix-ins to your homemade ice cream creations.
Churning the Ice Cream
Churning is a critical step in the ice cream-making process that transforms the liquid ice cream mixture into a smooth and creamy frozen dessert. With the Kitchenaid Ice Cream Maker, churning is a breeze. Follow these steps to achieve the perfect consistency:
- Prepare the freeze bowl: Ensure that the freeze bowl is properly chilled according to the manufacturer’s instructions. The bowl should be frozen for at least 15 hours prior to churning to ensure optimal freezing of the ice cream mixture.
- Assemble the Kitchenaid Ice Cream Maker: Attach the freeze bowl to the Kitchenaid stand mixer’s power hub, making sure it is securely fastened. Insert the dasher into the freeze bowl, ensuring it fits properly into the drive assembly.
- Add the ice cream mixture: Pour your prepared ice cream mixture into the freeze bowl through the opening in the lid. Avoid overfilling the bowl, as the mixture will expand as it churns. Leave some room for the ice cream to incorporate air and expand.
- Secure the lid: Place the lid on top of the freeze bowl, making sure it locks securely. This prevents any spillage and helps maintain the ideal temperature inside the bowl for efficient freezing.
- Start the mixer: Turn on the Kitchenaid stand mixer and set it to a low speed to begin the churning process. Allow the mixture to churn for about 20-30 minutes, or as specified in your recipe, gradually increasing the speed as needed.
- Observe the texture: Keep an eye on the texture of the ice cream as it churns. It will start off as a liquid but gradually thicken and increase in volume. The churning process incorporates air into the mixture, resulting in a smoother and creamier texture.
- Check for desired consistency: After about 20 minutes, check the ice cream for the desired consistency. It should resemble a soft-serve texture at this stage. If you prefer a firmer consistency, continue churning for a few more minutes.
- Transfer and freeze: Once the ice cream reaches your desired consistency, turn off the mixer and carefully remove the freeze bowl from the Kitchenaid stand mixer. Transfer the freshly churned ice cream into a lidded container, cover it, and place it in the freezer. Allow the ice cream to harden for a few hours before serving.
Remember, every recipe may have its own specific instructions and churn time, so it’s essential to refer to your recipe for precise guidance. With these general steps in mind, you’re ready to create homemade ice cream with the perfect creamy texture using the Kitchenaid Ice Cream Maker.
In the next section, we’ll explore the delightful world of adding mix-ins to your ice cream, allowing you to customize and elevate your frozen creations.
Adding Mix-ins
Adding mix-ins to your homemade ice cream is a wonderful way to enhance the flavors and textures of your frozen creations. Whether it’s adding chunks of chocolate, swirls of caramel, or a sprinkle of your favorite nuts, the Kitchenaid Ice Cream Maker allows you to easily incorporate mix-ins into your ice cream. Here’s how:
- Prepare your mix-ins: Start by preparing your mix-ins of choice. Chop chocolate into small chunks, toast nuts, or soften any caramel or fudge sauces you plan to swirl into the ice cream. Get creative and think about combinations that will complement the base ice cream flavor.
- Churn the ice cream: Follow the churning process with the Kitchenaid Ice Cream Maker as outlined in the previous section. Allow the ice cream to churn until it reaches your desired consistency.
- Add the mix-ins: Once the ice cream has reached the desired consistency, it’s time to incorporate the mix-ins. With the mixer turned off, remove the freeze bowl from the Kitchenaid stand mixer. Gently fold in your prepared mix-ins using a spatula or a spoon. Be careful not to overmix, as you want to ensure the mix-ins are evenly distributed throughout the ice cream.
- Layering technique: Alternatively, you can choose to layer the mix-ins as you transfer the freshly churned ice cream into a lidded container. Scoop a layer of ice cream into the container, then sprinkle or drizzle your mix-ins on top. Repeat this layering process until all the ice cream and mix-ins are used. This creates beautiful ribbons and pockets of flavor throughout the ice cream.
- Freeze and allow flavors to meld: After adding the mix-ins, cover the container and return it to the freezer. Allow the ice cream to harden for a few hours or overnight. This freezing time allows the flavors to meld together and the mix-ins to fully integrate into the ice cream, resulting in a delicious and well-balanced frozen treat.
Remember to get creative with your mix-ins and explore different flavor combinations. Whether it’s adding crushed cookies to a mint chocolate chip base or swirling raspberry preserves into a vanilla ice cream, the possibilities are endless. Experimentation is the key to discovering your favorite mix-ins and creating unique ice cream flavors that reflect your taste preferences.
In the next section, we’ll discuss the important topic of cleaning and maintaining your Kitchenaid Ice Cream Maker to ensure its longevity and optimal performance.
Read more: How To Use Whynter Ice Cream Maker
Cleaning and Maintenance
Cleaning and maintaining your Kitchenaid Ice Cream Maker is essential to ensure its longevity and continued performance. By following these simple guidelines, you can keep your ice cream maker in excellent condition:
- Clean after each use: After making ice cream, sorbet, or any frozen treats, it’s important to thoroughly clean the components of the ice cream maker. Disassemble the freeze bowl, dasher, lid, and drive assembly and wash them with warm, soapy water. Rinse them thoroughly and dry them completely before storing.
- Do not immerse the freeze bowl: While cleaning the freeze bowl, make sure not to immerse it in water or other liquids. Instead, wipe the freeze bowl with a damp cloth or sponge to remove any residues. This helps prevent damage to the freeze bowl’s internal coolant.
- Avoid using harsh abrasives: When cleaning the components, avoid using harsh abrasives, scouring pads, or abrasive cleaners. These can scratch the surfaces and damage the finish of the Kitchenaid Ice Cream Maker. Opt for mild dish soap and a soft cloth or sponge for gentle yet effective cleaning.
- Store the freeze bowl in the freezer: After cleaning and drying, always store the freeze bowl in the freezer. Keeping it in the freezer ensures that it is consistently chilled and ready for use whenever the craving for homemade ice cream arises.
- Check for damage or wear: Regularly inspect the components of the ice cream maker for any signs of damage or wear. This includes checking for cracks, chips, or loose parts. If any components are damaged, discontinue use and contact the manufacturer or authorized service center for assistance.
- Refer to the instruction manual: Consult the instruction manual provided by the manufacturer for specific cleaning instructions, maintenance tips, and any additional recommendations for your specific model of the Kitchenaid Ice Cream Maker.
By properly cleaning and maintaining your Kitchenaid Ice Cream Maker, you can ensure its longevity and enjoy many batches of delicious homemade frozen treats for years to come.
In the final section, we’ll address some common troubleshooting tips to help you resolve any issues that may arise while using the Kitchenaid Ice Cream Maker.
Troubleshooting
While the Kitchenaid Ice Cream Maker is a reliable and user-friendly attachment, you may occasionally encounter some issues during the ice cream-making process. Here are some common troubleshooting tips to help you overcome these challenges:
- Ice cream not freezing: If your ice cream mixture is not freezing properly, ensure that the freeze bowl is adequately chilled. It should be frozen for at least 15 hours prior to churning. Additionally, make sure that the mixture is cold enough before churning. Cooling the mixture in the refrigerator for a few hours before churning can help ensure proper freezing.
- Ice cream too soft: If your ice cream turns out too soft after churning, it may have been churned for too short a time. Continue churning for a few more minutes until the desired consistency is achieved. Alternatively, your mixture may have contained too much liquid, which prevented it from freezing thoroughly. Adjust the ratio of liquid ingredients in your recipe for a firmer result.
- Ice crystals in the ice cream: The presence of ice crystals in your ice cream can be due to improper chilling of the freeze bowl or adding warm ingredients to the ice cream maker. Ensure that the bowl is properly chilled and that all the ingredients are adequately cooled before churning. Ice crystals can also form if the ice cream is stored improperly, such as being exposed to temperature fluctuations in the freezer. Transfer the ice cream to an airtight container to minimize the formation of ice crystals.
- Loud noise or vibration: If you experience loud noise or excessive vibration while using the Kitchenaid Ice Cream Maker, check that all the components are properly assembled and securely attached. The mixture may be too thick or the dasher may be hitting the sides of the freeze bowl. Adjust the speed or amount of mixture, and ensure that the lid is locked securely.
- Uneven freezing or over-spinning: Uneven freezing or over-spinning can occur if the dasher is not properly aligned or if the mixture is too thick. Check that the dasher is securely attached and spins freely without obstruction. Adjust the mixture consistency if needed, ensuring it is not too thick to allow for proper churning.
- For other specific issues: If you encounter any other specific issues or have concerns about the performance of your Kitchenaid Ice Cream Maker, consult the instruction manual provided with the attachment or reach out to the manufacturer’s customer support for further assistance.
Remember that troubleshooting may vary depending on the specific model of your Kitchenaid Ice Cream Maker. It is always best to consult the instruction manual or contact the manufacturer for guidance specific to your attachment.
With these troubleshooting tips, you’ll be equipped to overcome any challenges and continue creating delicious homemade ice cream with your Kitchenaid Ice Cream Maker.
Let your culinary creativity run wild and enjoy the delightful flavors of homemade frozen treats!
Note: The information provided in this article is intended as a general guide. Always follow the specific instructions provided by the manufacturer for your Kitchenaid Ice Cream Maker model.
Conclusion
Congratulations on embarking on your homemade ice cream-making journey with the Kitchenaid Ice Cream Maker! By understanding the components, preparing the attachment, and following the assembly and usage instructions, you can create delicious frozen treats right in your own kitchen.
The Kitchenaid Ice Cream Maker offers versatility and convenience, allowing you to explore a variety of flavors and experiment with mix-ins to create personalized frozen delights. From classic vanilla and rich chocolate to fruity sorbets and inventive combinations, the possibilities are endless.
Remember to properly clean and maintain your Kitchenaid Ice Cream Maker after each use to ensure its longevity and continued performance. By following the troubleshooting tips, you can overcome any challenges that may arise and continue to perfect your homemade ice cream-making skills.
With each batch of freshly churned ice cream, you can indulge in the satisfaction of creating a treat that is tailored to your taste preferences. Share the joy by serving your creations to family and friends, or simply enjoy a moment of sweet indulgence all to yourself.
So, grab your favorite mix-ins, unleash your creativity, and let the Kitchenaid Ice Cream Maker transport you to a world of creamy, dreamy frozen goodness. Happy churning!
Note: Always refer to the instruction manual provided by the manufacturer for specific guidelines and safety information regarding your Kitchenaid Ice Cream Maker.
Frequently Asked Questions about How To Use The Kitchenaid Ice Cream Maker
Was this page helpful?
At Storables.com, we guarantee accurate and reliable information. Our content, validated by Expert Board Contributors, is crafted following stringent Editorial Policies. We're committed to providing you with well-researched, expert-backed insights for all your informational needs.


0 thoughts on “How To Use The Kitchenaid Ice Cream Maker”