Articles
How Long To Perk Coffee On The Stove Top
Modified: August 27, 2024
Discover how long it takes to perk coffee on the stove top with these informative articles. Unlock the secrets to brewing the perfect cup of joe at home.
(Many of the links in this article redirect to a specific reviewed product. Your purchase of these products through affiliate links helps to generate commission for Storables.com, at no extra cost. Learn more)
Introduction
Welcome to the wonderful world of stovetop coffee! If you’re tired of your typical drip coffee maker and want to try something new and exciting, brewing coffee on the stovetop is a fantastic option. Not only does it create a unique and flavorful cup of coffee, but it also allows you to have more control over the brewing process.
Stovetop coffee, also known as percolator coffee, has been a popular method of brewing coffee for many years. It involves using a stovetop coffee maker, also called a percolator, to heat water and extract the coffee’s rich flavors. The result is a robust and aromatic cup of coffee that is sure to please any coffee lover.
In this article, we will guide you through the process of brewing stovetop coffee to perfection. We will cover everything from choosing the right grind to perking the coffee and finally serving it. So, grab your coffee beans, dust off your stovetop coffee maker, and let’s get started on this delicious journey!
Key Takeaways:
- Experience the rich and robust flavors of stovetop coffee by mastering the art of brewing. From grind selection to perking time, immerse yourself in the delightful journey of creating a perfect cup.
- Elevate your coffee experience with stovetop brewing. Embrace the sensory process, experiment with variables, and savor the nostalgia and tradition of crafting a comforting cup of rich, aromatic coffee.
What is stovetop coffee?
Stovetop coffee, also known as percolator coffee, is a brewing method that involves using a stovetop coffee maker to extract the flavors of coffee beans. It is a traditional and classic way to brew coffee that has been enjoyed by coffee enthusiasts for generations.
The stovetop coffee maker, also called a percolator, is made up of two chambers – the bottom chamber holds water, while the top chamber holds the coffee grounds. As the water in the bottom chamber heats up, it creates steam pressure that forces the water up through a central tube. The hot water then flows over the coffee grounds, extracting their flavors as it percolates back down into the bottom chamber.
One of the unique aspects of stovetop coffee is the extended contact time between the water and the coffee grounds. This results in a strong and robust cup of coffee, with a deep and rich flavor profile. Stovetop coffee can have a slightly stronger taste compared to other brewing methods, making it a favorite among those who prefer a bold and intense cup of joe.
Stovetop coffee makers come in various sizes and styles, ranging from small single-serving models to larger ones that can brew enough coffee for a group of people. They are typically made of stainless steel or aluminum, providing durability and heat resistance. Some percolators also feature glass or clear plastic knobs that allow you to monitor the brewing process.
While stovetop coffee may take a bit more time and effort compared to other brewing methods, many coffee enthusiasts believe it is well worth it. The process itself can be quite enjoyable, from the sound of the coffee percolating to the enticing aroma that fills your kitchen. Plus, the end result is a delicious and satisfying cup of coffee that will surely satisfy your caffeine cravings.
In the next sections, we will guide you through the steps to make the perfect stovetop coffee, ensuring that every cup is brewed to perfection.
Step 1: Choosing the right grind
One of the key factors in brewing delicious stovetop coffee is selecting the appropriate grind size for your coffee beans. The grind size determines how quickly the water extracts flavors from the beans and plays a crucial role in the overall taste and strength of the coffee.
For stovetop coffee, a medium to medium-fine grind is typically recommended. This grind size allows for the optimal extraction of flavors without causing the coffee to become too bitter or over-extracted. A medium grind is similar to the consistency of granulated sugar, while a medium-fine grind is slightly finer, resembling sand.
You can either purchase pre-ground coffee or grind your own beans at home. If you choose to grind your own coffee, invest in a burr grinder for the most consistent results. Burr grinders allow you to adjust the grind size to your preference, ensuring that you achieve the perfect grind for stovetop coffee.
It’s important to note that different coffee beans and roasts may require slight adjustments in the grind size. Darker roasts generally benefit from a slightly coarser grind, while lighter roasts may benefit from a finer grind to extract more flavors.
Once you have selected the appropriate grind size, it’s crucial to use the right amount of coffee for your stovetop coffee maker.
In the next step, we will discuss measuring the coffee and water for the perfect stovetop brew.
Step 2: Measuring the coffee and water
Accurate measurement of the coffee and water is essential to achieve a well-balanced and flavorful cup of stovetop coffee.
As a general rule of thumb, use a ratio of 1 tablespoon of coffee grounds for every 6 ounces of water. This ratio can be adjusted based on your personal preference for a stronger or weaker cup of coffee. If you prefer a stronger brew, you can increase the amount of coffee grounds, while for a milder cup, you can decrease the amount.
When measuring the coffee grounds, it’s best to use a digital kitchen scale for accuracy. This ensures that you are consistently using the same amount of coffee grounds for each brew. However, if you don’t have a scale, you can use a tablespoon to measure the coffee grounds, leveling off each scoop with a knife or your finger.
Similarly, when measuring the water, it’s helpful to use a measuring cup or a scale to ensure the correct amount. Remember to measure the water before placing it in the stovetop coffee maker.
By carefully measuring the coffee and water, you can maintain a consistent and balanced brew every time you make stovetop coffee. This ensures that you extract the ideal flavors from the coffee grounds without over or under-extracting.
Once you have measured the coffee and water, you are ready to move on to preparing the stovetop coffee maker for brewing.
Step 3: Preparing the stovetop coffee maker
Before you start brewing stovetop coffee, it’s important to properly prepare the stovetop coffee maker. This will ensure that it is clean and ready to produce a delicious cup of coffee.
First, disassemble the stovetop coffee maker by removing the top chamber, the coffee basket, and the bottom chamber. Rinse each component with warm water to remove any dust or residue. You can also use a mild detergent to give it a thorough cleaning if necessary. Make sure to rinse off all soap residue before reassembling the coffee maker.
Next, fill the bottom chamber of the stovetop coffee maker with fresh, cold water. It’s important to use cold water rather than hot water, as this will allow the coffee maker to gradually heat up and extract the flavors effectively.
Place the coffee basket into the bottom chamber, ensuring it sits snugly without any gaps. This is where you will add the coffee grounds later on.
Once the coffee basket is in place, carefully screw on the top chamber of the stovetop coffee maker. Ensure that it is securely tightened to prevent any leaks during the brewing process.
At this point, your stovetop coffee maker is ready to go. Double-check that all the components are properly assembled and tightly secured before moving on to the next step.
In the next step, we will discuss how to heat the stovetop coffee on the stove.
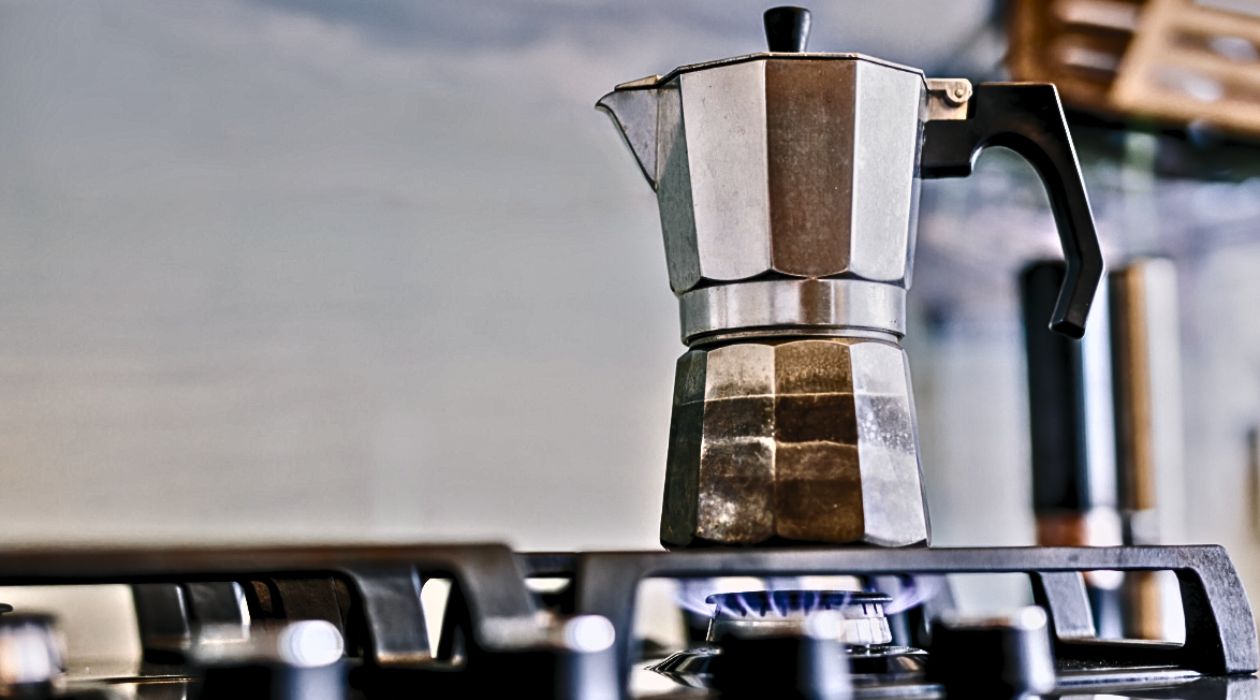
Keep the coffee on the stove top for about 5-7 minutes after it starts to perk. This will ensure that the coffee is properly brewed and not over-extracted.
Read more: How To Make Coffee On The Stove Top
Step 4: Heating the coffee on the stovetop
Heating the coffee on the stovetop is a crucial step in the stovetop coffee brewing process. This is where the magic happens and the water begins to extract the flavors from the coffee grounds.
Place the assembled stovetop coffee maker on your stovetop burner. Make sure to align it with the heat source properly to ensure even heating.
Turn the heat to medium-low or low, as stovetop coffee benefits from a slower and gentler heating process. This allows for proper extraction and ensures that the coffee doesn’t become too bitter.
It’s important to monitor the heating process closely to prevent the coffee from boiling or overheating. Once the water in the bottom chamber starts to heat up, you will notice steam and hear a gentle gurgling sound as the water begins to percolate and rise through the central tube.
Patience is key when heating stovetop coffee. Allow the coffee maker to heat slowly and steadily, giving the water sufficient time to extract the flavors from the coffee grounds. The heating process usually takes around 5-8 minutes, but this can vary depending on the size of your stovetop coffee maker and the heat intensity.
As the water percolates, pay attention to the aroma that fills the air. The delightful scent of freshly brewed coffee is an indication that your stovetop coffee is on its way to perfection.
Once the heating process is complete, it’s time to move on to the exciting step of perking the coffee.
Note: It’s important to follow the manufacturer’s instructions and safety precautions when using a stovetop coffee maker. Ensure that your stovetop coffee maker is compatible with your stovetop burner and that you are using it in a safe and appropriate manner.
Step 5: Perking the coffee
Perking the coffee is the heart of the stovetop coffee brewing process. This is where the water that has been heated in the bottom chamber rises up through the central tube and flows over the coffee grounds, extracting their rich flavors.
As the water percolates, you will notice a steady stream of coffee filling the top chamber of the stovetop coffee maker. This is a beautiful sight to behold and a sign that your coffee is well on its way to perfection.
Perking times can vary depending on personal preference and the desired strength of the coffee. A general guideline is to perk the coffee for around 5-7 minutes. However, you can adjust this time to achieve a milder or stronger brew.
It’s important to maintain a gentle and consistent heat during the perking process. Keep the stovetop burner at a low to medium-low heat setting to prevent the coffee from boiling over or over-extracting, which can lead to a bitter taste.
As the coffee perks, the aroma will continue to fill your kitchen, creating a truly enticing atmosphere. It’s a joy to observe the transformation of water and coffee grounds into a delicious cup of stovetop coffee.
Once the desired perking time has elapsed, it’s time to move on to the final step of removing the stovetop coffee maker from heat and serving the coffee.
Pro tip: Use a kitchen timer or stopwatch to ensure that you perk the coffee for the appropriate amount of time. This will help you achieve consistent and delicious results with each brew.
Step 6: Removing from heat and serving
After the coffee has finished perking, it’s important to remove the stovetop coffee maker from the heat to prevent over-extraction and ensure that your coffee is at the optimal temperature for serving.
Carefully use a heat-resistant oven mitt or towel to grip the handle of the stovetop coffee maker. Lift it off the stovetop burner and place it on a heat-resistant surface, such as a trivet or a folded kitchen towel.
Allow the stovetop coffee maker to cool for a minute or two before serving. This will give the coffee time to settle and allow the flavors to fully develop. It’s worth the short wait to ensure that you enjoy the best possible cup of stovetop coffee.
When serving the stovetop coffee, use a heat-resistant coffee pot or a pouring vessel with a spout to avoid any spills or drips. Slowly and gently pour the coffee into your favorite mug or cup, taking care to avoid pouring any coffee grounds that may have made their way into the top chamber.
Stovetop coffee is often enjoyed as is, without the need for additional sugar or cream. However, feel free to customize your cup of coffee to your liking. Add a splash of milk, a dollop of cream, or a sprinkle of sugar if desired. Experiment with different flavorings and toppings to enhance the taste and create your perfect cup of stovetop coffee.
Finally, sit back, relax, and savor the delicious aroma and flavors of your homemade stovetop coffee. Take a moment to appreciate the craftsmanship and love that went into brewing this delightful cup.
Pro tip: If you have brewed more coffee than you will drink at once, transfer the remaining coffee to a thermos or an airtight container to keep it warm and fresh for later servings.
Congratulations! You have successfully brewed a flavorful and aromatic batch of stovetop coffee. Now, sit back, enjoy, and revel in the satisfaction of your brewing prowess.
Tips for perfect stovetop coffee
While brewing stovetop coffee is a relatively straightforward process, there are a few tips and tricks that can help you achieve the perfect cup every time. Here are some suggestions to enhance your stovetop coffee brewing experience:
- Choose quality coffee beans: The quality of your coffee beans will greatly impact the taste of your stovetop coffee. Opt for freshly roasted beans from a reputable source for the best flavor.
- Grind your coffee just before brewing: To maximize the flavors, grind your coffee beans just before you’re ready to brew. This ensures that the grounds are fresh and the aroma is at its peak.
- Experiment with different coffee-to-water ratios: While the general ratio is 1 tablespoon of coffee per 6 ounces of water, feel free to adjust it to your preference. You can increase or decrease the coffee grounds for a stronger or milder cup of coffee.
- Preheat the water: If you prefer a hotter cup of coffee, consider preheating the water in a kettle before pouring it into the stovetop coffee maker. This can help maintain a higher brewing temperature.
- Don’t overheat the coffee: Keep the heat at a low to medium-low setting to avoid boiling the coffee, which can lead to a bitter taste. A gradual and gentle heating process is key to extracting the best flavors.
- Avoid over-extraction: Once the coffee has finished perking, remove the stovetop coffee maker from the heat promptly. Allowing it to perk for too long can result in over-extraction and a bitter taste.
- Clean the stovetop coffee maker regularly: A clean coffee maker ensures optimal brewing. Regularly clean the various components of your stovetop coffee maker to remove any residue or buildup.
- Experiment and personalize: Stovetop coffee brewing is a fun and customizable process. Don’t be afraid to experiment with different beans, grind sizes, brewing times, and serving styles to find your perfect cup of stovetop coffee.
By incorporating these tips into your stovetop coffee brewing routine, you can elevate your coffee experience and enjoy a consistently delicious cup of joe.
Remember, brewing stovetop coffee is an art form that allows you to express your creativity and passion for coffee. Embrace the process, savor the results, and indulge in the rich flavors of your homemade stovetop coffee.
Read more: How Long To Cook Cod On Stove Top
Conclusion
Brewing stovetop coffee is a rewarding and immersive experience that allows you to enjoy a delicious cup of coffee with a rich and robust flavor. By following the steps outlined in this guide, you can master the art of stovetop coffee brewing and create an exceptional cup of joe each time.
From selecting the right grind size to measuring the coffee and water accurately, every aspect of the process plays a vital role in achieving the perfect brew. The gentle heat, the perking sound, and the enticing aroma together create a sensory experience that simply cannot be replicated with other brewing methods.
Remember to keep experimenting and adjusting the variables to cater to your personal taste preferences. Every coffee bean, grind size, and brewing time can deliver unique results. Embrace the opportunity to explore different flavors and find the perfect balance that suits your palate.
Whether you’re starting your day with a comforting cup of stovetop coffee or enjoying a relaxing afternoon break, the process of brewing stovetop coffee adds a touch of nostalgia and tradition to your coffee-making routine. It’s a time-honored method that connects you with the rich history of coffee brewing and allows you to create a comforting ritual.
Now that you have a comprehensive understanding of brewing stovetop coffee, it’s time to put your knowledge into practice. Dust off your stovetop coffee maker, gather your favorite coffee beans, and steep yourself in the delightful journey of brewing your very own stovetop coffee masterpiece.
Enjoy the process, embrace the aroma, and savor every sip of your homemade stovetop coffee. Cheers to the joy of brewing and to the incredible world of coffee!
Frequently Asked Questions about How Long To Perk Coffee On The Stove Top
Was this page helpful?
At Storables.com, we guarantee accurate and reliable information. Our content, validated by Expert Board Contributors, is crafted following stringent Editorial Policies. We're committed to providing you with well-researched, expert-backed insights for all your informational needs.


0 thoughts on “How Long To Perk Coffee On The Stove Top”