Articles
How To Make Coffee On The Stove Top
Modified: January 5, 2024
Learn how to make delicious coffee on the stove top with these easy-to-follow articles. Start brewing your perfect cup today!
(Many of the links in this article redirect to a specific reviewed product. Your purchase of these products through affiliate links helps to generate commission for Storables.com, at no extra cost. Learn more)
Introduction
There’s nothing quite like the aroma of freshly brewed coffee to kickstart your morning or to enjoy during a relaxing afternoon. While there are various ways to make coffee, one timeless method is using a stove top coffee maker. This classic brewing technique offers simplicity, convenience, and the ability to produce a rich and flavorful cup of coffee.
In this article, we will guide you through the steps of making coffee on the stove top. Whether you’re a coffee enthusiast looking to explore new brewing methods or simply don’t have access to a traditional coffee machine, learning how to make coffee on the stove top will empower you to create a delicious cup of Joe in the comfort of your own home.
Before we begin, it’s important to note that this method typically involves using a Moka pot or a percolator. These specialized coffee makers are designed to brew coffee on the stove top and come in various sizes to accommodate different brewing volumes.
So, grab your favorite coffee beans, prepare your stove, and let’s dive into the wonderful world of stove top coffee brewing!
Key Takeaways:
- Elevate your coffee experience with stove top brewing. Follow simple steps to create a rich and aromatic cup of coffee tailored to your taste preferences. Embrace the art of stove top brewing and savor the satisfaction.
- Master the art of stove top coffee brewing. From grinding beans to serving the perfect cup, enjoy the process and experiment with different techniques to craft your personalized coffee experience.
Read more: How Long To Perk Coffee On The Stove Top
Equipment Needed
Before you embark on your stove top coffee brewing journey, it’s important to gather all the necessary equipment. Here’s what you’ll need:
- Stove Top Coffee Maker: As mentioned earlier, you’ll need a specialized coffee maker such as a Moka pot or a percolator. These can be easily found online or at your local kitchenware store. Choose a size that suits your brewing needs.
- Coffee Beans: Quality coffee beans are the foundation of a great cup of coffee. Select your favorite coffee beans, preferably whole bean for maximum freshness. If possible, opt for beans that are freshly roasted.
- Coffee Grinder: To ensure optimal flavor extraction, it’s recommended to grind your coffee beans just before brewing. Invest in a good quality coffee grinder to achieve a consistent grind size.
- Filtered Water: The quality of water used can significantly impact the taste of your coffee. For the best results, use filtered or bottled water. Avoid using distilled or heavily chlorinated water.
- Stove: Of course, you’ll need a stove or a cooktop to heat your water and brew your coffee. Ensure that your stove is clean and in good working condition.
- Heat Source: Depending on your stove top coffee maker, you may need a gas burner, electric coil, or induction cooktop. Make sure you have the appropriate heat source to match your coffee maker’s requirements.
- Timer: While not essential, a timer can be handy for keeping track of the brewing time and ensuring consistent results with each batch.
Now that you have all the necessary equipment ready, it’s time to move on to the next step: grinding the coffee beans.
Step 1: Grind the Coffee Beans
Grinding your coffee beans just before brewing is essential for unlocking their full flavor potential. The grind size will depend on your stove top coffee maker, so it’s important to refer to the manufacturer’s instructions or experiment to achieve the desired taste. Here’s how to grind your coffee beans:
- Select the Right Grinder: If you haven’t already, invest in a good quality coffee grinder. Burr grinders are highly recommended for their ability to deliver a consistent grind size.
- Measure the Coffee: Determine the amount of coffee you need based on your desired strength and the capacity of your stove top coffee maker. As a general guideline, use approximately 1 tablespoon (7-8 grams) of coffee per 6 ounces (180 milliliters) of water.
- Set the Grind Size: Adjust the grind size on your coffee grinder to match the requirements of your stove top coffee maker. For Moka pots, a medium-fine grind works well, similar to that of table salt. Percolators may require a slightly coarser grind.
- Grind the Coffee: Add the measured coffee beans to the grinder and start grinding. Aim for a consistent grind size, avoiding large chunks or excessively fine particles. Grind just enough coffee for your current brewing session to maintain freshness.
- Inspect the Grounds: After grinding, inspect the grounds for any clumps or unevenness. Break up any clumps with your fingers or a spoon to ensure even extraction during brewing.
- Transfer the Grounds: Carefully transfer the freshly ground coffee into a clean, dry container or directly into your coffee maker’s brewing chamber if it allows for it.
Now that your coffee beans are ground, it’s time to move on to the next step: measuring the coffee and water.
Step 2: Measure the Coffee and Water
Now that you have freshly ground coffee beans, it’s time to measure the coffee and water for your stove top brewing. Proper measurements will ensure a balanced and flavorful cup of coffee. Here’s how to measure the coffee and water:
- Coffee Measurement: Refer to the instructions provided by your stove top coffee maker to determine the appropriate coffee-to-water ratio. As a general guideline, use approximately 1 tablespoon (7-8 grams) of coffee per 6 ounces (180 milliliters) of water. Adjust the amount based on your personal preference for a stronger or milder brew.
- Water Measurement: Measure the desired amount of water using a measuring cup or scale. Be precise in your measurements to ensure consistency with every brew. Take note of the capacity of your coffee maker to avoid overfilling.
- Combine Coffee and Water: Prepare your coffee maker by removing any old grounds or residue. Add the measured coffee into the coffee maker’s filter basket or chamber, distributing it evenly. Then, pour the measured water into the coffee maker’s water reservoir.
- Level the Coffee: Take a spoon or your finger and level the coffee grounds in the filter basket or chamber for an even extraction. This helps to ensure that the water flows through the coffee uniformly.
- Double-check the Measurements: Before moving on to the next step, verify that you have accurately measured both the coffee and water. Accurate measurements are crucial for a balanced and flavorful cup of coffee.
Now that you have measured the coffee and water, it’s time to move on to the next step: heating the water on the stove.
Step 3: Heat the Water on the Stove
With the coffee and water measured, it’s time to heat the water on the stove. This step sets the stage for the brewing process and requires careful attention to ensure proper water temperature. Follow these steps to heat the water:
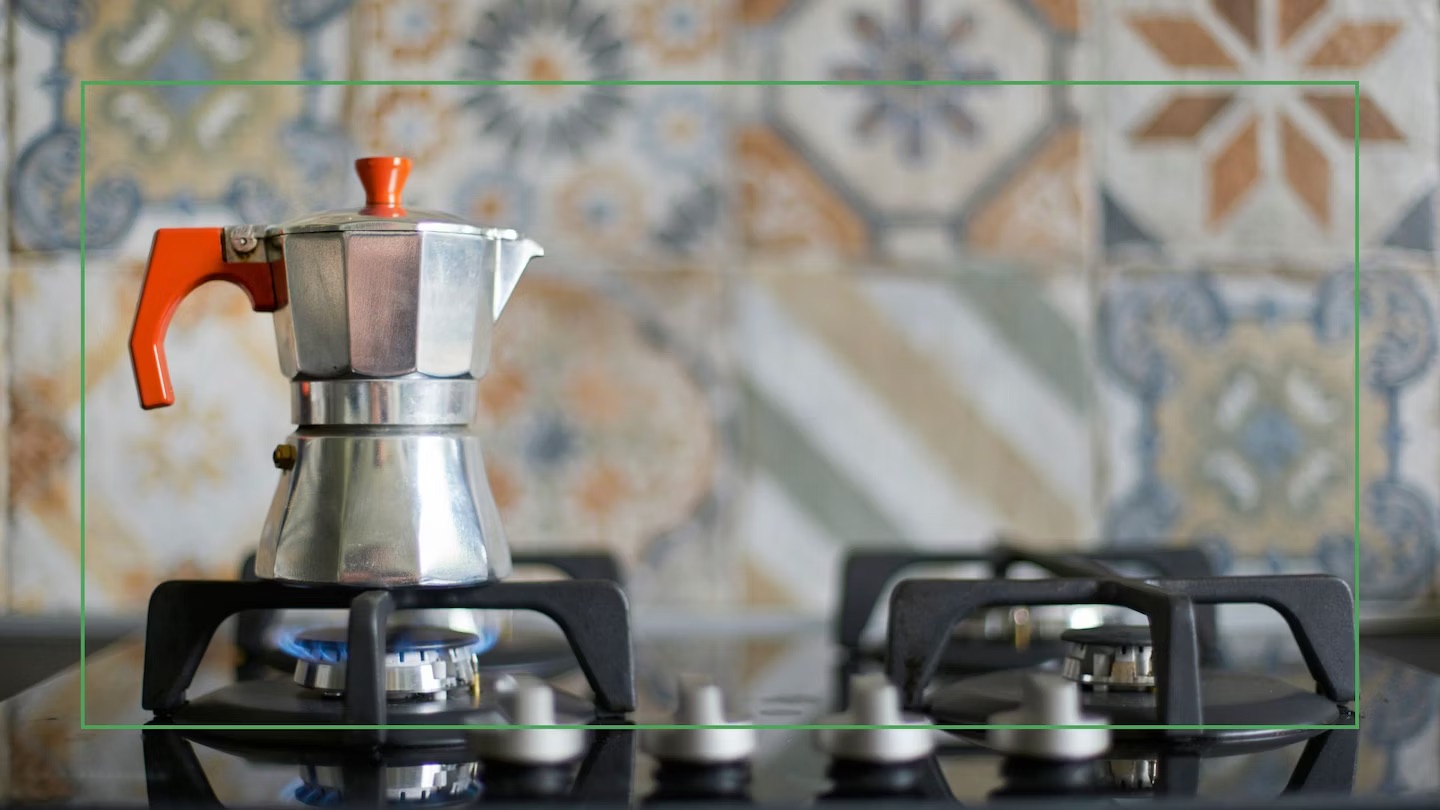
- Place the Coffee Maker: Set your stove top coffee maker on the stove, making sure it is stable and secure. Align it with the heat source, whether it’s a gas burner, electric coil, or induction cooktop.
- Turn on the Heat: Turn on the heat source to a medium to medium-high heat setting. The exact setting will depend on your stove and the desired brewing time. It’s best to start with medium heat and adjust as needed.
- Monitor the Heat: As the water begins to heat, pay close attention to the process. Avoid using high heat, as it can lead to rapid boiling and potentially over-extracted coffee.
- Watch for the Boil: Keep an eye on the water as it approaches boiling temperature. You will start to see small bubbles forming and rising to the surface. The water shouldn’t come to a vigorous boil, as this can negatively affect the coffee’s flavor.
- Remove from Heat: Once the water is heated but not boiling excessively, remove the coffee maker from the heat source. This step ensures that the water and grounds are in the optimal temperature range for brewing.
Now that the water is heated and ready, it’s time to move on to the next step: adding the coffee to the pot.
Use a medium to fine grind coffee and a 1:15 coffee to water ratio. Heat water in a pot, add coffee, stir, and let it steep for 4 minutes. Stir again, then let it sit for 2 more minutes before pouring through a fine mesh strainer.
Step 4: Add the Coffee to the Pot
Now that the water is heated to the proper temperature, it’s time to add the coffee to the pot. This step is crucial for extracting the rich flavors and aromas from the coffee grounds. Follow these steps to add the coffee to the pot:
- Open the Coffee Maker: Carefully open the coffee maker’s lid or remove any necessary parts to access the brewing chamber. Be cautious as the components may still be hot.
- Add the Coffee: Pour the measured coffee grounds into the brewing chamber of your stove top coffee maker. Make sure to distribute the coffee evenly to ensure consistent extraction.
- Do Not Tamp the Coffee: Unlike espresso brewing, it’s important not to tamp or compact the coffee grounds in the brewing chamber. Leave the coffee grounds loose to allow proper water flow and extraction.
- Clean the Rim: Before closing the coffee maker, clean any excess coffee grounds from the rim or threads to ensure a proper seal. This prevents any grounds from escaping into the brewed coffee.
- Close the Coffee Maker: Securely close the lid or reassemble any parts of the coffee maker that were opened. Ensure that it is tightly sealed to prevent any leaks during the brewing process.
Now that the coffee is added to the pot, it’s time to move on to the next step: brewing the coffee.
Step 5: Brew the Coffee
With the coffee added to the pot, it’s time to brew! This step involves allowing the water to pass through the coffee grounds, extracting all the delicious flavors and aromas. Follow these steps to brew your coffee on the stove top:
- Place the Coffee Maker on the Stove: Carefully place the coffee maker back on the heat source. Ensure that it is securely positioned and aligned with the flame or heat element.
- Heat the Coffee Maker: Turn on the heat source to a medium-low to medium heat setting. The exact setting will depend on your stove and the brewing time recommended by the coffee maker’s manufacturer.
- Monitor the Brewing Process: As the water heats and the coffee begins to brew, keep a close eye on the process. You should see steam and hear a gentle bubbling sound. This indicates that the water is passing through the coffee grounds.
- Control the Heat: Adjust the heat as necessary to maintain a steady brewing process. Too high of a heat can result in a rushed extraction, while too low of a heat can cause a weak brew. Aim for a gentle, steady flow of coffee into the upper chamber.
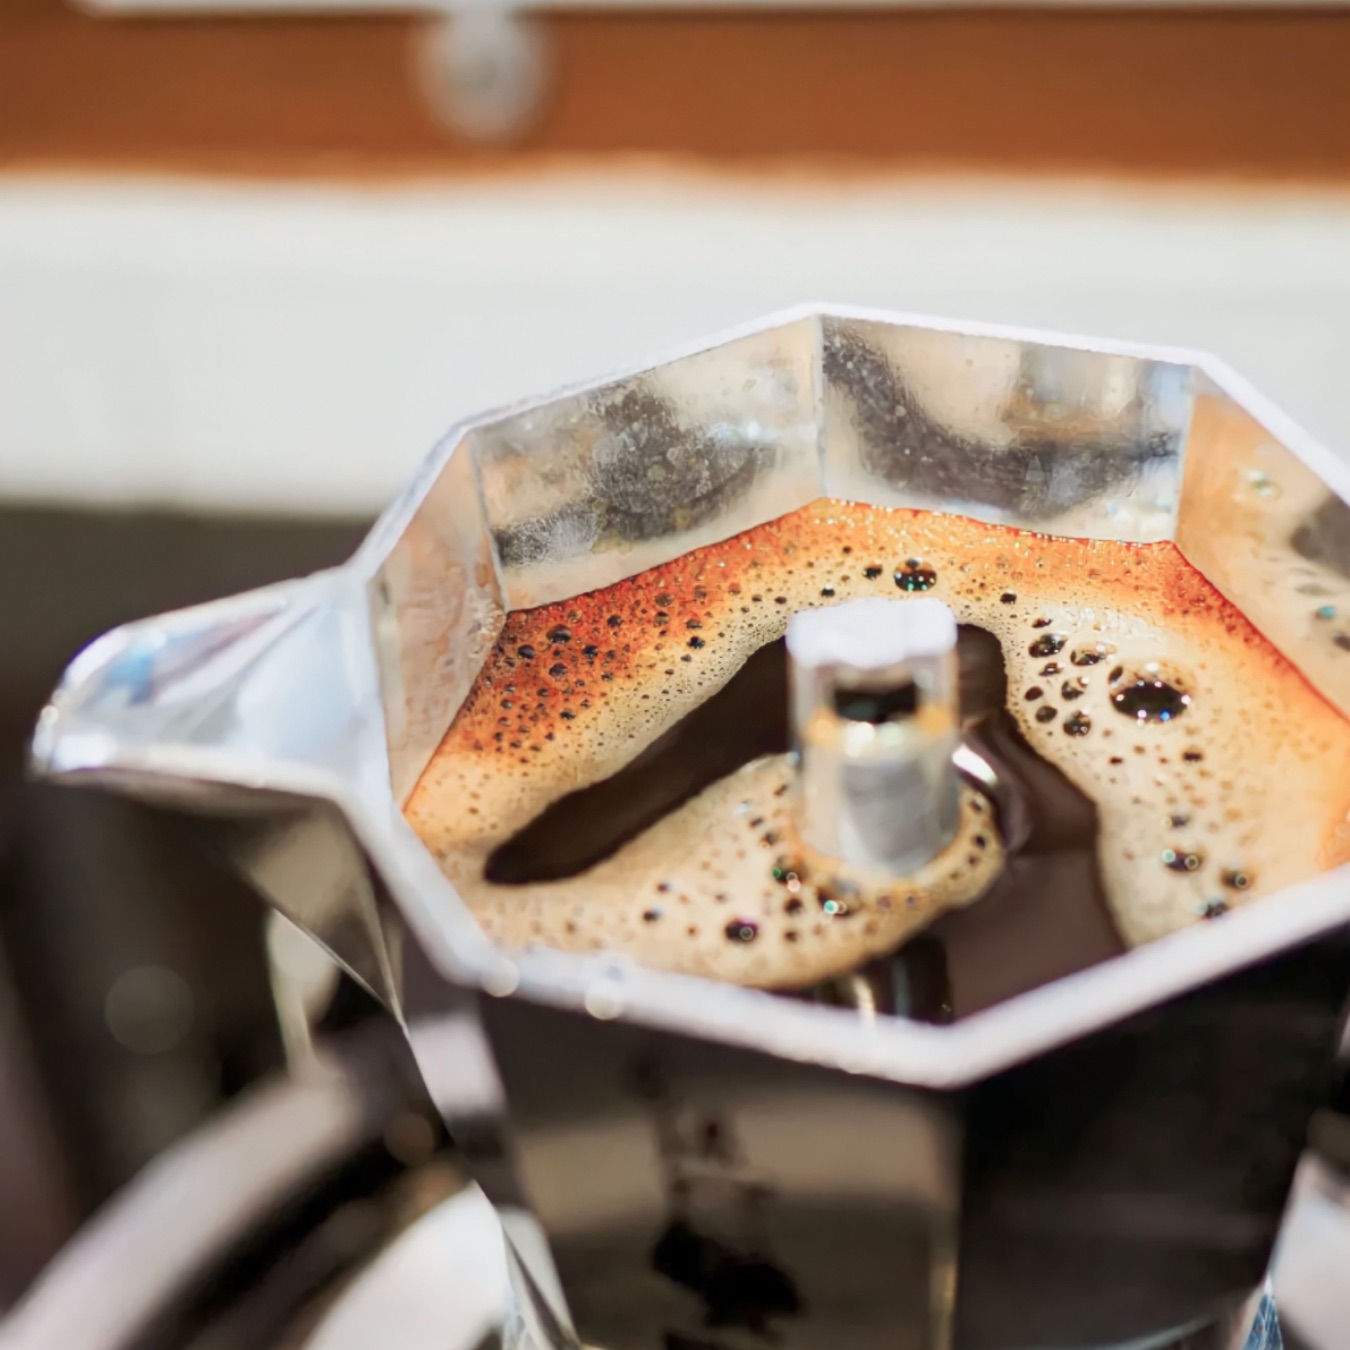
- Observe the Extraction: Watch as the brewed coffee fills the upper chamber of the coffee maker. The process should take a few minutes, and you’ll notice it by the color change in the coffee-stream.
- Remove from Heat: Once the upper chamber is filled with coffee and steam, carefully remove the coffee maker from the heat source to stop the extraction. Be cautious as the coffee maker and its contents will be hot.
Now that your coffee is brewed, it’s time to move on to the final step: serving and enjoying your delicious cup of stove top coffee!
Step 6: Serve and Enjoy
Congratulations! You’ve successfully brewed your coffee on the stove top. Now, it’s time to savor the delightful flavors and aromas. Follow these steps to serve and enjoy your cup of stove top coffee:
- Prepare Your Cup: Get your favorite coffee mug or cup ready for serving. Pre-warming the cup with hot water can help maintain the coffee’s temperature.
- Decant the Coffee: Carefully pour the brewed coffee from the upper chamber of the coffee maker into your cup. Use a slow and steady motion to prevent any grounds from entering your cup.
- Add Optional Ingredients: Customize your coffee by adding any desired optional ingredients, such as sugar, milk, or flavors. Experiment with different combinations to find your perfect cuppa.
- Stir and Taste: Give your coffee a gentle stir to incorporate any added ingredients. Take a moment to savor the aroma and take a sip to enjoy the flavors you’ve meticulously crafted.
- Serve Hot: Stove top coffee is best enjoyed hot. If your coffee has cooled down a bit during the brewing process, you can reheat it on the stove or in the microwave, if needed.
- Sit Back and Enjoy: Find a cozy spot, sit back, and savor each sip of your stove top brewed coffee. Take a moment to unwind, reflect, or simply enjoy the wonderful taste and aroma.
Congratulations again on your stove top coffee brewing skills! With a little practice and experimentation, you will discover the nuances of making the perfect cup of coffee to suit your taste preferences.
Now, go ahead and treat yourself to another cup or share your newfound brewing expertise with family and friends. Happy brewing and happy sipping!
Conclusion
Coffee brewed on the stove top is a wonderful way to enjoy a rich and flavorful cup of coffee in the comfort of your own home. With the right equipment and a few simple steps, you can achieve a brewing method that produces a deliciously aromatic and satisfying coffee experience.
In this article, we discussed the equipment needed, the importance of grinding your coffee beans, measuring the coffee and water accurately, heating the water on the stove, adding the coffee to the pot, brewing the coffee, and finally, serving and enjoying your creation.
By following these steps, you can become skilled at stove top coffee brewing and have the ability to create a personalized coffee experience tailored to your taste preferences. Experiment with different coffee beans, grind sizes, water ratios, and additional ingredients to discover your perfect brew.
Remember, patience and attention to detail are key to achieving a delicious cup of stove top coffee. Take the time to understand your equipment, experiment with brewing techniques, and most importantly, enjoy the process of crafting your own cup of coffee.
So why not give stove top coffee brewing a try? You might just find that it becomes your favorite way to start your day or to enjoy a moment of relaxation. Embrace the art of stove top brewing and elevate your coffee experience to a new level of satisfaction. Cheers!
Frequently Asked Questions about How To Make Coffee On The Stove Top
Was this page helpful?
At Storables.com, we guarantee accurate and reliable information. Our content, validated by Expert Board Contributors, is crafted following stringent Editorial Policies. We're committed to providing you with well-researched, expert-backed insights for all your informational needs.


0 thoughts on “How To Make Coffee On The Stove Top”