Articles
How To Add Plumbing To A Garage
Modified: October 31, 2024
Learn how to add plumbing to your garage with these informative articles. Find expert tips and step-by-step guides to complete your project.
(Many of the links in this article redirect to a specific reviewed product. Your purchase of these products through affiliate links helps to generate commission for Storables.com, at no extra cost. Learn more)
Introduction
Adding plumbing to a garage can be a game-changer, providing convenience and functionality to the space. Whether you plan to use your garage as a workshop, laundry room, or even a living space, having the ability to access water and proper drainage is essential. By extending the plumbing system from your main house to the garage, you can transform the space and make it more versatile.
However, adding plumbing to a garage is not a task to be taken lightly. It requires careful planning, precise installation, and adherence to local building codes. In this article, we will guide you through the step-by-step process of adding plumbing to your garage, from assessing the plumbing needs to completing the final touches.
Before you begin, it’s important to note that adding plumbing to a garage may require the expertise of a licensed plumber, depending on the complexity of the project and local regulations. It’s always a good idea to consult with a professional to ensure that you are following the correct procedures and ensuring the safety of your plumbing system.
Now, let’s dive into the first step of this process: determining the plumbing needs for your garage.
Key Takeaways:
- Adding plumbing to a garage can transform the space into a versatile and convenient area for various uses, such as a workshop, laundry room, or living space. Careful planning, precise installation, and adherence to local regulations are essential for a successful plumbing addition.
- From determining plumbing needs to completing the finishing touches, the step-by-step process of adding plumbing to a garage involves thorough planning, precise installation, and attention to detail. Consulting with professionals and following local regulations ensures a safe and functional garage plumbing system.
Read more: How To Change Plumbing To Add A Second Sink
Step 1: Determine the Plumbing Needs for the Garage
Before you start adding plumbing to your garage, you need to assess your specific needs and requirements. This will help you determine the type of plumbing system you need, as well as the fixtures and accessories that will be necessary.
Start by considering how you plan to use the garage. Will it primarily serve as a workshop, a laundry room, or a living space? Understanding the purpose of the garage will help you determine the type and quantity of plumbing fixtures you will need.
If you plan to use the garage as a workshop, for example, you may require a sink for cleaning tools or a floor drain for easy cleanup. In the case of a laundry room, you will need water supply lines for your washing machine and a drain for the wastewater. And if you want to convert the garage into a living space, you may need a kitchenette with a sink, a bathroom with a toilet and shower, and possibly a utility area for a washer and dryer.
Next, consider the proximity of your garage to the main house. The closer the garage is to the main plumbing system, the easier and less costly it will be to connect the plumbing. However, if the garage is located far from the main house, you may need to account for additional piping and consider the logistics of running the plumbing lines.
Another important factor to consider is your local building codes and regulations. Different areas may have specific requirements for plumbing installations, including the materials to be used, the minimum distance between certain fixtures, and the need for permits. Research your local building codes or consult with a licensed plumber to ensure you meet all the necessary requirements.
Once you have determined your specific needs and familiarized yourself with the local regulations, you can move on to the next step: planning the plumbing layout for your garage.
Step 2: Plan the Plumbing Layout
Now that you have a clear understanding of your plumbing needs, it’s time to plan out the layout for your garage plumbing system. This step is crucial for ensuring that your plumbing installation is efficient, functional, and meets all the necessary requirements.
Start by creating a detailed sketch or blueprint of your garage, indicating the desired locations of the fixtures, such as sinks, toilets, showers, and water supply points. Consider the flow of water and drainage, as well as any specific requirements for each fixture.
When planning the layout, keep in mind the accessibility of the plumbing system. Ensure that you have enough space for pipe runs, valves, and other components. It’s also important to consider the insulation needs for pipes that may be exposed to cold temperatures in the garage.
Depending on the complexity of your plumbing system, you may need to install a manifold system for better control and distribution of water supply lines. A manifold system allows you to independently control the flow of water to each fixture, reducing the chances of pressure fluctuations.
Additionally, if you plan to install multiple fixtures in the garage, consider the venting requirements. Proper venting ensures that air can flow freely in the drain system, preventing clogs and allowing for efficient drainage.
While planning the plumbing layout, it’s also a good idea to think about any future expansion or changes you may want in your garage. Anticipating future needs can help you design a more flexible and versatile plumbing system from the start.
After you have planned the layout, review it carefully and make any necessary adjustments. Consider the practical aspects, such as the ease of installation, maintenance, and accessibility for repairs. Once you are satisfied with the layout, you can move on to gathering the necessary tools and materials for the installation process.
Step 3: Gather the Necessary Tools and Materials
Before you begin the plumbing installation process in your garage, it’s essential to gather all the necessary tools and materials. Having the right equipment on hand will make the installation smoother and more efficient. Here is a list of common tools and materials you may need:
- Pipe cutter
- Pipe wrench
- PVC pipe and fittings
- Copper pipe and fittings
- Pipe insulation
- Teflon tape
- Plumber’s putty
- PVC glue
- Adjustable wrench
- Hacksaw
- Channel locks
- Plumbing pliers
- Level
- Measuring tape
- Screwdrivers
- Drain auger/snake
- Plunger
- Plumber’s tape
- Drain fittings and traps
- Water supply lines
- Valves
- P-traps and S-traps
- Hammer drill (for concrete floors)
- Drainage pipe
- Utility knife
- Safety goggles
- Protective gloves
Ensure that you have all the necessary sizes and types of pipes and fittings based on your plumbing layout plan. If you’re unsure about the specific materials and quantities you need, consult with a licensed plumber or a knowledgeable employee at your local hardware store.
Remember to adhere to local building codes and regulations when selecting your materials. Some areas may have restrictions on the type of pipes allowed or require specific certifications for plumbing products.
Having all your tools and materials in place before starting the installation process will save you time and allow you to work more efficiently. It’s also a good idea to have safety equipment, such as goggles and gloves, to protect yourself during the installation.
Once you have gathered all the necessary tools and materials, you’re ready to move on to the next step: installing the water supply lines in your garage.
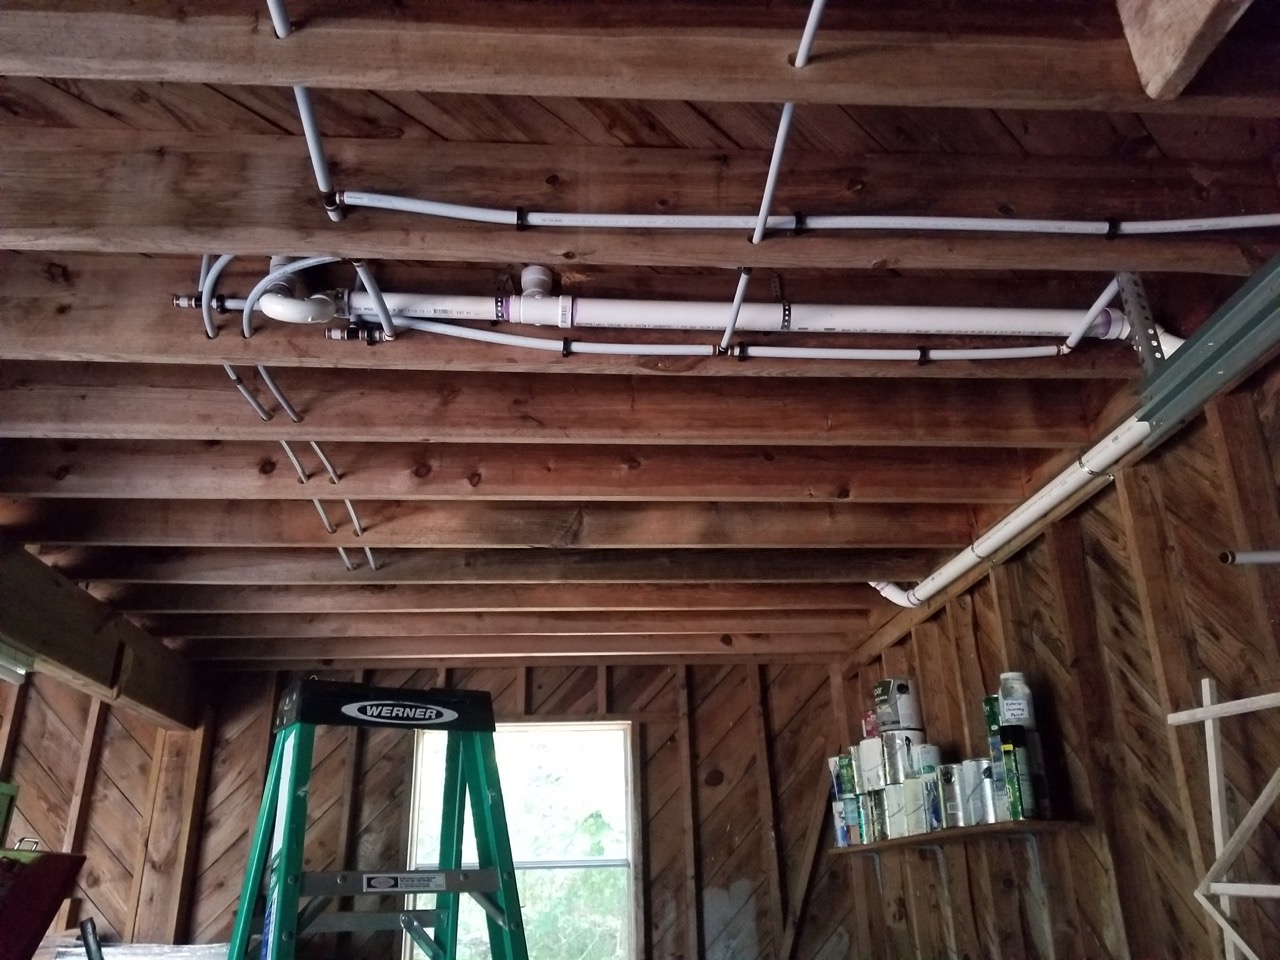
Step 4: Install Water Supply Lines
With the tools and materials in hand, it’s time to start installing the water supply lines in your garage. The water supply lines will deliver fresh water from your main house plumbing system to the desired fixtures in the garage.
Before beginning the installation, make sure to shut off the main water supply to avoid any accidental leaks or water damage. It’s also recommended to drain any residual water from the existing pipes to prevent potential flooding during the installation process.
Here’s a step-by-step guide to help you install the water supply lines:
- Map out the paths for the water supply lines based on your plumbing layout plan. Determine the locations where you will need to install tees and other fittings to connect the pipes.
- Cut the pipes to the desired lengths using a pipe cutter. Be sure to measure and mark the pipes accurately before making any cuts.
- Apply Teflon tape to the threaded ends of the pipes and fittings for a watertight seal.
- Connect the pipes using the appropriate fittings, such as tees, elbows, and couplings, based on your plumbing layout. Use a pipe wrench or pliers to tighten the connections securely.
- If you are working with copper pipes, you may need to solder the joints using a torch and soldering flux. Follow the manufacturer’s instructions and take the necessary safety precautions when soldering.
- In areas where the pipes may be exposed to cold temperatures, such as in unheated garages, consider insulating the pipes with pipe insulation to prevent freezing.
- Install shutoff valves at strategic points along the water supply lines. These valves will allow you to control the flow of water to specific fixtures or shut off the water supply in case of emergencies or repairs.
- Once all the water supply lines are installed, turn on the main water supply and check for any leaks. Inspect all the connections to ensure everything is properly sealed.
Remember to follow local building codes and regulations when installing the water supply lines. It’s important to consult with a licensed plumber if you have any doubts or if your plumbing system is more complex.
With the water supply lines successfully installed, you’re ready to move on to the next step: installing the drainage system in your garage.
Step 5: Install Drainage System
Installing a proper drainage system is crucial for effectively managing wastewater in your garage. This step will involve routing the drainage pipes from the fixtures to the main sewer line or septic system. Here’s a step-by-step guide to help you install the drainage system:
- Refer to your plumbing layout plan to determine the locations for the drains and the paths they will follow to reach the main sewer or septic system.
- Cut the drainage pipe to the required lengths using a hacksaw or pipe cutter. Ensure that the pipes are properly aligned and level for efficient drainage.
- Assemble the fittings, such as elbows, couplings, and P-traps, to connect the drainage pipes. Use PVC glue or primer plus cement to secure the connections, following the manufacturer’s instructions.
- Ensure that all the fixtures in your garage, such as sinks, showers, and toilets, are properly vented. Vent pipes allow air to enter the drain system, preventing airlock and facilitating smooth drainage.
- Connect the drain pipes to the existing main sewer line or septic system using the appropriate fittings and connectors. Ensure a secure and watertight connection.
- Install clean-outs at strategic points to provide access for cleaning and maintenance in the future.
- Test the drainage system by running water through each fixture and flushing toilets. Check for any leaks or slow drainage and make the necessary adjustments.
When installing the drainage system, it’s important to follow local building codes and regulations, especially in regard to venting requirements and sizing of the pipes. Proper venting ensures the smooth flow of wastewater and prevents odors from entering your garage.
If you encounter any challenges or have concerns about installing the drainage system, it’s best to consult with a licensed plumber who can provide guidance and ensure compliance with the necessary standards.
With the drainage system successfully installed, you can now proceed to connect the plumbing in your garage to the main house system.
When adding plumbing to a garage, make sure to check local building codes and obtain any necessary permits before starting the project. This will ensure that the plumbing is installed correctly and up to code.
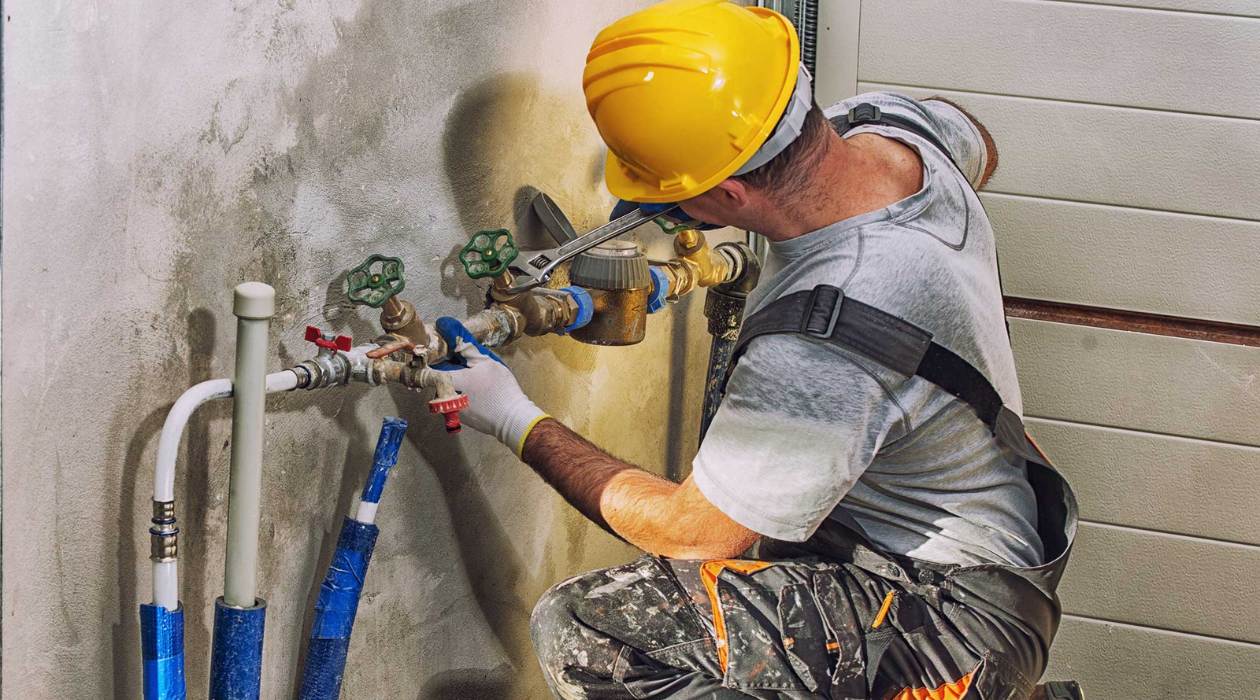
Step 6: Connect the Plumbing to the Main House System
Connecting the plumbing in your garage to the main house system is a critical step to ensure that water supply and drainage functions seamlessly between the two. Here’s a step-by-step guide to help you connect the plumbing to the main house system:
- Locate the main water supply line in your house. This is typically found near the water meter or where the water enters your home.
- Turn off the main water supply to prevent any water flow as you make the connection.
- Determine the appropriate location for tapping into the main water supply line. This should be done after consulting with a licensed plumber or a knowledgeable professional to ensure that the connection is made correctly.
- Use a pipe cutter or a hacksaw to cut into the main water supply line at the chosen location. Ensure that the cut is clean and even.
- Install a tee fitting at the cut section of the main water supply line. Use the appropriate connectors and fittings to ensure a secure and watertight connection.
- Attach a shut-off valve to the branch of the tee fitting that will supply water to your garage. This will allow you to easily control the water flow to your garage plumbing system.
- Connect the water supply lines from your garage to the tee fitting. Use the appropriate fittings and connectors to ensure secure connections.
- With the water supply lines connected, turn on the main water supply and check for any leaks. Inspect all the connections to ensure they are properly sealed.
- Next, establish a connection between the drain from your garage plumbing system and the main house drain or septic system. Consult with a licensed plumber to determine the best method for connecting the drains and follow all local building codes and regulations.
- Test the entire plumbing system by running water through all the fixtures and checking for any leaks or issues. If any problems are identified, make the necessary adjustments or seek professional help to resolve them.
Connecting the plumbing in your garage to the main house system requires careful attention to detail and adherence to local codes and regulations. If you are unsure about making these connections, it is highly recommended to seek the assistance of a licensed plumber to ensure a proper and seamless integration.
Once you have successfully connected the plumbing to the main house system, you can move on to the next step: testing and checking for any leaks in your garage plumbing system.
Step 7: Test and Check for Leaks
After completing the plumbing installation in your garage, it’s crucial to thoroughly test the system and check for any leaks. This step ensures that your plumbing is functional, efficient, and free from any water wastage or potential damage. Here’s a step-by-step guide to help you test and check for leaks:
- Close all faucets, valves, and fixtures in your garage.
- Turn on the main water supply to your garage plumbing system.
- Observe all the installed pipes, fittings, and connections for any visible leaks. Pay close attention to joints and connections, as they are common areas for leaks to occur.
- Use a flashlight to inspect hard-to-reach areas, such as under sinks or behind walls, for any signs of moisture or dripping water.
- Check the water pressure in your garage. Ensure that it is in line with the water pressure in the main house. Excessive water pressure can lead to leaks and cause damage to your plumbing system over time.
- Test each water fixture individually, such as sinks, showers, and toilets, by running the water for a few minutes. Look for any leaks, unusual sounds, or improper drainage.
- Inspect the drainage system by allowing water to flow through each drain. Ensure that the water drains smoothly and there are no backups or slow drainage.
- If you detect any leaks or issues, promptly address them. Tighten any loose connections, replace damaged or faulty parts, or seek professional assistance if needed.
- Repeat the testing process a few more times to ensure the system is leak-free and properly functioning.
Testing and checking for leaks is a crucial step in ensuring the long-term functionality and reliability of your garage plumbing system. Any leaks left unattended can lead to water damage, mold growth, and increased water bills. It’s important to address any issues promptly to avoid costly repairs and potential water wastage.
Once you are confident that your garage plumbing system is leak-free and working properly, you can move on to the next step: insulating the plumbing in your garage to protect it from extreme temperatures.
Step 8: Insulate the Plumbing in the Garage
Insulating the plumbing in your garage is essential to protect it from extreme temperatures. Proper insulation helps prevent freezing of pipes during cold weather and minimizes heat loss from hot water pipes. It also improves energy efficiency and reduces the risk of pipe damage and leaks. Here’s a step-by-step guide to help you insulate the plumbing in your garage:
- Identify the pipes that need insulation. Focus on both hot and cold water supply lines, as well as drain pipes.
- Measure the length and diameter of the pipes to determine the appropriate insulation materials to use.
- Purchase insulation sleeves or wraps specifically designed for plumbing pipes. These materials are typically made from foam or fiberglass and are readily available at hardware stores.
- Cut the insulation material to fit the length of each pipe. Ensure that there are no gaps or exposed areas.
- Wrap the insulation around the pipes, securing it with adhesive or tape as needed. Pay special attention to areas where pipes are exposed to colder temperatures or areas that require additional protection.
- Seal any gaps or joints in the insulation material to ensure a tight fit. This can be done using tape or adhesive suitable for insulation materials.
- For exposed pipes in unheated areas of the garage, consider installing electric heating cables or heat tape to provide additional protection against freezing.
- Insulate any valves, fittings, and joints using foam insulation tape or wraps. This helps prevent heat loss and keeps vulnerable areas protected.
- Once the insulation is applied, double-check that all pipes and fittings are fully covered and insulated.
Insulating the plumbing in your garage will help maintain the proper functionality of your plumbing system throughout the year. It is particularly important in regions with freezing temperatures, as it prevents pipes from bursting and costly water damage.
Remember to regularly inspect the insulation for any signs of wear or damage. Replace any worn-out or damaged insulation materials promptly to ensure continuous protection.
Now that the plumbing in your garage is properly insulated, you can move on to the next step: installing fixtures and accessories to bring your plumbing system to life.
Step 9: Install Fixtures and Accessories
Now that you have completed the plumbing and insulation in your garage, it’s time to install the fixtures and accessories that will make your space functional and convenient. This step involves connecting and mounting the necessary fixtures, such as sinks, toilets, showers, and other accessories. Here’s a step-by-step guide to help you install fixtures and accessories in your garage:
- Refer to your plumbing layout plan to determine the exact locations for each fixture and accessory.
- Start by installing the main fixtures, such as sinks, showers, and toilets. Follow the manufacturer’s instructions for each fixture.
- Connect the appropriate water supply lines to each fixture. Use the necessary fittings and connectors to ensure a secure and leak-free connection.
- For each fixture, connect the drain pipes to the corresponding drain lines in the garage plumbing system. Ensure proper alignment and use the appropriate fittings and traps for efficient drainage.
- Mount the fixtures securely to the walls or countertops, following the manufacturer’s instructions. Ensure that they are level and properly anchored.
- Install any additional accessories, such as towel racks, soap dispensers, or shelves, to enhance the functionality and organization of your garage space.
- Test each fixture to ensure proper functionality. Check for any leaks, proper drainage, and correct water flow.
- Make any necessary adjustments or repairs if issues are detected during testing. Double-check all connections and fittings to ensure they are watertight.
- Once all fixtures and accessories are installed and tested, give them a final inspection to ensure they are securely mounted and functioning properly.
Proper installation of fixtures and accessories is essential for creating a functional space in your garage. Take the time to carefully follow the manufacturer’s instructions and consult with a licensed plumber if you have any concerns or difficulties during the installation process.
With the fixtures and accessories successfully installed, you can proceed to the final step: completing the finishing touches to make your garage plumbing system visually appealing and fully functional.
Step 10: Complete the Finishing Touches
As you near the completion of your garage plumbing project, it’s time to focus on the finishing touches. This step involves adding the final details and making sure your garage plumbing system is visually appealing and fully functional. Here’s a step-by-step guide to help you complete the finishing touches:
- Inspect the entire plumbing system, including all connections, fittings, and fixtures, for any signs of leaks or issues. Make any necessary repairs or adjustments.
- Clean up your work area and remove any debris, ensuring that the space is tidy and ready for use.
- Paint or decorate exposed pipes and fixtures, if desired, to match the aesthetics of your garage. Ensure that any paint or coatings used are safe and appropriate for plumbing materials.
- Consider adding insulation to exposed pipes in the garage that are at risk of condensation. This helps prevent moisture buildup and potential damage.
- Install proper lighting in your garage to ensure visibility and safety. Consider the best placement for lighting fixtures that will illuminate the areas around your plumbing installations.
- Organize and arrange your garage space to maximize efficiency and functionality. Use storage solutions and shelving units to keep tools, supplies, and other equipment easily accessible.
- Add any desired finishing touches, such as hanging curtains for privacy or adding decorative elements to enhance the aesthetics of the space.
- Compile all relevant documentation, such as permits and plumbing plans, and keep them in a safe and easily accessible location.
- Consider labeling the valves and shut-off points for your garage plumbing system. This makes it easier to find and operate them when needed.
- Schedule regular maintenance and inspections of your garage plumbing system to ensure its ongoing functionality and to catch any issues before they escalate.
By completing these finishing touches, you’ll ensure that your garage plumbing system is not only functional but also visually appealing and well-organized. Taking the time to add these final details will enhance your overall garage experience and make it a more enjoyable space to utilize.
Congratulations! You have successfully completed the implementation of plumbing in your garage. Your newly installed system will provide convenience and functionality for various uses. Remember to continue proper maintenance and periodic inspections to keep your garage plumbing system in excellent working condition for years to come.
Conclusion
Adding plumbing to your garage can significantly enhance its functionality and versatility. Whether you plan to use your garage as a workshop, laundry room, or even a living space, having access to water supply and proper drainage is essential. By following the step-by-step process outlined in this article, you can successfully install a plumbing system in your garage and enjoy its numerous benefits.
Throughout the installation process, it’s crucial to keep in mind the specific needs of your garage and adhere to local building codes and regulations. Consulting with a licensed plumber is highly recommended to ensure that you are following the correct procedures and meeting the necessary requirements.
From determining the plumbing needs and planning the layout to gathering the tools and materials, each step plays a vital role in creating a functional and efficient plumbing system. Installing water supply lines, drainage systems, and connecting the plumbing to the main house system are key components that require attention to detail and precision.
It’s also important to test and check for leaks throughout the process and insulate the plumbing in your garage to protect it from extreme temperatures. The installation of fixtures and accessories, such as sinks, toilets, and showers, completes the functionality of your garage plumbing system.
With the finishing touches, including painting, organizing, and labeling, you can create a visually appealing space that is tailored to your needs. By regularly maintaining and inspecting your garage plumbing system, you can ensure its long-term functionality and prevent potential issues.
Remember, it’s essential to consult with professionals and follow local regulations to ensure that your garage plumbing installation is done safely and to code. By doing so, you can transform your garage into a versatile and convenient space that meets your specific needs.
Now that you have completed the plumbing installation in your garage, enjoy the benefits of having access to water supply and proper drainage. Whether you’re working on projects, doing laundry, or using the space for various other purposes, your garage plumbing system will provide the convenience and functionality you need.
Frequently Asked Questions about How To Add Plumbing To A Garage
Was this page helpful?
At Storables.com, we guarantee accurate and reliable information. Our content, validated by Expert Board Contributors, is crafted following stringent Editorial Policies. We're committed to providing you with well-researched, expert-backed insights for all your informational needs.


0 thoughts on “How To Add Plumbing To A Garage”