Home>Articles>How To Build A Classic Arbor For A Charming Outdoor Entryway
Articles
How To Build A Classic Arbor For A Charming Outdoor Entryway
Modified: January 5, 2024
Discover step-by-step articles on how to build a classic arbor for a charming outdoor entryway and enhance the appeal of your home. Grab some handy tips and DIY inspiration!
(Many of the links in this article redirect to a specific reviewed product. Your purchase of these products through affiliate links helps to generate commission for Storables.com, at no extra cost. Learn more)
Introduction
Welcome to the world of outdoor craftsmanship, where you can turn your backyard into a charming oasis with a classic arbor as the centerpiece. A well-designed and beautifully constructed arbor not only adds aesthetic appeal to your outdoor space but also serves as a functional entryway that welcomes you and your guests with open arms.
In this detailed guide, we will take you through the process of building a classic arbor step by step. Whether you are a seasoned DIY enthusiast or a beginner looking to enhance your woodworking skills, this project is perfect for you. With the right materials, tools, and a little bit of time and effort, you can create a stunning arbor that will be the envy of your neighborhood.
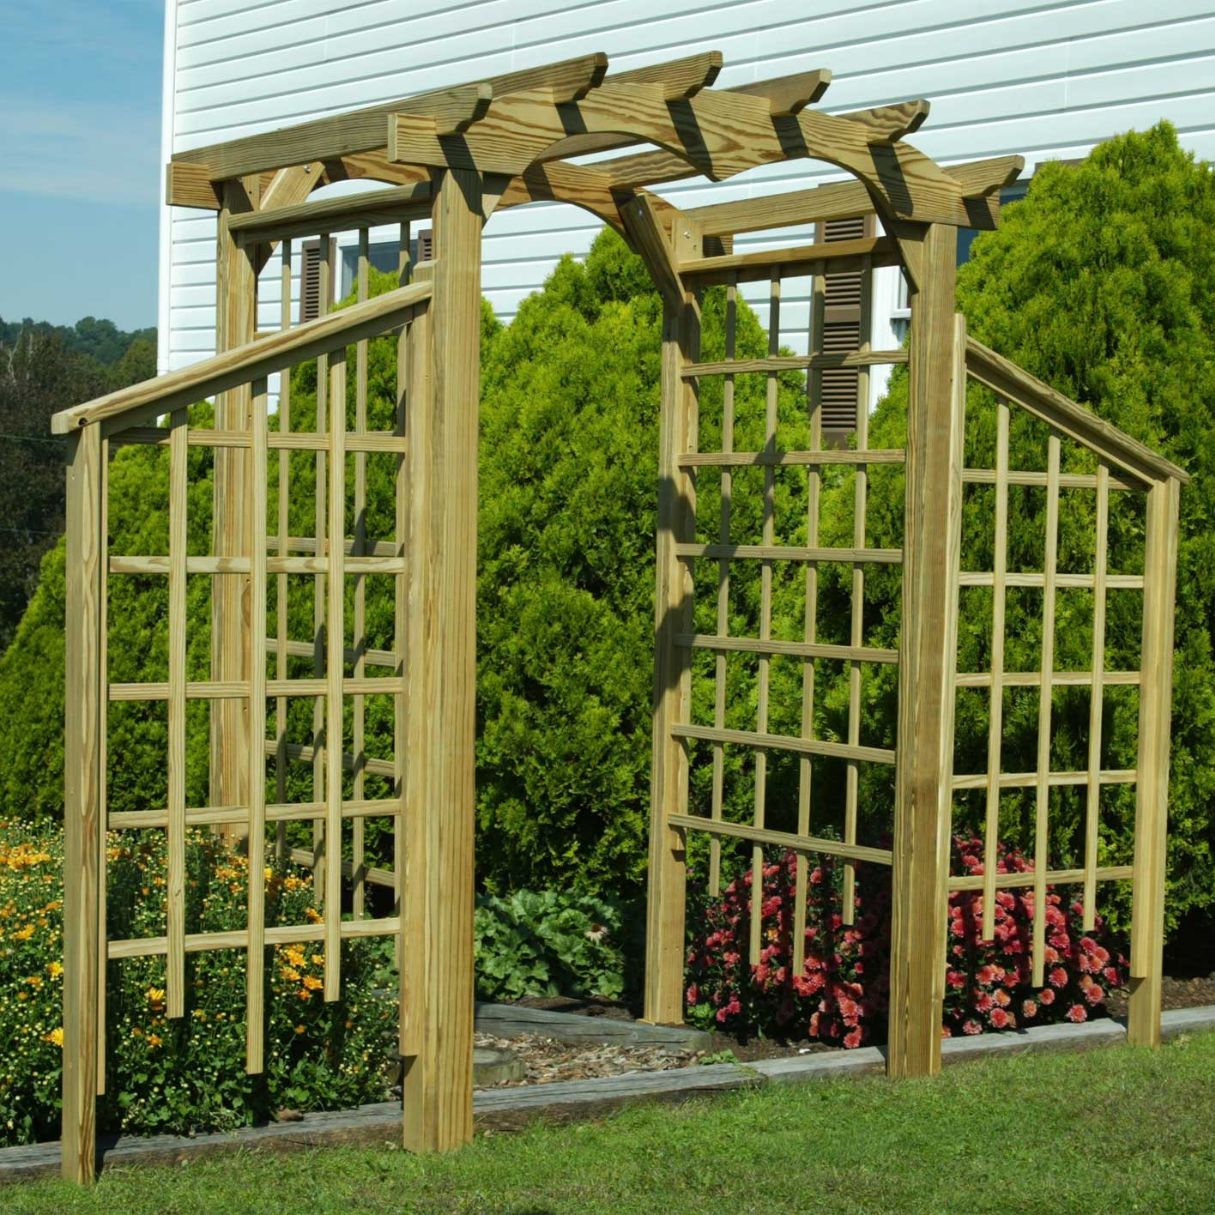
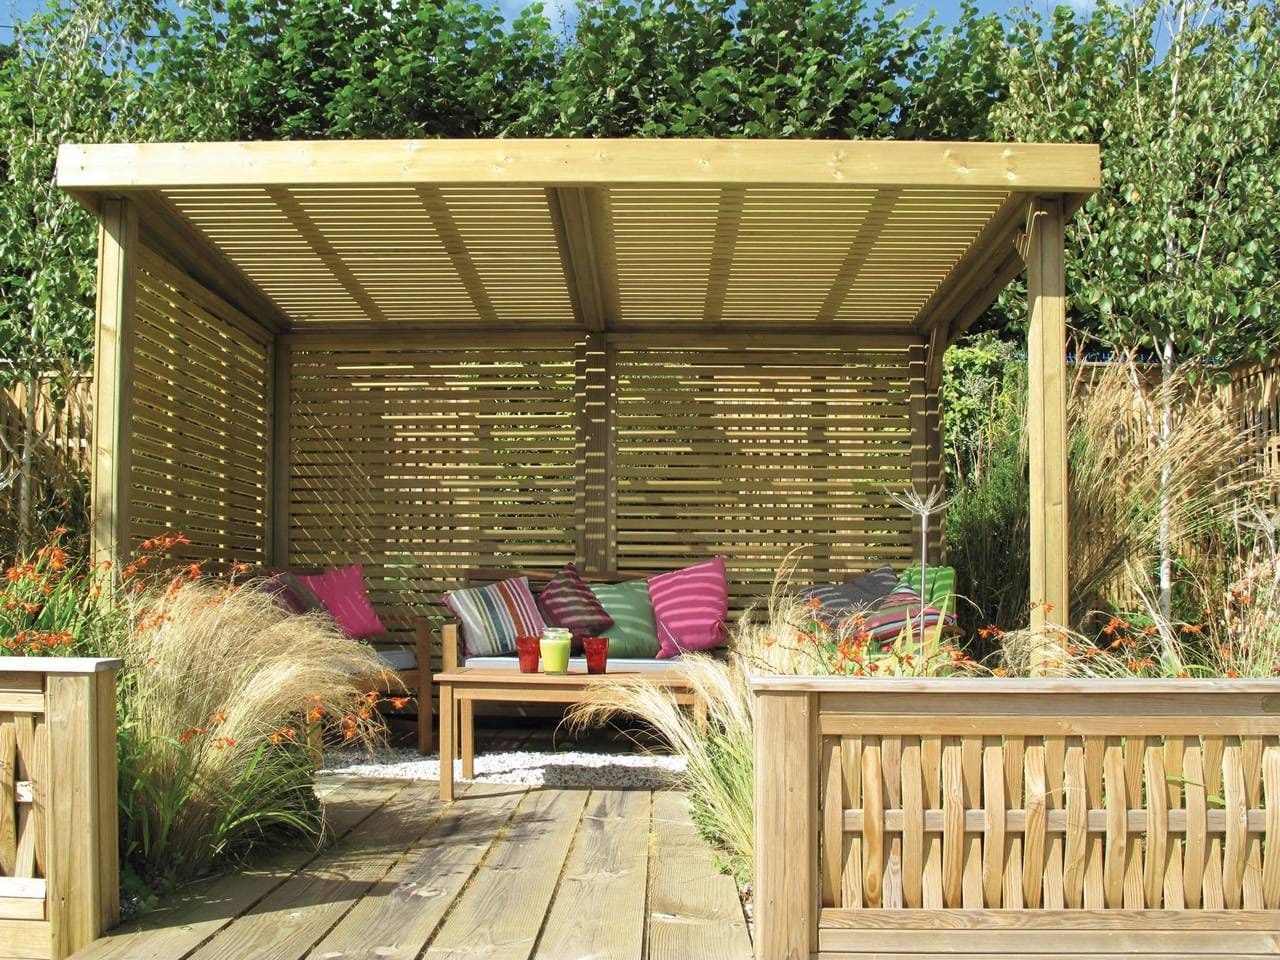
Before we dive into the construction process, let’s talk about what exactly an arbor is. An arbor is a structure, typically made of wood, that features a series of lattice panels or trelliswork on the sides and a roof-like structure on top. It creates a beautiful archway that can be adorned with climbing plants such as roses, vines, or jasmine, adding a touch of natural beauty and fragrance to your outdoor space.
Building a classic arbor requires careful planning and attention to detail. From designing the structure to selecting the right materials and tools, each step of the process plays a crucial role in ensuring the durability and longevity of your arbor. Throughout this guide, we will provide you with all the information you need to successfully complete this project.
So, roll up your sleeves, grab your measuring tape, and let’s get started on creating a stunning arbor that will transform your outdoor entryway into a charming and inviting space. Get ready to impress your friends and family with your woodworking skills and create a relaxing ambiance that you can enjoy for years to come.
Key Takeaways:
- Transform your outdoor space into a charming oasis by building a classic arbor. With careful planning, the right materials, and a touch of creativity, you can create a stunning entryway that adds beauty and functionality to your home.
- Embrace the joy of woodworking and craftsmanship as you construct a timeless arbor. From gathering materials to adding finishing touches, the process is a rewarding journey that results in a durable and visually appealing outdoor structure.
Materials Needed
Before you begin constructing your classic arbor, you will need to gather the necessary materials. Here is a list of items you will need to complete the project:
- Pressure-treated lumber: You will need 4×4 posts for the main structure of the arbor. The number of posts will depend on the size of your desired arbor.
- 2×4 boards: These will be used for constructing the frame and crossbeams of the arbor.
- Lattice panels: You will need lattice panels to create the trelliswork on the sides of the arbor. Make sure they are wide enough to cover the desired width of your arbor.
- Screws and nails: Choose weather-resistant screws and nails to ensure the longevity of your arbor.
- Concrete mix: You will need concrete mix to secure the arbor posts in the ground.
- Post hole digger: This tool will help you dig holes for the arbor posts.
- Level: A level is essential for ensuring that your arbor is straight and level during construction.
- Saw: You will need a saw, such as a circular saw or a miter saw, to cut the lumber to the required lengths.
- Drill: A drill will be necessary for drilling pilot holes and inserting screws.
- Tape measure: Use a tape measure to accurately measure and mark the dimensions of your arbor.
- Paint or stain: Choose a paint or stain that is suitable for exterior wood to protect your arbor from the elements.
- Brush or roller: Use a brush or roller to apply the paint or stain to your arbor.
These are the basic materials you will need for constructing a classic arbor. Depending on your personal preferences and the design of your arbor, you may also want to consider additional decorative elements, such as finials, decorative trim, or climbing plants, to add a touch of elegance to your project.
Once you have gathered all the necessary materials, you will be ready to move on to the next step: planning and designing your arbor.
Step 1: Planning and Designing the Arbor
Before you begin constructing your classic arbor, it is essential to spend some time planning and designing your project. This step is crucial as it will ensure that your arbor meets your aesthetic preferences, functional needs, and fits perfectly into your outdoor space.
Here are some key considerations to help you in the planning and designing process:
1. Determine the Purpose: Think about how you intend to use your arbor. Will it serve as an entryway to your garden, a focal point in your backyard, or a shaded seating area? Understanding the purpose will help you determine the size, shape, and placement of the arbor.
2. Measuring Your Space: Measure the available space where you plan to install the arbor. Consider the width, height, and depth of the area. This will guide you in determining the dimensions of your arbor.
3. Design and Style: Research different arbor designs and styles to find inspiration for your own project. Consider the architectural style of your home and choose a design that complements it. Classic arbor styles with curved arches and lattice panels are popular choices for a timeless look.
4. Materials and Finish: Decide on the type of wood you want to use for your arbor. Cedar and pressure-treated lumber are popular options due to their durability and resistance to rot and insects. Also, consider if you want to paint or stain the arbor to enhance its appearance and protect it from the elements.
5. Climbing Plants: If you plan to train climbing plants on your arbor, consider the type of plants that will thrive in your climate and complement the overall design. Roses, wisteria, and clematis are popular choices for arbor adornments.
6. Permits and Regulations: Check with your local authorities regarding any permits or regulations that may be required for building a structure in your area. It is important to comply with any guidelines to ensure your project is legal and safe.
Take the time to sketch out your design and make any necessary adjustments to ensure that your arbor will be visually appealing, functional, and suitable for your outdoor space. Once you have a clear vision of your design, you are ready to move on to gathering the necessary tools for construction.
In the next step, we will discuss the tools you will need to have on hand for building your classic arbor.
Step 2: Gathering the Necessary Tools
Now that you have planned and designed your classic arbor, it’s time to gather the necessary tools for the construction process. Having the right tools on hand will make the project smoother and more efficient. Here is a list of essential tools you will need:
- Tape Measure: To accurately measure and mark the dimensions of your arbor.
- Miter Saw or Circular Saw: For cutting the lumber to the required lengths.
- Drill: To drill pilot holes and insert screws.
- Level: To ensure your arbor is straight and level during construction.
- Post Hole Digger: For digging holes for the arbor posts.
- Screwdriver: For tightening screws and assembling parts.
- Hammer: For driving nails and securing components.
- Paintbrush or Roller: To apply paint or stain to the finished arbor.
- Safety Glasses: To protect your eyes from debris and dust.
- Gloves: To protect your hands from sharp edges and splinters.
- Workbench or Sawhorses: To provide a stable surface for cutting and assembling the arbor.
These are the basic tools you will need for building your classic arbor. Depending on the complexity of your design, you may require additional tools such as a jigsaw for intricate cuts or a router for decorative edges on the lumber.
Before you begin construction, it’s important to ensure that all your tools are in good working condition and that you have the necessary safety equipment. Familiarize yourself with the proper usage and safety guidelines for each tool to prevent accidents and injuries.
With your tools gathered and ready, you are now prepared to move on to the next step: preparing the site for the arbor construction.
Step 3: Preparing the Site
Before you start building your classic arbor, it’s important to prepare the site where the arbor will be installed. Proper site preparation ensures a stable foundation and makes the construction process easier. Follow these steps to prepare the site:
1. Clear the Area: Remove any plants, rocks, or debris from the area where the arbor will be placed. This will give you a clean and level surface to work with.
2. Mark the Location: Use stakes and string to mark the exact location and dimensions of the arbor. This will help you visualize the final placement and ensure accurate construction.
3. Dig the Holes: Use a post hole digger to dig holes for the arbor posts. The depth of the holes should be determined by the height of your arbor, plus an additional 6 inches for the gravel and concrete mix. Make sure the holes are evenly spaced and leveled.
4. Add Gravel: Pour a few inches of gravel into each hole to provide drainage and stability for the posts. Use a tamper tool to compact the gravel and create a solid base.
5. Set the Posts: Insert the arbor posts into the holes, making sure they are level and plumb. Use a level to verify that the posts are perfectly vertical and adjust if necessary. Fill the holes with a concrete mix as per the manufacturer’s instructions. Allow the concrete to cure before proceeding to the next step.
6. Double-Check Measurements: Measure the distance between the posts to ensure they are aligned correctly and are parallel to each other. Make any necessary adjustments before continuing with the construction.
By properly preparing the site, you will ensure a solid and stable foundation for your arbor. This will contribute to the overall strength and longevity of the structure. With the site prepared, you are now ready to move on to the exciting part- the actual construction of your arbor!
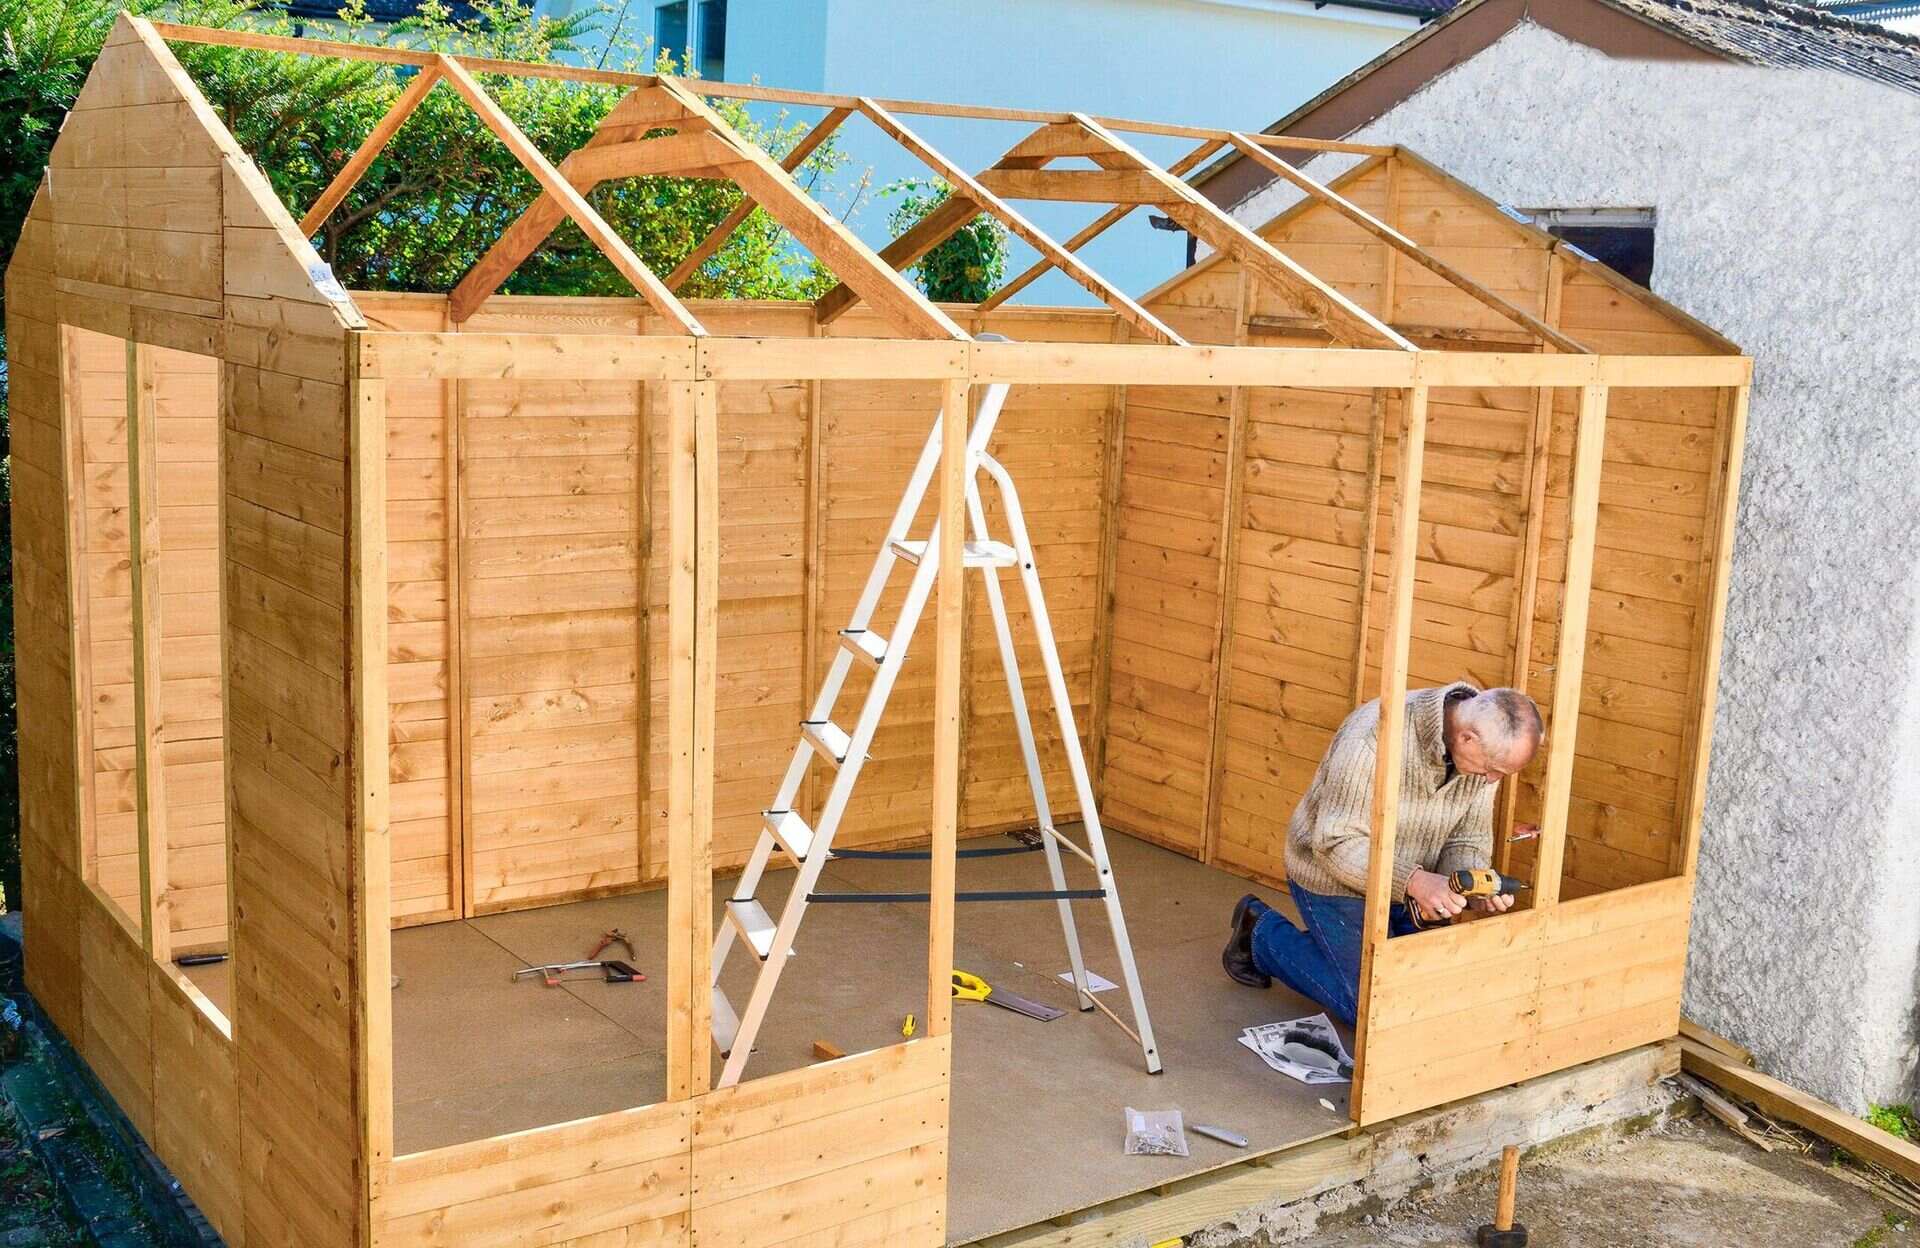
Step 4: Building the Arbor Posts
Now that you have prepared the site for your classic arbor, it’s time to start building the arbor posts. The posts play a crucial role in providing support and stability to the entire structure. Follow these steps to construct the arbor posts:
1. Measure and Cut the Posts: Measure the desired height of your arbor and mark it on the 4×4 pressure-treated lumber. Use a miter saw or circular saw to cut the posts to the desired length. Ensure that the cuts are straight and clean.
2. Mark the Crossbeams and Rails Placement: Measure and mark the locations for the crossbeams and rails on the arbor posts. This will ensure that the components are evenly spaced and aligned. Use a level to ensure the marks are straight and level.
3. Cut Mortises and Tenons: To create a strong connection between the arbor posts and the crossbeams, you can use mortise and tenon joints. Mark the dimensions for the mortises on the posts and use a chisel or router to remove the wood. Cut corresponding tenons on the ends of the crossbeams to fit into the mortises.
4. Dry Fit the Components: Before permanently attaching the crossbeams to the posts, do a dry fit by inserting the tenons into the mortises. Check for proper fit, alignment, and levelness. Make any necessary adjustments before proceeding.
5. Secure the Components: Apply a weather-resistant adhesive into the mortises and then insert the tenons of the crossbeams. Use clamps to hold the components firmly together. Drill pilot holes through the posts and into the tenons, then insert screws to secure the connection. Repeat the process for each crossbeam.
6. Reinforce the Joints: For added strength, you can reinforce the mortise and tenon joints with metal brackets or corner braces. Attach these to the inside corners of the posts and crossbeams using screws or nails.
By following these steps, you will successfully construct the arbor posts for your classic arbor. These sturdy and well-built posts will create a solid foundation for the rest of the structure. Once the posts are securely in place, you can move on to constructing the frame of your arbor in the next step.
When building a classic arbor, make sure to use pressure-treated wood to prevent rot and decay. Additionally, consider adding decorative elements like lattice panels for a charming touch.
Step 5: Constructing the Arbor Frame
With the arbor posts securely in place, it’s time to move on to constructing the frame of your classic arbor. The frame provides the structure and shape for the entire arbor. Follow these steps to build the arbor frame:
1. Measure and Cut the Frame Pieces: Measure the distance between the arbor posts and cut the 2×4 boards to fit as the horizontal and diagonal supports of the frame. Ensure that the cuts are accurate and straight.
2. Attach the Horizontal Supports: Position the first horizontal support board at the desired height on the arbor posts. Use a level to ensure it is straight and then secure it in place with screws or nails. Repeat this process for the remaining horizontal support boards, evenly spacing them along the height of the posts.
3. Add the Diagonal Supports: Measure and mark the locations for the diagonal supports on the horizontal boards. Cut the 2×4 boards at the appropriate angles to fit diagonally between the arbor posts. Secure the diagonal supports to the horizontal boards with screws or nails. These diagonal supports will strengthen the frame and provide visual interest as they intersect with the posts.
4. Install the Header Board: Measure and cut a 2×4 board to fit as the header board of the arbor frame. This board will span across the top of the arbor posts and add structural stability. Secure the header board in place with screws or nails.
5. Check Alignment and Levelness: Use a level to ensure that the frame is straight and level. Make any necessary adjustments by loosening the screws or nails and repositioning the frame pieces as needed.
By following these steps, you will successfully construct the frame for your classic arbor. The frame provides the backbone of the structure and sets the stage for the remaining elements. Once the frame is securely in place, you can move on to the next step: adding the crossbeams and rafters.
Step 6: Adding the Crossbeams and Rafters
After constructing the frame of your classic arbor, the next step is to add the crossbeams and rafters. These elements not only provide additional support but also contribute to the aesthetic appeal of the arbor. Follow these steps to add the crossbeams and rafters:
1. Measure and Cut the Crossbeams: Measure the distance between the vertical posts and cut the 2×4 boards to fit as the crossbeams. These crossbeams will be positioned perpendicular to the horizontal supports of the frame.
2. Mark the Placement of the Crossbeams: Determine the desired spacing between the crossbeams and make corresponding markings on the vertical posts. Use a level to ensure that the markings are straight and level.
3. Attach the Crossbeams: Position the first crossbeam at the desired height and align it with the markings on the posts. Secure the crossbeam in place using screws or nails. Repeat this process for the remaining crossbeams, evenly spacing them along the height of the arbor posts.
4. Measure and Cut the Rafters: Measure and cut the 2×4 boards to fit as the rafters, which will span between the header board and the top of the arbor posts. The number of rafters will depend on the size of your arbor and the desired spacing between them.
5. Attach the Rafters: Position the first rafter at one end of the arbor and align it with the header board and the top of the vertical posts. Secure the rafter in place with screws or nails. Repeat this process for the remaining rafters along the length of the arbor, evenly spacing them.
6. Check Alignment and Levelness: Use a level to ensure that the crossbeams and rafters are straight and level. Make any necessary adjustments by loosening the screws or nails and repositioning the beams as needed.
By following these steps, you will successfully add the crossbeams and rafters to your classic arbor. These elements not only provide structural reinforcement but also add visual interest and dimension to the overall design. Once the crossbeams and rafters are securely in place, you can proceed to the next step: installing the arbor rails.
Step 7: Installing the Arbor Rails
With the crossbeams and rafters in place, it’s time to install the arbor rails. The rails add a decorative touch to the arbor and provide support for the lattice panels. Follow these steps to install the arbor rails:
1. Measure and Cut the Rail Boards: Measure the distance between the vertical posts and cut the 2×4 boards to fit as the arbor rails. These rails will be positioned horizontally between the vertical posts.
2. Mark the Placement of the Rails: Determine the desired height for the rails and make corresponding markings on the vertical posts. Use a level to ensure that the markings are straight and level.
3. Attach the Rails: Position the first rail at the desired height and align it with the markings on the posts. Secure the rail in place using screws or nails. Repeat this process for the remaining rails, evenly spacing them along the height of the arbor posts.
4. Check Alignment and Levelness: Use a level to ensure that the rails are straight and level. Make any necessary adjustments by loosening the screws or nails and repositioning the rails as needed.
By following these steps, you will successfully install the arbor rails. These rails not only provide support for the lattice panels but also enhance the overall look of the arbor. Once the rails are securely in place, you can move on to the final step: adding the finishing touches and decorations.
Step 8: Finishing Touches and Decorations
Congratulations! You are in the final step of building your classic arbor. Now, it’s time to add the finishing touches and decorations that will truly bring your arbor to life. Follow these steps to complete your arbor:
1. Sanding and Smoothing: Use sandpaper or a power sander to smooth out any rough surfaces or edges on the arbor. This will ensure a polished and professional look.
2. Paint or Stain: Choose a paint or stain that is suitable for exterior wood and matches your desired aesthetic. Apply a coat of paint or stain to protect the wood from the elements and enhance its appearance. Follow the manufacturer’s instructions for proper application and drying time.
3. Lattice Panels: Attach lattice panels to the sides of the arbor between the vertical posts. Secure them in place using screws or nails. The lattice panels not only add a decorative element but also serve as a foundation for climbing plants.
4. Climbing Plants: Choose and plant climbing vines or flowers that will beautifully intertwine with the lattice panels. Roses, wisteria, and jasmine are popular choices that can add fragrance and color to your arbor.
5. Decorative Elements: Consider adding decorative finials or trim to the top of the arbor posts for an extra touch of elegance. You can also hang decorative lanterns or potted plants from the crossbeams to enhance the overall ambiance.
6. Final Inspection: Take a step back and inspect your arbor from different angles. Make sure all connections are secure, the structure is stable, and everything is visually pleasing. Make any necessary adjustments or touch-ups as needed.
By following these steps, you will complete your classic arbor with the perfect finishing touches and decorations. Step back and admire your handiwork, knowing that you have created a beautiful and functional entryway for your outdoor space.
Remember to provide regular maintenance for your arbor, such as periodic repainting or staining, and pruning the climbing plants to maintain their health and beauty. With proper care, your classic arbor will bring you joy and create a charming ambiance for many years to come.
Enjoy your new outdoor oasis and the beauty it adds to your home!
Conclusion
Congratulations on successfully completing the construction of your classic arbor! By following the step-by-step guide and putting your woodworking skills to work, you have transformed your outdoor space into a charming and inviting entryway. The arbor will not only add beauty and elegance but also provide a functional structure for climbing plants to flourish.
Throughout the journey of planning, gathering materials, and constructing your arbor, you have undoubtedly gained valuable knowledge and experience in woodworking. The attention to detail, precise measurements, and proper execution have resulted in a durable and visually appealing structure that will stand the test of time.
As you delight in the completed arbor, take a moment to appreciate the craftsmanship and effort you have put into this project. The arbor serves as a testament to your creativity, dedication, and commitment to enhancing your outdoor living space.
Remember to regularly maintain your arbor by inspecting for any loose screws or nails, and performing touch-ups on the paint or stain to keep it looking its best. Additionally, continue to care for the climbing plants by pruning and training them to grow along the lattice panels, adding a touch of nature’s beauty to your arbor.
Now, it’s time to enjoy the rewards of your hard work by creating cherished memories in your newly transformed outdoor space. Whether you relax under the shade of the arbor on a sunny afternoon, host gatherings with loved ones, or simply admire the beauty it brings to your home, your arbor will be a source of joy and pride.
Thank you for embarking on this journey to build a classic arbor with us. We hope this comprehensive guide has provided you with the knowledge and inspiration to tackle other exciting woodworking projects in the future.
Happy woodworking and may your arbor bring you years of beauty and tranquility!
Frequently Asked Questions about How To Build A Classic Arbor For A Charming Outdoor Entryway
Was this page helpful?
At Storables.com, we guarantee accurate and reliable information. Our content, validated by Expert Board Contributors, is crafted following stringent Editorial Policies. We're committed to providing you with well-researched, expert-backed insights for all your informational needs.

0 thoughts on “How To Build A Classic Arbor For A Charming Outdoor Entryway”