Articles
How To Build BBQ Island
Modified: October 20, 2024
Discover expert articles on how to build a BBQ Island and take your outdoor cooking skills to the next level. Find step-by-step guides, tips, and tricks.
(Many of the links in this article redirect to a specific reviewed product. Your purchase of these products through affiliate links helps to generate commission for Storables.com, at no extra cost. Learn more)
Introduction
Welcome to the world of outdoor cooking! If you love barbecues and want to take your grilling game to the next level, building a BBQ island is the perfect project for you. A BBQ island not only provides a dedicated space for your grill but also adds functionality and style to your backyard or patio.
Creating a BBQ island may seem like a daunting task, but with proper planning and a little know-how, you can transform your outdoor space into a cooking haven. This comprehensive guide will walk you through the process, step by step, so you can build your very own BBQ island with confidence.
Before we dive into the details, it’s important to note that building a BBQ island requires some DIY skills and a basic understanding of construction. If you are not comfortable with power tools or have limited experience with building projects, it’s recommended to seek professional help or enlist the assistance of a skilled friend or family member.
Now that we’ve got that covered, let’s get started on the journey to creating your dream BBQ island!
Key Takeaways:
- Planning and designing your BBQ island is crucial for a successful project. Consider layout, size, materials, functionality, and style to ensure your outdoor cooking space meets your needs and fits seamlessly into your backyard or patio.
- Building a BBQ island requires careful attention to detail and the right tools and materials. From constructing the base structure to installing the countertop, appliances, and side cabinets, each step contributes to creating a functional and stylish outdoor cooking haven.
Read also: 10 Amazing BBQ Island for 2025
Step 1: Planning and Design
Before you start gathering materials and tools, it’s crucial to take the time to plan and design your BBQ island. This step is essential to ensure that the end result meets your needs and fits seamlessly into your outdoor space. Here are a few key considerations:
- Layout: Determine the layout and placement of your BBQ island. Consider factors such as the location of gas, water, and electrical connections, as well as proximity to the main entertaining area.
- Size: Decide on the size of your BBQ island based on the available space and your cooking needs. Consider the grill size, countertop space, storage requirements, and any additional features you want to incorporate.
- Materials: Choose the right materials for your BBQ island. Common options include concrete blocks, brick, stone, and outdoor-rated wood. Consider durability, aesthetics, and maintenance when making your selection.
- Functionality: Think about the features and accessories you want to include in your BBQ island. This may include a sink, refrigerator, storage cabinets, side burners, and a prep area. Ensure that these elements are integrated into the design seamlessly.
- Style: Determine the style and theme you want for your BBQ island. It can match the existing décor of your outdoor space or serve as a statement piece. Consider factors such as color, texture, and architectural details.
Once you have a clear vision of your BBQ island, it’s a good idea to sketch out your design or use online design tools to create a visual representation. This will help you refine your plans and make any necessary adjustments before starting the construction process.
Keep in mind that local building codes and regulations may dictate certain aspects of your BBQ island design, such as setback requirements or ventilation specifications. Make sure to check with your local authorities to ensure compliance.
By investing time in careful planning and design, you’ll have a solid foundation for the rest of the construction process. Let’s move on to the next step: choosing the location for your BBQ island.
Step 2: Choosing the Location
When selecting the location for your BBQ island, there are a few key factors to consider that will contribute to the functionality and overall enjoyment of your outdoor cooking space.
First and foremost, you’ll want to choose an area that is easily accessible and convenient. Consider the proximity to your house and main entertaining area. It’s ideal to have your BBQ island located close to the kitchen for easy access to food and supplies.
Next, take into account the prevailing wind direction in your area. You don’t want smoke blowing directly into your outdoor seating area or neighboring properties. Positioning your BBQ island with the wind in mind will ensure a more comfortable grilling experience for everyone.
In addition to accessibility and wind direction, it’s important to consider the clearance requirements of your grill and any other appliances or features you plan to include in your BBQ island. Be mindful of any overhead structures, such as trees or awnings, that may obstruct the space or pose a safety hazard.
Furthermore, think about the overall layout and flow of your outdoor space. Your BBQ island should fit harmoniously within the existing landscape and complement the overall aesthetics of your backyard or patio.
Finally, assess the availability of utility connections, such as gas, water, and electricity. If you plan on incorporating a sink or outdoor fridge, make sure you have access to the necessary utility lines. If these connections are not readily available, you may need to consult with professionals to determine the feasibility and cost of running utility lines to your desired location.
By considering factors such as accessibility, wind direction, clearance requirements, layout, and utility connections, you can select the perfect location for your BBQ island. Once you have determined the ideal spot, you can move on to gathering the materials and tools needed for the construction process.
Step 3: Gathering Materials and Tools
Now that you have a clear plan and a designated location for your BBQ island, it’s time to gather the necessary materials and tools for the construction process. Proper preparation and organization will ensure a smoother and more efficient building experience.
Here is a list of common materials and tools you will need:
Materials:
- Concrete blocks or bricks for the base structure
- Countertop material such as granite, concrete, or tile
- Outdoor-rated wood or composite decking for side cabinets
- Stainless steel or weather-resistant hardware
- Gas, water, and electrical lines (if required)
- Reinforcement material such as rebar or mesh (for added strength)
- Grill, sink, refrigerator, and other desired appliances
- Pipe fittings, hoses, and connectors for gas and water lines
- Fasteners, screws, and construction adhesive
- Mortar or construction adhesive (for securing bricks or blocks)
- Finishing materials such as paint or stain
Read more: How Long To BBQ Hamburgers
Tools:
- Tape measure and level
- Hammer
- Power drill or screwdriver
- Masonry trowel
- Tile cutter (if using tile for countertop)
- Saw (circular saw or miter saw)
- Chisel (for shaping blocks or bricks)
- Utility knife
- Plumbing wrench (for sink installation)
- Wire cutters (for electrical connections)
- Paintbrushes or rollers
- Safety equipment (gloves, safety glasses, dust mask)
Make a list of these materials and tools and ensure that you have everything you need before starting the construction process. It’s also a good idea to check with your local home improvement store or online suppliers for any specific recommendations or requirements for your chosen materials.
Gathering all the necessary materials and tools upfront will save you time and frustration down the line. Now that you’re fully prepared, you can move on to the next step: building the base structure of your BBQ island.
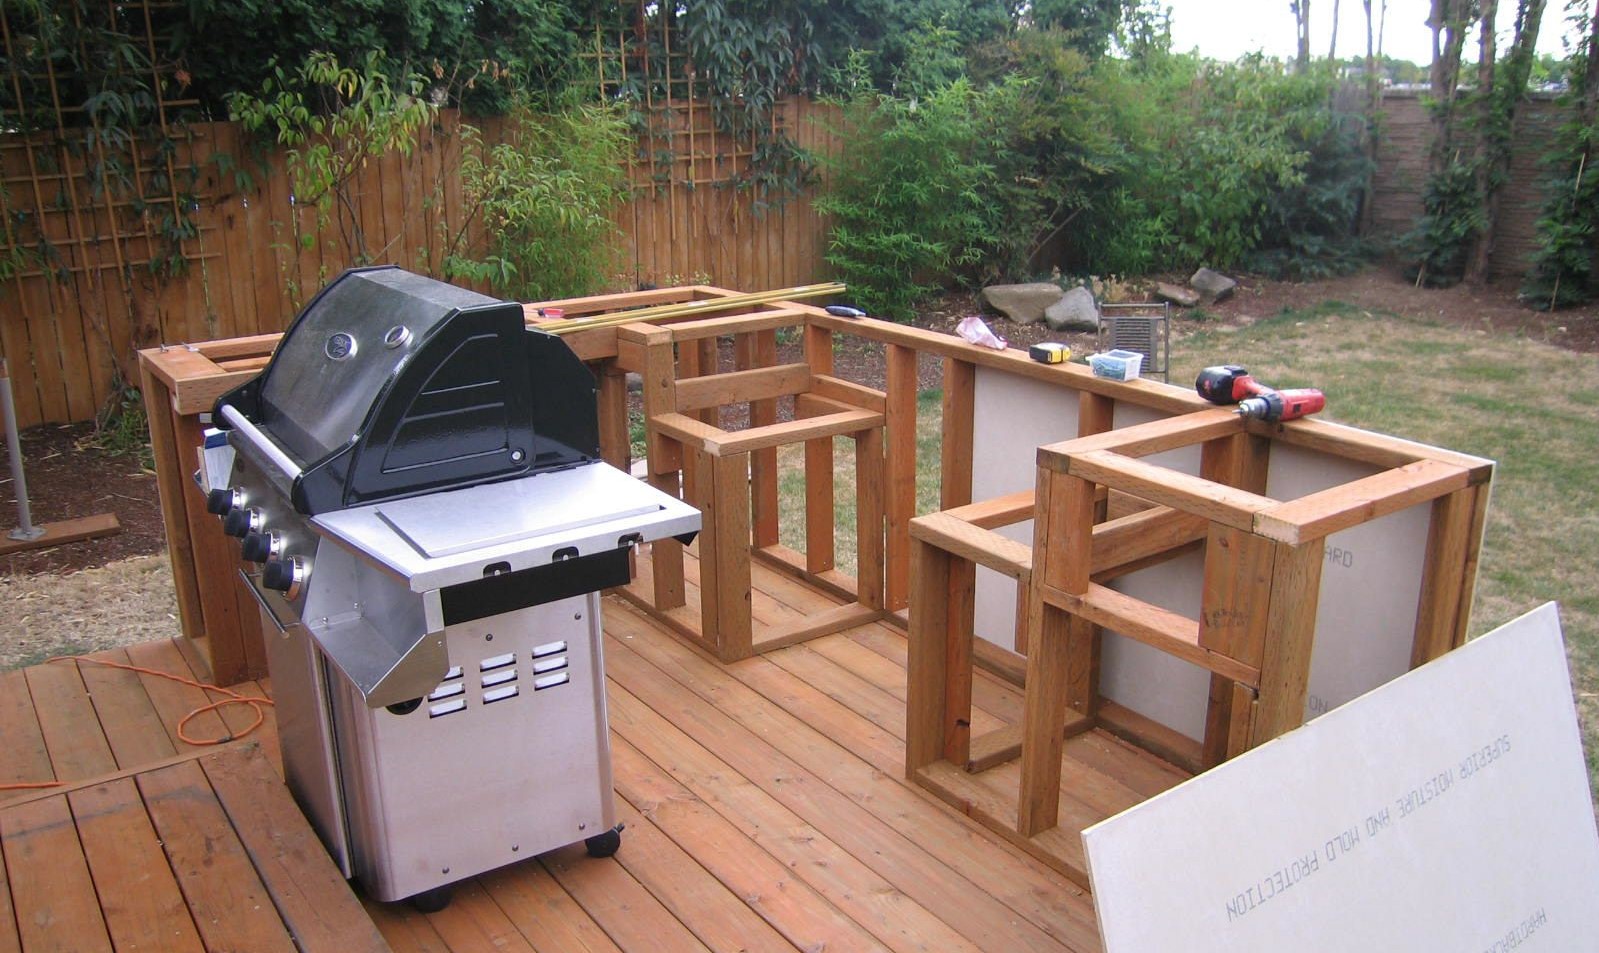
Step 4: Building the Base Structure
With all the materials and tools in hand, it’s time to start building the base structure of your BBQ island. The base provides the foundation for the entire island and supports the weight of the countertop, appliances, and side cabinets.
Here’s a step-by-step guide to help you construct the base structure:
- Prepare the ground: Clear the area where the base will be built. Ensure the ground is level and free of any debris or vegetation that may interfere with the construction process.
- Mark the layout: Use a tape measure and stakes to mark the dimensions of the base on the ground. This will serve as a guide for laying the concrete blocks or bricks.
- Start laying the blocks or bricks: Begin by applying a layer of mortar or construction adhesive to the ground where the first row of blocks or bricks will be placed. Lay the first row, ensuring they are level and square with the marks on the ground. Use a level to check for accuracy.
- Continue building the rows: Apply mortar or adhesive between each row of blocks or bricks to secure them together. Stagger the joints of each row to add stability to the structure. Use a level frequently to ensure the base remains level and plumb.
- Create spaces for appliances: As you build the base, make sure to leave openings for the grill, sink, and any other appliances you plan to install. Take precise measurements and mark the exact locations on the base structure.
- Reinforce the base: For added strength, insert pieces of rebar or mesh into the mortar or adhesive between each row of blocks or bricks. This will provide stability and help prevent any shifting or cracking in the future.
- Allow for ventilation: It’s important to create adequate ventilation in the base structure, especially if you’re using a gas grill. Install vents or leave gaps in the base to allow the proper airflow for ventilation.
- Let it cure: Once the base structure is complete, allow the mortar or adhesive to cure according to the manufacturer’s instructions. This may take several days, so be patient and avoid placing any weight on the base during this time.
Building the base structure requires precision and attention to detail. Take your time to ensure the foundation is solid and level, as it will directly impact the stability and longevity of your BBQ island. Once the base has cured, you can move on to the next step: installing the countertop and appliances.
Step 5: Installing the Countertop and Appliances
With the base structure completed, it’s time to move on to installing the countertop and appliances, which will bring functionality and style to your BBQ island. This step requires careful measurement, precision, and attention to detail.
Here’s a step-by-step guide to help you through the installation process:
- Measure and cut the countertop: Take accurate measurements of the space on the base structure where the countertop will be placed. Transfer these measurements to your chosen countertop material (such as granite, concrete, or tile) and use a saw or tile cutter to cut the countertop to the appropriate size and shape.
- Secure the countertop: Apply a thin layer of construction adhesive to the top of the base structure, ensuring even coverage. Carefully place the countertop onto the base and press it down firmly. Use a level to ensure it is even and adjust as necessary.
- Install the grill and other appliances: Follow the manufacturer’s instructions to install the grill, sink, refrigerator, and any other appliances you have chosen. Make sure to properly connect the gas, water, and electrical lines. If you are unsure about any of the connections, it is advisable to consult a professional.
- Seal the countertop: Depending on the material you’re using for the countertop, it may need to be sealed for protection against stains, moisture, and UV exposure. Follow the manufacturer’s instructions for the appropriate type of sealer and apply it according to the recommended method.
- Test the functionality: Once everything is installed, test each appliance to ensure they are working properly. Check for any leaks, ignition issues, or other potential problems. Make any necessary adjustments or repairs before proceeding.
During the installation process, it’s crucial to handle the countertop and appliances with care to avoid damage. Seek assistance if needed, especially when working with heavy or fragile materials. Take your time to ensure each element is properly aligned and securely attached to the base structure.
Once the countertop and appliances are installed and tested, you can move on to the next step: building the side cabinets to add storage and functionality to your BBQ island.
When building a BBQ island, make sure to use durable and weather-resistant materials such as stainless steel, stone, or tile to ensure longevity and easy maintenance.
Step 6: Building the Side Cabinets
Side cabinets are a valuable addition to your BBQ island as they provide storage space for utensils, grilling accessories, and other essentials. Building the side cabinets requires some woodworking skills, but with the right tools and materials, you can create functional and stylish storage solutions.
Here’s a step-by-step guide to help you construct the side cabinets:
- Measure and plan: Determine the dimensions of the side cabinets based on the available space on either side of the grill. Consider the height, width, and depth of the cabinets to ensure they fit your storage needs. Sketch out a plan and create a list of materials required.
- Cut the materials: Using the measurements from your plan, cut the outdoor-rated wood or composite decking into the necessary pieces for the cabinet sides, top, bottom, and shelves. Use a saw or circular saw, ensuring accurate and straight cuts.
- Assemble the cabinets: Begin by attaching the sides to the top and bottom pieces using screws or construction adhesive. Use a level to ensure the cabinets are square and plumb. Add additional support if needed, such as corner braces or reinforcement blocks.
- Add the shelves: Install the shelves within the cabinet framework. Measure and cut the shelves to fit snugly, using screws or shelf brackets to secure them in place. Consider adjustable shelves for added flexibility.
- Install cabinet doors or drawers: Choose whether you want cabinet doors or drawers for your side cabinets. Measure and cut the door or drawer fronts and attach them to the cabinet framework using hinges or drawer slides. Ensure they are aligned properly and open and close smoothly.
- Apply finishing touches: Sand the cabinets to smooth any rough edges and provide a clean surface for paint or stain. Apply a weather-resistant finish to protect the wood from moisture and UV exposure. Choose a color or stain that complements the overall style of your BBQ island.
- Mount the cabinets: Attach the side cabinets to the base structure using screws or brackets. Make sure they are securely fastened and level with the countertop. Use a level to check for accuracy and make any adjustments if necessary.
Building the side cabinets may require some customization based on your specific needs and preferences. Consider adding hooks, racks, or dividers inside the cabinets to further optimize storage space and keep items organized.
Once the side cabinets are built and installed, you can move on to the final step: adding the finishing touches to complete your BBQ island.
Read more: How To Do Korean BBQ
Step 7: Adding Finishing Touches
Congratulations! You’re almost done with building your BBQ island. The final step involves adding the finishing touches to enhance the functionality, aesthetics, and overall enjoyment of your outdoor cooking space.
Here are some ideas for adding those final touches:
- Accessorize: Consider adding accessories such as hooks, towel racks, spice racks, or utensil holders to keep your grilling tools and supplies organized and easily accessible.
- Lighting: Install outdoor lighting around your BBQ island to create a warm and inviting atmosphere for evening cookouts. This can include overhead lights, string lights, or even built-in LED strips.
- Seating: Provide comfortable seating options near your BBQ island, such as chairs, benches, or stools. This will allow your guests to relax and enjoy the food while you grill.
- Landscaping: Enhance the surrounding area with landscaping elements, such as plants, shrubs, or flowers. This will add color and texture to your outdoor space, creating a more inviting and cohesive environment.
- Storage: If your side cabinets don’t provide enough storage space, consider adding additional storage options such as outdoor storage boxes or cabinets. This will help keep your grilling essentials organized and protected from the elements.
- Outdoor entertainment: Take your BBQ island to the next level by incorporating outdoor entertainment features such as a TV, sound system, or outdoor speakers. This will create a truly enjoyable outdoor cooking and dining experience.
Additionally, don’t forget to regularly clean and maintain your BBQ island to ensure its longevity and optimal performance. Keep the grill and appliances clean, wipe down the countertops, and inspect the structure for any signs of wear or damage. Taking care of your BBQ island will ensure you can enjoy it for many years to come.
Now that you’ve successfully added the finishing touches, it’s time to fire up the grill and start cooking your favorite dishes. Enjoy the fruits of your labor and savor the satisfaction of creating a beautiful and functional BBQ island.
Congratulations again on completing your BBQ island project!
Conclusion
Building a BBQ island is a rewarding project that allows you to create a dedicated space for outdoor cooking and entertaining. Throughout this comprehensive guide, we’ve covered the steps involved in planning, designing, and constructing your own BBQ island.
From the initial planning and design process to choosing the perfect location, gathering materials and tools, and building the base structure, each step is essential to ensure a successful and functional BBQ island. Installing the countertop and appliances, building the side cabinets, and adding the finishing touches complete the transformation, turning your outdoor space into a grilling paradise.
Remember, while this guide provides a solid foundation, it’s important to adapt the instructions to your specific needs, space, and skill level. Don’t hesitate to seek professional assistance if needed, especially for gas, water, or electrical installations.
With your new BBQ island, you can enjoy countless hours of grilling, entertaining, and creating memorable experiences with family and friends. The possibilities are endless – from backyard barbecues to casual get-togethers or even hosting outdoor parties.
As you embark on this journey, always prioritize safety, quality materials, and attention to detail. Regular maintenance and care will contribute to the longevity and durability of your BBQ island, ensuring it remains a centerpiece of outdoor enjoyment for years to come.
Now, it’s time to embrace the joy of outdoor cooking and let your creativity shine in your beautifully crafted BBQ island. Enjoy the process, embrace the flavors, and savor the satisfaction that comes with owning your own outdoor cooking haven!
Frequently Asked Questions about How To Build BBQ Island
Was this page helpful?
At Storables.com, we guarantee accurate and reliable information. Our content, validated by Expert Board Contributors, is crafted following stringent Editorial Policies. We're committed to providing you with well-researched, expert-backed insights for all your informational needs.


0 thoughts on “How To Build BBQ Island”