Home>Articles>How To Change A Doorknob Quickly For An Updated Look
Articles
How To Change A Doorknob Quickly For An Updated Look
Modified: December 7, 2023
Learn how to quickly update the look of your space by changing a doorknob with our informative articles.
(Many of the links in this article redirect to a specific reviewed product. Your purchase of these products through affiliate links helps to generate commission for Storables.com, at no extra cost. Learn more)
Introduction
Changing a doorknob is a simple yet effective way to update the look of your doors and enhance the overall aesthetic of your home. Whether you’re looking to replace a worn-out doorknob or just want to give your door a fresh new look, this step-by-step guide will walk you through the process of changing a doorknob quickly and easily.
A doorknob not only serves as a functional component of your door, but it also plays a significant role in the overall design and style of your living space. By swapping out an old, outdated doorknob with a sleek and modern alternative, you can instantly transform the look and feel of your doors.
Additionally, replacing a doorknob can also provide added security and convenience. Modern doorknobs often feature advanced locking mechanisms and keyless entry options, ensuring the safety of your home while simplifying access for you and your family.
Before embarking on this DIY project, it’s essential to gather the necessary tools and supplies. By having everything prepared in advance, you can streamline the process and avoid any unnecessary trips to the hardware store. So let’s dive into the first step of this doorknob-changing adventure!
Key Takeaways:
- Updating your home’s aesthetic and enhancing security is as easy as changing a doorknob. With the right tools and steps, you can quickly transform the look and functionality of your doors.
- By following a simple DIY process, you can give your doors a fresh, modern look and enjoy the added convenience and security of advanced doorknob options. It’s a quick and effective home improvement project.
Read more: How To Childproof A Doorknob
Step 1: Gather the Necessary Tools and Supplies
Before you begin changing a doorknob, it’s crucial to collect all the tools and supplies you’ll need for the job. Having everything ready at hand will make the process smoother and more efficient. Here are the essential tools and supplies you’ll need:
- Phillips head screwdriver
- Flathead screwdriver
- Drill (if necessary)
- Doorknob replacement kit
- Masking tape or painter’s tape
- Pen or pencil
The Phillips head screwdriver will be used to remove and install screws, while the flathead screwdriver can be handy for prying open certain parts or removing stubborn components. If your door requires additional drilling for the new doorknob, ensure you have a drill with the appropriate drill bit.
Next, you’ll need a doorknob replacement kit. This typically includes a new doorknob, latch mechanism, strike plate, and screws. Make sure the kit is compatible with the size and style of your door.
Additionally, masking tape or painter’s tape will come in handy for marking the position of the new doorknob on the door. You may also want to use a pen or pencil to make the marks more visible.
Once you have gathered all the necessary tools and supplies, you’re ready to move on to the next step: removing the old doorknob.
Step 2: Remove the Old Doorknob
Now that you have all the necessary tools and supplies, it’s time to remove the old doorknob. Follow these steps to successfully remove the old doorknob:
- Examine the doorknob: Take a close look at the old doorknob to identify any screws or hidden components that need to be removed. Most doorknobs have visible screws on the interior side of the door handle.
- Locate the screws: Using a Phillips head screwdriver, locate and remove the screws that hold the doorknob plate in place. Typically, there will be two screws on either side of the plate. Set the screws aside as you’ll need them later.
- Remove the doorknob plate: Once the screws are removed, gently pull the doorknob plate away from the door. You may need to use a flathead screwdriver to pry it open if it’s stuck.
- Take out the latch assembly: After removing the doorknob plate, you’ll see the latch assembly exposed. Locate and remove the screws that hold the latch assembly in place. Set these screws aside as well.
- Pull out the latch assembly: With the screws removed, pull the latch assembly out of the door. Be careful not to damage the surrounding area as you do this.
- Repeat the process for the other side: If your door has a doorknob on both sides, repeat steps 2-5 to remove the second doorknob.
With the old doorknob removed, you’re one step closer to giving your door a fresh new look. The next step involves preparing the door for the new doorknob installation.
Step 3: Prepare the Door for the New Doorknob
With the old doorknob removed, it’s time to prepare the door for the installation of the new doorknob. Follow these steps to ensure a smooth transition:
- Inspect the door: Take a moment to examine the door and ensure it’s in good condition. Look for any signs of damage or wear that may affect the installation or functionality of the new doorknob.
- Clean the area: Use a damp cloth to wipe away any dirt, dust, or debris from the door surface where the new doorknob will be installed. This will provide a clean and even surface for the new hardware.
- Measure and mark the placement: Place the new doorknob on the door and align it with the desired height and orientation. Use a measuring tape to make precise measurements, and then use masking tape or painter’s tape to mark the exact position of the new doorknob on the door.
- Mark the hole for the latch: Place the latch assembly on the edge of the door where it will be installed. Trace around the faceplate of the latch with a pencil or pen to mark the outline of the hole that needs to be chiseled.
- Chisel out the hole: Use a sharp chisel and a hammer to carefully chisel out the marked hole for the latch. Take your time and make small, controlled cuts to ensure the hole is the perfect size and shape for the latch assembly.
- Test the fit: Insert the latch assembly into the chiseled hole to test the fit. It should slide in easily and sit flush with the surface of the door. If needed, make any necessary adjustments to ensure a proper fit.
By properly preparing the door for the new doorknob, you’re setting the stage for a seamless and secure installation. Next up, we’ll dive into the exciting part – installing the new doorknob!
When changing a doorknob for an updated look, make sure to measure the existing hole size before purchasing a new knob to ensure a proper fit.
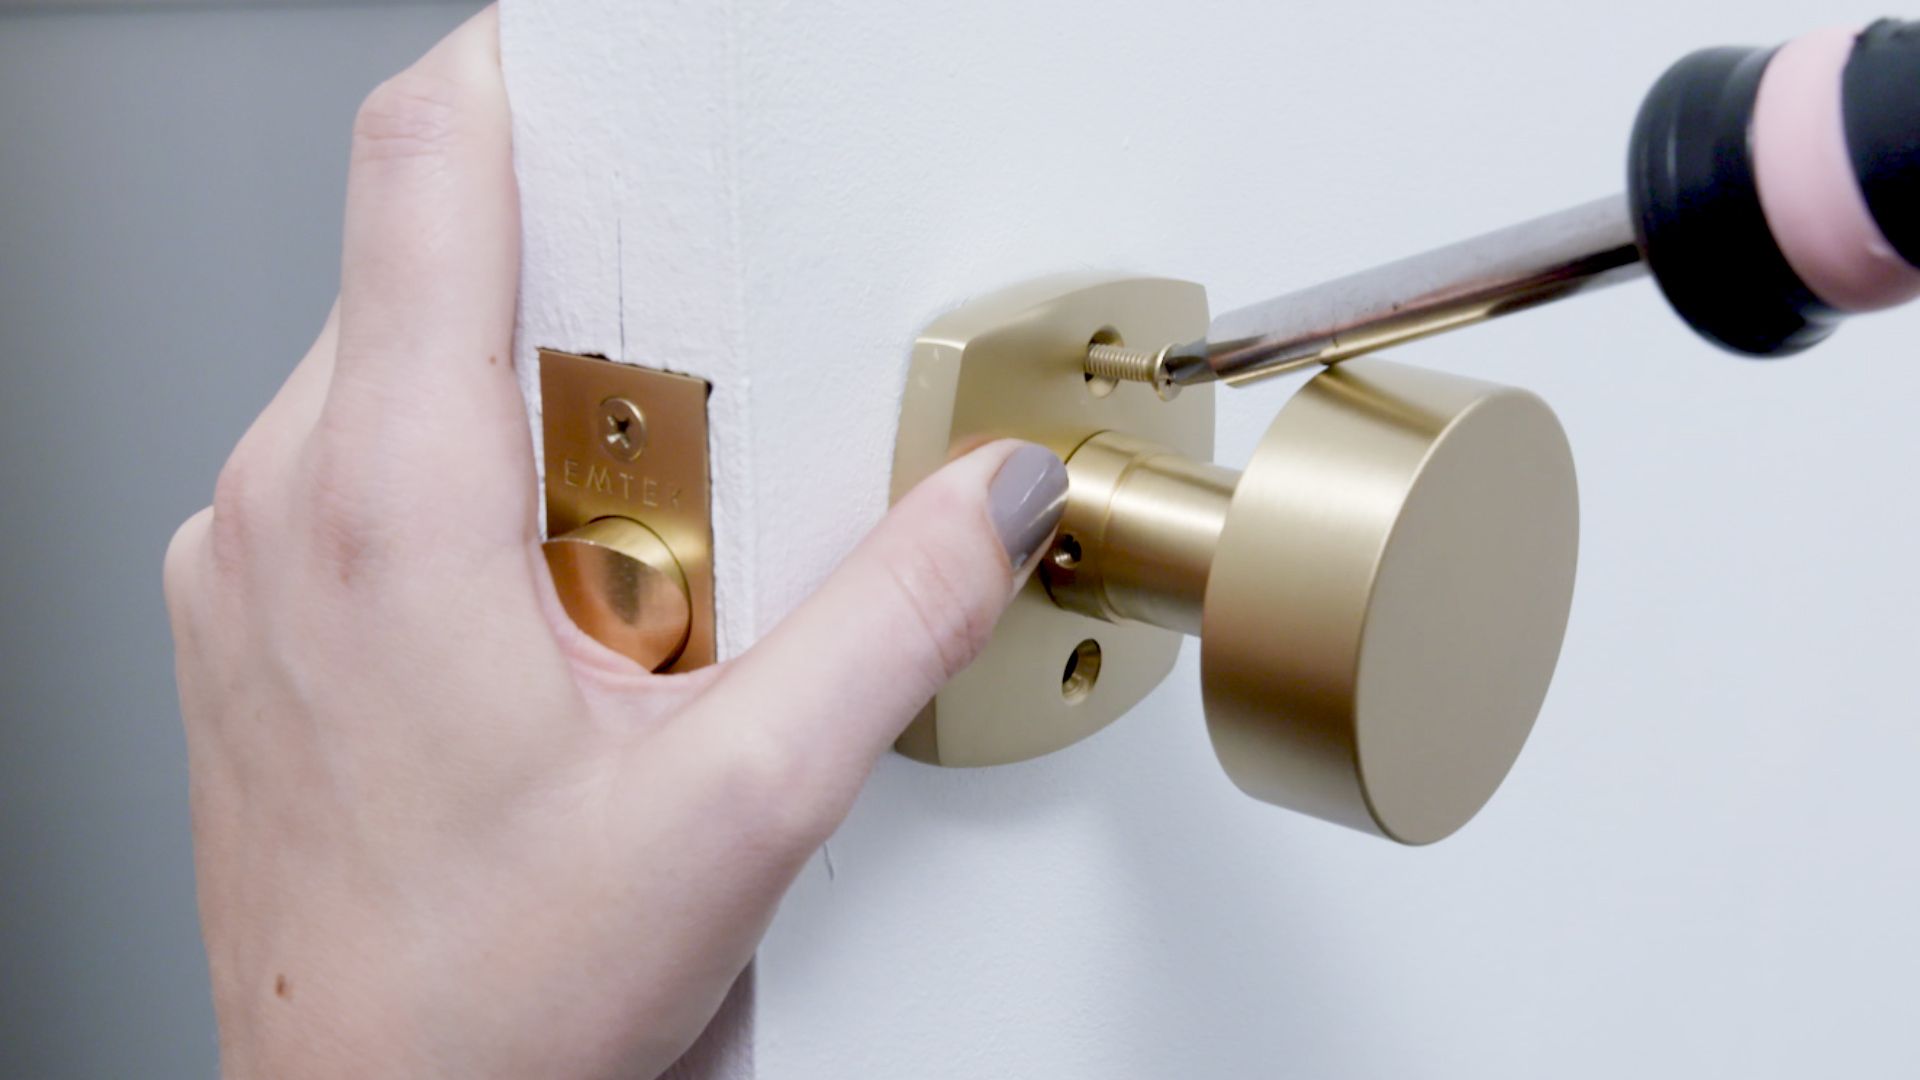
Step 4: Install the New Doorknob
Now that you have prepared the door, it’s time to install the new doorknob. Follow these steps to ensure a successful installation:
- Insert the latch assembly: Start by inserting the latch assembly into the hole you chiseled out in the previous step. Make sure it fits securely and sits flush with the door’s surface.
- Attach the outside portion of the doorknob: Take the outside portion of the new doorknob and insert it into the hole on the exterior side of the door. Ensure that the spindle is properly aligned with the latch assembly.
- Secure the outside doorknob: Once the outside portion is in place, align the screw holes on the doorknob plate with the corresponding holes on the exterior side of the door. Use the screws provided in your doorknob replacement kit to secure the outside doorknob in place.
- Insert the inside portion of the doorknob: Take the inside portion of the doorknob and insert it into the hole on the interior side of the door. Align the spindle with the latch assembly.
- Secure the inside doorknob: Similar to the outside doorknob, align the screw holes on the doorknob plate with the corresponding holes on the interior side of the door. Use the screws provided to secure the inside doorknob in place.
- Tighten all screws: Double-check that all screws are securely tightened, but be careful not to overtighten them as it may cause damage to the doorknob or door.
Once you’ve followed these steps, you’ll have successfully installed the new doorknob. Now it’s time to move on to the final step – testing the new doorknob to ensure it functions properly.
Step 5: Test the New Doorknob
With the new doorknob installed, it’s important to test it to ensure that it functions properly and provides the desired level of security. Follow these steps to test the new doorknob:
- Close the door: Shut the door and ensure it is fully closed.
- Rotate the doorknob: Turn the doorknob in both directions to check if it moves smoothly and without any resistance.
- Check the latch: With the door closed, turn the doorknob to engage the latch mechanism and ensure it securely holds the door in place.
- Lock and unlock the doorknob (if applicable): If your new doorknob features a lock, test the lock and key mechanism to make sure it works effectively.
- Test the door’s alignment: Open and close the door several times to check if the latch aligns properly with the strike plate. It should engage smoothly without any issues or inconsistencies.
- Inspect for any loose screws: With the doorknob fully tested, inspect all the screws to make sure they are securely tightened. If you find any loose screws, tighten them as necessary.
By following these steps, you’ll be able to verify that the new doorknob is functioning correctly and provides the desired level of security. If you encounter any issues or notice any problems during the testing phase, carefully review the installation steps and make any necessary adjustments.
Congratulations! You have successfully changed your doorknob and given your door a fresh, updated look. Enjoy the enhanced functionality and aesthetics that your new doorknob brings to your home.
Remember, proper maintenance and regular inspections can help ensure the longevity and reliability of your doorknob. If you ever need to change or upgrade again in the future, you now have the knowledge and experience to confidently tackle the task.
Thank you for following along with this step-by-step guide. Happy DIY-ing!
Conclusion
Changing a doorknob not only updates the look of your doors but also enhances the overall aesthetic and functionality of your home. Throughout this step-by-step guide, we’ve covered the process of changing a doorknob quickly and easily. From gathering the necessary tools and supplies to removing the old doorknob, preparing the door, installing the new doorknob, and testing its functionality, we’ve provided you with all the information you need to successfully complete this DIY project.
By following the outlined steps and using the proper tools, you can confidently change a doorknob and give your doors a fresh new look. Whether you’re replacing a worn-out doorknob or simply updating the style, the process is straightforward and can be accomplished with ease.
Not only does changing a doorknob improve the aesthetics of your home, but it can also enhance security and convenience. With the availability of modern doorknob options featuring advanced locking mechanisms and keyless entry, you can ensure the safety of your home while simplifying access for you and your family.
Remember to take your time during each step, paying attention to detail and ensuring proper alignment and tightening of screws. Regularly inspecting and maintaining your doorknob will help prolong its lifespan and reliability.
Now that you have the knowledge and confidence to change a doorknob, don’t hesitate to embark on this DIY project. With a little effort and the right tools, you can transform the entire look and feel of your doors, giving your home a fresh and updated appearance.
We hope this guide has been helpful in assisting you with changing your doorknob. Happy DIY-ing!
Frequently Asked Questions about How To Change A Doorknob Quickly For An Updated Look
Was this page helpful?
At Storables.com, we guarantee accurate and reliable information. Our content, validated by Expert Board Contributors, is crafted following stringent Editorial Policies. We're committed to providing you with well-researched, expert-backed insights for all your informational needs.


0 thoughts on “How To Change A Doorknob Quickly For An Updated Look”