Home>Furniture & Design>Bathroom Accessories>How To Update Bathtub
Bathroom Accessories
How To Update Bathtub
Modified: March 19, 2024
Learn how to update your bathtub with the latest bathroom accessories. Find tips and ideas for a stylish and functional bathroom renovation. Discover the best products and designs for your project.
(Many of the links in this article redirect to a specific reviewed product. Your purchase of these products through affiliate links helps to generate commission for Storables.com, at no extra cost. Learn more)
Assessing the Condition of Your Bathtub
Before embarking on a bathtub update, it's crucial to thoroughly assess the current condition of your bathtub. This initial step will help you determine the extent of the update required and the specific areas that need attention. Here's a comprehensive guide to assessing the condition of your bathtub:
-
Surface Damage: Begin by examining the surface of the bathtub for any signs of wear and tear, such as cracks, chips, or discoloration. These issues can detract from the overall appearance of the bathtub and may require repair or refinishing.
-
Leakage and Sealing: Check for any signs of leakage around the edges of the bathtub and the surrounding tiles. Proper sealing is essential to prevent water damage and mold growth, so it's important to address any areas where the sealant may be compromised.
-
Structural Integrity: Assess the structural integrity of the bathtub, paying close attention to any sagging or unevenness. A stable and level bathtub is essential for both functionality and safety.
-
Fixtures and Hardware: Evaluate the condition of the fixtures and hardware, including the faucet, handles, and drain. Look for signs of corrosion, rust, or malfunction that may indicate the need for replacement or repair.
-
Overall Aesthetics: Consider the overall aesthetics of the bathtub, including its style, color, and compatibility with the rest of the bathroom decor. If the bathtub appears outdated or mismatched, updating its aesthetic appeal may be a priority.
By conducting a thorough assessment of these key areas, you'll gain valuable insights into the specific updates and repairs needed to rejuvenate your bathtub. This proactive approach sets the stage for a successful and transformative bathtub update, ensuring that each aspect of the project is tailored to address the unique condition of your bathtub.
Key Takeaways:
- Assess the condition of your bathtub by checking for surface damage, leakage, structural integrity, fixtures, and overall aesthetics. This helps determine the specific updates and repairs needed for a successful bathtub rejuvenation.
- When updating your bathtub, choose the right materials and tools, prepare the surface meticulously, and pay attention to the details. This ensures a satisfying and enduring transformation, enhancing both functionality and visual appeal.
Read more: How To Update An Old Bathtub
Choosing the Right Materials and Tools
Selecting the appropriate materials and tools is a critical aspect of updating a bathtub. The right choices can significantly impact the outcome of the project, ensuring durability, functionality, and aesthetic appeal. Here's a comprehensive guide to help you make informed decisions when choosing materials and tools for your bathtub update:
1. Surface Refinishing Materials:
- Epoxy Coating: For refinishing the bathtub surface, consider high-quality epoxy coatings designed specifically for this purpose. These coatings offer durability, resistance to chipping, and a smooth, glossy finish.
- Refinishing Kits: Look for bathtub refinishing kits that include all the necessary materials, such as cleaners, primers, and coatings. These kits streamline the refinishing process and ensure compatibility between the different products.
2. Repair and Sealant Materials:
- Epoxy Putty: To address cracks and chips in the bathtub surface, epoxy putty provides a reliable solution for filling and reinforcing damaged areas.
- Silicone Sealant: Choose a high-quality silicone sealant for resealing the edges of the bathtub and around fixtures. Opt for a waterproof and mold-resistant formula for long-lasting results.
3. Fixture and Hardware Replacement:
- New Faucet and Handles: If the existing faucet and handles are worn or outdated, consider replacing them with modern, water-efficient fixtures. Look for options that complement the overall style of your bathroom.
- Drain Assembly: Upgrading the drain assembly can improve functionality and enhance the visual appeal of the bathtub. Select a durable and corrosion-resistant drain assembly for long-term performance.
Read more: How To Update A Fireplace
4. Cleaning and Preparation Tools:
- Abrasive Cleaners: Choose non-abrasive cleaners specifically formulated for removing soap scum, mineral deposits, and grime from the bathtub surface. These cleaners prepare the surface for refinishing and ensure optimal adhesion of the new coatings.
- Sanding Tools: Depending on the refinishing process, select appropriate sanding tools, such as sandpaper or sanding pads, to smooth the surface and promote adhesion of the new coatings.
5. Safety Equipment:
- Respirator Mask: When working with refinishing products and sealants, a respirator mask is essential for protecting against fumes and airborne particles.
- Protective Gloves and Eyewear: Ensure the use of protective gloves and eyewear to safeguard against skin contact and eye irritation when handling chemicals and tools.
By carefully considering these materials and tools, you can ensure that your bathtub update is carried out with precision and attention to detail. Making informed choices at this stage sets the foundation for a successful and satisfying transformation of your bathtub, enhancing both its functionality and visual appeal.
Preparing the Bathtub for Update
Preparing the bathtub for an update is a crucial phase that sets the stage for a successful transformation. This process involves thorough cleaning, surface preparation, and ensuring proper ventilation to create an optimal environment for the subsequent refinishing and fixture updates.
1. Cleaning the Surface:
Begin by thoroughly cleaning the bathtub surface to remove any soap scum, mineral deposits, and grime. Utilize non-abrasive cleaners specifically formulated for this purpose, ensuring that the surface is free from any residue that could affect the adhesion of the new coatings. Pay close attention to areas around the drain, fixtures, and edges where buildup is common.
Read more: How To Update A Dresser
2. Repairing Surface Imperfections:
Address any cracks, chips, or imperfections in the bathtub surface using epoxy putty or suitable repair materials. It's essential to carefully follow the manufacturer's instructions and allow sufficient time for the repairs to cure before proceeding with the refinishing process. By addressing these imperfections, you ensure a smooth and uniform surface for the subsequent coatings.
3. Removing Old Caulking and Sealant:
Inspect the caulking and sealant around the edges of the bathtub and adjacent tiles. If these areas show signs of wear, mold, or deterioration, it's advisable to remove the old caulking and sealant using a utility knife or a specialized removal tool. Thoroughly clean the exposed edges to prepare them for resealing during the update.
4. Ventilation and Safety Measures:
Proper ventilation is essential during the preparation phase, especially when working with cleaning agents, solvents, and repair materials. Ensure adequate airflow by opening windows and using exhaust fans to minimize exposure to fumes. Additionally, wearing a respirator mask, protective gloves, and eyewear is crucial to safeguard against potential chemical irritants and airborne particles.
5. Sanding and Surface Etching:
Depending on the refinishing method chosen, the bathtub surface may require sanding or etching to promote adhesion of the new coatings. Follow the specific guidelines provided with the refinishing materials to prepare the surface accordingly. This step is critical for ensuring the longevity and durability of the updated finish.
By meticulously preparing the bathtub for the update, you establish a solid foundation for the subsequent refinishing and fixture updates. This proactive approach not only enhances the overall quality of the update but also contributes to the longevity and resilience of the updated bathtub, ensuring a satisfying and enduring transformation.
Read more: How To Update Wardrobe
Updating the Bathtub Surface
Updating the surface of your bathtub is a transformative process that can breathe new life into the entire bathroom. Whether your goal is to repair surface imperfections, change the color, or simply refresh the appearance, this phase of the update requires careful attention to detail and precision. Here's a comprehensive guide to updating the bathtub surface, encompassing the essential steps and considerations for a successful transformation.
1. Surface Refinishing Method:
Selecting the appropriate refinishing method is pivotal in achieving a durable and visually appealing bathtub surface. Epoxy coatings and refinishing kits are popular options for their ability to provide a smooth, glossy finish while addressing surface imperfections. Consider the specific requirements of your bathtub, such as material and existing finish, to choose the most suitable refinishing method.
2. Application Process:
Follow the manufacturer's instructions meticulously when applying the refinishing materials to the bathtub surface. Ensure that the area is well-ventilated, and adhere to the recommended drying and curing times to achieve optimal results. Applying multiple thin coats, as opposed to a single thick layer, promotes even coverage and enhances the durability of the new finish.
3. Surface Protection and Maintenance:
Once the refinishing process is complete, it's essential to allow sufficient time for the new surface to cure and harden. Avoid using the bathtub for the specified duration provided by the manufacturer to prevent any premature damage to the finish. Additionally, implement regular maintenance practices, such as using non-abrasive cleaners and avoiding harsh chemicals, to preserve the integrity and appearance of the updated surface.
Read more: How To Update A Fireplace Mantel
4. Quality Assurance:
Thoroughly inspect the updated surface for any imperfections or inconsistencies after the refinishing process. Address any areas that may require touch-ups or additional attention to ensure a flawless and uniform finish. Taking the time to assess the quality of the updated surface contributes to the overall satisfaction and longevity of the bathtub update.
By meticulously following these steps and considerations, you can achieve a remarkable transformation of the bathtub surface, enhancing its aesthetic appeal and functionality. The updated surface serves as a focal point in the bathroom, elevating the overall ambiance and contributing to a rejuvenated and inviting space.
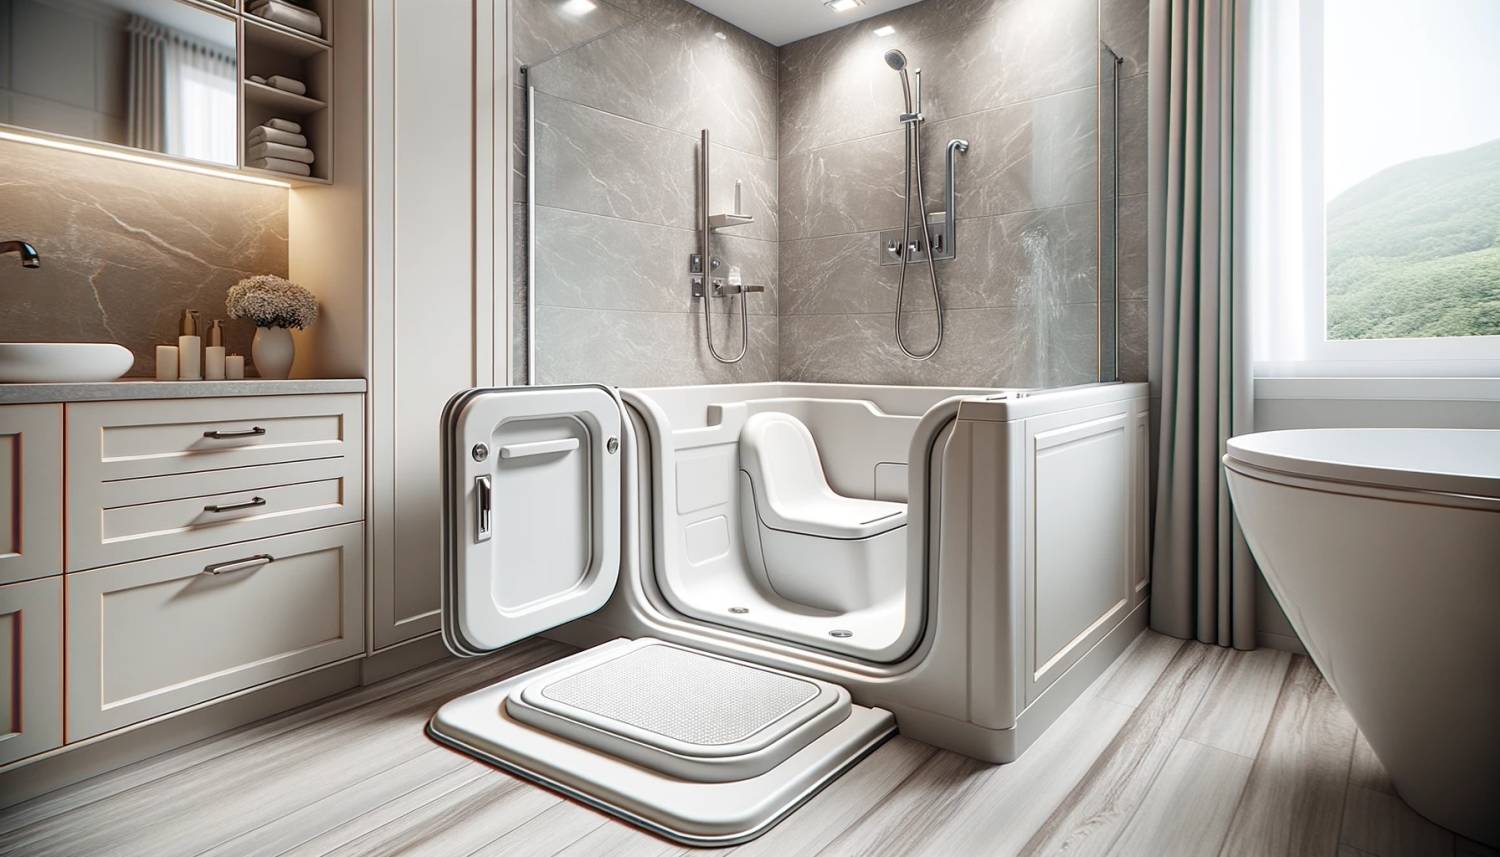
Updating the Bathtub Fixtures
Updating the fixtures of your bathtub presents an opportunity to enhance both functionality and aesthetic appeal. Whether you aim to replace worn-out hardware, upgrade to modern fixtures, or simply revitalize the visual impact of the bathtub, this phase of the update plays a pivotal role in the overall transformation of the bathing space.
1. Fixture Selection:
Carefully consider the style, finish, and functionality of the new fixtures to ensure they align with your desired aesthetic and practical requirements. From sleek and contemporary designs to timeless and classic options, the selection of fixtures can significantly influence the overall ambiance of the bathroom. Additionally, prioritize water-efficient and durable fixtures to promote sustainability and long-term performance.
2. Faucet and Handles Replacement:
If the existing faucet and handles exhibit signs of wear, corrosion, or outdated design, replacing them with new, high-quality counterparts can rejuvenate the bathtub's appearance. Choose fixtures that complement the overall style of the bathroom while offering improved functionality and ease of use. Additionally, consider the installation of water-saving aerators to promote eco-friendly water usage.
Read more: How To Update Printer Drivers
3. Drain Assembly Upgrade:
Upgrading the drain assembly not only enhances the visual appeal of the bathtub but also contributes to improved drainage and maintenance. Opt for a corrosion-resistant and durable drain assembly that aligns with the chosen fixture style. This upgrade not only elevates the aesthetic appeal of the bathtub but also ensures efficient water drainage, minimizing the risk of clogs and maintenance issues.
4. Installation Process:
Follow the manufacturer's guidelines and, if necessary, seek professional assistance to ensure the proper installation of the new fixtures. Attention to detail during the installation process is crucial for achieving optimal functionality and longevity. Properly sealed and securely installed fixtures contribute to a seamless and reliable bathing experience.
5. Coordinated Design Elements:
Consider the broader design elements within the bathroom when selecting new fixtures for the bathtub. Coordinating the finish and style of the fixtures with other hardware, such as towel bars, robe hooks, and cabinet pulls, creates a cohesive and harmonious aesthetic throughout the space. This attention to detail elevates the overall visual impact of the bathroom, creating a unified and polished look.
By meticulously updating the bathtub fixtures, you can achieve a comprehensive transformation that enhances both the visual appeal and functionality of the bathing space. The updated fixtures serve as essential components in creating a rejuvenated and inviting bathroom environment, reflecting your personal style and attention to detail.
Finishing Touches and Clean-Up
Once the primary phases of updating the bathtub, including refinishing the surface and replacing fixtures, are complete, attention turns to the crucial stage of finishing touches and clean-up. This phase is essential for ensuring that the updated bathtub not only looks visually appealing but also functions optimally while maintaining a clean and inviting environment in the bathroom.
Read more: How To Update Dining Table
1. Final Inspections:
Before proceeding with the finishing touches, it's imperative to conduct a comprehensive inspection of the updated bathtub. This involves examining the refinished surface for any imperfections, ensuring that the new fixtures are securely installed, and verifying that all components are functioning as intended. Addressing any remaining touch-ups or adjustments at this stage contributes to the overall quality and satisfaction of the update.
2. Reapplying Caulking and Sealant:
To complete the update, reapplying caulking and sealant around the edges of the bathtub and adjacent tiles is essential. This not only enhances the visual cohesion of the bathtub but also ensures proper sealing to prevent water leakage and potential damage. Utilizing high-quality silicone sealant and applying it with precision contributes to the longevity and maintenance of the updated bathtub.
3. Polishing and Detailing:
A final polish and detailing of the updated bathtub surface and fixtures add a touch of finesse to the overall presentation. This step involves carefully cleaning and buffing the refinished surface to achieve a smooth and lustrous appearance. Additionally, ensuring that the new fixtures are free from any residue and are polished to a gleaming finish elevates the visual impact of the bathtub.
4. Clean-Up and Debris Removal:
As the update nears completion, thorough clean-up and debris removal are essential to restore the bathroom to its pristine state. Clearing away any remnants of the update process, such as packaging materials, old fixtures, and cleaning supplies, contributes to a clean and organized environment. Attention to detail during this phase enhances the overall satisfaction and visual appeal of the updated bathtub and the surrounding space.
Read more: How To Update Porch Columns
5. Final Functional Checks:
Conducting final functional checks, such as testing the water flow and drainage, ensures that the updated bathtub is fully operational. This step provides peace of mind, knowing that the bathtub not only looks rejuvenated but also functions reliably. Addressing any minor adjustments or fine-tuning at this stage contributes to a seamless and satisfying update experience.
By meticulously attending to the finishing touches and clean-up, the updated bathtub is not only visually transformed but also optimized for long-term functionality and enjoyment. This comprehensive approach ensures that the bathtub update culminates in a space that is both aesthetically pleasing and practical, reflecting a commitment to quality and attention to detail.
Frequently Asked Questions about How To Update Bathtub
Was this page helpful?
At Storables.com, we guarantee accurate and reliable information. Our content, validated by Expert Board Contributors, is crafted following stringent Editorial Policies. We're committed to providing you with well-researched, expert-backed insights for all your informational needs.


0 thoughts on “How To Update Bathtub”