
Articles
How To Update A Ceiling Fan
Modified: October 20, 2024
Learn how to update your ceiling fan with these helpful articles. Get step-by-step instructions and expert tips for a smooth upgrade.
(Many of the links in this article redirect to a specific reviewed product. Your purchase of these products through affiliate links helps to generate commission for Storables.com, at no extra cost. Learn more)
Introduction
Welcome to our comprehensive guide on how to update a ceiling fan! Whether you’re looking to replace an outdated fan or want to upgrade to a more modern and efficient model, this step-by-step tutorial will provide you with all the information you need to successfully complete the project. A ceiling fan can not only enhance the comfort and aesthetics of a room but also help to reduce energy costs by improving air circulation.
Before you begin, it’s important to gather the necessary tools and materials. This will ensure that you have everything you need on hand and save you from making multiple trips to the hardware store. We’ll discuss the specific tools and materials required in the next section.
Next, we will cover the essential step of turning off the power supply to the existing ceiling fan. This is a crucial safety measure that should never be skipped. We will guide you through the process of locating the correct breaker and disabling the power to ensure that you can work safely.
Once the power is completely turned off, we can move on to removing the old ceiling fan. This involves detaching the fan blades, removing the mounting bracket, and disconnecting the wiring. We’ll provide detailed instructions on how to complete each of these steps to make the process as smooth as possible.
After removing the old fan, it’s time to install the new one. We’ll guide you through the installation process, including attaching the mounting bracket and securing the fan to it. It’s important to ensure that the new fan is properly aligned and balanced to prevent any wobbling or uneven rotation.
Next, we’ll cover the wiring connections. This step involves connecting the wires from the new fan to the existing electrical system. We’ll explain the different wires and their corresponding functions, providing clear instructions on how to make the proper connections.
Once the wiring is complete, it’s time to secure the fan blades. We’ll show you how to attach the blades securely to the fan motor, ensuring that they are properly aligned and balanced for optimal performance.
If your new fan comes with a light kit, we’ll guide you through the process of attaching it to the fan. This step is optional, but it can add functionality and enhance the lighting in the room.
Before finishing up, it’s important to test the fan to ensure that it is functioning correctly. We’ll explain how to do this and provide troubleshooting tips in case you encounter any issues.
Finally, we’ll wrap up the tutorial by discussing some finishing touches and cleanup. We’ll offer suggestions on how to clean and maintain your new ceiling fan to ensure its longevity and efficiency.
Now that you have an overview of what we’ll cover in this guide, let’s dive into the first step: gathering the necessary tools and materials.
Key Takeaways:
- Updating a ceiling fan involves essential steps such as turning off the power supply, removing the old fan, installing the new one, and connecting the wiring. Prioritizing safety and proper installation ensures optimal performance and longevity.
- Adding a light kit, testing the fan’s functionality, and completing finishing touches are crucial for a successful ceiling fan update. Choosing a high-quality fan and ensuring balanced rotation contribute to improved air circulation and energy efficiency.
Read more: How A Ceiling Fan Works
Step 1: Gather the necessary tools and materials
Before you begin updating your ceiling fan, it’s important to have all the necessary tools and materials ready. This will ensure that you have everything you need to complete the project smoothly and efficiently. Here is a list of tools and materials you will need:
- Screwdriver set: You’ll need a set of screwdrivers with different sizes and head types to remove the fan blades and mounting bracket.
- Wire cutters/strippers: These will be used to cut and strip the electrical wires for proper connections.
- Voltage tester: A voltage tester is essential to ensure that the power supply is completely turned off before working on the fan.
- Ladder: Depending on the height of your ceiling, you may need a ladder to reach the fan.
- New ceiling fan: Choose a high-quality fan that fits your style and meets your desired specifications, such as size, airflow, and energy efficiency.
- Mounting bracket: Depending on the type of fan you choose, you may need a new mounting bracket to secure it to the ceiling.
- Fan blades: Some fans may come with pre-attached blades, while others may require you to purchase the blades separately.
- Hardware: Check the fan’s instruction manual to see if any additional hardware, such as screws or bolts, are required for installation.
- Electrical tape: Electrical tape will help secure and insulate the wire connections.
- Wire connectors: These connectors are used to join the fan’s wires with the existing electrical system.
- Ceiling medallion (optional): If you want to add a decorative touch, consider installing a ceiling medallion around the fan’s canopy.
- Ceiling fan remote or wall control (optional): If you want the convenience of controlling your fan and its speed from a remote or wall control, make sure to purchase the appropriate device.
Make sure to read the instruction manual provided with your new ceiling fan to ensure you have all the necessary tools and materials specific to your model. It’s also helpful to gather any additional tools or safety equipment you feel may be useful during the installation process.
By having all the required tools and materials ready to go, you’ll streamline the process and minimize interruptions or delays. Now that you have everything you need, it’s time to move on to the next step: turning off the power supply.
Step 2: Turn off the power supply
Prior to starting any electrical work, it is crucial to ensure your safety by turning off the power supply to the existing ceiling fan. This step will protect you from electric shock and prevent any accidents from occurring during the installation process. Here’s how to turn off the power supply:
- Locate the breaker panel: The breaker panel is usually found in the basement, utility room, or garage. It contains a series of circuit breakers or fuses that control the electrical supply to different areas of your home.
- Identify the correct breaker: Look for the breaker that corresponds to the room where the ceiling fan is located. Breakers are typically labeled to indicate which area or room they control. If there’s no specific label for the fan, you may need to identify it by trial and error.
- Turn off the breaker: Once you’ve identified the correct breaker, switch it to the “Off” position. Some breakers have a handle or switch that you can move, while others may have a button that you need to push to deactivate the circuit.
- Double-check the power: To ensure that the power is completely turned off, use a voltage tester. Hold the tester against the wiring or switch connected to the fan to confirm that there is no electrical current running through it. If the tester does not detect any voltage, it is safe to proceed with the installation.
It is important to note that turning off the light switch in the room is not sufficient to ensure your safety. There may still be electrical current flowing to the fan if the switch is connected to a different circuit. Always follow the aforementioned steps to turn off the power at the breaker panel.
If you are unsure about how to locate or safely turn off the power supply, it is recommended to consult a licensed electrician. They have the knowledge and expertise to ensure your safety and can assist you with any electrical work.
With the power safely turned off, you’re now ready to move on to the next step: removing the old ceiling fan.
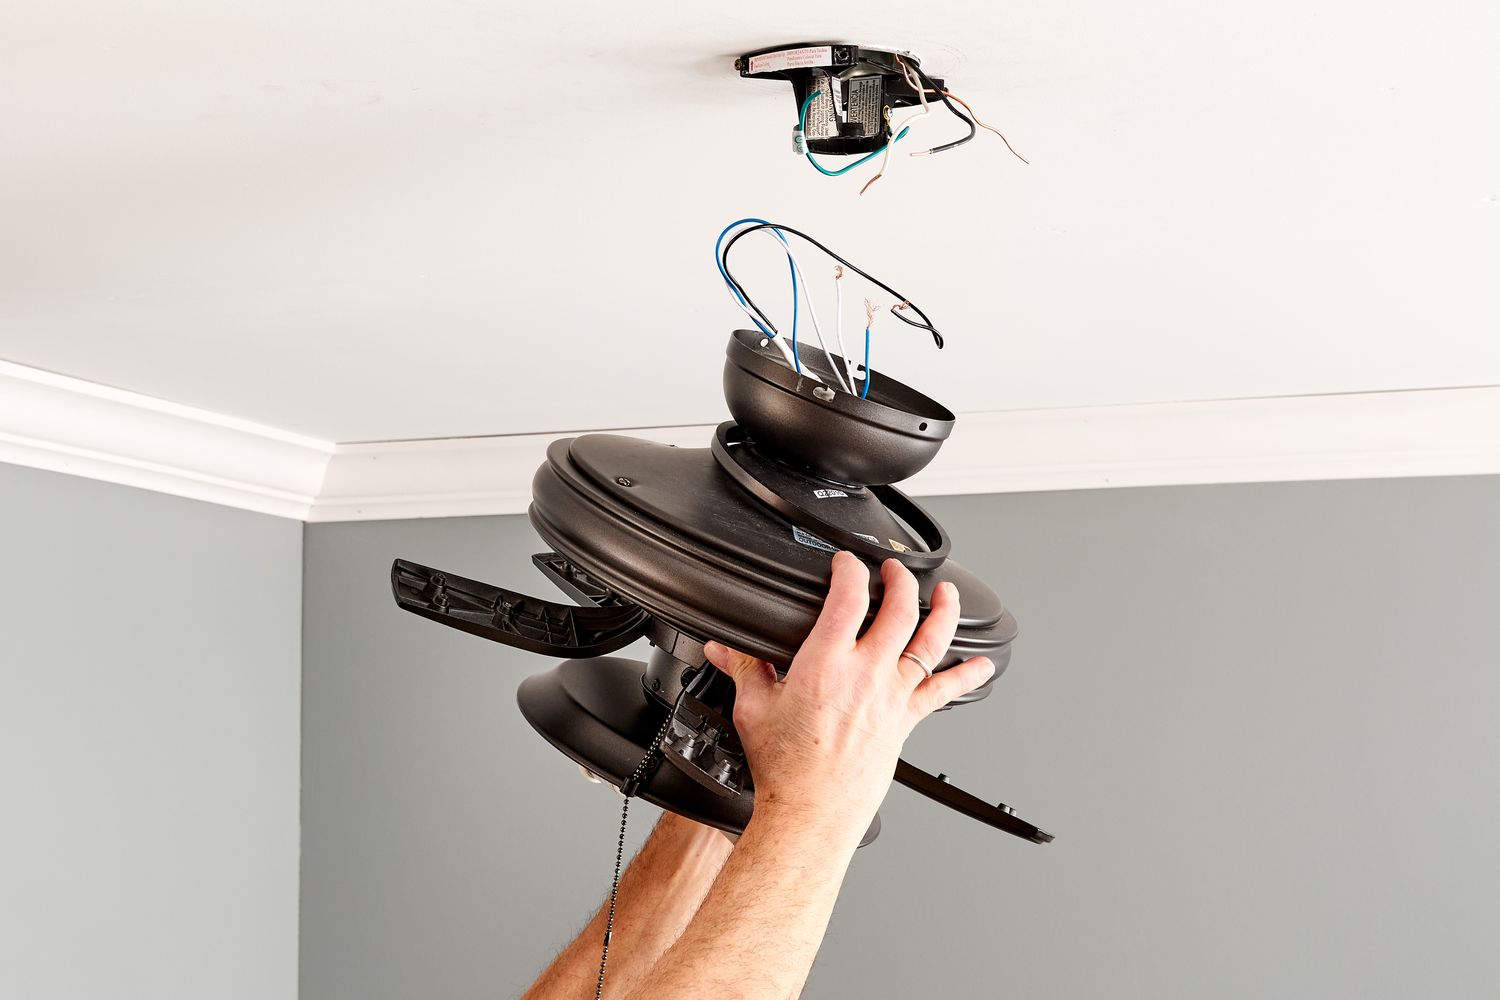
Step 3: Remove the old fan
Now that you have turned off the power supply, it’s time to remove the old ceiling fan. This step involves detaching the fan blades, removing the mounting bracket, and disconnecting the wiring. Here’s a step-by-step guide to help you through the process:
- Remove the fan blades: Start by unscrewing the screws or nuts that secure the fan blades to the motor. Use a screwdriver or a wrench, depending on the type of fasteners used. Once all the blades are detached, set them aside in a safe place.
- Remove the light fixture (if applicable): If your old fan has an integrated light fixture, carefully unscrew the screws that hold it in place. Disconnect the wiring connections and set aside the light fixture.
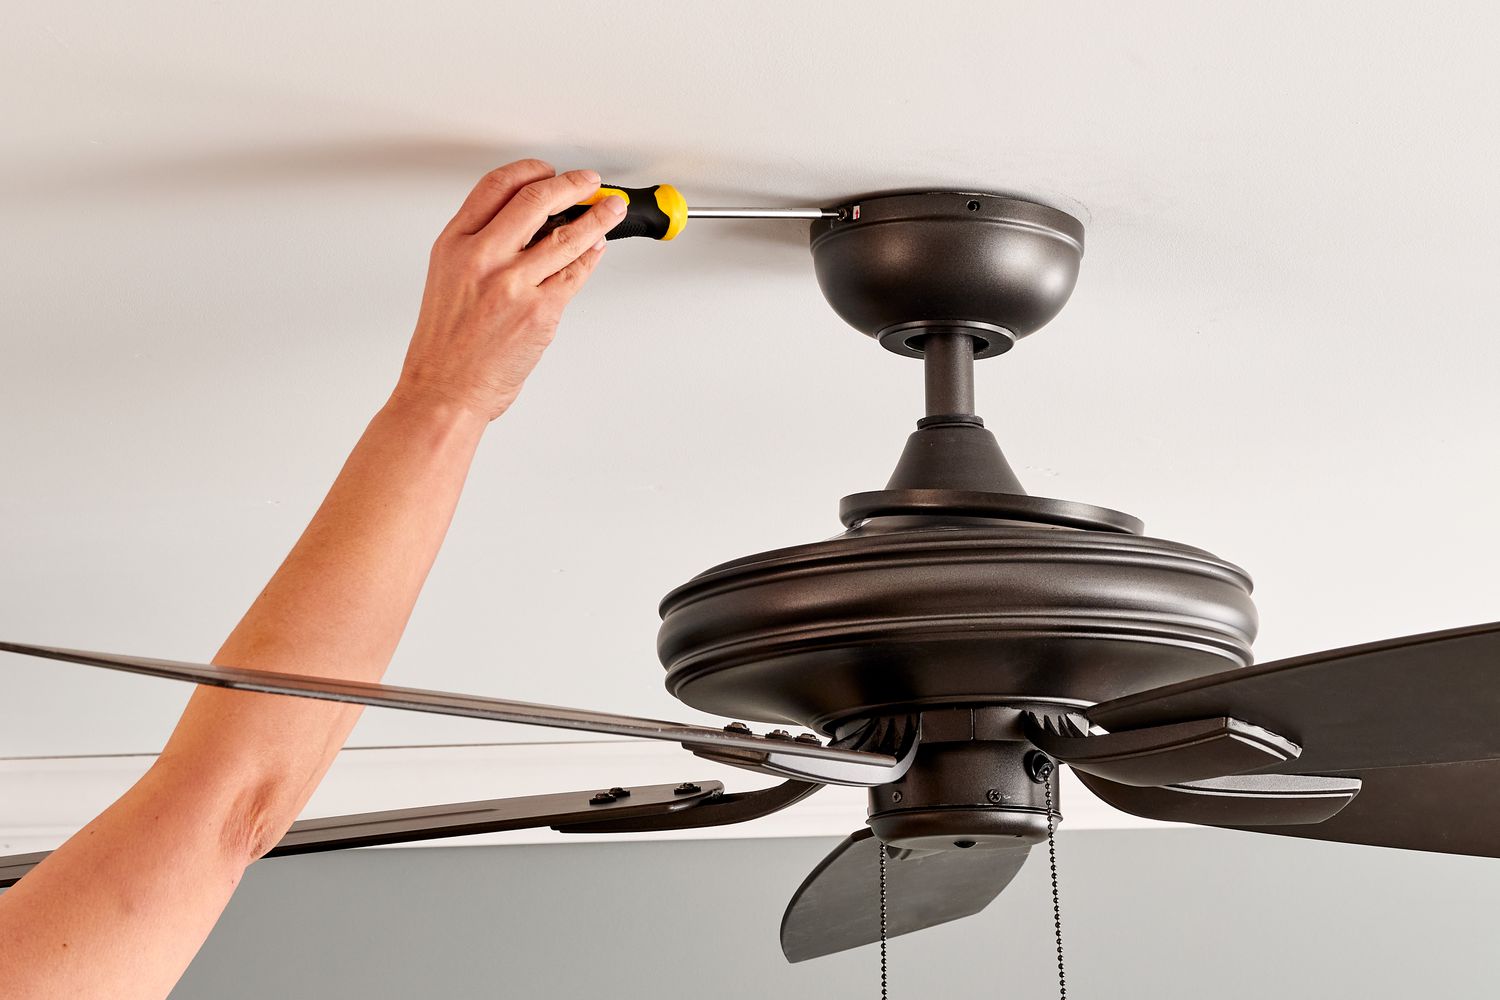
- Detach the mounting bracket: Next, remove the mounting bracket that holds the fan to the ceiling. Typically, this involves unscrewing a couple of screws that secure the bracket to the electrical box. Use a screwdriver to carefully remove the screws and detach the bracket.
- Disconnect the wiring: Once the mounting bracket is removed, you will see the wiring connections. Take note of the different wire colors and their corresponding functions for reference during the installation of the new fan. Using wire cutters or strippers, carefully disconnect the wiring connections by unscrewing the wire connectors and separating the wires.
It’s important to be cautious when dealing with electrical wiring. Ensure that the power supply is still turned off and use insulated tools for added safety. Take your time and double-check your work to avoid damaging any wires or components.
Once the old fan has been completely removed, inspect the electrical box to ensure it is in good condition. Look for any signs of damage or deterioration, such as loose or exposed wires. If you notice any issues, it is recommended to consult a licensed electrician for further evaluation and repairs.
With the old fan successfully removed, you’re now ready to move on to the exciting part: installing the new fan! In the next step, we’ll guide you through the process of installing the new fan and getting it ready for use.
Step 4: Install the new fan
Now that you have removed the old fan, it’s time to install the new one. Installing a new ceiling fan involves attaching the mounting bracket and securing the fan to it. Here’s a step-by-step guide to help you through the process:
- Start by ensuring that the electrical box is securely mounted to the ceiling. If you notice any loose or damaged parts, it’s important to address them before proceeding.
- Take the new fan’s mounting bracket and align it with the screw holes in the electrical box. Use the provided screws or bolts to secure the bracket to the box. Tighten them firmly, but be careful not to over tighten and damage the bracket or box.
- Now, carefully lift the new fan and position it onto the mounting bracket. Make sure the electrical wires are fed through the center of the fan and align the holes on the fan’s canopy with the screws on the mounting bracket.
- Using the screws provided with the fan, attach the canopy to the mounting bracket. Ensure that the screws are tightened securely, but again, be cautious not to over tighten.
- For added stability, some fans may come with a support brace or additional screws that need to be installed. Follow the manufacturer’s instructions to properly install and secure any additional support components.
Throughout the installation process, it’s important to ensure that the fan is properly aligned and balanced. Check that it is level and straight before proceeding to the next steps.
Installing the new fan can be a two-person job, especially if the fan is heavy or has multiple components. Enlist the help of a friend or family member to make the process easier and safer.
With the fan securely installed, you’re ready to move on to the next step: connecting the electrical wiring. In the following step, we’ll guide you through the process of connecting the wiring and ensuring a safe and reliable connection.
Read more: How To Dispose Ceiling Fans
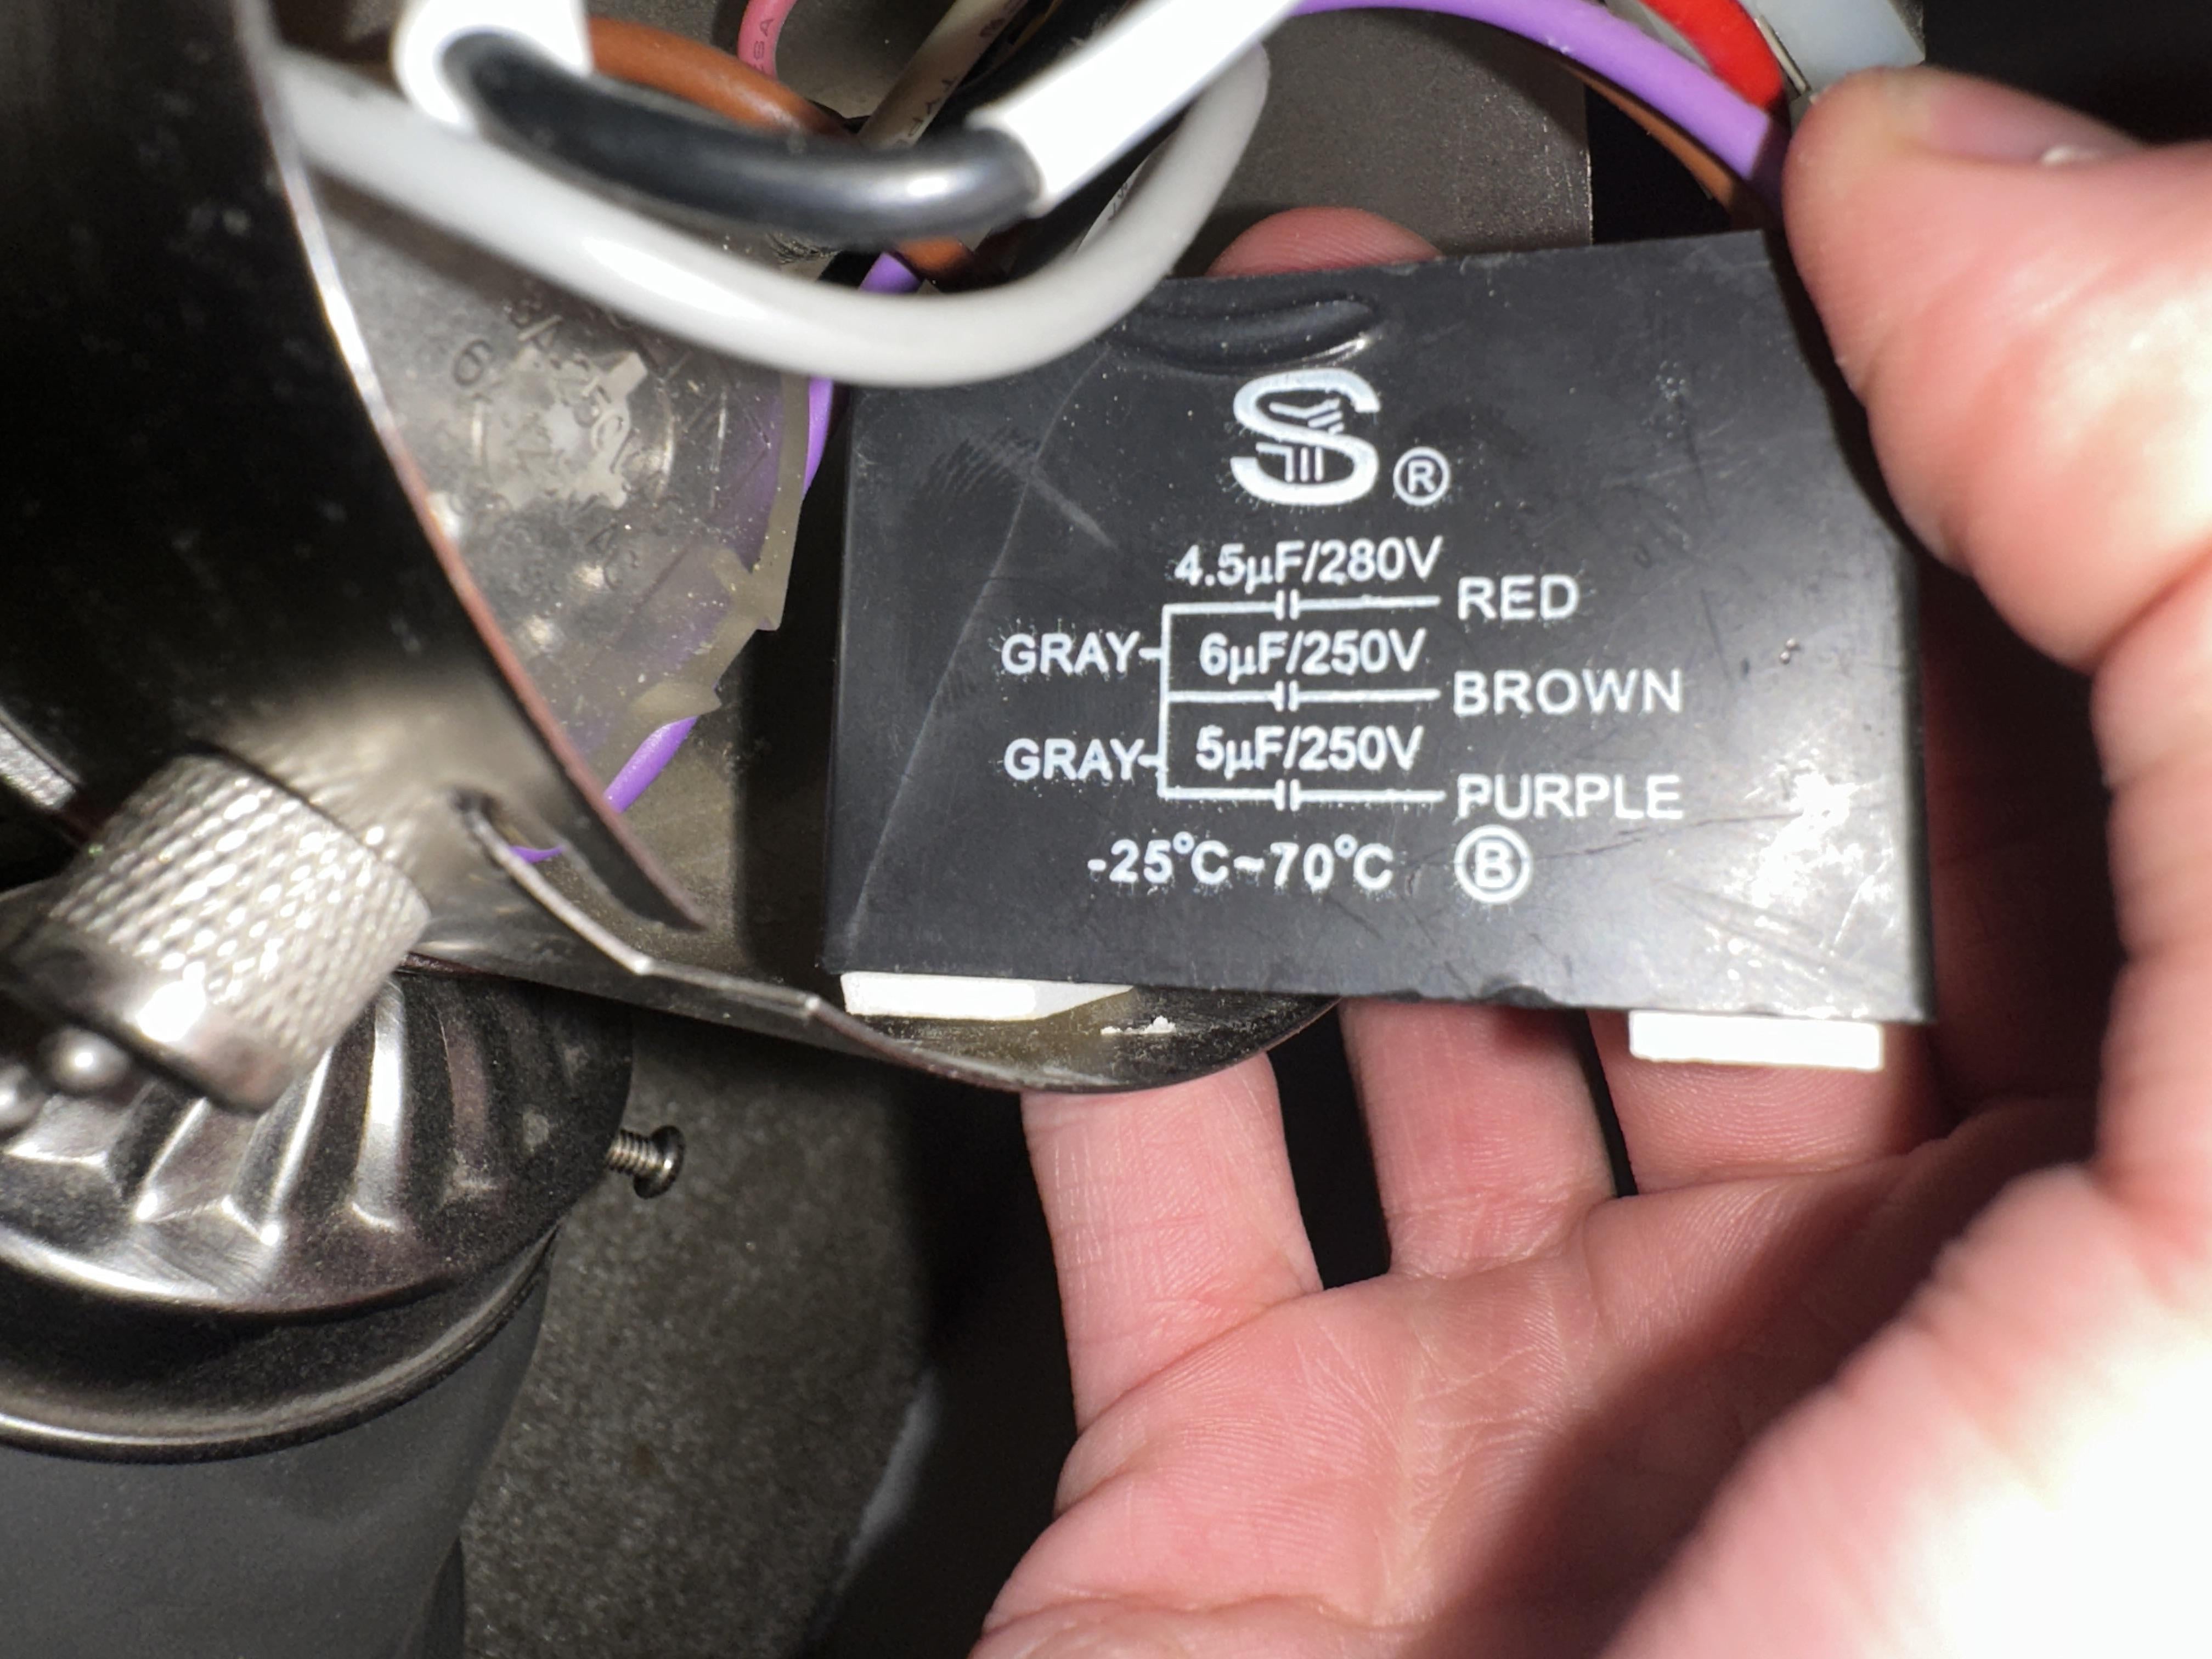
Step 5: Connect the wiring
With the new fan securely installed, it’s time to connect the wiring to ensure proper functioning. Connecting the electrical wires correctly is essential for the safe and efficient operation of your ceiling fan. Here’s a step-by-step guide to help you through the process:
- Start by identifying the different wiring connections. Most ceiling fans have three main wires: a black wire for the fan’s motor, a white wire for the neutral connection, and a green or bare copper wire for the ground connection.
- First, connect the black wire from the ceiling fan to the black wire from the electrical box. Twist the ends of the wires together and secure them with a wire connector. You may also need to use electrical tape to provide additional insulation.
- Next, connect the white wire from the fan to the white wire from the electrical box. Again, twist the ends together and secure them with a wire connector.
- If your fan has a green or bare copper wire, connect it to the grounding wire from the electrical box. This helps to provide a safe path for any electrical faults or surges.
- Once the connections are secure, carefully tuck the wires back into the electrical box. Make sure there are no loose or exposed wires, which can be a safety hazard.
- Tighten any screws or clamps on the electrical box to ensure that the fan is securely attached and properly grounded.
It’s essential to check the manufacturer’s instructions for your specific ceiling fan model, as the wiring connections may vary slightly. Pay attention to any additional wires or connectors provided with the fan and follow the instructions accordingly.
After connecting the wiring, double-check all your connections to ensure they are properly secured and insulated. Avoid leaving any exposed wires, as this can lead to electrical hazards.
When dealing with electrical connections, it’s important to prioritize your safety. Remember to keep the power turned off at the breaker panel until the entire installation is complete and verified.
With the wiring successfully connected, you’re now ready to move on to the next step: securing the fan blades. In the following step, we’ll guide you through the process of attaching and balancing the fan blades to ensure smooth and efficient operation.
When updating a ceiling fan, make sure to turn off the power at the circuit breaker before starting any work. This will ensure your safety while making the necessary updates.
Step 6: Secure the fan blades
With the wiring connected, it’s time to move on to securing the fan blades. Properly attaching and balancing the blades is crucial for ensuring smooth and efficient operation of your ceiling fan. Here’s a step-by-step guide to help you through the process:
- Start by carefully unpacking the fan blades and identifying the correct position for each blade. Most fans have arrows or markings indicating the correct orientation.
- Align the holes on each blade with the corresponding holes on the fan motor. Make sure the blades are evenly spaced and positioned correctly.
- Using the provided screws, attach each blade to the fan motor. Start by loosely screwing them in place, and then use a screwdriver to tighten them securely. Be careful not to over tighten, as this can cause the blades to warp or wobble.
- Once all the blades are securely attached, check for any movement or wobbling. If you notice any imbalance, try adjusting the position of the blades slightly or tightening the screws further until the fan runs smoothly.
- After securing the blades, give them a test spin to ensure they rotate freely without any obstructions. Check for any unusual noises or resistance that may indicate a problem.
It’s important to thoroughly inspect each blade and ensure there are no cracks, chips, or other damages that could affect the performance or safety of the fan. If you notice any imperfections, contact the manufacturer for replacements before proceeding.
If your fan includes a balancing kit, follow the manufacturer’s instructions to fine-tune the balance of the blades. This typically involves attaching small weights to the fan blades to correct any slight imbalances.
Properly securing and balancing the fan blades will not only enhance the performance and longevity of your ceiling fan but also reduce noise and vibrations. Take your time to ensure each blade is securely attached and the fan rotates smoothly.
With the fan blades securely in place, you’re now ready to move on to the next step: attaching the light kit (if applicable). In the following step, we’ll guide you through the process of adding a light kit to your ceiling fan for added functionality and illumination.
Step 7: Attach the light kit (if applicable)
If your new ceiling fan includes a light kit, this step will guide you through the process of attaching it to the fan. Adding a light kit to your ceiling fan can enhance the overall functionality and provide additional illumination to your space. Here’s a step-by-step guide to help you through the process:
- Start by carefully unpacking the light kit and all its components. Make sure you have all the necessary parts, including the light fixture, screws, and any additional wiring connectors.
- Refer to the manufacturer’s instructions to determine the specific installation method for your light kit. Different models may have slightly different installation procedures.
- Identify the location on the fan where the light kit will be attached. This is typically located on the bottom of the fan near the motor assembly. There may be pre-drilled holes or a designated mounting area.
- Align the holes on the light kit fixture with the pre-drilled holes or mounting area on the fan. Use the provided screws to secure the light kit in place. Ensure that the screws are tightened securely, but be careful not to over tighten and damage the fan or light kit.
- Next, connect the wiring for the light kit. Most light kits have separate wiring connections, including a black wire for the hot/positive connection and a white wire for the neutral connection. Follow the manufacturer’s instructions to properly connect the wires.
- Once the wiring connections are made, carefully tuck the wires into the housing of the fan or light kit. Ensure that there are no loose or exposed wires that could cause a safety hazard.
- Finally, attach the light bulbs to the light kit, following the manufacturer’s recommendations for bulb wattage and type. Make sure the bulbs are securely tightened to prevent any accidents or damage.
After attaching the light kit, turn on the power supply and test the functioning of both the fan and the lights. Check for any flickering, dimming, or other issues that may require further adjustments or troubleshooting.
If you encounter any difficulties or have specific questions related to your ceiling fan’s light kit, it’s advisable to consult the manufacturer’s instructions or reach out to their customer support for further assistance.
With the light kit successfully attached, you have completed the installation process of your updated ceiling fan. In the next step, we’ll guide you through testing the fan to ensure it is functioning correctly before completing all finishing touches and cleanup.
Step 8: Test the fan
After completing the installation of your updated ceiling fan, it’s essential to test its functionality to ensure that it is working properly. Testing the fan will help you identify any potential issues or adjustments that need to be made before completing the final touches. Here’s a step-by-step guide to help you through the testing process:
- Turn on the power supply: Make sure the power supply to the fan is turned on at the breaker panel.
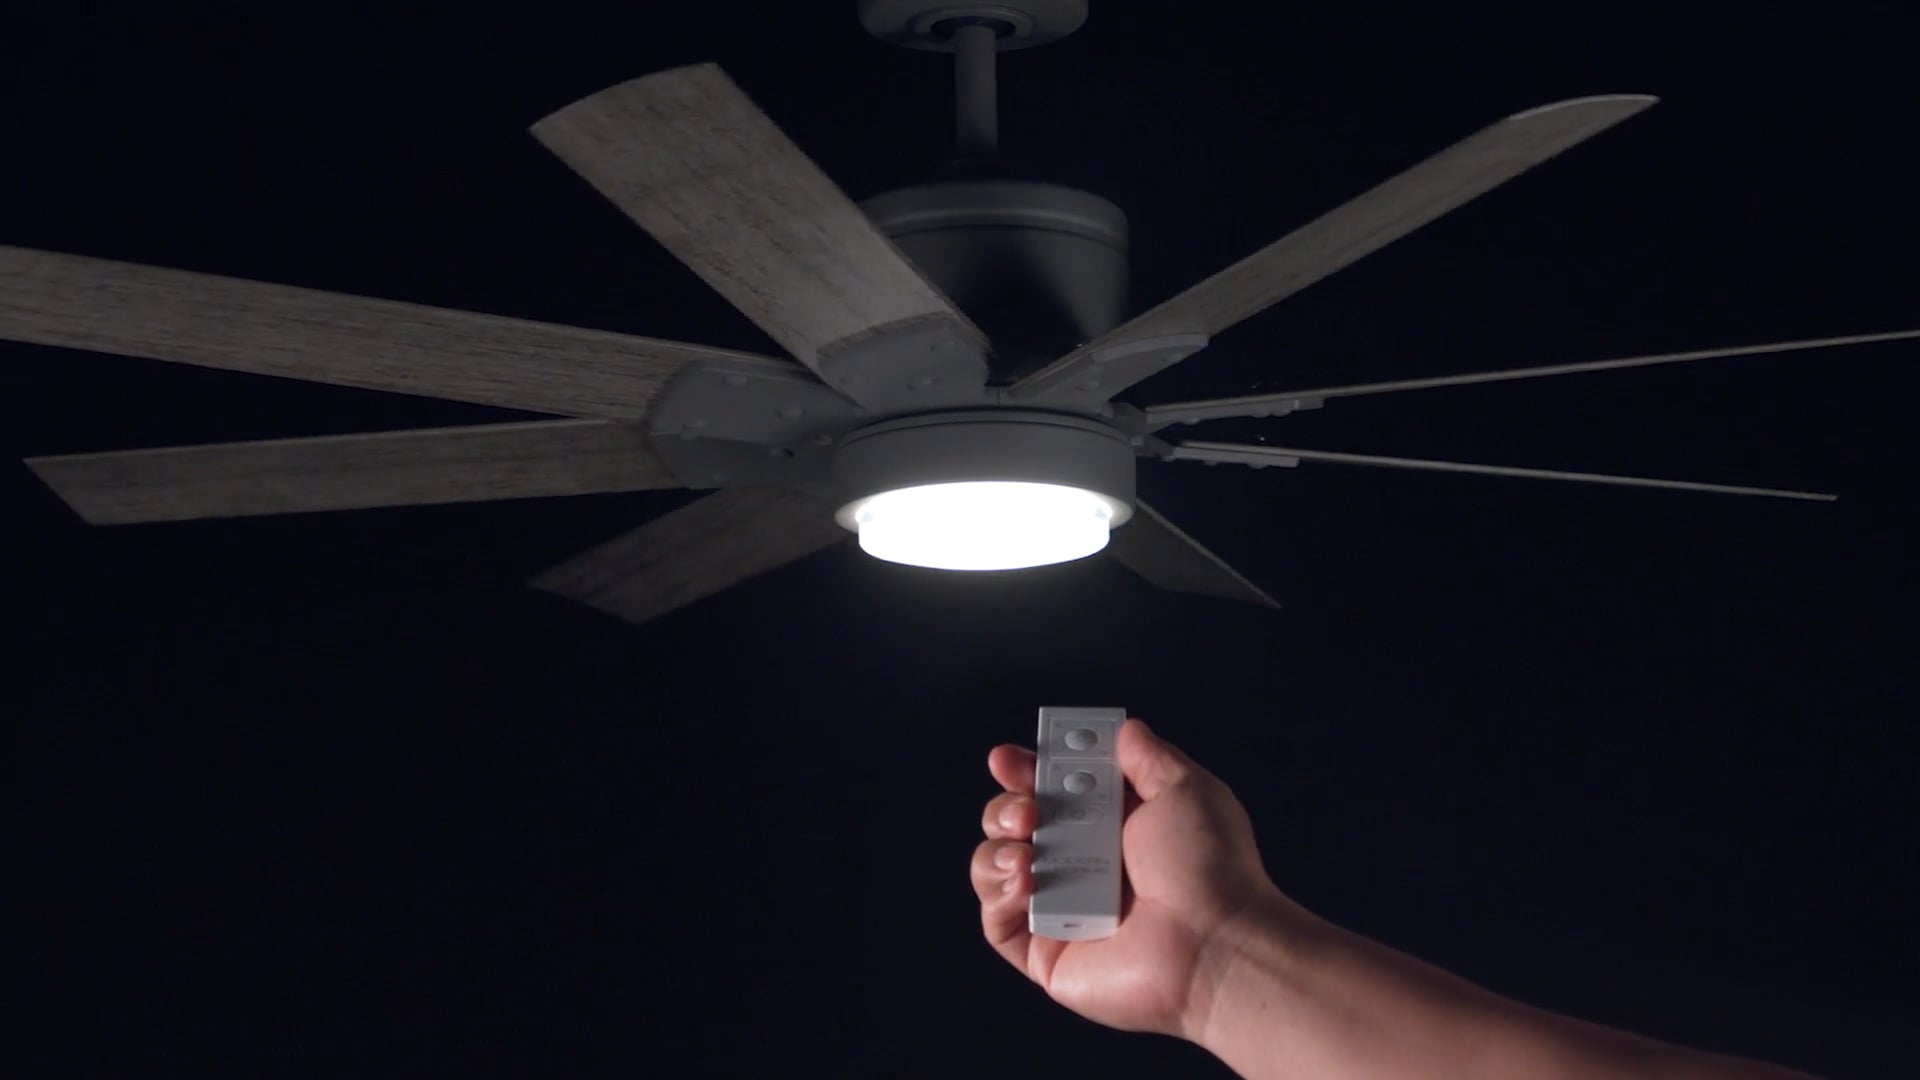
- Switch on the fan: Locate the fan control switch on the wall or use the remote control (if available) to turn on the fan. Start with the lowest fan speed setting.
- Observe the fan blades: Watch the fan blades as they rotate. Make sure they are spinning smoothly and evenly without any wobbling or hitting other components.
- Check for noises or vibrations: Listen for any unusual noises, such as grinding, rubbing, or clicking sounds. Excessive vibrations or shaking could indicate an installation issue that needs to be addressed.
- Test the fan’s speed settings: If your fan has multiple speed settings, gradually increase the speed to higher levels and observe its performance at each setting. Ensure that the fan operates smoothly and consistently without any issues.
- Test the fan’s direction: Many ceiling fans have a reverse function that allows you to change the direction of the airflow. Test the reverse function to ensure that it is working correctly, especially if you live in an area with both warm and cold seasons.
- Test the lights (if applicable): If your fan includes a light kit, turn on the lights and check if they are functioning properly. Make sure there are no flickering or dimming issues.
If you notice any issues during the testing phase, such as wobbling, strange sounds, or malfunctioning components, it’s important to address them before proceeding. Check the fan’s instruction manual for troubleshooting tips or contact the manufacturer’s customer support for assistance.
Remember, safety is paramount when testing the fan. Keep a safe distance from the rotating blades and avoid touching any electrical components while the power is on.
Once you have tested the fan and verified its functionality, you can proceed to the final step: adding the finishing touches and completing the cleanup.
Read more: How To Change A Ceiling Fan
Step 9: Finishing touches and cleanup
With the installation and testing of your updated ceiling fan complete, it’s time to add the finishing touches and complete the cleanup process. This step will ensure that your ceiling fan not only functions well but also adds aesthetic value to your space. Here’s a step-by-step guide to help you with the final touches:
- Secure all screws and fasteners: Double-check all the screws and fasteners on the fan to ensure they are tightened securely. This will help prevent any potential loosening over time and keep the fan stable.
- Install any additional accessories (if desired): If your fan came with optional accessories or features, such as decorative pull chains or a remote control holder, now is the time to install and incorporate them into the fan.
- Clean up the workspace: Remove any packaging materials, tools, or debris from the installation process. Wipe down the ceiling fan and surrounding area with a soft, dry cloth to remove any dust or fingerprints.
- Dispose of the old fan properly: If you replaced an existing fan, make sure to dispose of it responsibly. Check with your local recycling or waste management facilities for information on how to properly dispose of electrical appliances.
- Test the fan again: Before considering the installation complete, it’s a good idea to test the fan once more to ensure that everything is still functioning correctly after the finishing touches and cleanup are done.
By taking the time to pay attention to these finishing touches, you can ensure that your updated ceiling fan looks clean and polished, adding the perfect finishing touch to the room.
Lastly, make sure to keep the instruction manual and any warranty information in a safe place for future reference. This will come in handy should you need to troubleshoot any issues or seek support from the manufacturer.
Congratulations! You have successfully updated your ceiling fan. Not only will it provide better air circulation and energy efficiency, but it will also enhance the ambiance and comfort of your space.
Thank you for following our comprehensive guide on how to update a ceiling fan. Enjoy the benefits and cool breezes provided by your newly installed fan!
Conclusion
Updating a ceiling fan is a rewarding and worthwhile project that can enhance both the functionality and aesthetics of a room. By following this comprehensive guide, you have learned the step-by-step process of how to update a ceiling fan successfully.
Throughout this guide, we covered important steps, from gathering the necessary tools and turning off the power supply to removing the old fan, installing the new one, connecting the wiring, securing the fan blades, attaching a light kit (if applicable), testing the fan, and completing the finishing touches.
It is important to prioritize safety when working with electricity. Always turn off the power supply and use caution during the installation process. If at any point you feel uncomfortable or unsure, it is recommended to consult a licensed electrician for assistance.
Remember to choose a high-quality ceiling fan that fits your style, preferences, and requirements in terms of size, airflow, and energy efficiency. Additionally, properly securing the fan blades and ensuring balanced rotation will contribute to its optimal performance and longevity.
By updating your ceiling fan, you can enjoy improved air circulation, reduced energy costs, and enhanced visual appeal in your space. The added functionality of a light kit, if applicable, can further enhance the ambience and illumination of your room.
Thank you for following our guide on how to update a ceiling fan. We hope that the information provided has been valuable and has empowered you to confidently complete this project. So go ahead, enjoy the benefits of your updated ceiling fan and embrace the comfort and style it brings to your space!
Frequently Asked Questions about How To Update A Ceiling Fan
Was this page helpful?
At Storables.com, we guarantee accurate and reliable information. Our content, validated by Expert Board Contributors, is crafted following stringent Editorial Policies. We're committed to providing you with well-researched, expert-backed insights for all your informational needs.


0 thoughts on “How To Update A Ceiling Fan”