Articles
How To Clean Ryobi Weed Eater Carburetor
Modified: August 16, 2024
Learn how to efficiently clean the carburetor of your Ryobi weed eater with these helpful articles. Maintain optimal performance and prolong the lifespan of your equipment.
(Many of the links in this article redirect to a specific reviewed product. Your purchase of these products through affiliate links helps to generate commission for Storables.com, at no extra cost. Learn more)
Introduction
Keeping your Ryobi weed eater in top condition is essential for maintaining its performance and longevity. One of the key components that require regular maintenance is the carburetor. The carburetor is responsible for mixing air and fuel in the correct ratio to provide the optimal combustion needed for the engine to run smoothly. Over time, the carburetor can become clogged with dirt, debris, and varnish, leading to poor engine performance and starting issues.
In this article, we will guide you through the step-by-step process of cleaning the carburetor on your Ryobi weed eater. By following these instructions, you’ll be able to restore the carburetor to its optimal functioning and ensure that your weed eater operates at its best.
Key Takeaways:
- Regularly cleaning your Ryobi weed eater’s carburetor is crucial for maintaining optimal engine performance and longevity. By following the step-by-step process outlined in this guide, you can ensure smooth and efficient operation of your machine.
- Proper preparation, thorough cleaning, and careful reassembly are essential for successful carburetor maintenance. Investing time and effort into cleaning your weed eater’s carburetor will result in a hassle-free and reliable weed eating experience.
Understanding the Carburetor Functionality
Before diving into the cleaning process, it’s important to have a basic understanding of how the carburetor works. The carburetor is a vital component in the fuel system of your Ryobi weed eater. Its main function is to mix the right amount of fuel with air in order to create a combustible mixture that powers the engine.
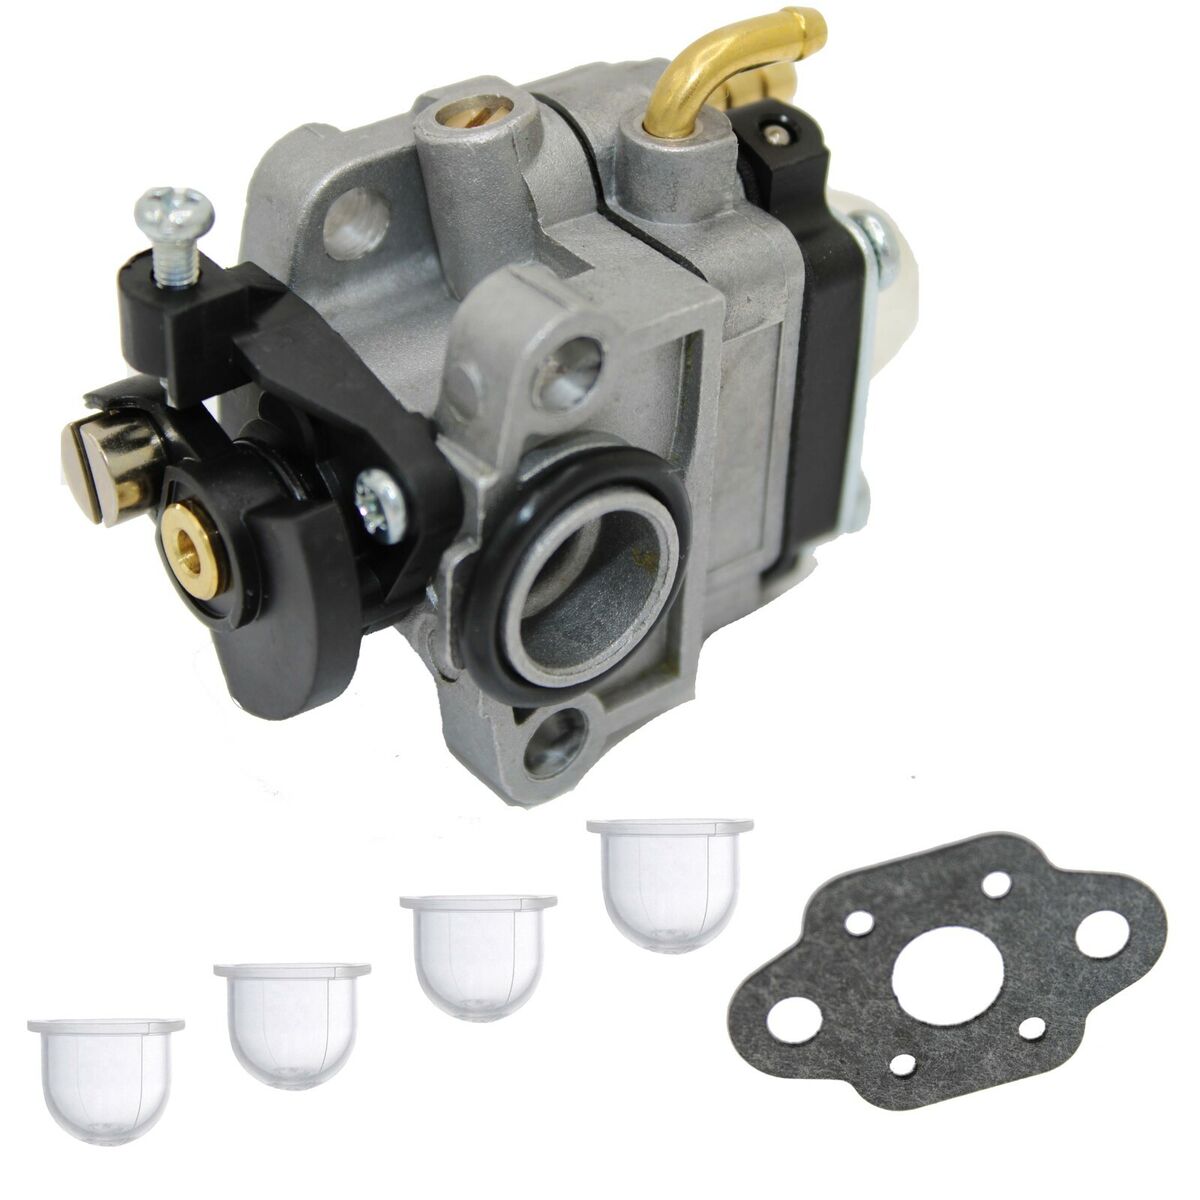
The carburetor consists of several important parts, including the choke, throttle valve, float bowl, and jets. When you start your weed eater, the choke restricts the incoming air, increasing the fuel flow to facilitate cold engine starting. As the engine warms up, the choke gradually opens to allow more air in.
The throttle valve controls the amount of air that enters the engine. When you squeeze the throttle trigger on your weed eater, it opens the throttle valve, allowing more air to enter and increasing the engine speed.
The float bowl contains a float and a needle valve that regulate the fuel level in the bowl. The float rises as the fuel level increases, causing the needle valve to close and stop fuel from entering until the fuel level drops. This ensures a consistent fuel supply to the carburetor.
The jets are small passages that control the fuel flow. The main jet regulates the fuel mixture during normal engine operation, while the idle jet controls the fuel mixture at low engine speeds. Over time, these jets can become clogged with dirt and debris, affecting the fuel delivery and engine performance.
Now that you have a basic understanding of the carburetor’s functionality, you are ready to move on to the cleaning process. Remember to always refer to your Ryobi weed eater’s manual for specific instructions on carburetor removal and cleaning, as the process may vary slightly depending on the model.
Tools and Materials Needed
Before you start cleaning the carburetor on your Ryobi weed eater, you’ll need to gather the necessary tools and materials. Here is a list of what you’ll need:
- A screwdriver (typically a Phillips-head)
- A small brush or toothbrush
- A carburetor cleaning solution or carburetor cleaner spray
- A clean cloth or paper towels
- A container for soaking and cleaning the carburetor parts
- A carburetor rebuild kit (optional, recommended for older or heavily damaged carburetors)
- Safety goggles
- Protective gloves
The screwdriver will be used to remove screws and bolts holding the carburetor and other components in place. A small brush or toothbrush will come in handy for scrubbing away debris and buildup on the carburetor surfaces.
Carburetor cleaning solution or carburetor cleaner spray is essential for removing dirt, varnish, and other deposits that have accumulated in the carburetor. Be sure to choose a cleaner that is specifically formulated for use on carburetors.
A clean cloth or paper towels are useful for wiping away excess cleaner and drying the carburetor parts before reassembly. Using a container for soaking and cleaning the carburetor parts will make the cleaning process more efficient.
A carburetor rebuild kit is optional, but recommended if you have an older weed eater or if the carburetor is heavily damaged. The kit will contain all the necessary parts to rebuild and restore the carburetor to its optimal functioning.
Lastly, don’t forget to wear safety goggles and protective gloves to protect your eyes and hands during the cleaning process. Safety should always be a top priority.
Now that you have gathered all the necessary tools and materials, you’re ready to start the carburetor cleaning process. Make sure to follow the steps carefully to ensure a successful cleanup.
Step 1: Preparing the Work Area
Before diving into the carburetor cleaning process, it’s important to prepare your work area to ensure a smooth and organized workflow. Here are the steps to follow:
- Find a well-ventilated area: Carburetor cleaning may involve the use of strong chemicals, so it’s essential to work in a well-ventilated area. If possible, perform the cleaning outdoors or in a garage with the doors open. This will help prevent the inhalation of harmful fumes.
- Gather your tools and materials: Make sure you have all the necessary tools and materials listed in the previous section. Having everything ready before you start will save you time and prevent any unnecessary interruptions.
- Protect your work surface: Place a clean cloth or a plastic sheet on your work surface to protect it from any spilled cleaner or dirt. This will make the cleaning process easier and keep your work area clean.
- Disconnect the spark plug wire: To avoid any accidental engine ignition, disconnect the spark plug wire before working on the carburetor. This will ensure your safety throughout the cleaning process.
Once you have completed these steps, you can proceed to the next step of removing the air filter and cover.
Note: It’s important to read and follow the safety guidelines outlined in your Ryobi weed eater’s manual. These instructions are meant to serve as a general guide and may not cover all the specific safety precautions for your particular model.
Step 2: Removing the Air Filter and Cover
With the work area prepared, it’s time to move on to removing the air filter and cover. Follow these steps:
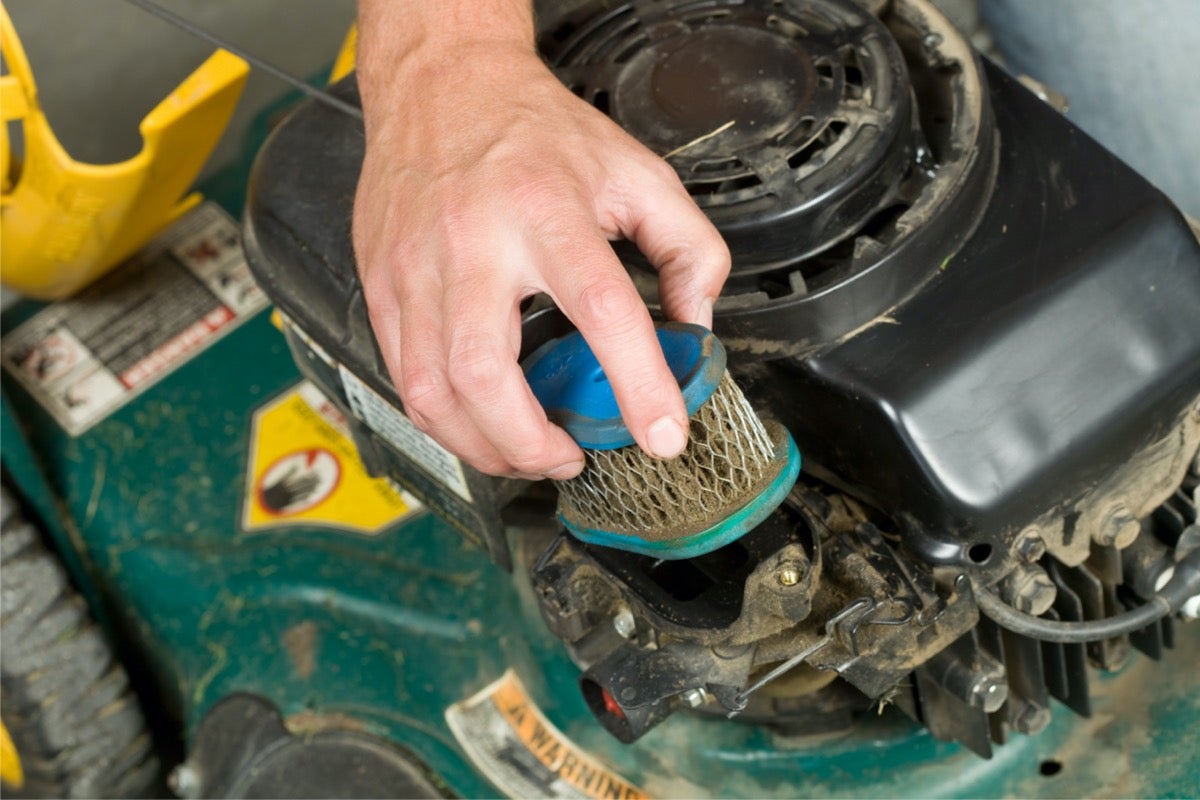
- Locate the air filter: The air filter is typically located on the side or top of the carburetor. It is housed inside a cover, which may be secured with screws or clips.
- Remove the screws or clips: Use the appropriate screwdriver or tool to remove the screws or release the clips holding the air filter cover in place. Take care not to misplace any screws, as you’ll need them for reassembly.
- Remove the air filter: Once the cover is loose, carefully remove it to reveal the air filter. The air filter may be secured with a screw or it may simply slide out. Take note of how the air filter is positioned so that you can reinstall it correctly later.
After removing the air filter and cover, you’ll have better access to the carburetor. This step is important to ensure a thorough cleaning of the carburetor and prevent any debris from falling into the engine.
Note: Take a moment to inspect the air filter. If it is dirty or damaged, it’s a good idea to clean or replace it before reassembling the weed eater. A clean air filter will help improve engine performance and protect the carburetor from further debris buildup.
Now that the air filter and cover have been removed, you’re ready to move on to the next step of disconnecting the fuel lines.
Read more: How To Adjust A Ryobi Carburetor
Step 3: Disconnecting the Fuel Lines
With the air filter and cover removed, the next step in cleaning your Ryobi weed eater carburetor is to disconnect the fuel lines. Follow these steps:
- Identify the fuel lines: Locate the fuel lines connected to the carburetor. There should be a fuel line coming from the gas tank and another fuel line returning to the tank.
- Pinch the fuel lines: Use your fingers or a pair of pliers to pinch the fuel lines near the carburetor. This will prevent fuel from leaking out when you disconnect the lines.
- Remove the fuel lines: Wiggle and gently pull the fuel lines straight off the carburetor fittings. It may require some effort to disconnect them, but be careful not to damage the lines or fittings. As you remove the fuel lines, any excess fuel may drain out, so be prepared with a rag or container to catch any spills.
By disconnecting the fuel lines, you ensure that no fuel flows into the carburetor during the cleaning process. This step will also allow you to have better access to the carburetor and its components.
Note: Take note of which fuel line is connected to the intake side and the return side of the carburetor. This will help with the reassembly process later on.
Now that the fuel lines are disconnected, you can proceed to the next step of removing the carburetor from the weed eater.
When cleaning a Ryobi weed eater carburetor, make sure to use a carburetor cleaner specifically designed for small engines. Remove the carburetor and soak it in the cleaner to remove any built-up debris and varnish. Be sure to follow the manufacturer’s instructions for reassembly.
Step 4: Removing the Carburetor
With the fuel lines disconnected, it’s time to remove the carburetor from your Ryobi weed eater. Follow these steps:
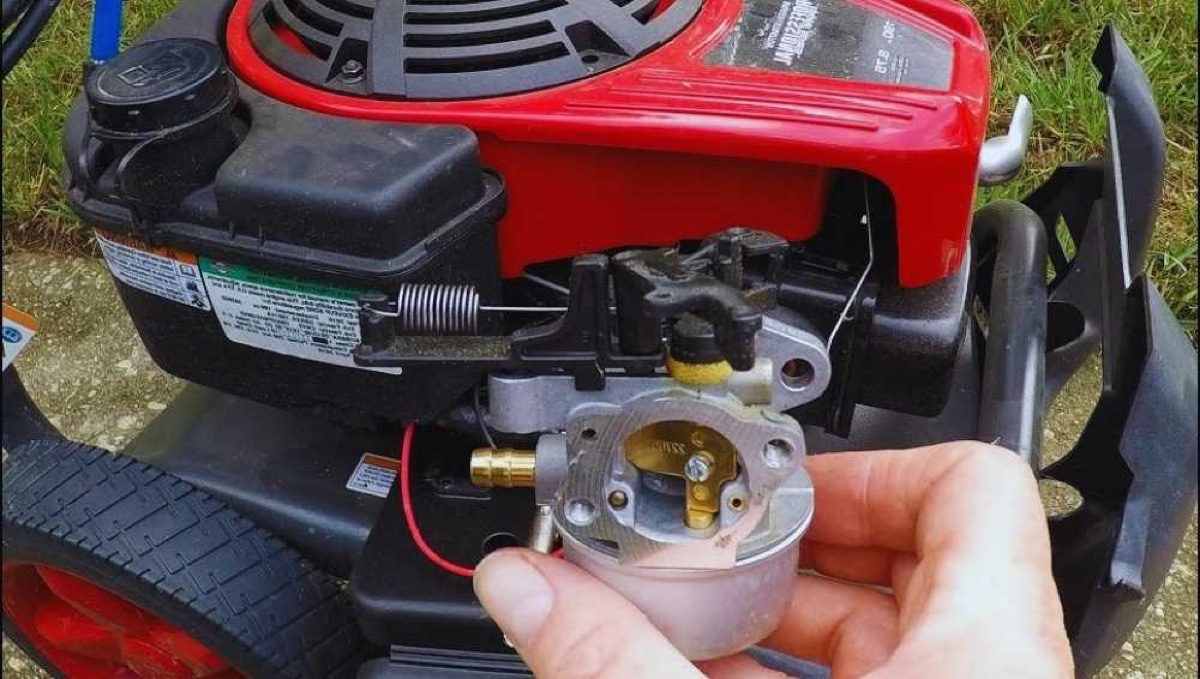
- Locate the carburetor: The carburetor is typically connected to the intake manifold of the engine. It may be held in place by screws, bolts, or clips.
- Disconnect any linkage: If there is any linkage or throttle cable connecting the carburetor to the engine, carefully disconnect it. Take note of the position and orientation of the linkage for proper reassembly later.
- Remove the mounting screws or bolts: Use the appropriate screwdriver or tool to remove the mounting screws or bolts that secure the carburetor to the intake manifold. Keep track of the screws or bolts to ensure they are not misplaced during the cleaning process.
- Gently remove the carburetor: Once the mounting screws or bolts are removed, carefully lift and remove the carburetor from the intake manifold. Take care not to damage any gaskets or seals in the process.
By removing the carburetor, you’ll have complete access to its various components for thorough cleaning. It is important to handle the carburetor with care and avoid any unnecessary force to prevent damage.
Note: Take a moment to inspect the carburetor and its gaskets. If any gaskets are worn or damaged, it’s best to replace them before reassembling the weed eater. Well-functioning gaskets are crucial for a proper seal and optimal performance.
Now that the carburetor is removed, you’re ready to move on to the next step of cleaning the carburetor thoroughly.
Step 5: Cleaning the Carburetor
Now that the carburetor is removed from your Ryobi weed eater, it’s time to clean it thoroughly. Follow these steps to ensure a complete and effective cleaning:
- Inspect the carburetor: Take a close look at the carburetor to identify any visible dirt, debris, or buildup. Pay special attention to the jets, passages, and the float bowl.
- Use carburetor cleaner spray: Spray carburetor cleaner directly onto the carburetor components, focusing on the areas with visible dirt or buildup. The cleaner will dissolve and remove the deposits, restoring the proper functioning of the carburetor.
- Scrub with a brush or toothbrush: Use a small brush or toothbrush to scrub away any stubborn dirt or debris. Be gentle to avoid damaging delicate parts, but thorough enough to ensure a complete cleaning.
- Soak the carburetor in a cleaning solution: If the carburetor is heavily soiled or there are stubborn deposits that won’t come off with just spray and scrubbing, you can soak it in a carburetor cleaning solution. Refer to the instructions on the cleaning solution for the appropriate soaking duration.
- Rinse with water: After soaking, rinse the carburetor thoroughly with clean water to remove any traces of the cleaning solution. Ensure that all the passages and jets are free from any remaining dirt or debris.
- Dry the carburetor: Use a clean cloth or paper towels to dry the carburetor and its components. Make sure there is no moisture remaining, as this can cause issues when reassembling the carburetor.
By following these steps, you’ll effectively remove any dirt, debris, or buildup that may have been affecting the performance of your Ryobi weed eater’s carburetor.
Note: For more stubborn deposits or if you have an older or heavily damaged carburetor, you may need to use a carburetor rebuild kit to replace worn or damaged parts. Refer to the instructions in the rebuild kit for specific guidance on replacing the necessary components.
Now that the carburetor is clean and dry, you can proceed to the next step of reassembling it.
Step 6: Reassembling the Carburetor
With the carburetor clean and dry, it’s time to reassemble it. Follow these steps to ensure a proper reassembly:
- Inspect gaskets and seals: Take a moment to check the condition of the gaskets and seals on the carburetor. If any are damaged or worn out, replace them with new ones from a carburetor rebuild kit or suitable replacements.
- Position the carburetor: Carefully place the carburetor back onto the intake manifold, aligning it with the mounting holes.
- Insert and tighten mounting screws or bolts: Insert the mounting screws or bolts through the appropriate holes and tighten them securely. Be careful not to overtighten and cause damage.
- Reconnect any linkage or throttle cables: If you had previously disconnected any linkage or throttle cables, now is the time to reconnect them to the carburetor. Ensure they are properly aligned and functioning smoothly.
- Reconnect the fuel lines: Reattach the fuel lines to the appropriate fittings on the carburetor. Make sure they are securely connected to prevent any fuel leaks.
During the reassembly process, it’s important to take your time and ensure that all the components are properly aligned and secured. Double-check all the connections and fittings to avoid any issues later on.
Note: If you have used a carburetor rebuild kit, follow the instructions in the kit for any additional steps or replacement parts needed for reassembly.
Now that the carburetor is reassembled, you’re ready to move on to the next step of reconnecting the fuel lines.
Read more: How To Clean Dried Grass From Weed Eater
Step 7: Reconnecting the Fuel Lines
With the carburetor reassembled, it’s time to reconnect the fuel lines to ensure proper fuel flow. Follow these steps:
- Identify the fuel lines: Identify the fuel line connected to the intake side of the carburetor and the one returning to the fuel tank.
- Attach the fuel lines: Insert the end of each fuel line onto the appropriate fitting on the carburetor. Make sure they are securely attached to prevent any fuel leaks.
- Release the pinch: If you had previously pinched the fuel lines, release the pinch to allow fuel to flow through the carburetor.
By reconnecting the fuel lines, you ensure that the carburetor receives a steady supply of fuel for proper engine functioning. It’s important to double-check the connections to avoid any fuel leaks or blockages.
Note: If you are not sure which fuel line goes to which fitting, refer to your Ryobi weed eater’s manual or consult a professional for guidance.
Now that the fuel lines are securely attached, you’re ready to move on to the final step of installing the air filter and cover.
Step 8: Installing the Air Filter and Cover
With the fuel lines reconnected, it’s time to install the air filter and cover. Follow these steps to complete the carburetor cleaning process:
- Position the air filter: Take the air filter and position it correctly, aligned with the intake opening of the carburetor. Ensure it sits securely in place.
- Attach the air filter cover: Carefully place the air filter cover over the air filter and align it with the screw holes or clips.
- Insert and tighten screws or clips: Insert the screws into the screw holes or fasten the clips to secure the air filter cover in place. Tighten them securely but don’t overtighten.
By installing the air filter and cover, you ensure that the carburetor is protected from dirt, debris, and other contaminants. The air filter plays a crucial role in maintaining the engine’s performance and longevity.
Once the air filter and cover are securely installed, take a moment to inspect the connections and fittings to ensure everything is properly aligned.
Now that the carburetor cleaning process is complete, you can reattach the spark plug wire and prepare to use your Ryobi weed eater again.
Note: It’s recommended to refer to your Ryobi weed eater’s manual for any specific instructions or considerations regarding the air filter and cover installation for your particular model.
Congratulations! You have successfully cleaned the carburetor on your Ryobi weed eater. Regular maintenance and cleaning will help keep your machine running smoothly and efficiently, so remember to perform this cleaning process periodically or as needed.
Conclusion
Maintaining a clean and properly functioning carburetor is essential for the optimal performance of your Ryobi weed eater. By following the step-by-step process outlined in this guide, you can effectively clean and maintain your carburetor, ensuring that your weed eater runs smoothly and efficiently.
Throughout the cleaning process, we covered important steps such as preparing the work area, removing the air filter and cover, disconnecting the fuel lines, removing the carburetor, cleaning the carburetor thoroughly, reassembling the carburetor, reconnecting the fuel lines, and finally installing the air filter and cover.
Remember to refer to your Ryobi weed eater’s manual for specific instructions and safety guidelines. Additionally, it’s important to use the appropriate tools and materials and to take your time during each step to prevent damage and ensure a successful cleaning process.
Regular maintenance of the carburetor, including cleaning and periodic inspections, will help prolong the lifespan of your weed eater and ensure its reliable operation. A clean carburetor will prevent start-up issues, poor engine performance, and fuel efficiency problems.
By dedicating the time and effort to clean your Ryobi weed eater’s carburetor, you are investing in the longevity and optimal performance of your machine. Enjoy the benefits of a clean carburetor and a hassle-free weed eating experience.
Happy weed eating!
Now that you've got the hang of cleaning your Ryobi weed eater carburetor, why stop there? Keep your equipment running smoothly by learning how to fine-tune its performance. Our next guide focuses on adjusting the carburetor, ensuring your tool operates at peak efficiency. This step-by-step tutorial will make the task straightforward and hassle-free, perfect for keeping your garden maintenance on point. So, don't miss out on this essential skill!
Frequently Asked Questions about How To Clean Ryobi Weed Eater Carburetor
Was this page helpful?
At Storables.com, we guarantee accurate and reliable information. Our content, validated by Expert Board Contributors, is crafted following stringent Editorial Policies. We're committed to providing you with well-researched, expert-backed insights for all your informational needs.


0 thoughts on “How To Clean Ryobi Weed Eater Carburetor”