Articles
How To Clean Wood Siding
Modified: January 8, 2024
Learn effective techniques and methods to clean wood siding in our informative articles. Discover expert tips and tricks to maintain the beauty and longevity of your home's exterior.
(Many of the links in this article redirect to a specific reviewed product. Your purchase of these products through affiliate links helps to generate commission for Storables.com, at no extra cost. Learn more)
Introduction
Wood siding is a popular choice for many homeowners due to its natural beauty and durability. However, over time, dirt, grime, and weather elements can take a toll on the siding, leaving it looking dull and worn. Regular cleaning and maintenance is essential to keep wood siding looking its best and prolong its lifespan.
In this article, we will guide you through the process of cleaning wood siding to remove dirt, debris, and stains. We will also provide tips on maintaining the siding to ensure its longevity and keep it looking pristine.
Gathering the necessary supplies, proper preparation, and using the right cleaning solutions are key factors in achieving effective results. So, let’s dive in and learn how to clean wood siding like a pro!
Key Takeaways:
- Properly preparing the area, testing the cleaning solution, and applying gentle yet thorough scrubbing are crucial steps in effectively cleaning wood siding and preserving its natural beauty and durability.
- Regular maintenance, including inspections, cleaning, and protection from moisture and pests, is essential for prolonging the lifespan and maintaining the pristine appearance of wood siding.
Read more: How To Install Wood Siding
Gather Your Supplies
Before you start cleaning your wood siding, it’s important to gather all the necessary supplies. Having everything on hand will save you time and ensure a smooth cleaning process. Here are the supplies you’ll need:
- A ladder or scaffolding: Depending on the height of your siding, you may need a ladder or scaffolding to reach the upper areas.
- A soft-bristle brush: Choose a brush with soft bristles to avoid scratching or damaging the wood.
- A garden hose with a spray nozzle: A garden hose with an adjustable spray nozzle is ideal for rinsing off the cleaning solution.
- A bucket: You’ll need a bucket to mix and hold the cleaning solution.
- Mild dish soap or wood cleaner: Look for a mild, non-abrasive dish soap or a specifically formulated wood cleaner. Avoid using harsh chemicals that can damage the wood.
- A sponge or cloth: You’ll need a sponge or cloth to apply the cleaning solution to the wood siding.
- A protective tarp or plastic sheeting: To protect nearby plants and surfaces, it’s a good idea to lay down a protective tarp or plastic sheeting.
- Gloves and safety goggles: Wearing gloves and safety goggles will protect your hands and eyes from any potential harm.
Once you have gathered all these supplies, you will be well-equipped to start the cleaning process. Make sure to check the condition of your ladder or scaffolding to ensure safety during the cleaning process. Safety should always be a top priority.
Prepare the Area
Before you begin cleaning the wood siding, it’s important to prepare the surrounding area to minimize any potential damage or mess. Follow these steps to properly prepare the area:
- Remove any obstacles: Clear the area around the siding by removing any furniture, potted plants, or other objects that may be in the way. This will make it easier for you to access the siding and prevent any accidental damage.
- Protect nearby surfaces: Cover any nearby surfaces, such as windows, doors, or outdoor furniture, with plastic sheeting or tarps. This will prevent any cleaning solution or debris from splashing onto them and causing damage.
- Cover plants: If there are plants or shrubs near the siding, cover them with plastic sheeting or old bedsheets to protect them from the cleaning solution.
- Close windows and doors: Seal any windows and doors in the immediate vicinity of the wood siding to prevent water and cleaning solution from entering your home.
By taking these precautionary measures, you can ensure that the cleaning process goes smoothly and without any unwanted damage or mess. It’s always best to be prepared and protect the surrounding area before starting any cleaning project.
Remove Dirt and Debris
Before applying any cleaning solution, it’s important to remove loose dirt and debris from the wood siding. This will help prevent scratching the surface and ensure a more effective cleaning process. Follow these steps to remove dirt and debris:
- Use a broom or brush: Start by using a broom or brush to gently sweep away any loose dirt, cobwebs, or leaves from the wood siding. Begin at the top and work your way down, ensuring that you cover all areas of the siding.
- Pay attention to crevices and corners: Use a soft-bristle brush to clean any hard-to-reach areas, crevices, or corners where dirt and debris tend to accumulate. Be gentle to avoid scratching or damaging the wood.
- Remove stubborn stains: If you notice any stubborn stains, such as bird droppings or mold, try scrubbing them with a damp cloth or sponge. Apply gentle pressure and use a circular motion to lift the stains. Avoid using excessive force to prevent damaging the wood.
By removing dirt and debris before applying the cleaning solution, you’ll have a cleaner surface to work with and allow the cleaning solution to penetrate more effectively. This step is crucial in achieving the best cleaning results for your wood siding.
Mix Cleaning Solution
Once you have prepared the wood siding by removing dirt and debris, it’s time to mix a cleaning solution that will effectively remove stains and grime. Here’s how you can mix a homemade cleaning solution:
- Fill a bucket with warm water: Start by filling a bucket with warm water. The water should be comfortably warm, but not too hot.
- Add mild dish soap or wood cleaner: Add a small amount of mild dish soap or a specifically formulated wood cleaner to the bucket of warm water. Follow the instructions on the product label for the recommended amount.
- Mix the solution: Use a stirring stick or your hand (wear gloves if necessary) to gently mix the water and cleaning solution together. Ensure that the soap or cleaner is fully dissolved in the water.
If you prefer to use a commercial wood siding cleaner, follow the instructions provided on the packaging for the recommended mixing ratios. Some commercial cleaners may require dilution with water, while others may be ready-to-use.
It’s important to choose a mild soap or wood cleaner that is specifically formulated for wood surfaces. Harsh chemicals can damage the wood and strip away its natural oils, leading to premature deterioration.
Remember to mix only the amount of cleaning solution that you will need for the job at hand. It’s best to mix a fresh batch for each cleaning session to ensure the effectiveness of the solution.
Test Cleaning Solution
Before applying the cleaning solution to the entire wood siding, it’s important to test it on a small, inconspicuous area. This will help you determine if the solution is safe for your siding and if any adjustments need to be made. Follow these steps to test the cleaning solution:
- Choose a small area: Select a small area of the wood siding that is not easily noticeable, such as behind a plant or in a corner.
- Apply the cleaning solution: Dip a sponge or cloth into the cleaning solution and gently apply it to the test area. Make sure to fully saturate the wood and let the solution sit for a few minutes.
- Observe any reactions: After a few minutes, observe the test area for any adverse reactions. Look for discoloration, warping, or any other signs of damage. If the wood appears unaffected, you can proceed with confidence.
- Make adjustments if necessary: If you notice any negative reactions, such as discoloration or damage, you may need to adjust your cleaning solution. Try diluting it further with water or opt for a different cleaner altogether.
Testing the cleaning solution will give you peace of mind and prevent any potential damage to your wood siding. It’s always better to be safe than sorry when it comes to cleaning products.
Once you have confirmed that the cleaning solution is safe for your wood siding, you can proceed to apply it to the rest of the siding, following the next steps in the cleaning process.
Apply Cleaning Solution
Now that you have tested the cleaning solution and ensured its safety for your wood siding, it’s time to apply the solution to the entire surface. Follow these steps to effectively apply the cleaning solution:
- Dampen a sponge or cloth: Dip a sponge or cloth into the cleaning solution, making sure it is fully saturated but not dripping excessively.
- Start from the bottom: Begin applying the cleaning solution to the wood siding from the bottom and work your way up. This will prevent streaks and allow the cleaning solution to flow downwards, taking dirt and grime along with it.
- Cover a manageable area: Work in small sections, covering a manageable area at a time. This will prevent the cleaning solution from drying on the wood before you have a chance to scrub it.
- Apply with gentle pressure: Use gentle pressure to apply the cleaning solution to the wood siding. Make sure to cover the entire surface, paying extra attention to areas with stains or heavy soiling.
- Allow the solution to sit: After applying the cleaning solution to a section of the wood siding, allow it to sit for a few minutes. This will give the solution time to break down dirt and grime, making it easier to remove.
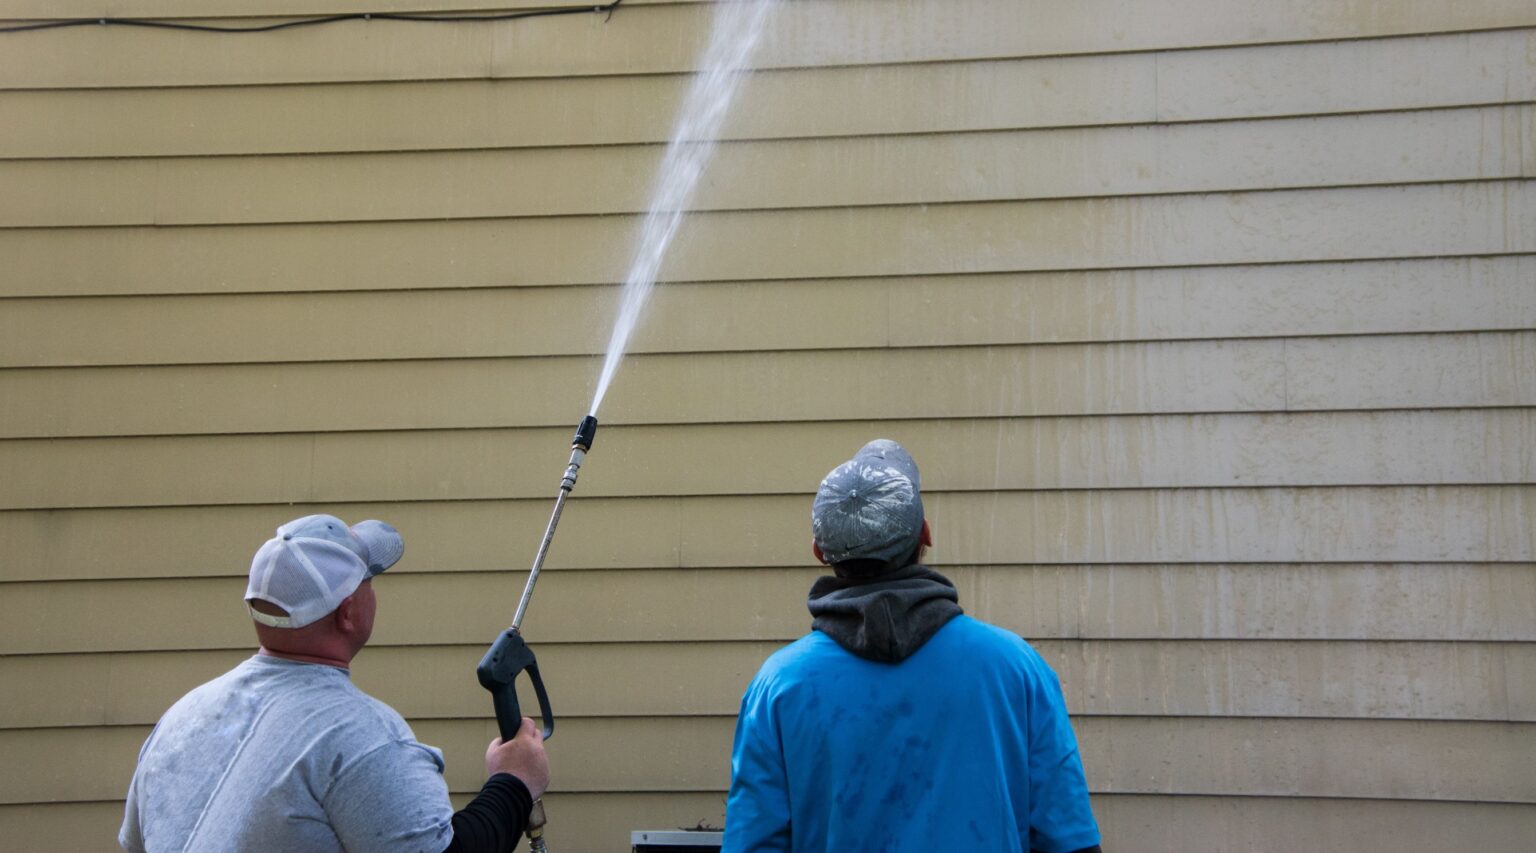
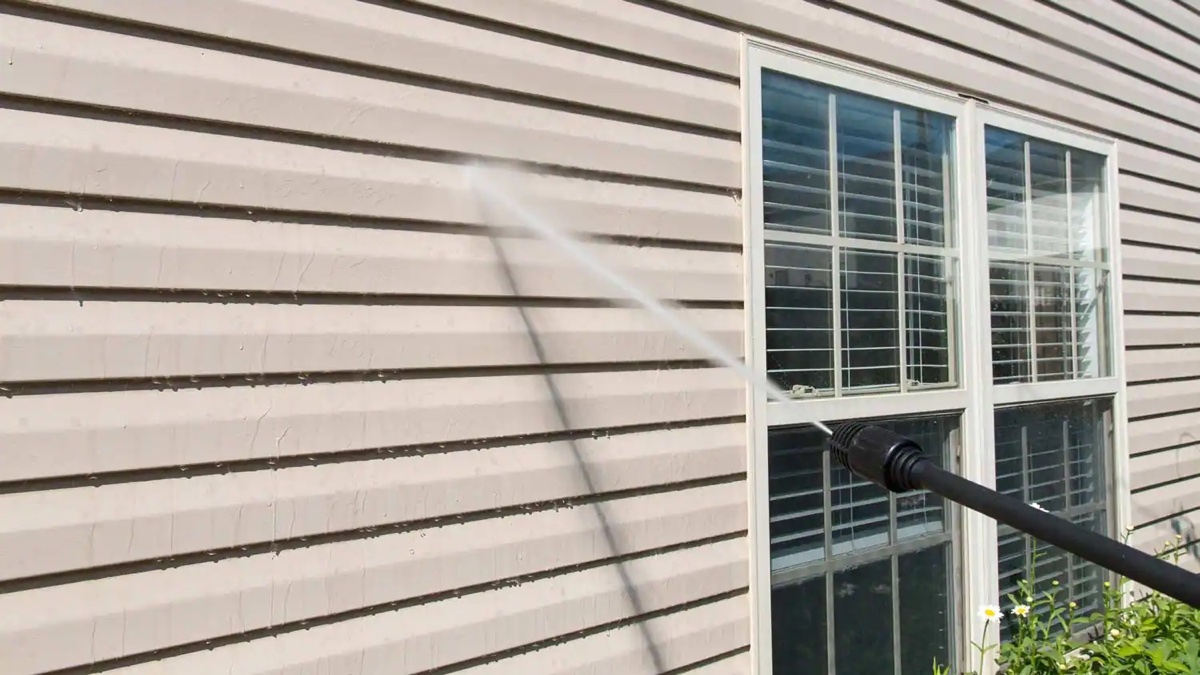
It’s important to note that wood siding is susceptible to water damage if it becomes excessively wet. Therefore, avoid spraying the cleaning solution directly onto the siding with high-pressure water, as this can force the water into the wood and cause swelling or warping.
By applying the cleaning solution methodically and evenly, you’ll ensure that the entire wood siding is thoroughly cleaned and ready for the next step: scrubbing.
To clean wood siding, mix a solution of water and mild detergent, then use a soft brush or cloth to scrub the siding. Rinse thoroughly with a hose. Avoid using a pressure washer, as it can damage the wood.
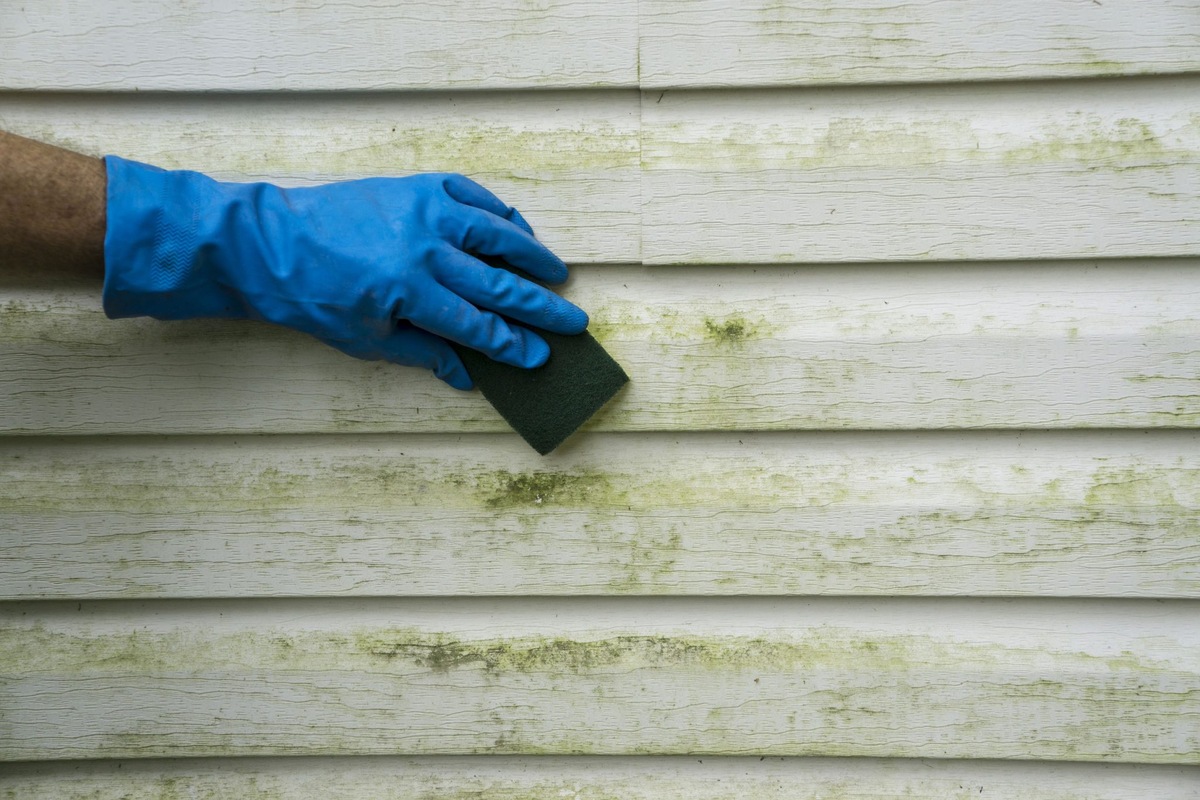
Scrub the Wood Siding
After allowing the cleaning solution to sit for a few minutes, it’s time to scrub the wood siding to remove dirt, stains, and grime. Follow these steps to effectively scrub the wood siding:
- Use a soft-bristle brush: Take a soft-bristle brush and begin scrubbing the wood siding in a gentle circular motion. Start from the bottom and work your way up to ensure thorough cleaning.
- Pay attention to tough stains: For stubborn stains or areas with heavy soiling, apply a bit more pressure to the brush. However, be cautious not to scrub too vigorously, as this can damage the wood.
- Work in sections: Divide the wood siding into manageable sections and focus on one area at a time. This will make the scrubbing process more efficient and prevent the cleaning solution from drying on the wood.
- Periodically rinse the brush: As you scrub, the brush may accumulate dirt and debris. Periodically rinse it off with clean water to ensure that you’re working with a clean brush.
- Continue scrubbing until clean: Continue scrubbing the wood siding until it appears clean and free from dirt, stains, and grime. Take your time and be thorough with your scrubbing.
Remember to be gentle yet firm while scrubbing the wood siding. Too much force can damage the wood, while being too gentle may not effectively remove built-up dirt and stains. It’s all about finding the right balance.
Scrubbing the wood siding may require some elbow grease, especially in areas with heavy soiling. However, the end result will be well worth the effort, as you’ll be left with clean and revitalized wood siding.
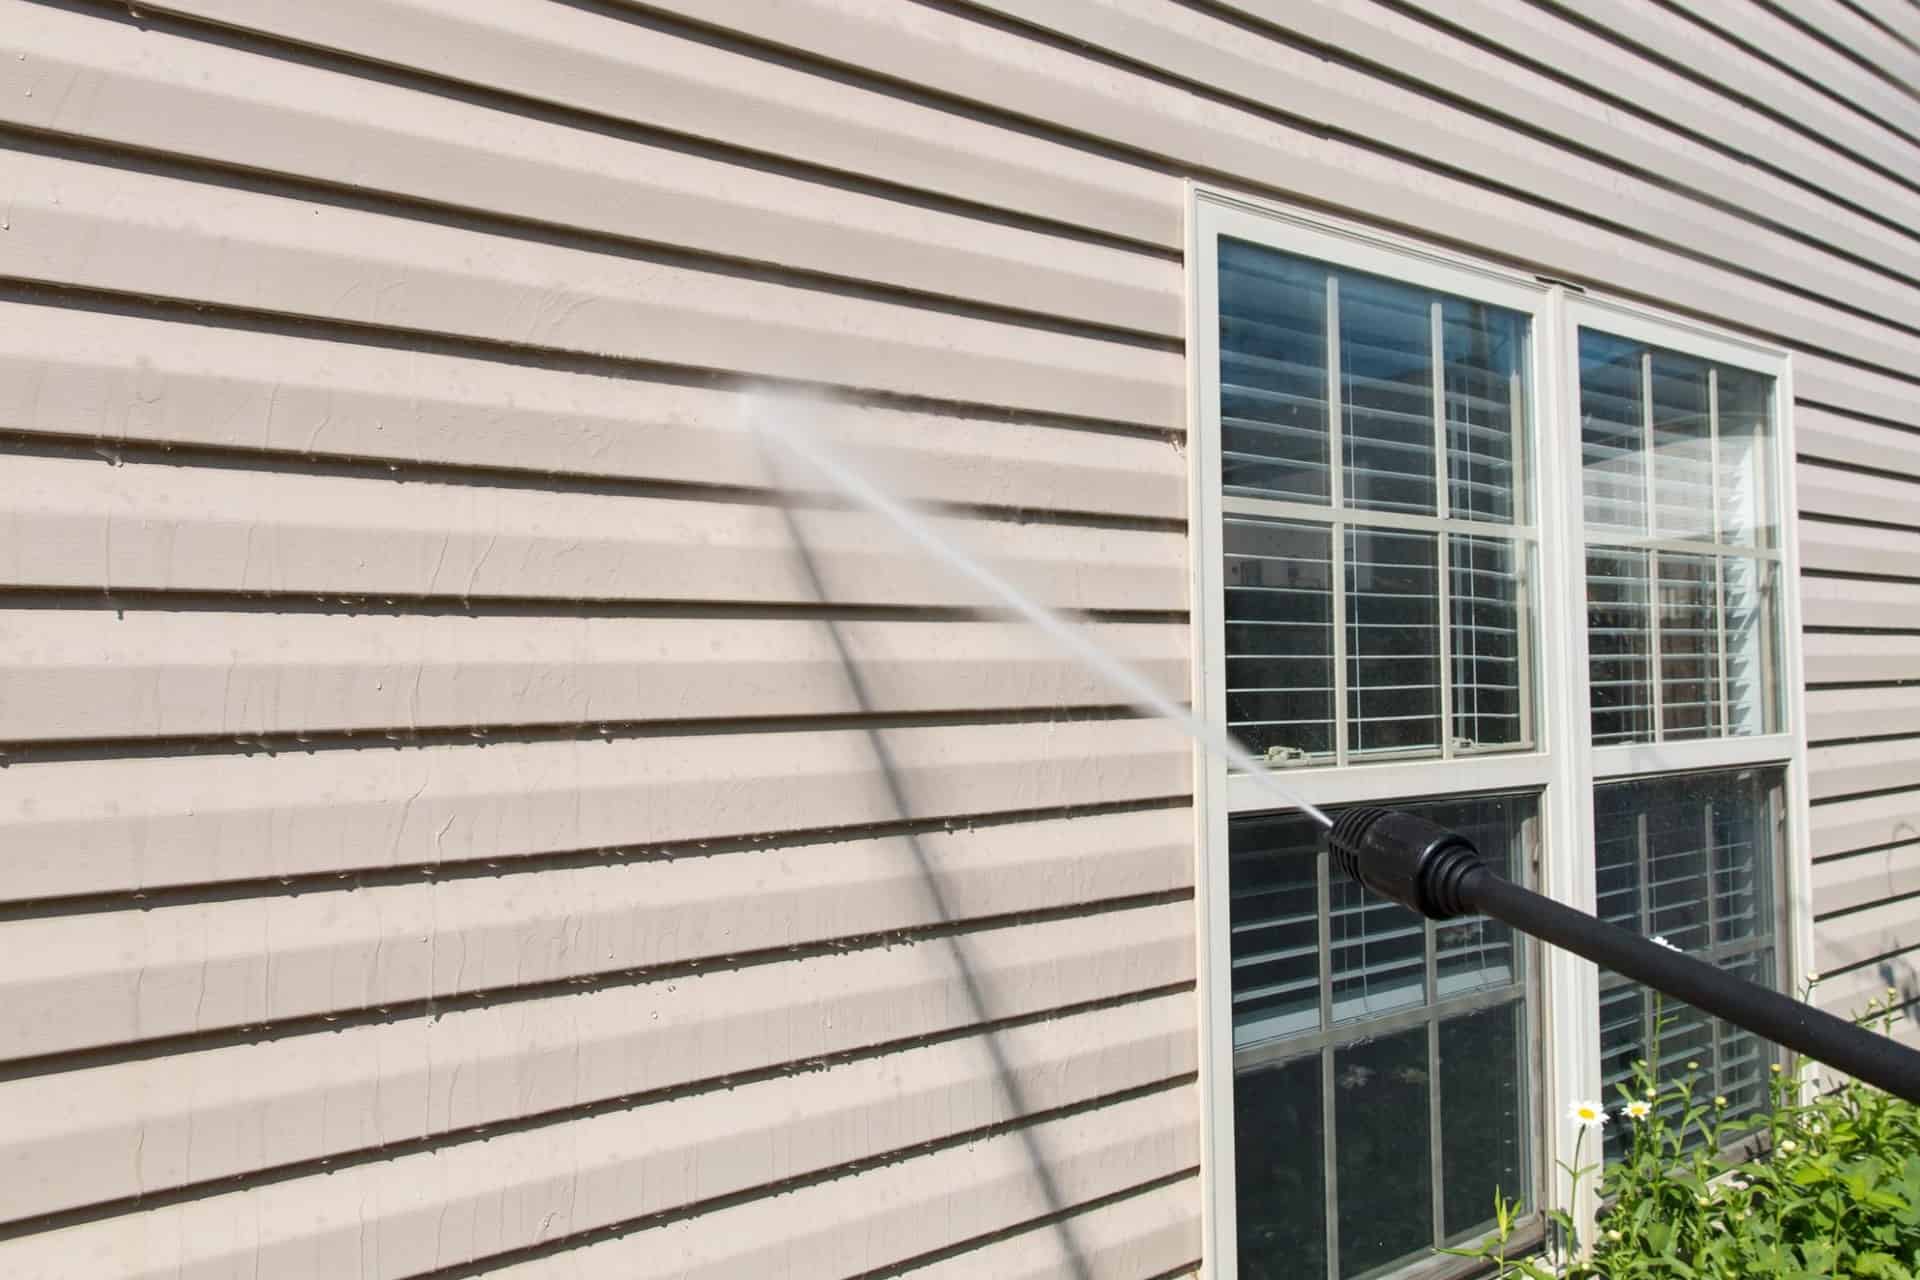
Rinse Off the Cleaning Solution
Once you have finished scrubbing the wood siding and it appears clean and free from dirt and stains, it’s time to rinse off the cleaning solution. Follow these steps to effectively rinse off the cleaning solution:
- Prepare your garden hose: Attach a spray nozzle with a gentle spray setting to your garden hose. This will provide a controlled flow of water for rinsing.
- Start from the top: Begin by rinsing the top section of the wood siding and work your way down. This will prevent any dirty water from flowing over previously cleaned areas.
- Position the hose at a downward angle: Hold the hose at a downward angle, directing the water flow towards the ground. This will prevent excess water from penetrating the wood.
- Rinse thoroughly: Make sure to thoroughly rinse off all the cleaning solution from the wood siding. Pay extra attention to areas where the cleaning solution might have pooled, such as corners or grooves.
- Continue rinsing until the water runs clear: Keep rinsing off the siding with clean water until the water running off is clear, indicating that all the cleaning solution has been removed.
Properly rinsing off the cleaning solution is crucial to ensure that no residue is left behind on the wood siding. Residue can lead to discoloration, streaks, or even damage to the wood over time.
Remember to avoid using excessive water pressure when rinsing, as it can force water into the wood and cause swelling or warping. It’s always best to use a gentle spray setting on your garden hose.
By thoroughly rinsing off the cleaning solution, you’ll be left with clean, refreshed wood siding ready to be dried and admired.
Read more: How To Repair Vertical Wood Siding
Dry the Wood Siding
After rinsing off the cleaning solution, it’s important to properly dry the wood siding to prevent water damage and maintain its optimal condition. Follow these steps to effectively dry the wood siding:
- Allow for natural air drying: Let the wood siding air dry naturally. Avoid using excessive heat sources or direct sunlight to speed up the drying process, as this can cause the wood to dry too quickly and potentially warp.
- Check for any remaining moisture: After a few hours, check the wood siding for any remaining moisture. Gently touch the surface of the siding to ensure it is dry to the touch.
- If necessary, use a towel or cloth: If you notice any lingering moisture, gently pat the wood siding dry with a clean towel or cloth. Avoid rubbing vigorously, as this can damage the wood or leave behind lint.
- Open windows and doors: To facilitate airflow and expedite the drying process, open windows and doors in the immediate vicinity of the wood siding. This will help promote air circulation and aid in drying.
Properly drying the wood siding is essential to prevent water from seeping into the wood and causing damage or decay over time. Any residual moisture can lead to mold growth or wood rot.
Be patient during the drying process and allow sufficient time for the wood siding to dry completely before applying any additional treatments or finishes.
Once the wood siding is dry, it’s time to move on to the optional step of applying a wood preservative to protect and maintain the wood’s integrity.
Apply Wood Preservative (Optional)
Applying a wood preservative is an optional step but can provide added protection and extend the lifespan of your wood siding. Wood preservatives help to prevent insect infestation, rot, and decay. Follow these steps to apply a wood preservative:
- Choose a suitable wood preservative: Look for a high-quality wood preservative that is specifically formulated for exterior wood surfaces. Consider factors such as the type of wood siding you have and the level of protection you desire.
- Follow the manufacturer’s instructions: Read and carefully follow the instructions provided by the manufacturer on the packaging. This will ensure that you apply the wood preservative correctly and in the recommended manner.
- Prepare the wood siding: Before applying the wood preservative, make sure the wood siding is clean, dry, and free from any remaining dirt, stains, or debris.
- Apply the wood preservative: Use a brush, roller, or sprayer to apply the wood preservative to the wood siding. Ensure that you cover the entire surface evenly, working in small sections at a time.
- Allow for proper drying time: Allow the wood preservative to dry according to the manufacturer’s instructions. This will typically require a few hours to a day, depending on the specific product and environmental conditions.
- Consider additional coats: Depending on the wood preservative and its recommended application, you may need to apply multiple coats for optimal protection. Follow the manufacturer’s guidelines for the recommended number of coats.
Applying a wood preservative can help to enhance the natural beauty of your wood siding and protect it from the elements. It’s a proactive step that can significantly extend the lifespan of your siding.
Remember to apply the wood preservative in a well-ventilated area and wear appropriate protective gear, such as gloves and safety goggles, as specified by the manufacturer.
This optional step will provide an extra layer of protection and help ensure that your wood siding remains in excellent condition for years to come.
Maintain the Wood Siding
To keep your wood siding looking its best and to maximize its longevity, regular maintenance is key. Here are some tips on how to maintain your wood siding:
- Inspect regularly: Periodically inspect your wood siding for any signs of damage, such as cracks, warping, or rot. Catching and addressing issues early can prevent further damage and costly repairs.
- Keep it clean: Regularly clean your wood siding to remove dirt, debris, and stains. Use a gentle cleaning solution and a soft-bristle brush to avoid scratching or damaging the wood.
- Protect from moisture: Ensure that water does not accumulate or pool near the wood siding. Properly maintain the gutter system to direct water away from the siding, and fix any leaks or drainage issues promptly.
- Apply a fresh coat of sealant or paint: Depending on the type of wood siding, periodic reapplication of sealant or paint may be necessary to protect it from the elements and maintain its appearance. Follow the recommendations of the manufacturer for the appropriate timing and application process.
- Trim nearby foliage: Trim any tree branches, shrubs, or vines that are in close proximity to your wood siding. This will prevent moisture accumulation, reduce the risk of damage from overhanging branches, and minimize the potential for pest infestations.
- Address pest issues promptly: If you notice signs of pest infestation, such as termites or carpenter ants, address the issue promptly. Consult with a professional pest control service to effectively eliminate the pests and protect your wood siding.
- Consider professional maintenance: Periodically, consider hiring a professional to inspect and maintain your wood siding. They can provide specialized treatments, repairs, and advice to keep your siding in optimal condition.
By implementing these maintenance practices, you can ensure that your wood siding remains beautiful, resilient, and protected throughout its lifespan.
Remember to consult your specific wood siding’s manufacturer guidelines for any additional maintenance recommendations that may be specific to your siding type.
Conclusion
Cleaning and maintaining your wood siding is essential for preserving its natural beauty and durability. By following the steps outlined in this article, you can effectively clean your wood siding and protect it from the damaging effects of dirt, debris, and the elements.
Starting with gathering the necessary supplies and preparing the area, you can remove dirt and debris before applying a properly mixed cleaning solution. Testing the cleaning solution ensures its safety before applying it to the entire wood siding. Scrubbing the siding helps to remove stubborn stains and grime, while rinsing off the cleaning solution ensures a clean, residue-free surface.
Drying the wood siding thoroughly and applying a wood preservative are optional, yet highly beneficial steps for enhancing the longevity of your siding. Ongoing maintenance, such as regular inspections, cleaning, and protection from moisture and pests, will help to prolong the life of your wood siding and keep it looking its best.
Remember to always follow the manufacturer’s instructions and use caution while cleaning and maintaining your wood siding. Proper care and maintenance will ensure that your wood siding remains a beautiful and enduring feature of your home for years to come.
Frequently Asked Questions about How To Clean Wood Siding
Was this page helpful?
At Storables.com, we guarantee accurate and reliable information. Our content, validated by Expert Board Contributors, is crafted following stringent Editorial Policies. We're committed to providing you with well-researched, expert-backed insights for all your informational needs.


0 thoughts on “How To Clean Wood Siding”