Articles
How To Cut Wooden Blinds
Modified: January 19, 2024
Discover the best articles on how to cut wooden blinds. Get expert tips, step-by-step guides, and DIY techniques for flawless blinds cutting.
(Many of the links in this article redirect to a specific reviewed product. Your purchase of these products through affiliate links helps to generate commission for Storables.com, at no extra cost. Learn more)
Introduction
Cutting wooden blinds to fit your windows can be a great DIY project that not only saves you money but also allows you to customize the blinds to your desired length. Whether you’ve purchased blinds that are too long or you want to resize existing blinds to fit a new window, with the right tools and materials, you can easily trim wooden blinds to the perfect size.
In this article, we will guide you through the step-by-step process of cutting wooden blinds. From measuring and marking the desired length to trimming the bottom rail, you’ll learn how to achieve professional-looking results. So let’s dive in and get started!
Key Takeaways:
- Customize your wooden blinds to the perfect length with these DIY cutting steps. Ensure accuracy, secure the blinds, and test for smooth operation to achieve professional-looking results.
- Prioritize safety, gather the right tools, and follow step-by-step instructions for a rewarding DIY project. Enjoy the custom fit and beauty of your newly cut wooden blinds!
Read more: How To Measure For Wooden Blinds
Tools and Materials Needed
Before you begin cutting wooden blinds, gather the following tools and materials:
- Safety goggles
- Measuring tape
- Marker or pencil
- Hacksaw or cordless circular saw
- Sandpaper or sanding block
- Masking tape
- Clean cloth
- Drop cloth or plastic sheet
Make sure you have all the necessary tools and materials so that you can work efficiently and safely. It’s also important to work in a well-ventilated area to minimize dust and debris.
Step 1: Measure and Mark the Desired Length
The first step in cutting wooden blinds is to measure and mark the desired length. Start by fully extending the blinds and placing them on a flat surface, such as a table or workbench. Use a measuring tape to determine the exact length you want the blinds to be. Measure from the top of the blind to the desired bottom length.
Once you have the measurement, make a mark on one of the ladder strings or louver at the desired length. It’s important to mark both sides of the blinds to ensure accuracy. Use a marker or pencil that is easily visible against the color of the blinds.
Make sure to double-check the measurement before proceeding to the next step. It’s always better to measure twice and cut once to prevent any mistakes.
Step 2: Secure the Blind
After measuring and marking the desired length, it’s essential to secure the blind in place before making any cuts. This will prevent the blinds from moving and ensure a clean and accurate cut.
First, lay down a drop cloth or plastic sheet to protect the surface you’re working on from any potential damage. Place the blinds on the cloth or sheet, making sure they are fully extended and flat.
Next, use masking tape to secure the slats in their current position. Start by taping the bottom of the blinds to the work surface. Then, continue taping around the sides and top, ensuring that the blinds are held securely without any movement.
Securing the blinds with masking tape will provide stability while cutting, preventing any unnecessary shifting or slippage. This will ultimately lead to cleaner and more precise cuts.
Once the blind is securely taped down, you can proceed to the next step of cutting the excess slats.
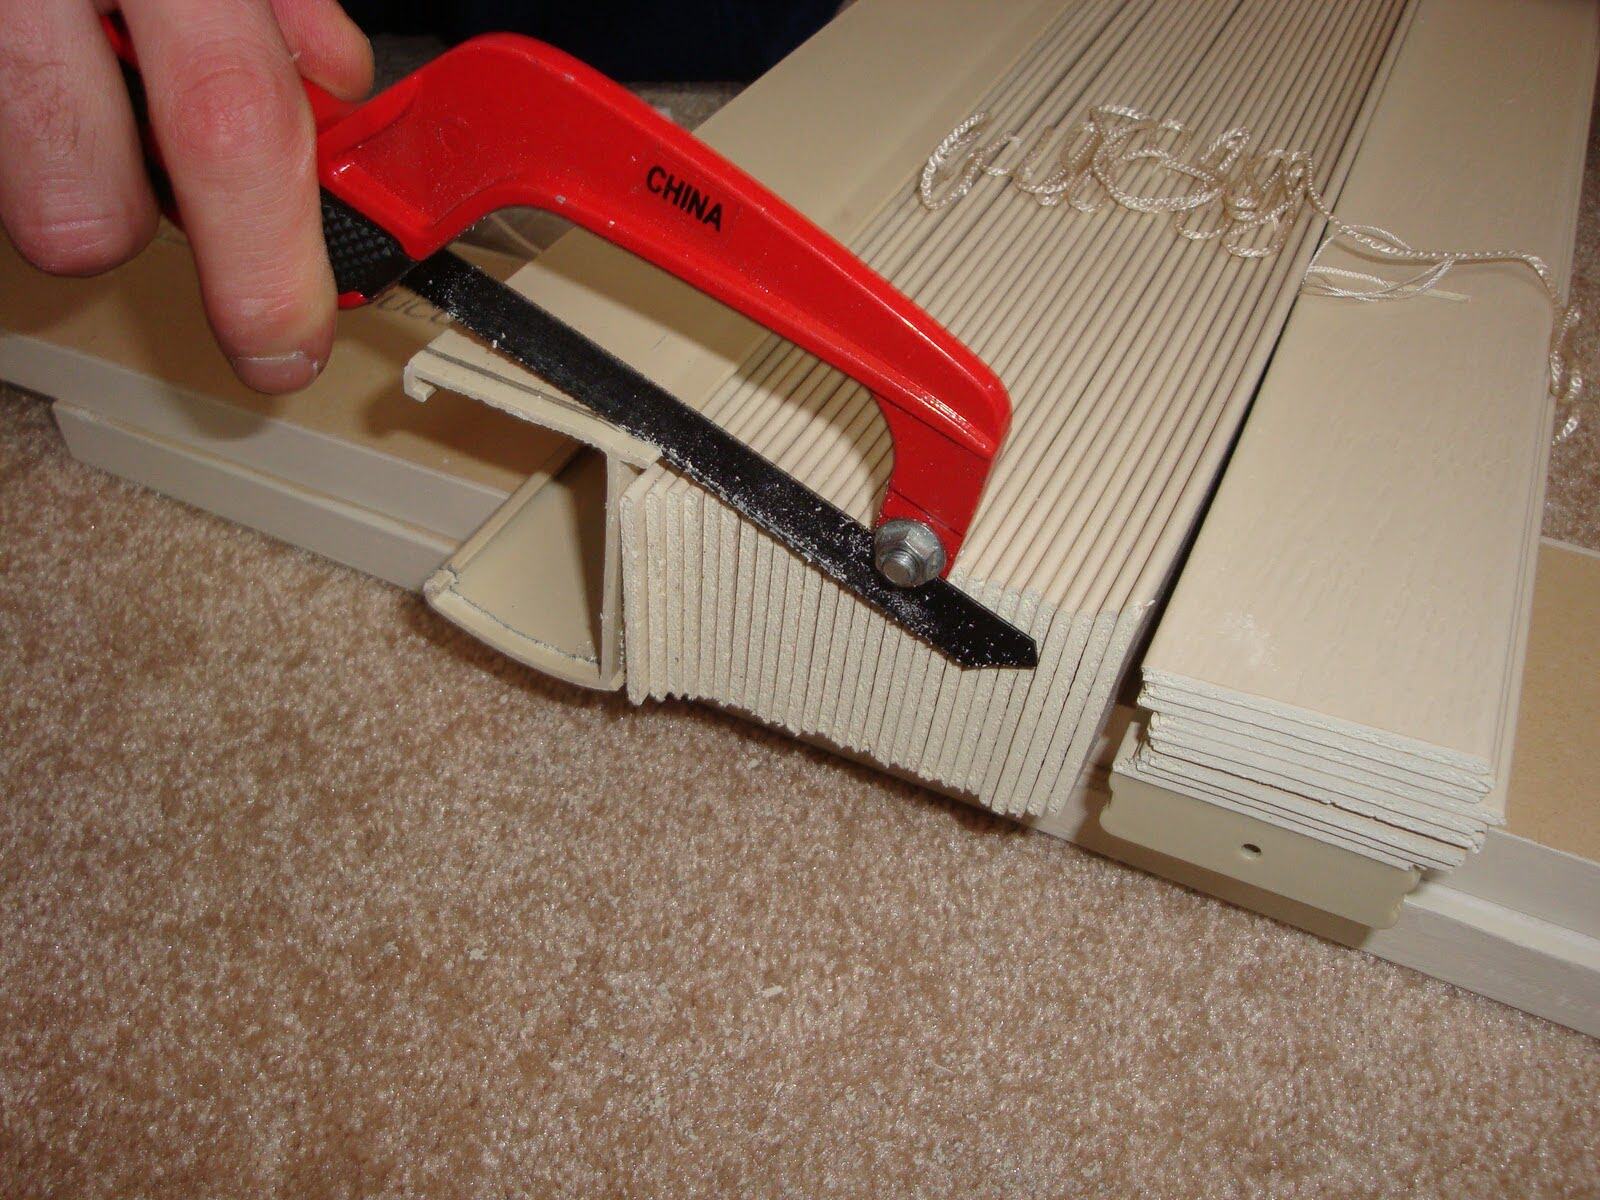
Step 3: Remove Excess Slats
With the blind properly secured, it’s time to remove the excess slats to achieve the desired length. This step requires careful precision, as you want to ensure that the cuts are clean and even.
Start by identifying the lowest mark you made on the ladder string or louver. Using a hacksaw or a cordless circular saw with a fine-toothed blade, carefully cut through the slats just above that mark. Make sure to follow the line and maintain a straight cut.
When cutting through the slats, it’s essential to apply gentle and steady pressure. Rushing or using excessive force can lead to jagged or uneven cuts. Take your time and let the saw do the work for smooth and clean cuts.
Continue cutting through the slats until you reach the top mark or the desired length. If you’re using a cordless circular saw, be cautious of the speed and make adjustments as necessary to maintain control over the cut.
Once all the excess slats are removed, use sandpaper or a sanding block to smooth out any rough edges. Gently sand the cut ends of the slats to achieve a polished finish.
Remember to wipe away any dust or debris left from the cutting process using a clean cloth. It’s important to have a clean surface before moving on to the next step.
When cutting wooden blinds, measure twice and cut once to ensure accuracy. Use a fine-toothed saw to make clean and precise cuts, and sand the edges for a smooth finish.
Read more: How To Install Wooden Blinds
Step 4: Trim the Bottom Rail
Now that the excess slats have been removed, you may notice that the bottom rail of the blind extends beyond the newly cut slats. In this step, we will trim the bottom rail to match the new length of the blinds.
Start by measuring the distance from the bottom of the blinds to the lowest cut slat. This measurement will determine how much of the bottom rail needs to be trimmed.
Using a hacksaw or a cordless circular saw, carefully cut through the bottom rail at the measured mark. Ensure that the cut is straight and even to maintain a clean and professional look.
When trimming the bottom rail, it’s crucial to follow the manufacturer’s instructions, as some blinds may have specific guidelines or restrictions. If you’re uncertain, refer to the manufacturer’s documentation or consult a professional for guidance.
After trimming the bottom rail to the appropriate length, use sandpaper or a sanding block to smooth out any rough edges. This step will provide a polished finish and prevent any splintering or snagging.
Once again, wipe away any dust or debris left from the cutting and sanding process using a clean cloth.
With the bottom rail trimmed, the blinds are starting to take shape and nearing completion.
Step 5: Reattach the Bottom Rail
After trimming the bottom rail to the correct length, it’s time to reattach it to the blinds. This step ensures that the blinds maintain their structure and functionality.
Start by aligning the trimmed bottom rail with the slats of the blinds. Make sure that it is centered and level before proceeding.
Using the appropriate screws or fasteners provided with the blinds, reattach the bottom rail to the bottom-most slat. It’s crucial to follow the manufacturer’s instructions for the specific hardware and attachment method.
When securing the bottom rail, be careful not to overtighten the screws, as this can cause damage or misalignment. Use a screwdriver or an appropriate tool to tighten the screws firmly but not excessively.
Double-check that the bottom rail is securely attached and aligned with the slats of the blinds. This ensures that the blinds will function properly when opened and closed.
If your blinds have any decorative end caps or covers for the bottom rail, reattach them as well. These components add a polished and finished look to the blinds.
With the bottom rail successfully reattached, your blinds are almost ready for use. But before that, there’s one more important step to complete.
Step 6: Test and Adjust
After reattaching the bottom rail, it’s crucial to test the blinds and make any necessary adjustments to ensure smooth operation and proper fit.
First, remove the masking tape that was used to secure the blinds during the cutting process. This will allow the blinds to move freely and function as intended.
Next, test the blinds by operating the lift mechanism or tilt control. Verify that the blinds raise and lower smoothly without any obstruction or resistance. If you encounter any issues, such as the blinds getting stuck or not operating correctly, double-check the alignment of the slats and bottom rail. Make any necessary adjustments to ensure proper function.
Additionally, observe the blinds when they are fully closed to check for any gaps or misalignment. If you notice any gaps between the slats or at the bottom, consider adjusting the tilt control or repositioning the bottom rail to achieve a more seamless and properly fitted appearance.
If necessary, consult the manufacturer’s instructions or seek professional assistance for troubleshooting and fine-tuning the blinds for optimal performance.
Remember to pay attention to any safety mechanisms or child safety features provided with the blinds. Ensure that these features are functioning correctly and follow any guidelines regarding cord management and child safety precautions.
By thoroughly testing and making any necessary adjustments, you can ensure that your newly resized wooden blinds are both functional and aesthetically pleasing.
Conclusion
Cutting wooden blinds to fit your windows can be a rewarding DIY project that allows you to customize your blinds to the desired length. By following the steps outlined in this guide, you can achieve professional-looking results and ensure that your blinds fit perfectly in your windows.
Remember to gather all the necessary tools and materials before starting the cutting process. Measure and mark the desired length carefully to ensure accuracy. Secure the blinds in place using masking tape to prevent any movement during cutting. Use a hacksaw or cordless circular saw to remove the excess slats, and trim the bottom rail to match the new length of the blinds.
Reattach the bottom rail securely, making sure it is aligned with the slats. Test the blinds and make any necessary adjustments to ensure smooth operation and proper fit.
Throughout the process, prioritize safety by wearing goggles and working in a ventilated area. Follow the manufacturer’s instructions and consult professionals if needed.
With your newly cut wooden blinds, you can enjoy the perfect fit and a custom look that adds beauty and functionality to your windows.
Happy blinds cutting!
Frequently Asked Questions about How To Cut Wooden Blinds
Was this page helpful?
At Storables.com, we guarantee accurate and reliable information. Our content, validated by Expert Board Contributors, is crafted following stringent Editorial Policies. We're committed to providing you with well-researched, expert-backed insights for all your informational needs.