Articles
How To Know If A Water Pump Is Bad
Modified: August 27, 2024
Learn how to determine if your water pump is experiencing issues with this helpful article. Gain insights and knowledge on identifying signs of a bad water pump.
(Many of the links in this article redirect to a specific reviewed product. Your purchase of these products through affiliate links helps to generate commission for Storables.com, at no extra cost. Learn more)
Introduction
A water pump is a crucial component of a vehicle’s cooling system, responsible for circulating coolant throughout the engine to maintain proper operating temperature. Over time, water pumps can wear out and develop issues due to constant use and exposure to heat and pressure. It is important to recognize the signs of a failing water pump to prevent potential engine damage and avoid being stranded on the side of the road.
In this article, we will explore the common signs of a bad water pump and provide guidance on how to test its functionality.
Image Placeholder: Insert an image of a water pump to accompany the introduction.
Ensuring the health of your vehicle’s water pump is vital because if it fails, it can cause overheating, engine damage, and increase the risk of a breakdown. By identifying the warning signs early on, you can address any issues promptly and save yourself from costly repairs.
Now, let’s dive into the signs that indicate a bad water pump.
Key Takeaways:
- Regularly inspecting your vehicle’s water pump and addressing any issues promptly can prevent engine damage, overheating, and potential breakdowns, ensuring a reliable and efficient cooling system.
- Conducting visual inspections, pressure tests, and coolant system inspections can help diagnose water pump issues early, allowing for timely repairs and maintenance to keep your vehicle running smoothly.
Read more: What Causes A Water Pump To Go Bad
Signs of a Bad Water Pump
A bad water pump can result in various symptoms, indicating that it is not functioning properly. Recognizing these signs will help you address the issue before it causes further damage to your vehicle. Here are some common indicators that your water pump may be failing:
- Engine Overheating: One of the most noticeable signs of a bad water pump is engine overheating. If the pump is malfunctioning and not circulating coolant effectively, the engine temperature can rise rapidly. Keep an eye on your temperature gauge and be cautious if it begins to reach the high end of the scale.
- Coolant Leakage: A leaking water pump is a clear indication of a problem. Check for puddles or stains of coolant under your vehicle when it is parked. Coolant is usually green, orange, or pink in color, and if you notice a consistent puddle, it may be a sign that the water pump seal or gasket is failing.
- Noisy Pump: Unusual noises coming from the water pump area can suggest a problem. If you hear a squeaking, whining, or grinding noise, it could indicate a failing bearing within the pump. These noises may vary in intensity depending on the speed of the engine.
- Low Coolant Levels: Keep an eye on your coolant levels regularly. If you find that you need to add coolant frequently, it could be a sign that the water pump is not effectively circulating the coolant through the system. Inadequate coolant levels can lead to engine overheating and potential damage.
- Engine Misfire: A bad water pump can cause an engine misfire or rough idling. This occurs because the pump is unable to maintain a consistent flow of coolant, resulting in inadequate cooling of the engine. If you notice a rough running engine or experience a loss of power, it may be linked to a malfunctioning water pump.
- Steam Under the Hood: If you notice steam escaping from under the hood of your vehicle, it is an alarming sign. This can occur when the water pump fails to circulate coolant effectively, causing the engine to overheat. Steam can be accompanied by a burning smell, indicating a significant cooling system issue.
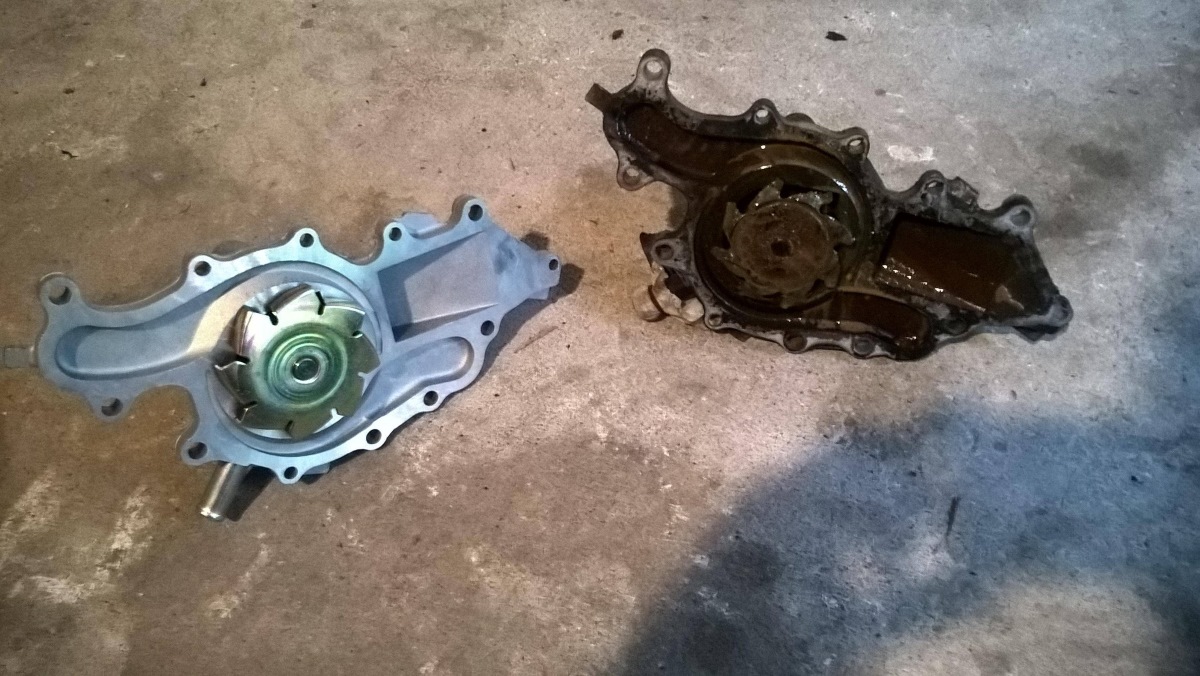
- Rust or Corrosion: Inspect the water pump for any signs of rust or corrosion. The components of the pump can deteriorate over time, leading to leakage and reduced performance. These issues can arise due to prolonged exposure to coolant, moisture, and other environmental factors.
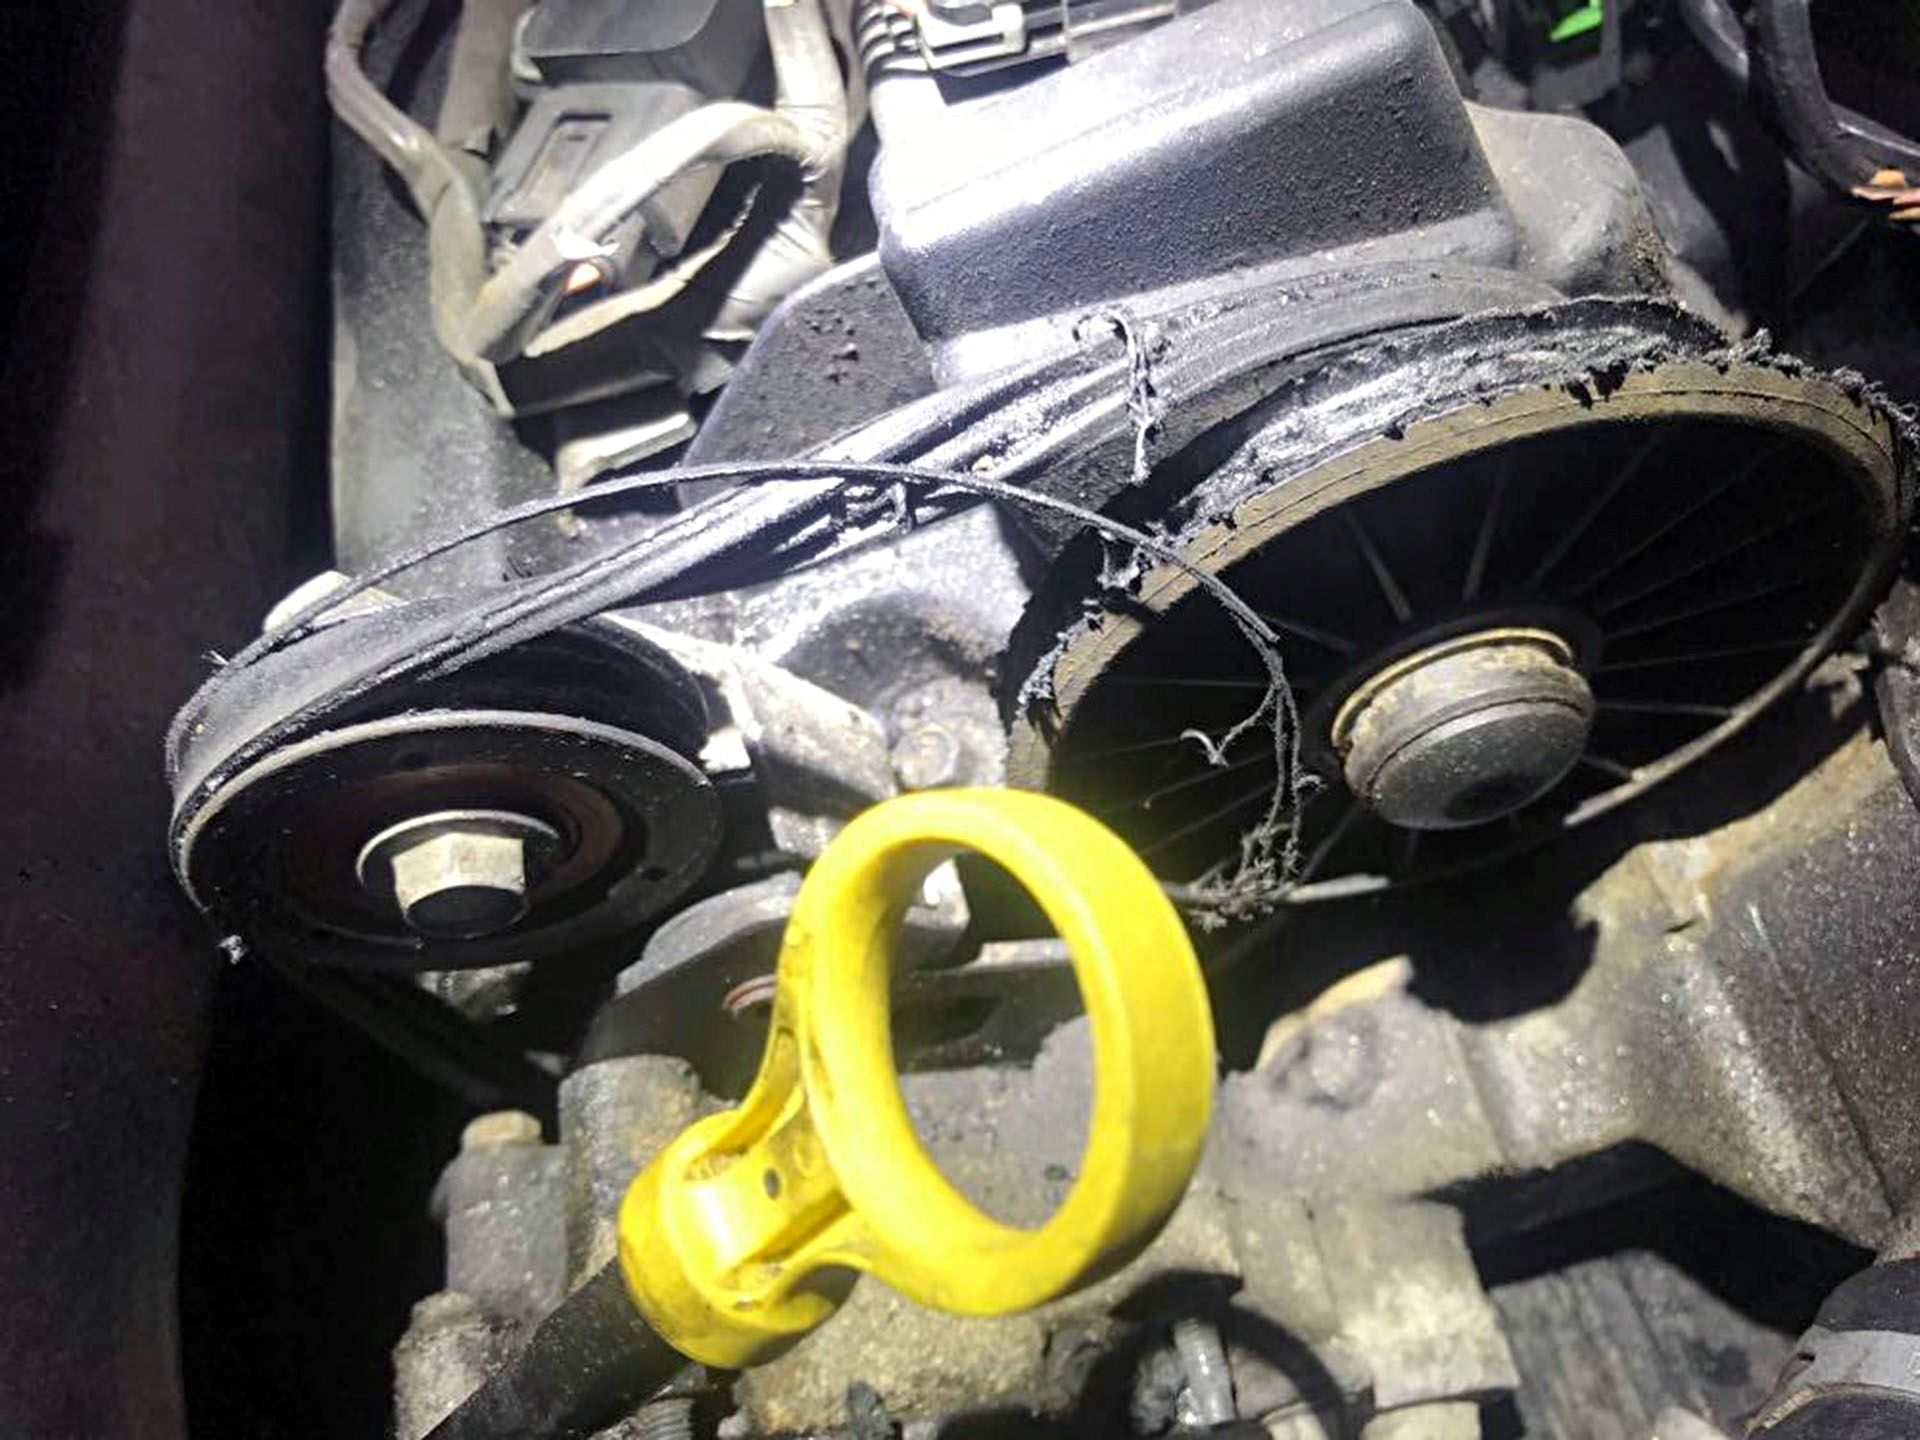
- Belt Problems: The water pump is typically driven by a belt connected to the engine. If you notice squealing noises coming from the front of your vehicle, it could be a sign that the belt driving the water pump is loose or worn. A damaged belt can cause the pump to operate inefficiently.
If you notice one or more of these signs, it is crucial to address the issue promptly to prevent further damage and potential breakdowns. Next, we will discuss how to test your water pump to determine if it is indeed the culprit.
Engine Overheating
Engine overheating is one of the most noticeable signs that your water pump may be failing. The water pump is responsible for circulating coolant through the engine to regulate its temperature. If the pump is not functioning properly, coolant may not flow adequately, leading to engine overheating.
You can identify engine overheating by monitoring the temperature gauge on your dashboard. If the needle consistently rises towards the high end of the scale or enters the red zone, it indicates that the engine is running hotter than it should. In some cases, the engine may even emit steam or an unusual smell, both of which are signs of severe overheating.
Several factors can contribute to engine overheating, such as a malfunctioning thermostat or a clogged radiator, but a failing water pump is a common culprit. It is essential to address this issue promptly to avoid engine damage and potential breakdowns.
If you suspect your water pump is causing engine overheating, there are a few steps you can take to confirm the problem:
- Check the coolant level: Ensure that the coolant reservoir is filled to the appropriate level. Low coolant levels can reduce the pump’s ability to circulate coolant effectively. If the coolant level is low, inspect for any leaks or signs of coolant under your vehicle.
- Inspect the water pump: Visually inspect the water pump for any visible signs of leakage, corrosion, or physical damage. The water pump is usually located near the front of the engine, connected to the drive belt. Look for coolant stains around the pump or any signs of coolant dripping from it.
- Check the drive belt: A worn or loose drive belt can cause the water pump to operate inefficiently, leading to inadequate coolant circulation. Inspect the drive belt for any signs of damage, such as cracks, fraying, or excessive slack. If the belt appears worn or damaged, it may be time for a replacement.
- Perform a cooling system pressure test: If you have the necessary tools and knowledge, you can perform a cooling system pressure test. This test involves using a pressure tester to simulate the pressure generated in the cooling system. By pressurizing the system, you can identify any leaks or weak points, including the water pump.
If you are unsure or uncomfortable performing these checks yourself, it is recommended to consult a professional mechanic. They have the expertise and diagnostic equipment to accurately determine if your water pump is the cause of the engine overheating.
Remember, engine overheating should never be ignored, as it can result in severe engine damage. Taking prompt action to address a failing water pump can prevent costly repairs and keep your vehicle running smoothly.
Coolant Leakage
Coolant leakage is a clear indication of a potential problem with your water pump. The water pump is responsible for circulating coolant throughout the engine to maintain optimal temperature levels. If there is a leak in the pump or its associated gaskets and seals, coolant can escape, leading to a loss of coolant and potential engine overheating.
To determine if your water pump is leaking coolant, you can perform a visual inspection. Here’s what you need to do:
- Park your vehicle on a clean surface: Choose a flat surface and park your vehicle, ensuring that it is turned off and the engine is cool.
- Inspect the area around the water pump: The water pump is typically located at the front of the engine and is connected to the drive belt. Carefully examine the pump and its surrounding area for any noticeable signs of coolant leakage.
- Check for coolant stains: Look for coolant stains or puddles under your vehicle. Coolant is usually green, orange, or pink in color, making it relatively easy to identify. If you notice a consistent puddle of coolant under your vehicle after it has been parked for a while, it may be an indication of a leaking water pump.
- Inspect the pump’s gaskets and seals: Examine the water pump’s gaskets and seals for any signs of damage or deterioration. These components are critical for maintaining a proper seal and preventing coolant leakage. Look for any visible cracks, splits, or coolant residue around the gaskets and seals.
If you find evidence of coolant leakage or suspect that your water pump may be the source of the leak, it is essential to address the issue as soon as possible. Ignoring a coolant leak can lead to engine damage and overheating, which can be expensive to fix.
Keep in mind that coolant leaks can also be caused by other components in the cooling system, such as hoses, radiator, or heater core. Therefore, if you are uncertain about the source of the leak, it is recommended to consult a professional mechanic. They have the expertise and diagnostic tools to pinpoint the exact cause and perform the necessary repairs.
Remember, addressing coolant leakage promptly can help prevent further damage to your engine and ensure the proper functioning of your vehicle’s cooling system.
Noisy Pump
If you hear unusual noises coming from the area of your water pump, it may be a sign that the pump is not operating correctly. Noisy operation is often an indication of a failing water pump, specifically related to issues with the pump’s bearings.
Here are some of the common noises you may hear from a malfunctioning water pump:
- Squeaking: A high-pitched squeaking noise can occur when the bearings within the water pump start to wear out. As the pump rotates, the worn bearings can create friction, resulting in a squeaking sound. The noise may become more noticeable as the engine speed increases.
- Whining: A whining noise, similar to the sound of a power steering pump, can be an indication of an issue with the water pump’s bearings. The whining may become more evident during acceleration or when the engine is under load.
- Grinding: A grinding noise is a more severe indication of a failing water pump. It can occur when the bearings within the pump are severely worn or damaged. This noise may be accompanied by increased vibration and can result in a complete pump failure if left unaddressed.
If you suspect that your water pump is causing these noises, it is important to have it inspected and repaired as soon as possible to prevent further damage to the pump or other components of the cooling system.
It is worth noting that not all noises coming from the engine bay are directly related to the water pump. Other components, such as the drive belt, pulleys, or even the alternator, can also produce similar sounds. Therefore, it is advisable to have a professional mechanic diagnose the specific cause of the noise to avoid unnecessary repairs.
Addressing a noisy water pump promptly can help prevent further damage and ensure the proper functioning of your vehicle’s cooling system. If you notice any unusual sounds coming from the water pump area, it is best to consult a professional to accurately diagnose and resolve the issue.
Read more: How To Tell If Your House Water Pump Is Bad
Low Coolant Levels
Low coolant levels can be an indication of a problem with your water pump. The water pump is responsible for circulating coolant throughout the engine to regulate its temperature. If the pump is not working efficiently, it may not be able to circulate enough coolant, resulting in low coolant levels.
Here’s how to check if your coolant levels are low:
- Park your vehicle on a level surface: Ensure your vehicle is turned off and the engine is cool before checking the coolant levels.
- Locate the coolant reservoir: The coolant reservoir is usually a translucent plastic tank located near the radiator. It has a “high” and “low” level marking on the side.
- Check the coolant level: Carefully remove the cap from the coolant reservoir and inspect the coolant level. The level should be between the “high” and “low” markings. If the level is below the “low” mark or significantly lower than usual, it may indicate a problem with the water pump or the overall cooling system.
- Inspect for any visible signs of leakage: While checking the coolant level, also look for any visible signs of coolant leakage around the water pump area or other components of the cooling system, such as hoses or the radiator. Coolant stains or puddles can indicate a leakage issue.
Low coolant levels can lead to engine overheating, as there may not be enough coolant to adequately regulate the engine’s temperature. If you notice that your coolant levels are consistently low, it is important to address the issue promptly.
Keep in mind that low coolant levels may also be caused by other factors, such as leaks in the cooling system or a faulty radiator cap. Therefore, if you suspect a problem with the water pump based on low coolant levels, it is advisable to consult a professional mechanic. They can perform a thorough inspection to identify the exact cause of the issue and provide necessary repairs.
Addressing low coolant levels and ensuring the proper functioning of your vehicle’s water pump is essential in maintaining a healthy and efficient cooling system. Regularly checking coolant levels can help you catch any problems early on and prevent potential engine damage and breakdowns.
Engine Misfire
An engine misfire can be a troubling symptom that may indicate a problem with your water pump. The water pump plays a vital role in maintaining proper engine temperature by circulating coolant throughout the engine. If the pump is failing or not operating efficiently, it can lead to coolant not flowing adequately, resulting in an engine misfire.
Here are some of the signs that may indicate an engine misfire related to a faulty water pump:
- Rough idling: A misfiring engine may exhibit rough idling, causing the vehicle to shake or vibrate when at a standstill. This can occur when the water pump fails to circulate coolant properly, leading to elevated engine temperatures and inadequate cooling.
- Loss of power: An engine misfire can cause a noticeable loss of power during acceleration or while driving. When the water pump is not functioning correctly, the engine may not receive adequate cooling, leading to decreased performance and power output.
- Irregular engine running: A misfire can result in the engine running irregularly or inconsistently. You may experience hesitation, stumbling, or sputtering during acceleration or at different engine speeds. This can be a consequence of improper combustion due to elevated engine temperatures caused by a malfunctioning water pump.
If you suspect that your water pump is contributing to an engine misfire, it is crucial to address the issue promptly. Ignoring the problem can result in further damage to the engine or even a complete breakdown.
While an engine misfire can occur due to various causes, such as faulty spark plugs, ignition coils, or fuel injectors, a malfunctioning water pump can be a contributing factor. It is recommended to have your vehicle inspected by a professional mechanic to accurately diagnose the root cause of the misfire.
A qualified mechanic can perform comprehensive diagnostic tests to determine if a failing water pump is indeed the cause. They may also inspect other components of the cooling system, such as the thermostat or radiator, to ensure a complete diagnosis and the necessary repairs.
By addressing an engine misfire related to a faulty water pump, you can prevent further damage to the engine and restore proper performance to your vehicle.
Steam Under the Hood
Seeing steam escaping from under the hood of your vehicle is a cause for concern and may indicate a problem with your water pump. When the water pump fails to circulate coolant effectively, it can result in engine overheating, leading to the production of steam.
If you notice steam under the hood of your vehicle, here are the steps to take:
- Safely pull over: When you see steam under the hood, it is important to pull over to a safe location as soon as possible. Continuing to drive with an overheating engine can cause severe damage.
- Turn off the engine: Once you have pulled over, turn off the engine and allow it to cool down. Do not attempt to open the hood right away, as it may be extremely hot and result in burns.
- Inspect for signs of coolant leakage: After the engine has cooled down, carefully open the hood and look for any visible signs of coolant leakage or stains around the water pump or other components of the cooling system. Coolant can often leave behind a distinct odor.
- Check coolant levels: If the steam is a result of low coolant levels, check the coolant reservoir to see if it is empty or significantly lower than normal. Low coolant levels can indicate a problem with the water pump or another component of the cooling system.
- Seek professional assistance: If you are uncertain about the cause of the steam or if you notice significant coolant leakage, it is advisable to contact a professional mechanic. They have the expertise to diagnose and repair any issues with your vehicle’s cooling system, including the water pump.
Experiencing steam under the hood is a sign of an overheating engine, which can be caused by a variety of factors, including a malfunctioning water pump. Ignoring this issue can lead to severe engine damage and potentially leave you stranded on the side of the road.
Remember, if you encounter steam under the hood of your vehicle, prioritize your safety and the well-being of your vehicle by pulling over, shutting off the engine, and seeking professional assistance if needed.
One way to know if a water pump is bad is to check for coolant leaks or puddles of coolant under the car. A failing water pump can cause coolant to leak, so keep an eye out for any signs of leakage.
Rust or Corrosion
Inspecting your water pump for rust or corrosion is an important part of maintaining your vehicle’s cooling system. Over time, exposure to coolant, moisture, and other environmental factors can cause the water pump and its components to deteriorate. Rust or corrosion on the water pump can lead to leaks and reduced performance.
Here’s how to check for rust or corrosion on your water pump:
- Locate the water pump: The water pump is typically located at the front of the engine and is connected to the drive belt. It may be partially hidden behind other components, so you may need to remove any necessary covers to access it.
- Inspect the water pump’s exterior: Carefully examine the water pump’s exterior surface for any visible signs of rust or corrosion. Pay close attention to areas where the metal is exposed, such as the pulley or housing. Rust or corrosion can manifest as discoloration, pitting, or flaking of the metal surface.
- Check for coolant stains: Look for any coolant stains or residue around the water pump. Rust or corrosion can lead to leaks in the pump, causing coolant to escape and leave behind stains or traces of dried coolant.
- Inspect the pump’s gaskets and seals: The gaskets and seals around the water pump are vital for maintaining a proper seal and preventing coolant leakage. Examine these components for any signs of rust, corrosion, or damage. Damaged gaskets or seals can lead to coolant leakage and diminished water pump performance.
If you notice significant rust or corrosion, it is important to address the issue promptly to prevent further damage to your vehicle’s cooling system. Rust or corrosion can weaken the water pump’s structural integrity, leading to potential leaks and decreased efficiency.
Repairing or replacing a water pump with rust or corrosion is best left to a professional mechanic. They have the expertise and tools necessary to perform the necessary repairs or replacements effectively. A mechanic can also inspect other components of the cooling system and address any additional issues that may be present.
Regular maintenance and ensuring the absence of rust or corrosion on your water pump will help extend its lifespan and keep your vehicle’s cooling system in optimal condition.
Read more: How To Know If Thyme Is Bad
Belt Problems
The water pump in your vehicle is typically driven by a belt connected to the engine. If there are issues with the belt, it can impact the performance of the water pump and the entire cooling system. Monitoring and addressing belt problems is important to ensure the proper functioning of your water pump.
Here are some common belt problems that can affect the water pump:
- Squealing noise: If you hear a high-pitched squealing noise coming from the front of your vehicle, it may indicate a loose or worn-out belt. A loose belt can slip, causing the water pump to operate inefficiently. This can lead to decreased coolant circulation, resulting in engine overheating. It is important to address squealing noises promptly to prevent further damage to the belt and water pump.
- Visible wear or damage: Visually inspect the belt connected to the water pump for any signs of wear or damage. Look for cracks, fraying, or glazing on the belt’s surface. A damaged belt may not effectively transfer power to the water pump, affecting its performance. Replace a worn-out or damaged belt as soon as possible to maintain proper coolant circulation.
- Excessive slack: A loose belt can cause issues with the water pump’s operation. Gently press down on the belt midway between two pulleys and check the tension. The belt should have a slight give but should not feel excessively loose. If there is too much slack, the belt may need to be tightened or replaced to ensure efficient water pump operation.
- Misalignment: The belt driving the water pump must be properly aligned with the pulleys. If the belt is misaligned, it can cause tension and friction, leading to premature wear and even belt failure. Inspect the belt and pulleys to ensure they are aligned correctly. Any signs of misalignment should be corrected as soon as possible.
If you notice any of these belt-related problems, it is important to take action to prevent potential water pump failure. Ignoring belt issues can lead to improper coolant circulation, engine overheating, and potential engine damage.
Replacing a worn-out or damaged belt should be done according to the manufacturer’s recommendations. It is advisable to consult a professional mechanic or refer to your vehicle’s service manual for specific instructions on belt replacement. A qualified mechanic can ensure proper installation and tensioning of the new belt, ensuring optimal performance of the water pump.
Regularly inspecting and maintaining the belt connected to the water pump will help ensure the longevity and efficiency of your vehicle’s cooling system.
How to Test a Water Pump
If you suspect that your water pump may be causing issues with your vehicle’s cooling system, performing a few tests can help you determine its functionality. Here are some methods to test your water pump:
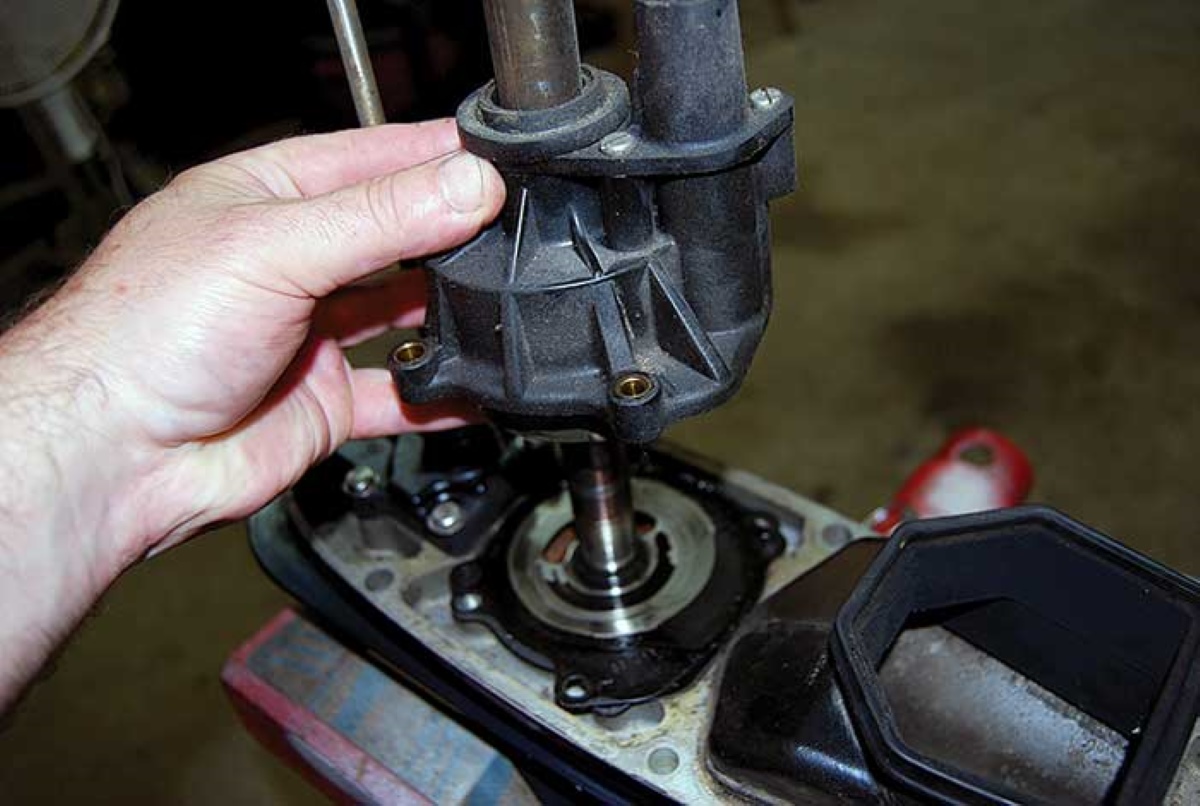
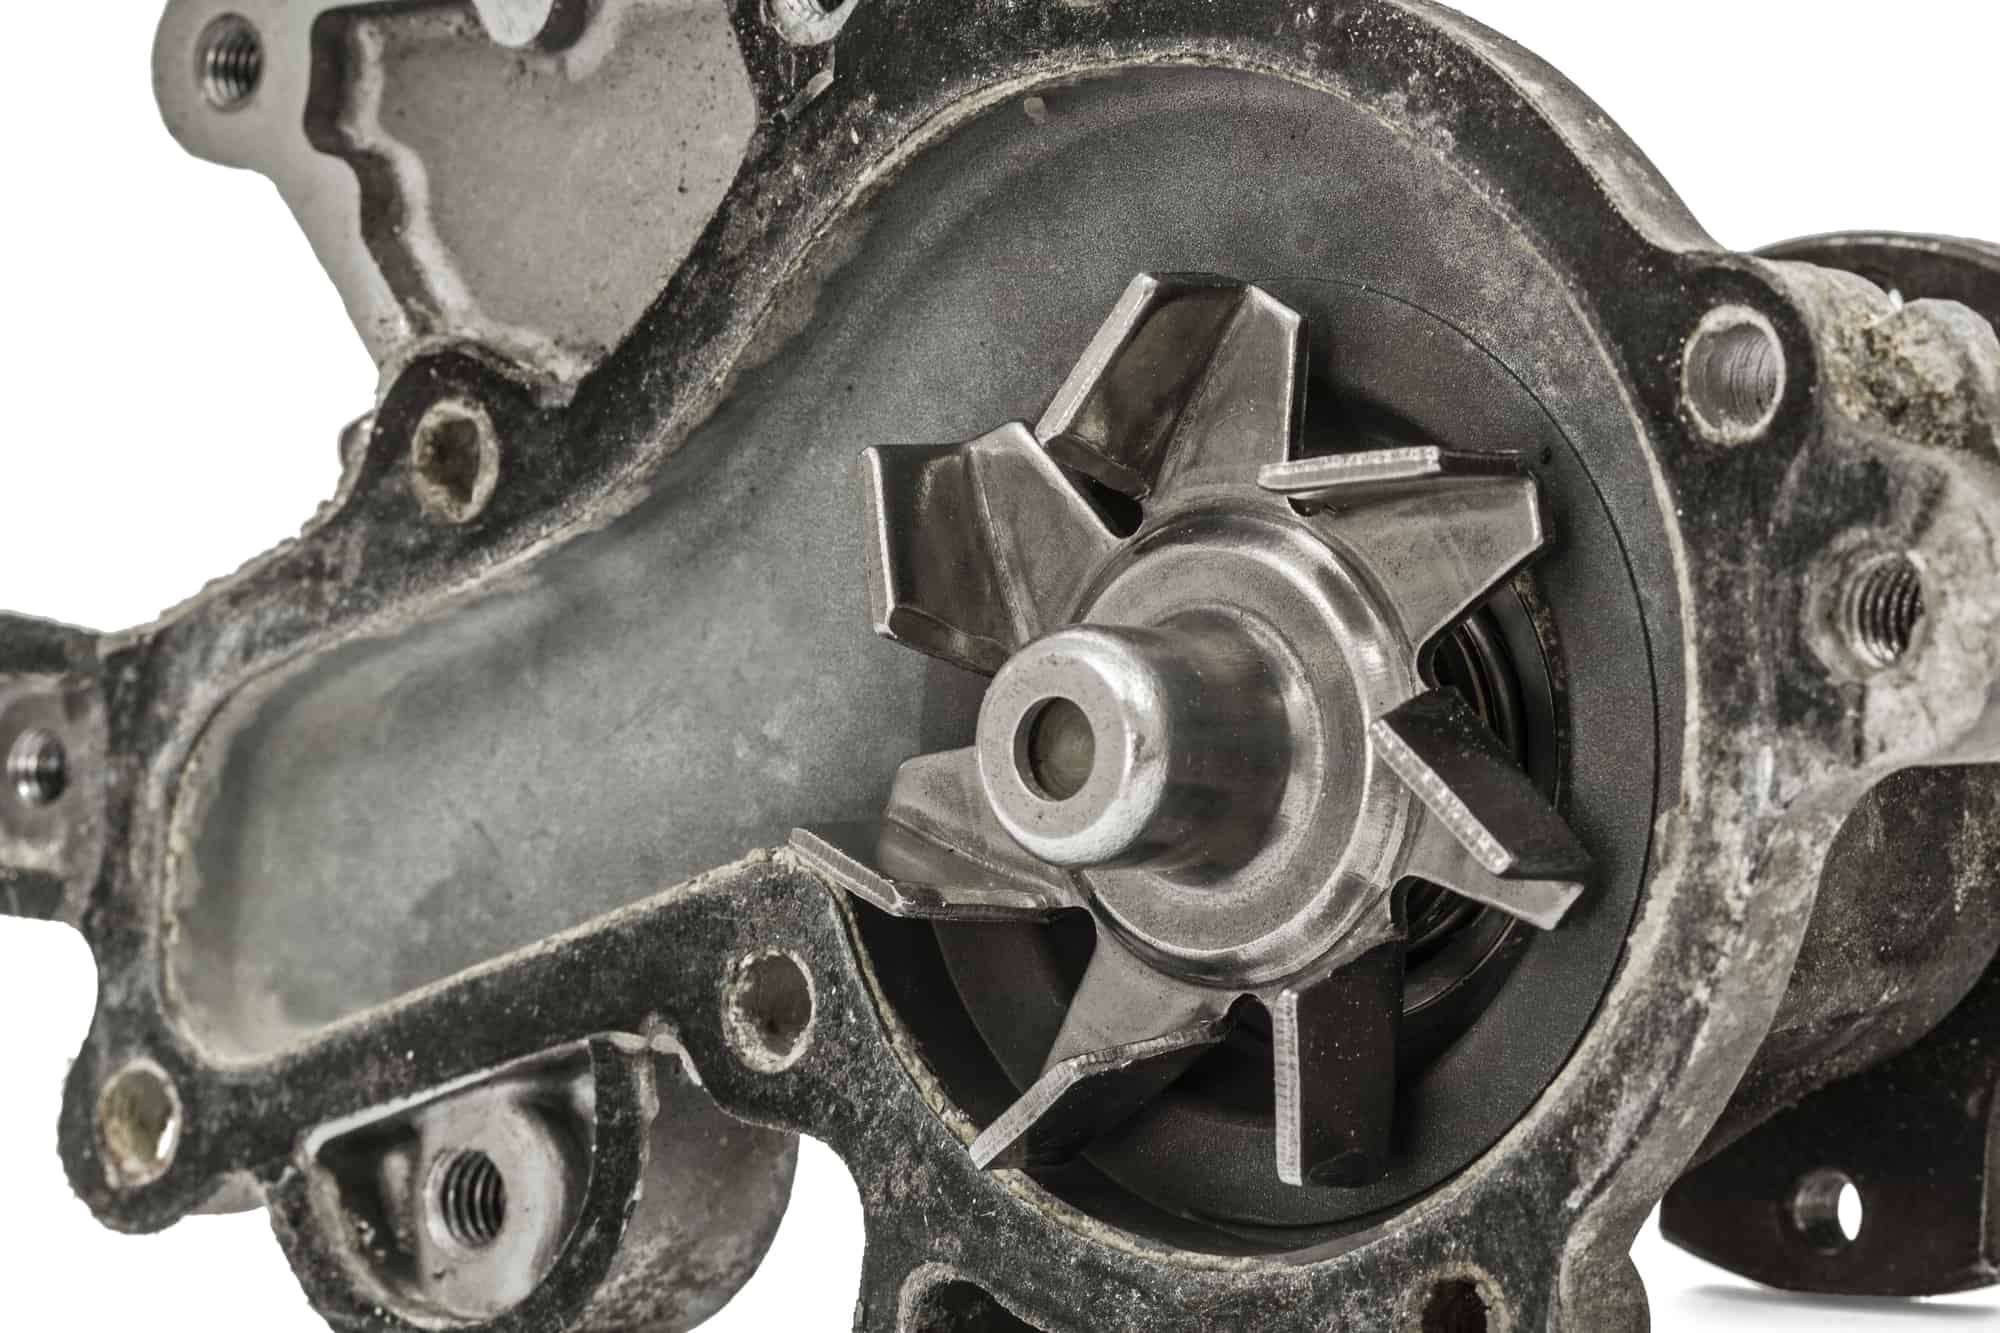
- Visual Inspection: Start by visually inspecting the water pump for any visible signs of leakage, corrosion, or damage. Look for coolant stains around the pump, as well as any cracks or excessive wear on the pump’s housing. Additionally, check the condition of the drive belt and ensure it is properly tensioned and without signs of damage.
- Pressure Test: A pressure test can help identify any leaks in the cooling system, including potential issues with the water pump. To perform a pressure test, a special tool is used to pressurize the system with air or coolant. The pressure gauge will indicate whether there are any leaks or if the pressure drops, indicating a problem with the water pump or another component of the cooling system.
- Coolant System Inspection: Another way to assess the water pump’s functionality is by inspecting the overall coolant system. Start by checking the coolant level in the reservoir and adding more if needed. Next, start the engine and observe the flow of coolant through the radiator. If the water pump is working correctly, you should see a steady flow of coolant. Irregular flow or a lack of flow can indicate a problem with the water pump.
If you don’t have the necessary tools or knowledge to perform these tests, it is best to consult a professional mechanic. They have the expertise and diagnostic equipment to accurately assess the performance of your water pump.
Keep in mind that the tests described above are not foolproof and may not provide definitive evidence of a water pump problem in all situations. However, they can provide valuable insights and help narrow down the potential causes of cooling system issues.
If you suspect that your water pump is not functioning properly, it is important to address the issue promptly. A failing water pump can lead to engine overheating, coolant leaks, and potential damage to your vehicle’s engine.
By performing these tests or seeking the assistance of a professional mechanic, you can determine if the water pump is the cause of the problem and take the necessary steps to repair or replace it, ensuring the proper functioning of your vehicle’s cooling system.
Visual Inspection
Visual inspection is a crucial step in assessing the condition of a water pump and diagnosing any potential issues. By carefully examining the pump and its surrounding components, you can identify visible signs of leakage, damage, or wear.
Here’s how to conduct a visual inspection of your water pump:
- Prepare your vehicle: Ensure that your vehicle is parked on a level surface, turned off, and the engine is cool before beginning the inspection.
- Locate the water pump: The water pump is typically located at the front of the engine, connected to the drive belt. It may be partially obscured by other components, such as the radiator fan or pulleys, so take note of its general position.
- Examine the water pump: Carefully inspect the water pump for any visible signs of coolant leakage, which may appear as wet spots or stains around the pump or on nearby components. Look for cracks, corrosion, or physical damage on the pump’s housing, impeller, and any gaskets or seals. These can indicate a failing water pump.
- Check the drive belt: Pay attention to the condition of the drive belt connected to the water pump. Look for any signs of wear, damage, or excessive slack. A worn-out or loose belt can affect the water pump’s efficiency and performance.
- Inspect hoses and fittings: While inspecting the water pump, also check the condition of the hoses and fittings connected to it. Look for any signs of leakage, cracks, or bulges, as these can contribute to cooling system issues.
During the visual inspection, it is important to note any abnormalities or signs of damage. These can include coolant stains, rust, corrosion, physical wear, or visible leaks. Any of these issues may indicate a problem with the water pump and should be addressed promptly to prevent further damage and potential engine overheating.
If you notice any concerning findings during the visual inspection, it is recommended to consult a professional mechanic. They have the expertise to accurately diagnose and repair any water pump-related problems.
Conducting regular visual inspections of your water pump can help you catch potential issues early on, allowing for timely repairs or replacements. By maintaining a well-functioning water pump, you can ensure the proper circulation of coolant and prevent overheating, contributing to the overall health and performance of your vehicle.
Pressure Test
A pressure test is a valuable method to assess the performance of your vehicle’s cooling system, including the water pump. By pressurizing the system, you can identify any leaks, weak points, or malfunctions that may affect the water pump’s functionality.
Here’s how to perform a pressure test on your cooling system:
- Gather the necessary tools: To conduct a pressure test, you will need a pressure tester kit, which typically includes a pressure pump, a pressure gauge, and various adapters specific to your vehicle.
- Prepare the system: Ensure that your vehicle is turned off and the engine is cool. Remove the radiator cap to release any built-up pressure.
- Attach the pressure tester: Select the appropriate adapter from the pressure tester kit and attach it to the radiator fill neck or coolant reservoir. Make sure it is securely connected.
- Pump the pressure: Use the pressure pump from the tester kit to increase the pressure in the cooling system. Refer to the kit’s instructions for the recommended pressure level, which is typically indicated in pounds per square inch (psi).
- Observe the pressure gauge: Once you have reached the desired pressure, observe the pressure gauge on the tester. The gauge should remain steady without any drop in pressure for a certain period of time. If the pressure drops, it indicates a leak somewhere in the cooling system, potentially including the water pump.
- Inspect for leaks: While the pressure is maintained, visually inspect the water pump, hoses, radiator, and other components for any signs of coolant leakage or spraying. Look for wet spots, stains, or dripping coolant, as these can indicate a problem with the water pump or other areas of the cooling system.
- Release the pressure: After completing the inspection, carefully release the pressure from the cooling system by slowly turning the release valve on the pressure tester.
A pressure test provides valuable information about the overall health of your vehicle’s cooling system, helping you identify potential issues with the water pump. If you notice a significant drop in pressure or detect coolant leakage during the test, it is advisable to consult a professional mechanic. They have the expertise to accurately diagnose any problems and recommend the necessary repairs or replacements.
Note that a pressure test may not pinpoint the exact source of a leak. It is a diagnostic tool to identify areas of concern in the cooling system, guiding further inspection and investigation. Therefore, professional guidance is invaluable in interpreting the pressure test results accurately.
Performing periodic pressure tests on your cooling system, including the water pump, can help ensure its proper functioning, reduce the risk of engine overheating, and extend the lifespan of your vehicle.
Read more: How Long Can You Drive On A Bad Water Pump
Coolant System Inspection
An essential part of testing your vehicle’s water pump is conducting a thorough inspection of the entire coolant system. This inspection allows you to assess the overall functionality of the system and check if the water pump is effectively circulating coolant.
Here are the steps to perform a coolant system inspection:
- Ensure a cooled engine: Make sure your vehicle’s engine has cooled down completely before starting the inspection to prevent burns.
- Locate the coolant reservoir: The coolant reservoir is typically a translucent plastic tank near the radiator. It has “high” and “low” level markings on its side.
- Check the coolant level: Open the coolant reservoir cap and visually inspect the coolant level. It should be between the “high” and “low” marks. If the coolant level is below the designated range, it may indicate a problem with the water pump or another component of the cooling system.
- Inspect the coolant condition: Observe the condition of the coolant in the reservoir. It should appear clean, free from debris, and have a consistent color (usually green, orange, or pink). If the coolant appears dirty, contaminated, or has an unusual color, it may signal the presence of an issue within the cooling system.
- Start the engine and observe coolant flow: With the engine running, observe the coolant flow through the radiator. There should be a steady flow of coolant indicated by visible movement of the coolant within the radiator. If there is no or restricted flow, it may be a sign of a water pump or cooling system problem.
- Check for overheating: While the engine is running, monitor the temperature gauge on the dashboard. Ideally, the needle should remain within the normal range. If the engine begins to overheat or shows signs of rapidly increasing temperature, it suggests insufficient coolant circulation, potentially caused by a malfunctioning water pump.
- Inspect hoses and connections: Examine the hoses connected to the water pump and other components of the cooling system. Inspect them for any signs of leakage, cracks, bulges, or deterioration. Additionally, ensure that all hose connections are secure and free from coolant seepage.
By performing a comprehensive coolant system inspection, you can assess the functioning of the water pump and the overall health of your vehicle’s cooling system. Any irregularities or abnormalities observed during the inspection may indicate a problem with the water pump that requires further attention.
If you notice any concerning findings, such as low coolant levels, dirty coolant, restricted flow, or engine overheating, it is advisable to consult a professional mechanic. They have the expertise to diagnose the issue accurately and recommend the appropriate repairs or replacements, if necessary.
Regular coolant system inspections help ensure the efficient operation of the water pump, promote the longevity of the cooling system, and prevent potential engine damage due to overheating.
Conclusion
Recognizing the signs of a failing water pump is essential for maintaining the health of your vehicle’s cooling system and preventing potential engine damage. By identifying these signs early on, you can address any issues promptly and ensure the proper circulation of coolant throughout the engine.
In this article, we discussed several common signs of a bad water pump, including engine overheating, coolant leakage, noisy pump, low coolant levels, engine misfire, steam under the hood, rust or corrosion, and belt problems. We also explored how to test a water pump through visual inspection, pressure tests, and coolant system inspections.
If you suspect that your water pump is faulty based on these signs, it is important to consult a professional mechanic. They have the expertise and diagnostic equipment to accurately diagnose the issue and perform the necessary repairs or replacements.
Regular maintenance of your vehicle’s cooling system, including periodic inspections of the water pump, is crucial in ensuring its optimal performance and preventing costly repairs. Remember to check coolant levels regularly, address any coolant leaks promptly, and follow the manufacturer’s recommendations for coolant replacement intervals.
By maintaining a well-functioning water pump, you can prevent engine overheating, maintain proper engine temperature, and prolong the lifespan of your vehicle’s cooling system. Timely action and regular maintenance will help keep your vehicle running smoothly and avoid potential breakdowns on the road.
In conclusion, being aware of the signs of a bad water pump and taking proactive measures to address any issues will assist you in maintaining a reliable and efficient cooling system in your vehicle.
Frequently Asked Questions about How To Know If A Water Pump Is Bad
Was this page helpful?
At Storables.com, we guarantee accurate and reliable information. Our content, validated by Expert Board Contributors, is crafted following stringent Editorial Policies. We're committed to providing you with well-researched, expert-backed insights for all your informational needs.


0 thoughts on “How To Know If A Water Pump Is Bad”