Articles
How To Drain Dishwasher Manually
Modified: August 31, 2024
Learn how to manually drain your dishwasher in this informative article. Follow these simple steps to troubleshoot and fix common draining issues.
(Many of the links in this article redirect to a specific reviewed product. Your purchase of these products through affiliate links helps to generate commission for Storables.com, at no extra cost. Learn more)
Introduction
Welcome to this guide on how to drain your dishwasher manually. Having a functional dishwasher is a convenience that many of us rely on for our daily routines. However, there may be situations where you need to manually drain the dishwasher to resolve drainage issues or perform maintenance tasks. Whether you are experiencing a clogged drain or simply want to give your dishwasher a thorough cleaning, draining it manually can help restore its proper functionality.
In this article, we will walk you through the steps to manually drain your dishwasher. We will cover the tools and materials you will need, as well as the necessary preparation before starting the process. Additionally, we will guide you through disconnecting the dishwasher, removing excess water, accessing and removing the drain hose, draining the dishwasher manually, reconnecting the dishwasher, and testing the drainage system afterwards.
By following these steps, you can successfully drain your dishwasher and ensure that it is working efficiently. So, without further ado, let’s get started on this DIY project!
Key Takeaways:
- Regularly draining your dishwasher manually is crucial for preventing clogs, eliminating odors, and maintaining its longevity. Follow the steps outlined to ensure a safe and successful drainage process.
- Prioritize safety, disconnect power and water supply, and consult your owner’s manual for specific instructions. Incorporate manual draining into your maintenance routine for a well-functioning dishwasher.
Read more: How To Drain A Washing Machine Manually
Why and When Should You Drain Your Dishwasher?
Draining your dishwasher manually is a task that may be necessary for a variety of reasons. Over time, debris, food particles, and mineral deposits can accumulate in the dishwasher’s drain, leading to clogs and poor drainage. Draining your dishwasher manually can help remove these obstructions and prevent further issues.
Here are some situations in which you may need to drain your dishwasher:
1. Clogged Drain:
If you notice standing water in the bottom of your dishwasher after a cycle, it’s likely that there is a clog in the drain. This can prevent the dishwasher from draining properly and can lead to unpleasant odors and the growth of bacteria. Draining the dishwasher manually can help clear the clog and restore proper drainage.
2. Maintenance and Cleaning:
Regular maintenance and cleaning are essential for keeping your dishwasher in good condition. By draining it manually, you can remove any accumulated debris and prevent potential blockages. This will not only improve the performance of your dishwasher but also enhance the longevity of its components.
3. Moving or Storing the Dishwasher:
If you are planning to move or store your dishwasher, it’s important to drain it beforehand. This will prevent any residual water from causing damage or leaking during transportation or storage. Draining the dishwasher is a necessary step to ensure its safety and proper functioning in its new location.
Read more: How To Connect A Dishwasher Drain
4. Troubleshooting:
If you are experiencing issues with your dishwasher, such as poor drainage, strange noises, or a foul smell, manually draining it can be a helpful troubleshooting step. This process allows you to inspect the drain system and identify any potential problems that may require repair or replacement.
Overall, draining your dishwasher manually is a proactive measure to maintain its efficiency, prevent clogs, and address any drainage issues that may arise. It is recommended to incorporate this task into your regular maintenance routine to keep your dishwasher in optimal condition.
Tools and Materials Needed
Before you begin draining your dishwasher manually, gather the following tools and materials:
1. Towels or Rags:
You will need towels or rags to soak up any excess water that may spill during the process. These will also come in handy for cleaning up any spills or drips as you work.
2. Bucket or Large Container:
Prepare a bucket or a large container to collect the water draining from your dishwasher. This will prevent any mess or water damage in your kitchen or surrounding area.
Read more: How To Drain Ge Dishwasher
3. Screwdriver or Adjustable Wrench:
Depending on the type of dishwasher, you may need a screwdriver or adjustable wrench to disconnect the dishwasher from its power source and plumbing connections. This will allow you to access the drain hose and remove any excess water.
4. Pliers:
If your dishwasher has hose clamps securing the drain hose, you will need a pair of pliers to loosen and remove them. Pliers can also be helpful for disconnecting any other connections during the process.
5. Drain Hose Extension (if needed):
In some cases, your dishwasher’s drain hose may not be long enough to reach the bucket or container. To overcome this, you may need a drain hose extension. Ensure that it is compatible with your dishwasher model.
6. Cleaning Solution:
It is recommended to have a gentle cleaning solution or dishwasher cleaner on hand to clean the dishwasher’s interior, especially if you are performing maintenance or troubleshooting tasks.
By having these tools and materials readily available, you will be equipped to effectively drain your dishwasher manually and complete the process smoothly.
Read more: How To Drain A Bosch Dishwasher
Step 1: Preparation
Before you begin draining your dishwasher manually, it’s important to take some necessary preparations. This will ensure a smooth and hassle-free process. Follow these steps to prepare:
1. Safety First:
Always prioritize safety when working on any home appliance. Start by disconnecting the power supply to the dishwasher. Locate the circuit breaker or switch that controls the dishwasher and turn it off. This will prevent any electrical accidents during the draining process.
2. Clear the Area:
Make sure the area around the dishwasher is clear and free of any obstacles. Remove any items or objects that may impede your access to the dishwasher, including nearby dishes or utensils.
3. Read the Owner’s Manual:
Refer to your dishwasher’s owner’s manual for specific instructions and guidelines. This will provide you with valuable information on your dishwasher’s particular setup and any precautions to take while draining it manually.
Read more: Where Is The Dishwasher Drain
4. Prepare the Towels and Bucket:
Place towels or rags on the floor in front of the dishwasher to absorb any water that may spill during the draining process. Position a bucket or a large container nearby to collect the water draining from the dishwasher.
5. Put on Protective Gloves:
Protect your hands by wearing a pair of rubber gloves. This will prevent any skin irritation from cleaning solutions or standing water.
6. Gather the Tools and Materials:
Ensure you have all the necessary tools and materials listed in the previous section. Having them within reach will enable you to work efficiently and without interruptions.
Once you have completed these preparations, you are ready to move on to the next step of manually draining your dishwasher. Stay tuned for the detailed instructions on how to disconnect the dishwasher and remove excess water.
Step 2: Disconnecting the Dishwasher
Now that you have made the necessary preparations, it’s time to disconnect your dishwasher from its power source and plumbing connections. Follow these steps to safely disconnect the dishwasher:
Read more: How To Drain A Samsung Dishwasher
1. Turn Off the Water Supply:
Locate the shut-off valve that supplies water to the dishwasher and turn it clockwise to shut off the water flow. This will prevent any leaks or water damage during the draining process.
2. Disconnect the Power:
Locate the circuit breaker or switch that controls the dishwasher and turn it off. This will ensure your safety by preventing electrical accidents as you work on the dishwasher.
3. Access the Rear of the Dishwasher:
Move the dishwasher away from the wall, allowing access to the back of the appliance. Be cautious not to damage any flooring or surfaces as you move the dishwasher.
4. Remove the Lower Access Panel (if applicable):
Some dishwashers have a lower access panel at the front, secured with screws. Use a screwdriver to remove the screws and take off the panel. This will give you better visibility and easier access to the dishwasher’s components.
Read more: How To Unclog Dishwasher Drain
5. Disconnect the Drain Hose:
The drain hose is usually located at the rear of the dishwasher and is connected to the plumbing system. Use pliers to loosen and remove any hose clamps securing the drain hose. Once loose, gently detach the drain hose from the plumbing system, allowing it to hang freely.
6. Disconnect the Water Supply Line (if applicable):
If your dishwasher is connected to a water supply line, disconnect it using an adjustable wrench. Loosen the nut that connects the water supply line to the dishwasher and carefully detach it. Be prepared to catch any residual water that may spill out.
7. Remove the Power Cord (if applicable):
If your dishwasher is plugged into a power outlet, unplug the power cord from the outlet. Carefully coil the power cord and secure it away from any water or moving parts to prevent damage.
By following these steps, you have successfully disconnected your dishwasher, allowing you to proceed with removing excess water in the next step. Stay tuned for detailed instructions on how to remove the accumulated water from your dishwasher.
Step 3: Removing Excess Water
Now that the dishwasher is disconnected, it’s time to remove excess water from the appliance. This step is crucial to ensure a proper draining process and prevent any spills or leaks. Follow these steps to remove the accumulated water:
Read more: Why Is My Whirlpool Dishwasher Not Draining
1. Soak up Standing Water:
Using towels or rags, soak up any standing water in the dishwasher’s interior. Start by wiping the bottom of the dishwasher and work your way up the sides. Be thorough in absorbing as much water as possible.
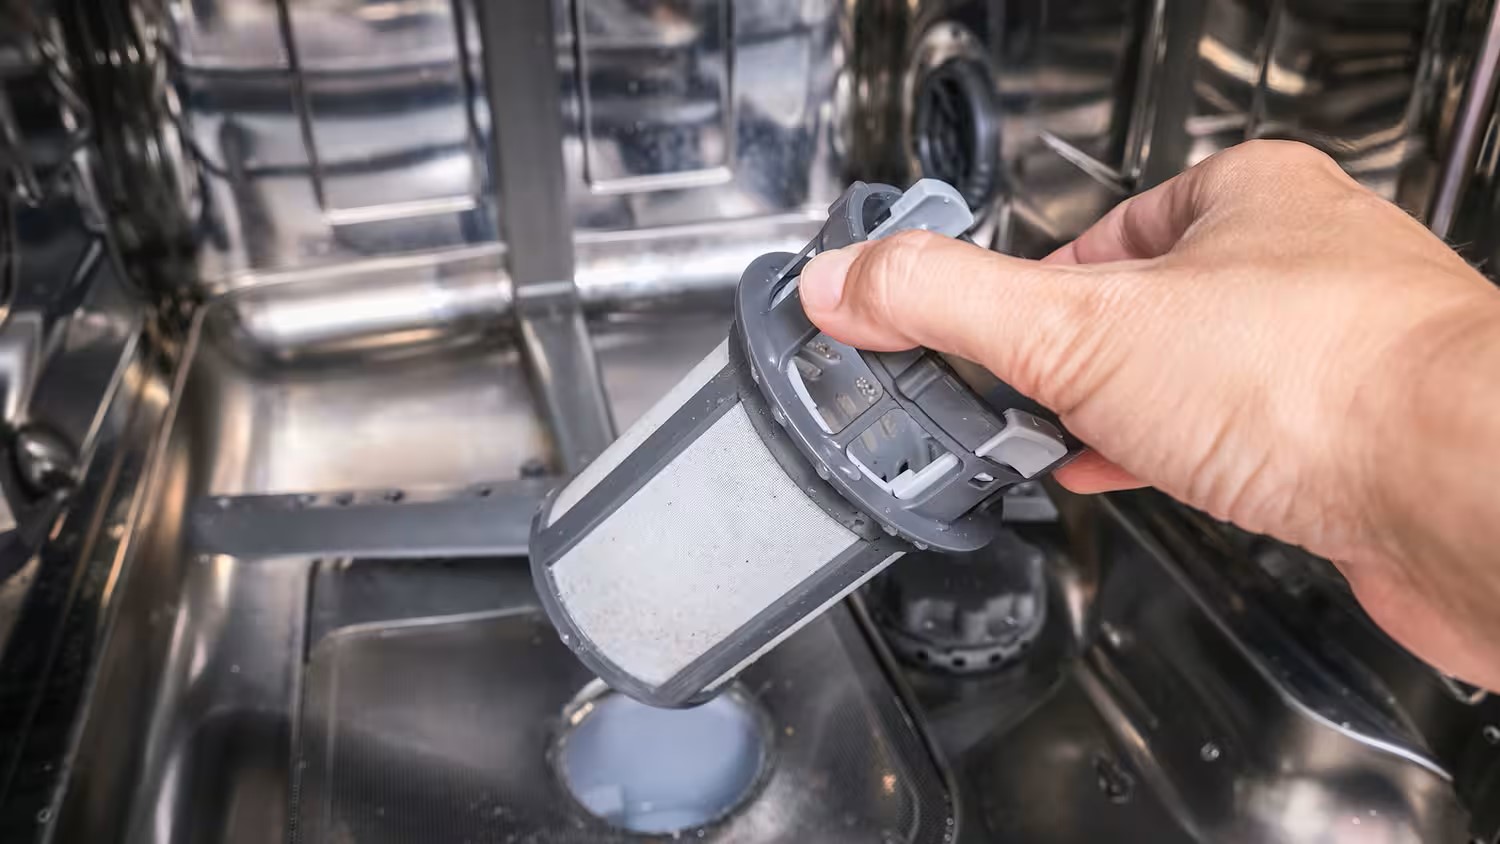
2. Empty the Filter and Drain Basket:
If your dishwasher has a removable filter and drain basket, remove them and empty any water or debris they may contain. Rinse them with clean water to remove any residue.
3. Check for Water in the Sump:
Inspect the sump, which is located at the bottom of the dishwasher’s interior. If you notice any water in the sump, carefully scoop it out using a cup or a small container. Be cautious not to spill the water outside the dishwasher.
4. Clean and Dry the Dishwasher Interior:
Using a mild cleaning solution or dishwasher cleaner, wipe down the interior of the dishwasher to remove any remaining residue or buildup. Pay close attention to the drain area and remove any debris or blockages.
Read more: How To Clean Dishwasher Drain Hose
5. Allow the Dishwasher to Air Dry:
Before proceeding with the next steps, allow the dishwasher’s interior to air dry for a few minutes. This will ensure any residual moisture evaporates, reducing the risk of future odors or mold growth.
By following these steps, you have successfully removed excess water from your dishwasher. Now, you can proceed to access and remove the drain hose in the next step. Stay tuned!
Step 4: Accessing the Drain Hose
Now that you have removed excess water from your dishwasher, the next step is to access the drain hose. The drain hose is responsible for carrying the wastewater out of the dishwasher. Follow these steps to access the drain hose:
1. Locate the Drain Hose:
Take a look at the back of your dishwasher and locate the drain hose. It is usually a flexible tube made of rubber or plastic, connected to the bottom of the dishwasher and leading to the plumbing system.
2. Remove the Lower Access Panel (if applicable):
If your dishwasher has a lower access panel, remove it using a screwdriver. This will provide you with better visibility and accessibility to the drain hose.
3. Position the Dishwasher:
If necessary, carefully slide the dishwasher forward to create enough space to access the back of the appliance. Be mindful of any flooring or countertop materials to avoid damage.
4. Inspect the Drain Hose:
Examine the drain hose for any cracks, kinks, or blockages. Ensure that it is properly connected to the dishwasher’s drain outlet and the plumbing system. If you notice any issues, such as a damaged or disconnected drain hose, it may need to be repaired or replaced.
5. Check for Clamps:
Observe if there are any hose clamps securing the drain hose to the dishwasher or the plumbing system. These clamps may need to be loosened or removed to allow you to disconnect the drain hose.
By following these steps, you have successfully accessed the drain hose of your dishwasher. In the next step, we will guide you on how to remove the drain hose and begin the manual draining process. Stay tuned!
Step 5: Removing the Drain Hose
Now that you have accessed the drain hose of your dishwasher, it’s time to remove it. Removing the drain hose will allow you to manually drain the dishwasher and address any clogs or obstructions. Follow these steps to remove the drain hose:
Read also: 13 Amazing Dishwasher Drain Pan for 2025
1. Loosen Hose Clamps (if applicable):
If there are hose clamps securing the drain hose to the dishwasher or the plumbing system, use pliers to loosen them. Rotate the clamps counterclockwise to release their grip on the drain hose. This will allow you to disconnect the drain hose more easily.
2. Disconnect the Drain Hose from the Dishwasher:
Gently pull the drain hose away from the dishwasher’s drain outlet. If there is any water remaining in the hose, prepare to catch it in a bucket or container to prevent spills. Wiggle the hose if needed to loosen it from the connection point.
3. Disconnect the Drain Hose from the Plumbing System:
Once the drain hose is disconnected from the dishwasher, trace it to its connection point with the plumbing system. Carefully detach the drain hose from the plumbing connection, ensuring that any remaining water flows into your bucket or container.
4. Inspect the Drain Hose:
Upon removing the drain hose, inspect it for any signs of damage or blockage. Look for cracks, kinks, or debris that may be hindering proper drainage. If necessary, clean the drain hose or replace it with a new one to ensure proper functioning.
Read more: How To Organize Manuals
5. Set Aside the Drain Hose:
Once removed, set aside the drain hose in a safe place. Keep it away from any water or cleaning solutions to prevent contamination or damage.
By following these steps, you have successfully removed the drain hose from your dishwasher. In the next step, we will guide you on how to manually drain the dishwasher using alternative methods. Stay tuned!
Step 6: Draining the Dishwasher Manually
Now that you have removed the drain hose, it’s time to manually drain the dishwasher. There are several methods you can use to achieve this. Follow these steps to drain your dishwasher manually:
1. Gravity Drain Method:
The gravity drain method is the simplest way to manually drain your dishwasher. Place the disconnected end of the drain hose into a bucket or a large container positioned lower than the dishwasher. The force of gravity will allow the water to naturally flow out of the dishwasher and into the bucket. Keep an eye on the bucket and empty it as needed until the dishwasher is drained completely.
2. Siphoning Method:
If you don’t have a bucket or container to collect the water, you can use the siphoning method. Fill the disconnected end of the drain hose with water, then quickly place it in a sink or drain. Create a seal around the hose with your hand to form a suction. As the water drains from the hose, it will continue to siphon out the water from the dishwasher. Monitor the process and adjust the hose as necessary to ensure continuous drainage.
Read more: How To Store Manuals
3. Wet Vacuum Method:
If you have access to a wet vacuum, you can use it to remove water from the dishwasher. Simply attach the vacuum hose to the disconnected end of the drain hose and create a tight seal. Turn on the vacuum and let it suction out the water from the dishwasher. Empty the vacuum as needed until the dishwasher is fully drained.
4. Towel Absorption Method:
If there is a small amount of water left in the dishwasher, you can use towels or rags to absorb it. Place the towels or rags in the bottom of the dishwasher and let them soak up the water. Wring out the towels or rags into a bucket or sink. Repeat this process until the dishwasher is empty.
Choose the method that is most convenient for you and suits the resources available. Whichever method you choose, ensure the water is properly drained to prevent any further issues.
Now that the dishwasher is emptied, you can move on to the next step of reconnecting the dishwasher in order to restore its functionality. Stay tuned!
Step 7: Reconnecting the Dishwasher
Now that you have successfully drained your dishwasher, it’s time to reconnect it and restore its functionality. Follow these steps to reconnect the dishwasher:
1. Inspect the Drain Hose:
Before reconnecting the drain hose, take a moment to inspect it for any damage or blockages. Ensure there are no cracks, kinks, or debris that may hinder proper drainage. If needed, clean the drain hose or replace it with a new one.
Read more: How To Use A Manual Juicer
2. Reconnect the Drain Hose to the Plumbing System:
Carefully reattach the end of the drain hose to the plumbing connection. Ensure it is securely connected to prevent any leaks or water damage. If applicable, tighten the hose clamp to secure the drain hose in place.
3. Reconnect the Drain Hose to the Dishwasher:
Insert the end of the drain hose into the dishwasher’s drain outlet. Push it in until it fits snugly and securely. If there are hose clamps, secure them tightly to prevent any leaks or disconnections.
4. Reconnect the Water Supply Line (if applicable):
If your dishwasher is connected to a water supply line, carefully reconnect it to the dishwasher. Use an adjustable wrench to tighten the nut and ensure a secure connection. Turn on the water supply to restore water flow to the dishwasher.
5. Position the Dishwasher:
If you moved the dishwasher to access the back, carefully slide it back into its original position. Ensure that it is aligned properly and level with the surrounding surfaces. Take caution not to damage any flooring or countertops during the process.
Read more: How To Manually Flush A Toilet
6. Reinstall the Lower Access Panel (if applicable):
If your dishwasher has a lower access panel, securely attach it using the appropriate screws. This will provide a finished look and protect the inner components of the dishwasher.
7. Restore Power:
Turn on the circuit breaker or switch that controls the dishwasher to restore power. This will allow the dishwasher to be operational and ready for use.
By following these steps, you have successfully reconnected your dishwasher. In the next step, we will guide you on testing the drainage system to ensure that it is functioning properly. Stay tuned!
Step 8: Testing the Drainage System
After reconnecting your dishwasher, it is important to test the drainage system to ensure that it is functioning properly. Follow these steps to test the drainage system:
1. Close the Dishwasher:
Make sure the dishwasher door is securely closed. This will allow the dishwasher to initiate a cycle and test the drainage system.
Read more: How To Lock A Garage Door Manually
2. Start a Test Cycle:
Refer to your dishwasher’s user manual for instructions on how to start a test cycle. Some dishwashers have specific buttons or settings for running a diagnostic cycle. Follow the instructions to initiate the test cycle.
3. Observe the Drainage:
During the test cycle, pay close attention to the drainage process. Ensure that the water is being effectively drained from the dishwasher and is flowing out through the drain hose. There should be no signs of standing water or slow drainage.
4. Monitor for Abnormal Odors or Noises:
As the dishwasher drains, monitor for any abnormal odors or noises. Foul odors may suggest lingering debris or buildup in the drain system, while strange noises could indicate a clog or mechanical issue. If you notice anything unusual, further inspection or maintenance may be required.
5. Check for Leaks:
While the dishwasher is running the test cycle, check for any signs of leaks or water pooling around the dishwasher or underneath it. Ensure that all connections are secure and tight, and there are no drips or water seepage.
Read more: How To Lock A Garage Door Manually
6. Complete the Test Cycle:
Allow the test cycle to run its full course. Once the cycle is complete, inspect the dishwasher for any remaining water or debris. If everything looks in order, the drainage system is functioning properly.
7. Run a Normal Cycle:
To further confirm the effectiveness of the drainage system, run a normal dishwasher cycle with dirty dishes. This will provide a real-world test and ensure that the dishwasher is operating optimally.
By following these steps and conducting a thorough test, you can verify that the drainage system of your dishwasher is in proper working condition. If any issues persist or you encounter concerns, it may be necessary to seek professional assistance or perform additional maintenance steps as recommended by the manufacturer.
With a functioning and properly drained dishwasher, you can now enjoy the convenience and efficiency it provides during your daily routines. Congratulations on successfully completing the manual draining process!
Conclusion
Manually draining your dishwasher is a straightforward process that can be incredibly helpful in resolving drainage issues and maintaining the appliance’s proper functionality. By following the steps outlined in this guide, you have learned how to effectively drain your dishwasher, from the necessary preparation to reconnecting the appliance and testing the drainage system.
Regularly draining your dishwasher and ensuring proper drainage is essential for preventing clogs, eliminating unpleasant odors, and maintaining the longevity of your appliance. By removing excess water and debris, you can prevent potential damage and keep your dishwasher running smoothly.
Remember to prioritize safety, disconnect the power and water supply before working on your dishwasher, and wear protective gloves when handling any cleaning solutions or water. Taking necessary precautions will ensure a safe and successful drainage process.
Additionally, don’t forget to consult your dishwasher’s owner’s manual for specific instructions and guidelines tailored to your appliance. Every dishwasher may have unique features, and it’s essential to follow manufacturer recommendations for optimal performance.
By manually draining your dishwasher, you have taken a proactive step in maintaining the functionality and cleanliness of your appliance. Incorporate this process into your regular maintenance routine to prevent future drainage issues and enjoy the convenience of a well-functioning dishwasher.
We hope this guide has provided you with the knowledge and confidence to drain your dishwasher manually. Remember, if you ever encounter complex issues or concerns, it is always recommended to consult a professional for assistance.
Thank you for following this guide, and we wish you all the best in your dishwasher maintenance endeavors!
Now that you've tackled manually draining your dishwasher, why stop there? Keeping your home in top shape involves regular upkeep. Dive into our next guide on essential home maintenance to keep your space running smoothly and efficiently. From seasonal tasks to simple fixes, this article demystifies the basics of maintaining every corner of your residence. Don't let minor issues become major headaches—stay one step ahead with proactive home care.
Frequently Asked Questions about How To Drain Dishwasher Manually
Was this page helpful?
At Storables.com, we guarantee accurate and reliable information. Our content, validated by Expert Board Contributors, is crafted following stringent Editorial Policies. We're committed to providing you with well-researched, expert-backed insights for all your informational needs.
0 thoughts on “How To Drain Dishwasher Manually”