Articles
How To Drain Gutters Into Ground
Modified: December 7, 2023
Learn how to efficiently drain gutters into the ground with these informative articles. Discover the best techniques for diverting rainwater away from your home.
(Many of the links in this article redirect to a specific reviewed product. Your purchase of these products through affiliate links helps to generate commission for Storables.com, at no extra cost. Learn more)
Introduction
When it comes to maintaining a functional and well-maintained home, proper gutter drainage is crucial. Gutters play a vital role in directing rainwater away from your property, preventing damage to the foundation, landscaping, and even the structural integrity of your home. While many homeowners opt for traditional gutter downspouts that empty into a designated area, such as a driveway or yard, draining gutters into the ground can offer a more efficient and aesthetically pleasing solution. In this article, we will delve into the process of how to drain gutters into the ground, providing you with a practical guide to follow.
Draining gutters into the ground offers several advantages. Firstly, it helps to eliminate the unsightly sight of downspouts discharging water onto your property and potentially causing erosion. By directing the water underground, you can maintain the beauty of your landscaping and protect delicate plants and flower beds from being washed away. Secondly, it helps to distribute the water more evenly, reducing the risk of pooling and flooding in certain areas.
Before embarking on the process of draining gutters into the ground, it’s essential to gather the necessary tools and materials. You will need a shovel or trenching tool, a drainage pipe, gutter downspout extension elbows, fasteners, and sealant. It’s always a good idea to measure and assess your specific needs before purchasing these materials to ensure a smooth installation process. Taking the time to plan and gather the right equipment will help you complete the project efficiently and effectively.
Now that we understand the advantages and have the necessary tools and materials, let’s dive into the step-by-step guide for draining gutters into the ground. Following these instructions will enable you to successfully redirect rainwater away from your home and protect your property from potential water damage.
Key Takeaways:
- Draining gutters into the ground offers benefits such as improved aesthetics, soil erosion prevention, and enhanced drainage efficiency. It’s a practical and effective solution for managing rainwater runoff and protecting your property.
- Proper installation, testing, and maintenance are crucial for a successful gutter drainage system. Choosing the right tools, determining the best drainage location, and regular inspections will ensure optimal water redirection and property protection.
Read more: How To Clean Out Gutters From The Ground
Why Drain Gutters into the Ground?
Draining gutters into the ground offers several benefits that make it a favorable option for homeowners. Let’s explore some of the reasons why you should consider this method for redirecting rainwater from your gutters.
1. Aesthetics: One of the main reasons to drain gutters into the ground is the improved aesthetics it provides. Traditional gutter downspouts can be unsightly and disrupt the visual appeal of your home’s exterior. By burying the drainage pipe underground, you can maintain a clean and seamless appearance. This is especially important if you have a well-designed landscape or if your home’s exterior is a focal point.
2. Soil Erosion Prevention: When rainwater is discharged directly onto your lawn or landscaping, it can lead to soil erosion. Over time, this erosion can negatively impact the stability of your property’s foundation and compromise the health of your plants. By redirecting the water underground, you can minimize the erosion and protect your landscaping investment.
3. Damage Prevention: Properly draining gutters into the ground helps to prevent water damage to your home. When rainwater is allowed to pool near the foundation, it increases the risk of water seeping into the basement or crawl space. Over time, this can lead to mold growth, rot, and structural damage. By effectively directing the water away from your home, you can safeguard your property against these potential issues.
4. Improved Drainage Efficiency: Draining gutters into the ground helps distribute the water more evenly across your property. Traditional downspouts can create concentrated water flow, resulting in pooling and flooding in certain areas. By channeling the water underground, you can disperse it over a larger surface area, reducing the likelihood of localized water accumulation.
5. Flexibility and Versatility: Another advantage of draining gutters into the ground is the flexibility it offers in terms of customization. Depending on your specific needs, you can adjust the route of the drainage pipe and the number of outlets. This adaptability allows you to tailor the drainage system to suit the layout and landscape of your property.
Overall, draining gutters into the ground provides a more visually appealing, effective, and environmentally-friendly method of managing rainwater runoff. By taking advantage of this technique, you can protect your property, enhance its curb appeal, and contribute to a healthier and more sustainable outdoor environment.
Tools and Materials Needed
Before you begin the process of draining gutters into the ground, it’s important to gather the necessary tools and materials. Here’s a comprehensive list of what you’ll need:
Tools:
- Shovel or trenching tool: You will need a shovel or trenching tool to dig the trench for the drainage pipe.
- Tape measure: Use a tape measure to accurately measure the distance and determine the length of the drainage pipe.
- Hacksaw or pipe cutter: You’ll need a hacksaw or pipe cutter to cut the drainage pipe to the desired length.
- Screwdriver or drill: Depending on the type of fasteners you choose, you’ll need a screwdriver or drill to secure the drainage pipe and downspout extension elbows.
- Level: A level will help you ensure that the drainage pipe is properly sloped for efficient water flow.
- Caulking gun: A caulking gun will be necessary to apply sealant for watertight connections.
Materials:
- Drainage pipe: Choose a durable and corrosion-resistant drainage pipe that is suitable for burying underground. PVC pipes are commonly used for this purpose, but you can also opt for alternatives such as aluminum or HDPE (high-density polyethylene) pipes.
- Gutter downspout extension elbows: These components will attach to your gutter downspouts and connect them to the drainage pipe. They typically come in various shapes and sizes, so choose the ones that best suit your specific gutter system.
- Fasteners: Depending on the type of downspout extension elbows you choose, you’ll need appropriate fasteners to secure them to the gutter downspouts and the drainage pipe.
- Sealant: Use a waterproof sealant to ensure watertight connections between the downspout extension elbows and the drainage pipe.
- Gravel or stone: This material is optional but can be used to cover the drainage pipe in the trench to provide additional support and stability.
Make sure to check with your local hardware store or home improvement center for specific brands, sizes, and quantities of the tools and materials listed above. It’s essential to choose high-quality materials that will withstand weather conditions and provide long-lasting drainage solutions for your gutters.
Now that you have all the necessary tools and materials, let’s move on to the step-by-step guide for draining gutters into the ground.
Read more: Where Do Gutters Drain To
Step-by-Step Guide
Now that you have gathered all the necessary tools and materials, it’s time to begin the process of draining gutters into the ground. Follow these step-by-step instructions to ensure a successful installation:
1. Determine the Best Drainage Location:
Take the time to assess your property and determine the best location to drain the gutters. Look for areas away from your home’s foundation where the water can flow freely without causing any damage. It’s important to consider the slope of your yard and ensure that the drainage location allows for efficient water flow.
2. Digging the Trench:
Using a shovel or trenching tool, dig a trench from your downspout location to the determined drainage location. The trench should have a gradual slope to encourage proper water drainage. A general rule of thumb is to maintain a slope of 1/8 inch per foot. The depth of the trench should be enough to accommodate the drainage pipe and allow for proper burial.
3. Install the Drainage Pipe:
Place the drainage pipe into the trench, ensuring it follows the slope and reaches the drainage location. If needed, cut the pipe to the desired length using a hacksaw or pipe cutter. Make sure to leave enough pipe exposed at the downspout end to attach the downspout extension elbow.
Read more: How Far Away From House Should Gutters Drain
4. Attach the Gutter Downspout:
Connect the downspout extension elbow to the bottom of the downspout. Secure it using the appropriate fasteners, such as screws or rivets, based on the design of your gutter system. Ensure a tight and secure connection to prevent any leaks.
5. Test and Adjust the Flow:
Once the drainage pipe and downspout are securely attached, turn on your garden hose and direct the water into the gutter. Observe the flow of water to ensure that it is effectively draining into the underground pipe and reaching the desired drainage location. Use a level to confirm that the pipe maintains the proper slope for efficient water flow. Make any necessary adjustments to the slope or positioning of the pipe as needed.
It’s important to note that the above steps provide a general guideline for draining gutters into the ground. The specific installation process may vary depending on the design of your gutter system and the materials you choose to use. Consult manufacturer instructions or seek professional advice if needed.
Congratulations! You have successfully completed the installation of draining gutters into the ground. This efficient system will help protect your property from water damage and keep your landscape looking its best. Remember to periodically inspect and maintain the drainage system to ensure its continued effectiveness.
Determine the Best Drainage Location
The first step in draining gutters into the ground is to determine the best location for the drainage. Choosing the right drainage location is crucial for effective water flow and preventing any potential damage to your property. Here are some considerations to keep in mind when determining the drainage location:
Away from the Foundation:
Ensure that the drainage location is at a sufficient distance from your home’s foundation. This helps prevent any water from seeping into your basement or crawl space, which can lead to structural damage and mold growth. The general rule of thumb is to keep the drainage location at least 5 to 10 feet away from the foundation.
Read more: How To Drain An Above Ground Swimming Pool
Slope and Grading:
Take into account the slope and grading of your property when selecting the drainage location. Water naturally flows downhill, so choose an area that allows for proper water flow without any obstructions. Ideally, the drainage location should be positioned to take advantage of the natural slope of your yard.
Away from Landscaping:
Consider the impact of water flow on your landscaping. Avoid directing the water towards delicate plants, flower beds, or other landscaping features that may be susceptible to damage. Instead, choose a location that allows water to flow away from these areas, preserving the beauty of your landscape.
Avoid Low-Lying Areas:
Avoid drainage locations that are in low-lying areas prone to pooling or flooding. You want to ensure that the water is efficiently directed away from your property to prevent any potential water damage. Choose an area where the water can flow freely and easily without accumulating and causing any issues.
Local Regulations and Considerations:
Check with your local authorities for any regulations or guidelines regarding drainage systems. Some areas may have specific rules regarding where and how you can drain your gutters. It’s important to comply with these regulations to avoid any potential legal issues.
Once you have assessed these factors, mark the determined drainage location for further reference. This will help guide the installation process and ensure that the drainage pipe is properly positioned to effectively divert water away from your home.
Note that the drainage location may vary depending on the layout and specific requirements of your property. It’s always a good practice to consult with professionals, such as landscapers or drainage specialists, who can provide expert advice tailored to your unique situation.
By carefully considering the above factors, you can determine the best drainage location for diverting the water from your gutters into the ground. This strategic decision will play a key role in the overall effectiveness of your gutter drainage system and help protect your home from potential water damage.
Digging the Trench
Once you have determined the best drainage location for your gutter system, the next step is to dig a trench that will accommodate the drainage pipe. The trench serves as a pathway for the water to flow from the downspout to the desired drainage location. Here’s a step-by-step guide on how to dig the trench:
1. Mark the Trench Path:
Use stakes and string to mark the pathway of the trench from the downspout location to the determined drainage location. This will help guide you in digging a straight and precise trench. Make sure to avoid any obstacles such as underground utilities or tree roots.
2. Determine the Trench Depth and Width:
The depth and width of the trench will depend on the size of your drainage pipe and the slope required for proper water flow. As a general guideline, the trench should be deep enough to bury the entire drainage pipe and allow for a slight slope. A depth of around 10 to 12 inches is commonly recommended. The width of the trench should be wide enough for comfortable access and working space.
3. Start Digging:
Using a shovel or trenching tool, begin digging the trench along the marked pathway. Start from the downspout location and work your way towards the drainage location. Take care to create a straight and even trench, ensuring that it follows the desired slope for efficient water flow. It may be helpful to periodically check the slope using a level to ensure accuracy.
Read more: How To Fix Leaky Gutters
4. Remove Excavated Soil:
As you dig the trench, place the excavated soil onto a tarp or wheelbarrow for easy removal. This will help keep your work area neat and minimize the amount of clean-up required later. If you have plans for landscaping or gardening, you can also consider repurposing the soil for those purposes.
5. Smooth the Trench Bottom:
After digging the trench to the desired depth, use the shovel or trenching tool to smooth the bottom of the trench. This will help ensure a stable and even surface for laying the drainage pipe. Remove any rocks, debris, or large chunks of soil that may obstruct the proper placement of the pipe.
6. Check the Trench Slope:
Once the trench is dug, use a level to check the slope of the trench. The recommended slope is typically around 1/8 inch per foot. This gradual slope allows the water to flow naturally and efficiently along the trench towards the drainage location. Adjust the trench if necessary to achieve the desired slope.
As you dig the trench, it’s important to work carefully and pay attention to safety precautions. Avoid rushing the process and take breaks as needed to prevent fatigue or injury. Be mindful of your surroundings and any potential hazards.
By following these steps, you can successfully dig the trench for your drainage pipe. The trench serves as a crucial component of the gutter drainage system, guiding the water underground and towards the designated drainage location.
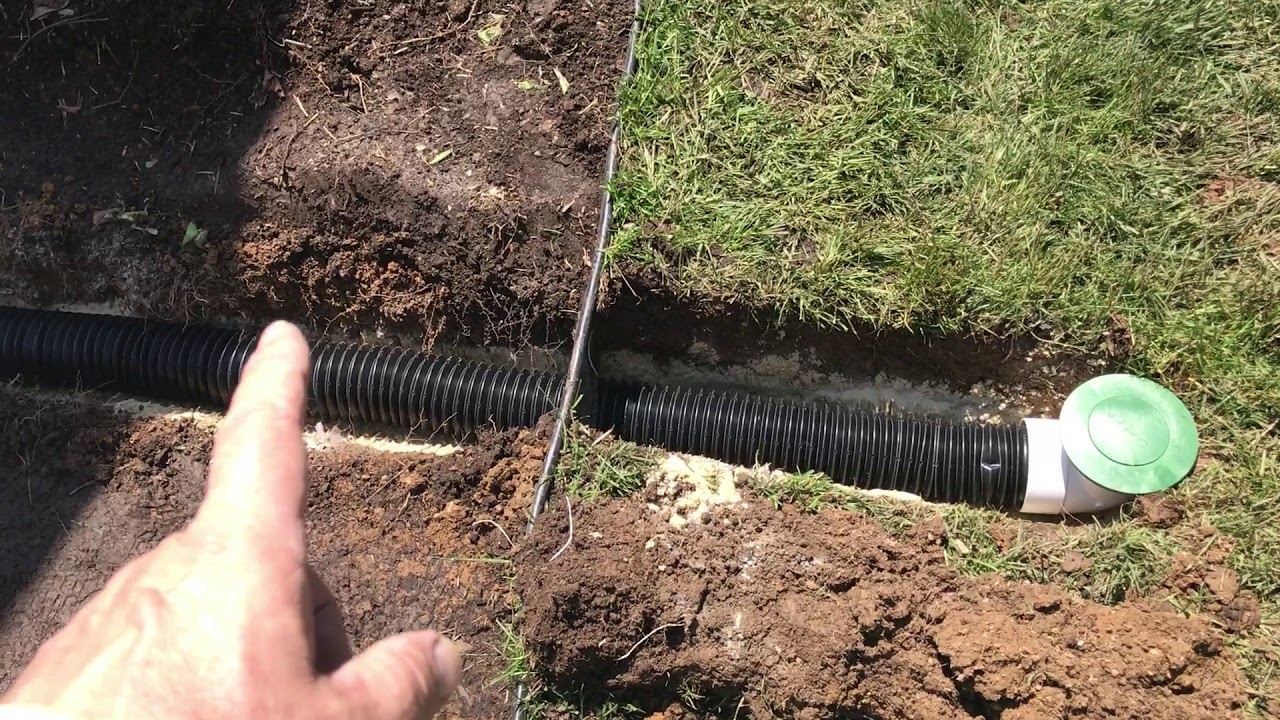
Install the Drainage Pipe
With the trench dug and prepared, it’s time to install the drainage pipe for your gutter system. The drainage pipe will serve as the conduit for redirecting water from the downspout to the desired drainage location. Here’s a step-by-step guide on how to install the drainage pipe:
Read more: How To Pitch Gutters
1. Select the Right Type of Pipe:
Choose a suitable drainage pipe that is designed for underground burial. PVC pipes are a popular choice due to their durability and resistance to corrosion, but you can also consider alternatives such as aluminum or HDPE (high-density polyethylene) pipes. Ensure that the pipe has a diameter that matches or exceeds the size of your downspouts.
2. Cut the Pipe to the Desired Length:
Measure the distance from the downspout location to the drainage location and cut the drainage pipe to the appropriate length using a hacksaw or pipe cutter. Remember to account for any necessary additional length to properly attach the downspout extension elbow and ensure a secure connection with the downspout.
3. Place the Pipe in the Trench:
Carefully place the drainage pipe into the trench, ensuring that it follows the desired slope for efficient water flow. Position the pipe so that it extends from the downspout location to the drainage location, with a slight downward slope to facilitate water drainage. Make sure that the pipe is aligned with the trench and centered so that it is fully supported.
4. Connect Multiple Sections (if necessary):
If your drainage pipe requires multiple sections to cover the entire distance, connect them using appropriate connectors or coupling fittings. Secure the connections according to the manufacturer’s instructions, ensuring that they are tight and watertight to prevent any leaks.
Read more: How Do Gutters Work
5. Use Supports or Anchors:
If needed, use supports or anchors to secure the drainage pipe at regular intervals along its length. This will help prevent sagging or shifting of the pipe over time. Choose supports that are designed for underground use and attach them securely to the pipe and the sides of the trench.
6. Test for Proper Alignment and Flow:
Before backfilling the trench, perform a test to ensure that the drainage pipe is properly aligned and has proper water flow. Run water through the downspout and monitor how it flows through the drainage pipe. Observe any potential blockages or areas where water might pool. Make any necessary adjustments to the pipe’s position or slope to ensure optimal water flow.
7. Consider Adding Gravel or Stone (Optional):
As an optional step, you can add a layer of gravel or stone along the top of the drainage pipe in the trench before backfilling. This provides additional support and stability to the pipe, and helps with water filtration as well. Make sure the layer of gravel or stone is even and does not obstruct water flow.
By following these steps, you can successfully install the drainage pipe for draining gutters into the ground. This component plays a crucial role in directing water away from your home and preventing potential water damage. With the drainage pipe properly installed, you are one step closer to achieving an efficient and effective gutter drainage system.
Attach the Gutter Downspout
Once you have installed the drainage pipe in the trench, the next step is to attach the gutter downspout to the pipe. The downspout will serve as the connection point between the gutter system and the underground drainage system. Here’s a step-by-step guide on how to attach the gutter downspout:
Read more: How Far Should Gutters Extend Past The Roof
1. Choose the Right Downspout Extension Elbow:
Select the appropriate downspout extension elbow that matches the size and style of your gutter system. These extension elbows come in various shapes and sizes to accommodate different types of downspouts, so choose the ones that best fit your specific system.
2. Position the Downspout Extension Elbow:
Position the downspout extension elbow at the bottom of the existing gutter downspout where it meets the ground. Ensure that the extension elbow aligns with the direction of the drainage pipe in the trench. The elbow should angle downwards, pointing towards the opening of the drainage pipe.
3. Secure the Downspout Extension Elbow:
Depending on the design of your downspout extension elbow, use the appropriate fasteners to secure it to the downspout. This may involve using screws, rivets, or other fastening methods. Follow the manufacturer’s instructions to ensure a secure and tight connection.
4. Attach the Downspout to the Drainage Pipe:
Once the extension elbow is securely attached to the downspout, connect the other end of the elbow to the opening of the drainage pipe. Depending on the specific type of connection, you may need to use additional fasteners or fittings to ensure a watertight seal. Apply sealant around the joint to prevent any potential leaks.
Read more: How To Put Up Gutters On A House
5. Secure and Test the Connection:
Check the connection between the downspout extension elbow and the drainage pipe to ensure it is secure and free from any gaps or leaks. Make any necessary adjustments or tighten the fasteners as needed. Once the connection is secure, run water through the gutter system to test the flow and verify that water is effectively directed into the drainage pipe.
6. Consider Adding Extensions (if necessary):
Depending on the location and layout of your drainage system, you may need to add additional extensions to the downspout to ensure that the water reaches the desired drainage location. These extensions can be attached using similar fastening methods and should be positioned to continue the downward flow of water towards the drainage pipe.
7. Trim and Conceal the Downspout (Optional):
If desired, you can trim the downspout and conceal it for a more visually appealing look. Use appropriate tools and techniques to cut the downspout to the desired length and consider installing downspout covers or decorative elements to make it blend seamlessly with your home’s exterior.
By following these steps, you can successfully attach the gutter downspout to the drainage pipe, completing the connection between your gutter system and the underground drainage system. This ensures that rainwater is effectively channeled away from your home and into the designated drainage location, reducing the risk of water damage and maintaining the overall functionality of your gutter drainage system.
Test and Adjust the Flow
After attaching the gutter downspout to the drainage pipe, it’s essential to test the flow of water and make any necessary adjustments to ensure optimal drainage. Testing the system will help you verify that the water is effectively directed into the underground pipe and reaching the desired drainage location. Here are the steps to test and adjust the flow:
Read more: How To Clear Clogged Gutters
1. Turn on the Water Source:
Turn on your garden hose or a nearby outdoor faucet to supply water to the gutter system. Start with a moderate water flow to simulate typical rain conditions. It’s important to avoid using excessive water pressure, as it may not accurately represent normal rain intensity.
2. Observe the Water Flow:
Watch the flow of water as it exits the downspout and enters the drainage pipe. Ensure that the water is being properly channeled into the pipe and flowing smoothly. Look for any signs of water leakage or blockages along the way.
3. Monitor the Drainage Location:
Check the drainage location to see if the water is being efficiently directed away from your home. Look for any pooling or areas where water is not properly dispersing. The goal is to prevent any accumulation of water near your foundation or landscaping.
4. Adjust the Slope (if necessary):
If you notice any issues with water flow or pooling, it may be necessary to adjust the slope of the drainage pipe. Use a level to ensure that the pipe maintains a gradual slope of approximately 1/8 inch per foot. Adjust the position of the pipe in the trench as needed to correct the slope and promote better water flow.
Read more: How To Attach Gutters Together
5. Check for Blockages:
If you encounter any blockages or restrictions in the water flow, inspect the drainage pipe for debris or obstructions. Use a plumber’s snake, water jetter, or other appropriate tools to clear away any blockages and ensure that water can flow freely through the pipe.
6. Reassess and Repeat the Test:
After making any adjustments or addressing any issues, repeat the flow test to verify that the changes have resolved any problems. Watch the water flow and observe the drainage location to ensure that the system is functioning correctly.
7. Regular Maintenance:
Remember that regular maintenance is vital for the optimal performance of your gutter drainage system. Clear away any leaves, sticks, or debris that may accumulate in the gutters or downspouts. Inspect the drainage pipe periodically for any signs of damage or clogs. A well-maintained system will ensure efficient water flow and minimize the risk of issues.
By testing and adjusting the flow of water through your gutter drainage system, you can ensure its effectiveness and reduce the risk of water damage to your property. Regular inspections and maintenance will help keep the system functioning optimally, allowing you to enjoy a well-drained and protected home.
Conclusion
Draining gutters into the ground provides a practical and effective solution for managing rainwater runoff. By redirecting the water away from your home and landscaping, you can prevent potential damage, maintain the aesthetic appeal of your property, and enhance the overall functionality of your gutter system.
Throughout this article, we have explored the step-by-step process of draining gutters into the ground. We started by understanding the benefits of this method, including improved aesthetics, prevention of soil erosion, and enhanced drainage efficiency. We then discussed the essential tools and materials needed for the installation, ensuring that you are equipped with everything necessary to complete the project successfully.
In the step-by-step guide, we outlined the key stages of the installation process, from determining the best drainage location and digging the trench to installing the drainage pipe and attaching the gutter downspout. We also emphasized the importance of testing the flow and making any necessary adjustments to ensure optimal water redirection.
It’s essential to note that while the instructions provided offer a general guideline, the specifics of the installation may vary based on your unique circumstances. Consulting with professionals or seeking advice from local authorities can help ensure compliance with regulations and address any specific challenges related to your property.
Regular maintenance and inspections are crucial in preserving the functionality of your gutter drainage system. Clearing any debris, checking for blockages, and addressing any issues promptly will help maintain proper water flow and prevent potential damage.
In conclusion, draining gutters into the ground is an effective way to manage rainwater runoff, protect your home, and maintain the beauty of your property. By following the steps outlined in this guide and staying proactive with system maintenance, you can enjoy a well-functioning gutter drainage system that effectively directs water away from your home, promoting its longevity and sustainability.
Read more: How To Keep Gutters Clean
Frequently Asked Questions
1. Can I drain my gutters into the ground?
Yes, you can drain your gutters into the ground. It involves installing a drainage pipe that redirects the water from the downspouts underground to a designated drainage location. This method offers several benefits, including improved aesthetics, prevention of soil erosion, and enhanced drainage efficiency.
2. What tools and materials do I need for draining gutters into the ground?
To drain your gutters into the ground, you will need tools such as a shovel or trenching tool, tape measure, hacksaw or pipe cutter, screwdriver or drill, level, and caulking gun. Additionally, you will need materials such as drainage pipe, gutter downspout extension elbows, fasteners, sealant, and optional gravel or stone for additional support.
3. How do I determine the best drainage location?
The best drainage location is typically away from your home’s foundation, at least 5 to 10 feet. Consider the slope and grading of your yard, avoiding low-lying areas prone to pooling or flooding. Also, ensure that the drainage location is away from delicate landscaping features. Local regulations and guidelines may also influence the choice of drainage location.
Read more: How Are Gutters Attached To House
4. How deep should the trench be for the drainage pipe?
The trench for the drainage pipe should be deep enough to accommodate the entire pipe and allow for a slight slope. A depth of around 10 to 12 inches is generally recommended. The width of the trench should provide enough space for comfortably working and ensuring proper pipe placement.
5. Can I customize the route of the drainage pipe?
Yes, you can customize the route of the drainage pipe to suit your specific needs and property layout. This flexibility allows you to redirect the water away from sensitive areas and optimize the flow towards the desired drainage location. Adjustments may be made during the installation process as needed.
6. Do I need to test the flow of water after installation?
Yes, it is important to test the flow of water after installation to ensure the system is functioning properly. Run water through the downspout and observe if the water is effectively channeled into the drainage pipe and reaching the desired drainage location. Test for any blockages and adjust the slope if necessary for optimal flow.
7. How often should I maintain my gutter drainage system?
Regular maintenance is important to keep your gutter drainage system functioning optimally. Clear away leaves, debris, and check for any blockages regularly. Inspect the system for any signs of damage or leaks. It is recommended to perform maintenance at least twice a year or more frequently if you live in an area with heavy rainfall or high debris accumulation.
If you have further questions or concerns about draining gutters into the ground, consult with professionals or seek advice from experts in this field.
Read more: How To Stop Dripping Sound In Gutters
Additional Tips and Considerations
As you embark on draining your gutters into the ground, here are some additional tips and considerations to keep in mind:
1. Choose the Right Size of Drainage Pipe:
Select a drainage pipe with the appropriate diameter to handle the expected volume of water from your gutters. This will ensure efficient water flow and minimize the risk of any blockages within the pipe.
2. Consider Using Perforated Pipe:
If your property experiences heavy rainfall or you have issues with water pooling, consider using perforated drainage pipe. The small perforations allow water to seep out along the length of the pipe, evenly distributing it into the surrounding soil.
3. Extend the Downspouts Away from the Foundation:
Regardless of whether you choose to drain your gutters into the ground or use traditional downspouts, it’s important to ensure that the downspouts extend far enough away from your home’s foundation. Redirecting the water at least 5 to 10 feet away will help prevent any potential water damage to the foundation.
Read more: How To Install Gutters On A Metal Building
4. Regularly Clean and Maintain Your Gutters:
To ensure proper water flow, regularly clean your gutters and remove any debris that may accumulate, such as leaves, twigs, and other debris. Clogged gutters can hinder water flow and cause overflow issues, so regular maintenance is essential for optimal gutter performance.
5. Consider Adding a Filter or Gutter Guard:
To further prevent debris from clogging your gutters and drainage system, consider installing a filter or gutter guard. These additions can help keep leaves and other debris out of your gutters while allowing the water to flow freely.
6. Monitor the Drainage System During Heavy Rainfall:
During periods of heavy rainfall, regularly monitor your gutter drainage system to ensure it can handle the volume of water. Look for any signs of overflow or pooling and make any necessary adjustments or improvements to prevent water damage.
7. Consult with Professionals if Needed:
If you are unsure about any aspect of draining your gutters into the ground or encounter challenges specific to your property, it’s always advisable to seek professional advice. Drainage specialists, landscapers, or gutter installation professionals can provide guidance and expertise to ensure a successful installation.
By following these additional tips and considering important factors, you can ensure the efficient functioning of your gutter drainage system and protect your property from potential water damage. Regular maintenance and periodic monitoring will help keep your system in excellent condition for years to come.
Read more: How To Install Gutters On A Metal Building
References
Here are some references to further explore and deepen your understanding of draining gutters into the ground:
1. Smith, Ruth. “The Benefits of Underground Gutter Drainage.” HGTV, https://www.hgtv.com/outdoors/landscaping-and-hardscaping/the-benefits-of-underground-gutter-drainage
2. “How to Bury a Gutter Downspout.” This Old House, https://www.thisoldhouse.com/gutters/21018445/how-to-bury-a-gutter-downspout
3. “Install an In-Ground Drainage System.” Lowe’s, https://www.lowes.com/n/how-to/install-an-in-ground-drainage-system
4. Lynch, Dale. “Underground PVC Gutter Drain Pipe Installation.” Home Guides, https://homeguides.sfgate.com/underground-pvc-gutter-drain-pipe-installation-85138.html
5. “How to Install a Downspout Drain Line.” Family Handyman, https://www.familyhandyman.com/article/how-to-install-a-downspout-drain-line/
6. “Common Gutter Problems and Solutions.” GutterSupply, https://www.guttersupply.com/t-common_gutter_problems_and_solutions.aspx
7. “10 Gutter and Downspout Runoff Drainage Tips.” Ask the Builder, https://www.askthebuilder.com/10-gutter-and-downspout-runoff-drainage-tips/
These resources provide valuable insights, detailed instructions, and expert advice on various aspects of draining gutters into the ground. Consulting these references will help you gain a comprehensive understanding of the installation process and ensure successful implementation of the system for optimal water management and protection of your property.
Frequently Asked Questions about How To Drain Gutters Into Ground
Was this page helpful?
At Storables.com, we guarantee accurate and reliable information. Our content, validated by Expert Board Contributors, is crafted following stringent Editorial Policies. We're committed to providing you with well-researched, expert-backed insights for all your informational needs.
0 thoughts on “How To Drain Gutters Into Ground”