Articles
How To Install A 240-Volt Receptacle
Modified: August 27, 2024
Learn how to install a 240-volt receptacle with our comprehensive articles. Follow our step-by-step guides to ensure a safe and efficient installation.
(Many of the links in this article redirect to a specific reviewed product. Your purchase of these products through affiliate links helps to generate commission for Storables.com, at no extra cost. Learn more)
Introduction
Welcome to our guide on how to install a 240-volt receptacle. Whether you want to power a heavy-duty appliance, electric vehicle charger, or other high-powered device, a 240-volt receptacle is the solution you need. This type of receptacle provides double the voltage of a standard 120-volt outlet, making it capable of handling more demanding electrical loads.
Before we dive into the installation process, it’s essential to emphasize the importance of safety. Working with electricity can be hazardous, so always ensure that the power is turned off before starting any electrical work. If you’re not confident in your abilities, it’s best to consult a licensed electrician.
In this article, we’ll guide you through the step-by-step process of installing a 240-volt receptacle. We’ll cover the tools and materials you’ll need, precautions to take, and detailed instructions on how to complete the installation safely and efficiently.
By the end of this guide, you’ll have the knowledge and confidence to install a 240-volt receptacle on your own, saving both time and money. So, let’s get started on this electrifying project!
Key Takeaways:
- Safety first! Always turn off the power supply and use a voltage tester before working on electrical installations. Prioritize safety to avoid potential hazards and ensure a successful 240-volt receptacle installation.
- From gathering tools to testing the connection, follow the step-by-step guide for a safe and effective installation. Enjoy the benefits of increased electrical capacity with your newly installed 240-volt receptacle!
Read more: How To Install Outdoor Receptacle
Step 1: Gather the necessary tools and materials
Before you begin the installation process, it’s important to gather all the necessary tools and materials. Having everything on hand will make the process smoother and more efficient. Here’s a list of what you’ll need:
- 240-volt receptacle
- Wire cutters/strippers
- Flathead screwdriver
- Phillips screwdriver
- Voltage tester
- Wire connectors
- Electrical tape
- Electrical box
- Circuit breaker
- Wire (size depends on the specific requirements)
Once you have gathered all the necessary tools and materials, you are ready to proceed to the next steps.
Step 2: Turn off the power supply
Safety should always be your top priority when working with electricity. Before you begin any electrical work, it’s crucial to turn off the power supply to ensure that you don’t get electrocuted. Here’s how you can turn off the power:
- Locate your main electrical panel or circuit breaker box. This is usually located in a utility room, basement, or garage.
- Open the panel door and identify the circuit breaker that controls the area where you will be installing the 240-volt receptacle.
- Flip the circuit breaker switch to the “off” position. You can also use a voltage tester to double-check that the power is indeed turned off.
- If you’re uncertain which breaker corresponds to the area, you can turn off the main breaker for added safety. Keep in mind that this will cut power to your entire home, so proceed with caution.
Once you have successfully turned off the power supply, it’s important to double-check that there is no electricity flowing to the area where you will be working. You can use a voltage tester to ensure that the circuit is de-energized, providing an additional layer of safety.
Remember, never attempt to work on electrical installations without first turning off the power supply. Neglecting this step can lead to severe injuries or even death. Safety should always come first!
Step 3: Remove the existing electrical outlet (if applicable)
If there is an existing electrical outlet in the location where you plan to install the 240-volt receptacle, you’ll need to remove it before proceeding. Follow these steps to safely remove the old outlet:
- Start by turning off the power supply to the outlet. This can be done by switching off the corresponding circuit breaker in the electrical panel.
- Use a voltage tester to double-check that the power is indeed turned off.
- Once you’ve confirmed that the power is off, remove the cover plate from the electrical outlet using a flathead screwdriver. Carefully unscrew the screws holding the cover plate in place and set it aside.
- Next, remove the screws that secure the outlet to the electrical box using a Phillips screwdriver.
- Gently pull the outlet out of the box, being careful not to damage the wires or surrounding connections. Take note of how the wires are connected to the outlet.
- Loosen the screws holding the wires in place on the outlet and disconnect them. Be sure to label each wire with tape or use a marker to indicate its corresponding position.
With the old outlet removed, you’re now ready to move on to the next step—preparing the wires for the installation of the 240-volt receptacle.
If you do not have an existing electrical outlet in the location, you can skip this step and proceed directly to Step 4.
Step 4: Prepare the wires
Now that the existing electrical outlet has been removed or if you are working in a new installation, it’s time to prepare the wires for connecting to the 240-volt receptacle. Here’s how to proceed:
- Begin by identifying the electrical wires coming into the electrical box. You should have three wires: a black (hot) wire, a white (neutral) wire, and a green or copper (ground) wire.
- Using wire cutters/strippers, remove approximately ¾ inch of insulation from the ends of each wire.
- Check the wiring instructions for your specific 240-volt receptacle. It will typically require connecting the black wire to one of the brass-colored screws, the white wire to the silver-colored screw, and the green or copper wire to the green screw (ground).
- Twist the exposed end of the black wire clockwise and insert it into the hole of the appropriate brass-colored screw. Tighten the screw to secure the wire in place.
- Repeat this process for the white wire, attaching it to the silver-colored screw, and the green or copper wire, attaching it to the green screw.
- Double-check that all the wire connections are secure and tight. Loose connections can lead to poor electrical conductivity and potential hazards.
- If your receptacle requires additional connections or special wiring instructions, follow the manufacturer’s guidelines carefully.
Once the wires are prepared and connected to the appropriate screws on the 240-volt receptacle, you’re ready to move on to the next step—connecting the receptacle to the electrical box.
When installing a 240-volt receptacle, make sure to turn off the power at the breaker box before beginning any work to ensure safety.
Read also: 13 Best Dryer Receptacle For 2025
Step 5: Connect the wires to the receptacle
With the wires prepared and the 240-volt receptacle ready, it’s time to connect the wires to the receptacle. Follow these steps to ensure a secure and proper connection:
- Locate the screws on the backside of the receptacle. These screws are typically labeled “Brass” for the black (hot) wire, “Silver” for the white (neutral) wire, and “Green” for the green or copper (ground) wire.
- Take the black wire that you previously connected to the brass-colored screw and wrap it clockwise around the corresponding screw on the receptacle. Use a Phillips screwdriver to tighten the screw and secure the black wire in place.
- Repeat the process with the white wire, wrapping it clockwise around the silver-colored screw and tightening the screw to secure it.
- Finally, take the green or copper wire and wrap it clockwise around the green screw. Tighten the screw to ensure a proper connection.
- Double-check that all the wire connections are secure and tight. Ensure that no bare wire is exposed and there are no loose or frayed ends.
By following these steps, you have successfully connected the wires to the 240-volt receptacle. The next step involves securely mounting the receptacle to the wall or electrical box.
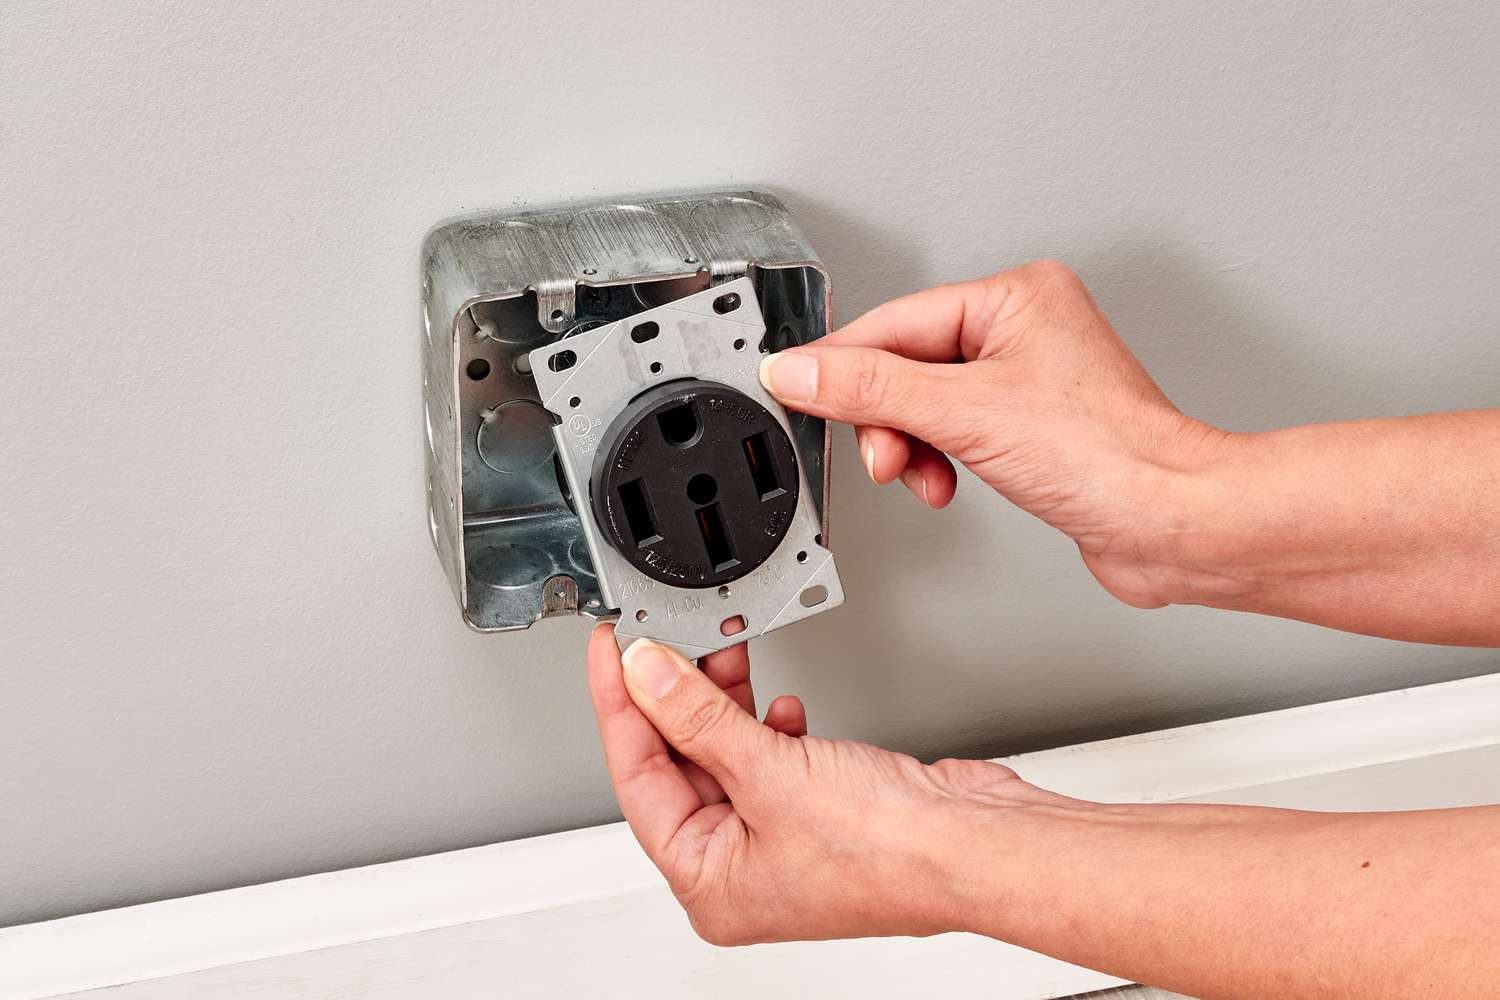
Step 6: Secure the receptacle to the wall
After connecting the wires to the 240-volt receptacle, it’s time to secure the receptacle to the wall or electrical box. Proper mounting ensures stability and safety. Follow these steps to securely mount the receptacle:
- Hold the receptacle against the wall or electrical box, aligning the screw holes on the receptacle with those on the wall or box.
- Using a screwdriver, insert the screws provided with the receptacle through the screw holes and into the wall or box.
- Tighten the screws until the receptacle is secure and firmly attached to the surface.
- Inspect the receptacle to ensure that it is level and flush against the wall or box.
It’s important to note that some receptacles may require additional steps or specific mounting techniques. Always refer to the manufacturer’s instructions for any variations in the installation process.
Once the 240-volt receptacle is securely mounted, you’re ready to proceed to the next step — testing the connection.
Step 7: Test the connection
Before restoring power to the circuit, it’s crucial to test the connection to ensure everything is functioning correctly. Follow these steps to test the 240-volt receptacle connection:
- Double-check that all wire connections are secure and properly attached to the receptacle.
- Ensure that there are no exposed wires or loose connections.
- Turn on the power supply to the circuit by flipping the corresponding circuit breaker switch in the main electrical panel.
- Using a voltage tester, carefully test each of the outlets on the 240-volt receptacle.
- The voltage tester should indicate the presence of power, confirming that the receptacle is properly connected and functioning.
If the voltage tester does not indicate power in any of the outlets, turn off the power again and recheck the wiring connections. Make sure all wires are properly connected to the correct screws on the receptacle.
If you are unsure about the testing process or are not getting the expected results, it’s best to consult a licensed electrician to avoid any potential electrical hazards.
Once you have confirmed that the connection is valid and there is power flowing to the receptacle, you can proceed to the final step.
Step 8: Restore the power supply
Now that you have tested the 240-volt receptacle and confirmed that the connection is working properly, you can proceed to restore the power supply. Follow these steps to restore power:
- Double-check that all wire connections are secure and in the correct position on the receptacle.
- If the circuit breaker corresponding to the receptacle is still in the “off” position, flip it to the “on” position.
- Monitor the receptacle and surrounding area for any signs of overheating or abnormal behavior once the power is restored.
- Check that the receptacle is supplying power to any devices or appliances connected to it.
If you detect any issues, such as sparks, smoke, or flickering lights, immediately turn off the power supply and consult a licensed electrician. These signs may indicate a wiring problem or electrical overload.
With power restored, you can now enjoy the benefits of a fully functioning 240-volt receptacle.
Remember, if you’re not comfortable working with electrical wiring or if the installation requires more complex procedures, it’s always best to seek the assistance of a qualified electrician.
Congratulations! You have successfully installed a 240-volt receptacle. Enjoy the increased electrical capacity and power it provides!
Conclusion
Installing a 240-volt receptacle can open up a whole new world of electrical possibilities. Whether you need to power heavy-duty appliances, electric vehicle chargers, or other high-powered devices, having a dedicated 240-volt outlet can make a significant difference. By following the step-by-step guide outlined in this article and taking the necessary safety precautions, you can successfully install a 240-volt receptacle on your own.
From gathering the necessary tools and materials to turning off the power supply, removing the existing outlet (if applicable), preparing and connecting the wires, securing the receptacle, and testing the connection, each step is essential in ensuring a safe and effective installation.
Remember to always prioritize safety when working with electricity. Turn off the power supply, test for voltage, and double-check all connections before restoring power. If you encounter any issues or are unsure about any part of the installation process, it is wise to consult a licensed electrician.
With your new 240-volt receptacle installed and powered up, you can now enjoy the benefits of increased electrical capacity. Whether using it for heavy-duty appliances in your kitchen or powering your electric vehicle, this upgrade will provide you with the power you need for your high-powered devices.
Thank you for following this guide on how to install a 240-volt receptacle. We hope it has been informative and helpful. Remember to always prioritize safety and consult professionals when needed. Enjoy the convenience and enhanced electrical capabilities that your new receptacle brings!
Frequently Asked Questions about How To Install A 240-Volt Receptacle
Was this page helpful?
At Storables.com, we guarantee accurate and reliable information. Our content, validated by Expert Board Contributors, is crafted following stringent Editorial Policies. We're committed to providing you with well-researched, expert-backed insights for all your informational needs.


0 thoughts on “How To Install A 240-Volt Receptacle”