Articles
How To Load A Quilt On A Long Arm Machine
Modified: January 5, 2024
Learn the step-by-step process of loading a quilt onto a long arm machine with our helpful articles. Gain expert tips and tricks to ensure a smooth quilting experience.
(Many of the links in this article redirect to a specific reviewed product. Your purchase of these products through affiliate links helps to generate commission for Storables.com, at no extra cost. Learn more)
Introduction
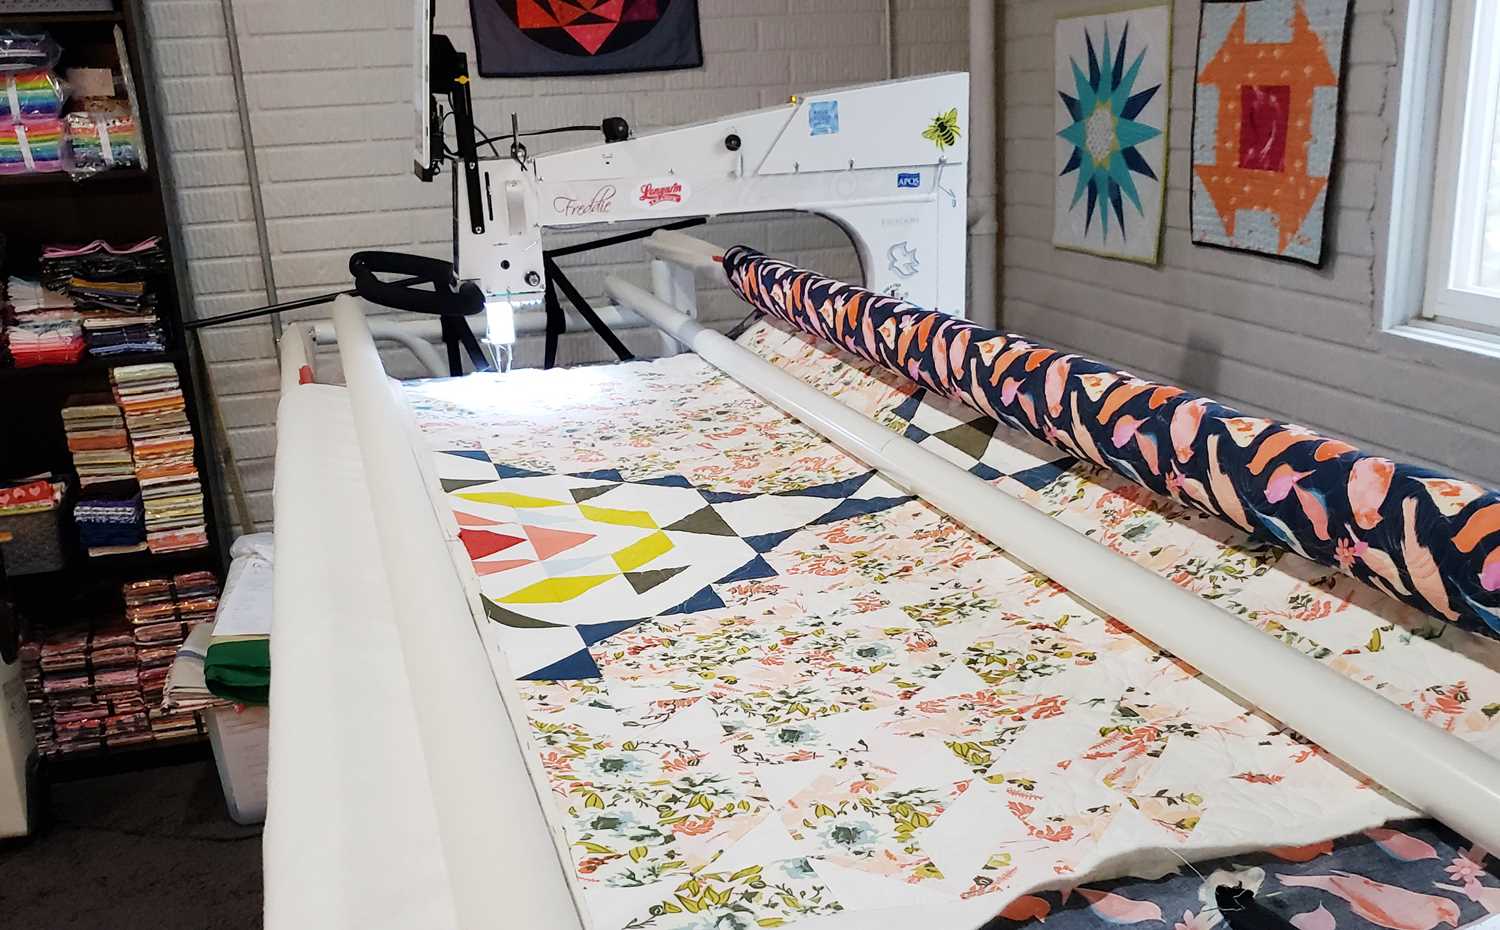
A long arm quilting machine offers a convenient and efficient way to quilt large projects with ease. Unlike a traditional sewing machine, a long arm machine features an extended sewing area and a frame that holds the layers of the quilt taut. This allows for more control and precision when quilting.
In order to effectively utilize a long arm machine, it is important to understand how to properly load a quilt onto the frame. This process ensures that the quilt top, batting, and backing are securely attached and perfectly aligned, minimizing any potential issues during the quilting process.
In this article, we will guide you through the step-by-step process of loading a quilt onto a long arm machine. From preparing the quilt for loading to troubleshooting common issues, we will provide you with the necessary knowledge and techniques to successfully load your next quilting project.
Key Takeaways:
- Master the art of loading a quilt onto a long arm machine for seamless and professional quilting results. Proper preparation, precise attachment, and troubleshooting skills are essential for a successful quilting experience.
- Achieve smooth and even quilting by understanding the components of a long arm machine, preparing the quilt with precision, and adjusting the rollers effectively. Troubleshoot common issues with patience and attention to detail to create stunning quilting masterpieces.
Read more: How To Use A Long Arm Quilting Machine
Understanding a Long Arm Quilting Machine
A long arm quilting machine is a specialized machine designed to make quilting large projects easier and more efficient. It consists of three main components: the machine head, the frame, and the computerized controls.
The machine head is typically larger and more powerful than a regular sewing machine. It is mounted on a movable carriage that glides smoothly along the frame. The machine head controls the stitching and can be adjusted for speed and stitch length.
The frame is an essential part of a long arm machine as it holds the layers of the quilt taut. It consists of horizontal and vertical bars that create a stable surface for quilting. The frame can be adjusted in size to accommodate different quilt sizes.
The computerized controls, also known as a stitch regulator, allow for precise stitching and speed control. This feature ensures that all stitches are the same length, producing a professional-looking quilt.
One of the main advantages of a long arm machine is the extended throat space, which allows for larger quilting areas. This makes it easier to quilt intricate patterns and stitch designs without needing to manipulate a bulky quilt through the small throat space of a regular sewing machine.
Long arm machines also have a variety of optional accessories that can be used to enhance quilting techniques. These accessories may include rulers, templates, and additional feet for different types of quilting.
Understanding the different components of a long arm quilting machine will help you make the most of its features and capabilities. With proper understanding and practice, you can achieve beautiful and professional-looking quilts with ease.
Preparing the Quilt for Loading
Before you can load your quilt onto a long arm machine, it is important to properly prepare the quilt top, batting, and backing. Following these steps will help ensure a smooth and successful quilting process.
1. Trim and square the quilt top: Start by trimming any excess fabric from the edges of the quilt top and ensuring that it is square. Use a rotary cutter and ruler for precision.
2. Press the quilt top: Iron the quilt top to remove any wrinkles or creases. This will help the fabric lay flat and prevent any uneven tension during the quilting process.
3. Prepare the batting: Cut the batting to the appropriate size, allowing for a few extra inches on each side. Make sure the batting is smooth and free from wrinkles.
4. Prepare the backing: Cut the backing fabric to the size of the quilt top, again allowing for a few extra inches on each side. Press the backing fabric and ensure it is free from any wrinkles or folds.
5. Square the backing: Lay the backing fabric on a flat surface and use a measuring tape to ensure it is square and straight. Adjust if necessary.
6. Baste the layers together: Place the backing fabric on a clean and flat surface, wrong side up. Smooth out any wrinkles and secure the fabric in place with masking tape. Next, layer the batting on top of the backing fabric, followed by the quilt top. Smooth out any wrinkles and secure the layers with safety pins or basting spray.
By properly preparing the quilt top, batting, and backing, you will create a solid foundation for loading the quilt onto the long arm machine. Taking the time to ensure that all layers are flat, smooth, and free from wrinkles will result in a more professional-looking finished quilt.
Attaching the Quilt Top to the Frame
Once you have prepared the quilt top, batting, and backing, it’s time to attach the quilt top to the frame of the long arm machine. Follow these steps to securely attach the quilt top:
1. Position the quilt top: Lay the quilt top on a clean and flat surface, right side up. Smooth out any wrinkles or folds, ensuring that the quilt top is centered and straight.
2. Align the quilt top with the frame: With the help of another person, carefully lift the quilt top and position it onto the frame of the long arm machine. Align the top edge of the quilt top with the top bar of the frame, making sure it is straight and evenly distributed.
3. Secure the quilt top: Use holding clamps or pins to secure the quilt top to the top bar of the frame. Place the clamps or pins at regular intervals along the top edge of the quilt top to ensure it remains in place during the quilting process.
4. Smooth out wrinkles: Starting from the center, gently smooth out any wrinkles or bubbles in the quilt top. Work your way outwards towards the edges, ensuring the quilt top is taut and free from any excess fabric.
5. Attach to side bars: Once the quilt top is securely attached to the top bar, carefully lift and position the sides of the quilt top onto the side bars of the frame. Align the edges of the quilt top with the side bars and use holding clamps or pins to secure.
6. Repeat for the bottom edge: Lastly, attach the bottom edge of the quilt top to the bottom bar of the frame using clamps or pins. Ensure the quilt top is taut and evenly stretched across the frame.
By following these steps, you will be able to securely attach the quilt top to the frame of the long arm machine. This ensures that the quilt top remains in position and prevents any shifting or wrinkles during the quilting process, resulting in a beautiful and well-quilted project.
Loading the Quilt Backing
Once the quilt top is securely attached to the frame, it’s time to load the quilt backing. Follow these steps to ensure a smooth and properly loaded backing:
1. Position the quilt backing: Lay the prepared backing fabric on a clean and flat surface, wrong side up. Ensure the backing fabric is centered and straight, with a few extra inches extending beyond the dimensions of the quilt top.
2. Align the backing with the frame: With the help of another person, carefully lift and position the backing fabric onto the frame. Align the top edge of the backing fabric with the bottom edge of the quilt top, ensuring it is straight and evenly distributed.
3. Secure the backing to the frame: Use holding clamps or pins to secure the backing fabric to the bottom bar of the frame. Place the clamps or pins at regular intervals along the bottom edge of the backing fabric to hold it in place.
4. Smooth out wrinkles: Starting from the center, gently smooth out any wrinkles or bubbles in the backing fabric. Work your way outwards towards the edges, ensuring the fabric is taut and free from any excess material.
5. Load the backing onto the rollers: Carefully roll up the backing fabric onto the bottom roller of the frame, ensuring it is evenly distributed and wrinkle-free. Roll the fabric onto the roller until it reaches the desired starting point for quilting.
6. Adjust tension and alignment: Once the backing fabric is loaded onto the rollers, verify that it is straight and properly aligned with the quilt top. Adjust the tension of the backing fabric by tightening or loosening the rollers as needed.
By following these steps, you will be able to properly load the quilt backing onto the long arm machine. This ensures that the backing fabric remains taut and in place, allowing for smooth and even quilting throughout the entire project.
When loading a quilt on a long arm machine, make sure to smooth out the backing fabric and batting to prevent any wrinkles or tucks from forming during the quilting process.
Read more: How To Load Top Load Washer Without Agitator
Ensuring Proper Tension and Alignment
Proper tension and alignment are crucial for a successful quilting process on a long arm machine. Here are some steps to follow to ensure that the tension and alignment are set correctly:
1. Check the tension settings: The long arm machine will have tension settings that control the tightness of the stitches. It’s important to ensure that the tension is properly adjusted for both the top thread and the bobbin thread. Consult the machine’s manual for specific instructions on adjusting the tension.
2. Test the tension: Before starting the actual quilting, it’s a good practice to test the tension on a scrap piece of fabric that’s similar to the quilt top and backing material. Stitch a few lines and examine the stitches on both sides. Adjust the tension as needed until you achieve balanced and even stitches.
3. Align the quilt layers: Ensure that all the layers—quilt top, batting, and backing—are aligned correctly. Double-check that the seams and edges of the quilt top are straight and parallel to the frame’s bars. This will help maintain alignment and prevent any puckering or uneven quilting.
4. Smooth out the layers: Smooth out any wrinkles or bubbles in the quilt top, batting, and backing as you advance the quilt. This will help maintain consistent tension and prevent any distortions or interruptions in the quilting process.
5. Check and adjust the quilt top: Periodically check that the quilt top is still properly attached to the frame. Make sure there are no loose areas or sagging fabric that can affect the tension and stability during quilting. Adjust the clamps or pins as necessary.
6. Monitor the tension during quilting: As you quilt, pay attention to the tension of the stitches. Watch for any signs of loose or tight stitches, such as loops or puckering. Adjust the tension as needed throughout the quilting process to maintain consistent and balanced stitches.
By ensuring proper tension and alignment, you will be able to achieve clean, even, and professional-looking stitches throughout your quilt. Continuously monitor and make adjustments when necessary to ensure a smooth quilting experience.
Adjusting the Rollers for Smooth Quilting
Proper adjustment of the rollers on a long arm machine is essential for achieving smooth and even quilting results. Here are the steps to follow in order to adjust the rollers effectively:
1. Assess the roller tension: Start by checking the tension of each roller. This can be done by gently pushing or pulling on the fabric while it is loaded onto the rollers. The fabric should have some resistance but should still be able to move freely without excessive tightness or looseness.
2. Adjust the tension knobs: To increase or decrease the tension, locate the tension knobs located on the sides of the machine or the frame. Gradually turn the knobs clockwise to increase tension or counterclockwise to decrease tension. Make small adjustments and test the tension as you go.
3. Align the rollers: Ensure that the rollers are aligned properly to maintain even tension and prevent fabric distortion. Check that the edges of the quilt top and backing fabric are aligned with the front edge of each roller.
4. Make adjustments as needed: If you notice any wrinkles or unevenness in the fabric as it is loaded onto the rollers, make the necessary adjustments. Loosen or tighten the tension knobs on each roller to achieve an even and smooth fabric surface.
5. Test the movement of the fabric: Gently advance the fabric by rolling it onto the next roller. Observe the movement of the fabric and ensure that it is flowing smoothly and without any resistance. Adjust the tension if needed to eliminate any snags or tugs.
6. Continue adjusting as you go: Throughout the quilting process, periodically check the tension and movement of the fabric on the rollers. If you encounter any issues such as fabric bunching or creasing, stop and make the necessary adjustments to the roller tension to resolve the problem.
By properly adjusting the rollers, you will create a smooth and even surface for quilting. This ensures that the fabric flows freely and that the stitches are consistent throughout the entire quilt, resulting in a professional-looking finished product.
Troubleshooting Common Issues
While using a long arm machine, you may encounter some common issues that can affect the quilting process. Here are some troubleshooting tips to help you overcome these challenges:
1. Thread breakage: If you experience frequent thread breakage, check for any snags or burrs in the machine’s thread path. Make sure the thread is properly threaded through the machine and the tension is set correctly. If necessary, change to a new needle and ensure that it is the appropriate size for the thread and fabric.
2. Uneven stitches: If your stitches are uneven, first check the tension settings on the machine. Make sure the tension is balanced for both the top thread and the bobbin thread. If the problem persists, try rethreading both the top thread and the bobbin thread, ensuring they are properly seated in their respective tension discs.
3. Puckering or tucks: If you notice puckering or tucks in the fabric, it may be an indication of uneven tension or improper fabric handling. Check the tension settings and ensure the fabric is smooth and taut on the frame. Also, check that the feed dogs are lowered or disengaged to allow for free-motion quilting.
4. Uneven quilt layers: If the quilt layers appear uneven or shifted during quilting, double-check that the quilt top and backing fabric are attached securely to the frame. Smooth out any wrinkles or folds before starting the quilting process. Adjust the tension on the rollers as needed to maintain even and consistent tension across the quilt.
5. Machine skipping stitches: If your machine is skipping stitches, first ensure that you are using the appropriate needle for the fabric and thread being used. Check for any lint or debris build-up in the bobbin case or needle area and clean it if necessary. Also, confirm that the machine is properly oiled and maintained according to the manufacturer’s instructions.
6. Tension issues when changing thread: When switching thread colors or types, it is common to experience tension issues. Take the time to test the tension on a scrap piece of fabric before proceeding with quilting. Make the necessary adjustments to achieve balanced tension with the new thread.
Remember, troubleshooting issues on a long arm machine may require trial and error. Take your time, be patient, and make small adjustments as needed until you achieve the desired results. Consulting the machine’s manual or seeking assistance from experienced quilters can also be helpful in solving specific issues.
Conclusion
Mastering the art of loading a quilt onto a long arm machine is essential for achieving beautiful and professional-looking quilting results. By following the steps outlined in this article, you can ensure that your quilt top, batting, and backing are securely attached and properly aligned for a smooth and successful quilting process.
Preparing the quilt by trimming, pressing, and basting the layers together creates a solid foundation for loading. Attaching the quilt top and backing to the frame with precision and ensuring proper tension and alignment sets the stage for a seamless quilting experience.
Adjusting the rollers for smooth quilting and troubleshooting common issues such as thread breakage, uneven stitches, or fabric puckering will help you overcome any challenges that may arise during the quilting process.
Remember, practice makes perfect. The more you work with a long arm machine and load quilts onto it, the more comfortable and knowledgeable you will become. Experiment with different techniques, thread colors, and designs to unleash your creativity and achieve stunning quilting masterpieces.
With dedication, patience, and attention to detail, you will soon discover the joy and satisfaction of quilting on a long arm machine. Enjoy the process, embrace the artistry, and create quilts that will be cherished for years to come.
Frequently Asked Questions about How To Load A Quilt On A Long Arm Machine
Was this page helpful?
At Storables.com, we guarantee accurate and reliable information. Our content, validated by Expert Board Contributors, is crafted following stringent Editorial Policies. We're committed to providing you with well-researched, expert-backed insights for all your informational needs.


0 thoughts on “How To Load A Quilt On A Long Arm Machine”