Articles
How To Lock A Chain Link Fence Gate
Modified: February 23, 2024
Learn how to lock a chain link fence gate with these helpful articles. Secure your property and keep unwanted intruders out.
(Many of the links in this article redirect to a specific reviewed product. Your purchase of these products through affiliate links helps to generate commission for Storables.com, at no extra cost. Learn more)
Introduction
When it comes to securing your property, a chain link fence can provide an effective physical barrier. However, to ensure maximum security, it is essential to properly lock the fence gate. Whether you want to prevent unauthorized access, keep pets or children safely inside, or enhance the overall security of your property, locking the chain link fence gate is an important step.
In this article, we will guide you through the process of how to lock a chain link fence gate. We will outline the tools and materials you need, as well as provide step-by-step instructions to help you secure your fence effectively.
Before we delve into the details, it’s important to note that the type of lock you choose will depend on your specific needs and preferences. There are various options available, including padlocks, combination locks, and even electronic locks. Consider factors such as security level, ease of use, and durability when selecting the right lock for your chain link fence gate.
Now, let’s get started on locking your chain link fence gate!
Key Takeaways:
- Properly locking a chain link fence gate is essential for security. Assess gate requirements, gather tools, measure placement, and test the lock to ensure maximum protection for your property.
- Selecting the right lock, drilling pilot holes, and testing the mechanism are crucial steps in effectively securing your chain link fence gate. Regular maintenance and adherence to local regulations are also key for long-term security.
Read more: How To Build A Chain Link Fence Gate
Tools and Materials Needed
Before you begin the process of locking your chain link fence gate, it’s important to gather all the necessary tools and materials. Having everything on hand will make the process smoother and more efficient. Here’s a list of what you’ll need:
- Padlock or lock mechanism of your choice
- Drill with the appropriate drill bit
- Measuring tape or ruler
- Marker or pencil
- Level (optional)
- Screwdriver or wrench (depending on the lock mechanism)
- Safety goggles
- Gloves
Make sure you have all these items readily available before you proceed.
Remember, the specific tools and materials required may vary depending on the type of lock you choose and the condition of your chain link fence gate. Always refer to the manufacturer’s instructions for any additional items required for installation.
With your tools and materials gathered, you’re now ready to move on to the next steps of locking your chain link fence gate.
Step 1: Assess the Gate Requirements
Before you start installing a lock on your chain link fence gate, it’s important to assess the specific requirements of your gate. Take a close look at the gate and consider the following:
- Gate size: Measure the width and height of your gate to ensure that the lock you choose is suitable for the dimensions.
- Gate material: Is your gate made of standard chain link fencing, or does it have any additional features or attachments? This will help you determine the best method for attaching the lock.
- Gate hardware: Take note of any existing hardware on the gate, such as hinges or latches, as this may impact the placement or installation of the lock.
- Security needs: Consider your security needs and the purpose of the lock. Are you aiming for basic security, or do you require a high-level lock to deter potential intruders?
By thoroughly assessing these gate requirements, you will have a clearer understanding of what type of lock will work best for your specific situation.
Additionally, it’s important to check if there are any local regulations or homeowner’s association guidelines that dictate the type of locks or additional security measures you can use on the fence gate. Familiarize yourself with these regulations to ensure compliance.
Once you have assessed the gate requirements, you can proceed with gathering the necessary tools and materials for the installation process.
Step 2: Gather the Necessary Supplies
Now that you’ve assessed the requirements of your chain link fence gate, it’s time to gather the necessary supplies for the lock installation. Here’s what you’ll need:
- Lock mechanism: Choose a lock that meets your security needs and is suitable for your gate. Consider factors such as durability, weather resistance, and ease of use.
- Mounting hardware: Check if the lock comes with mounting hardware or if you need to purchase it separately. This may include screws, bolts, or brackets.
- Tools: Depending on the type of lock and mounting hardware, you may need a screwdriver, wrench, or other tools for installation.
- Measuring tape or ruler: This will be essential for measuring and marking the placement of the lock on your gate.
- Marker or pencil: Use a marker or pencil to make clear marks on your gate to guide the installation process.
- Safety equipment: It’s always a good idea to wear safety goggles and gloves to protect yourself during the installation process.
Make sure you have all these supplies ready before proceeding with the installation. It’s also a good idea to double-check the instructions provided with your chosen lock to ensure you have all the tools and materials required.
With everything gathered, you’re now ready to move on to the next step: measuring and marking the placement of the lock on your chain link fence gate.
Step 3: Measure and Mark the Placement of the Lock
After gathering the necessary supplies, it’s time to measure and mark the placement of the lock on your chain link fence gate. Follow these steps:
- Measure the width of your gate: Use a measuring tape or ruler to determine the width of your gate. This measurement will help you determine where to place the lock.
- Consider the gate hardware: Take note of any existing gate hardware, such as hinges or latches. Ensure that the placement of the lock does not interfere with the functionality of these components.
- Choose a suitable placement: Depending on your preference and security needs, decide whether you want to place the lock on the top, center, or bottom of the gate. Consider the convenience and accessibility of the chosen placement.
- Mark the placement: Once you have determined the ideal placement for the lock, use a marker or pencil to make clear marks on the gate. Ensure that the marks are visible and will not be easily washed away.
- Double-check the alignment: Use a level to check the alignment of your marks. This will help ensure that the lock will be properly installed and function correctly.
It’s crucial to take your time during this step to ensure accurate placement of the lock. The location of the lock will heavily influence the security and functionality of your chain link fence gate. Double-checking the measurements and alignment will help prevent any issues during installation.
With the lock placement marked, you’re ready to move on to the next step: drilling pilot holes for the lock installation.
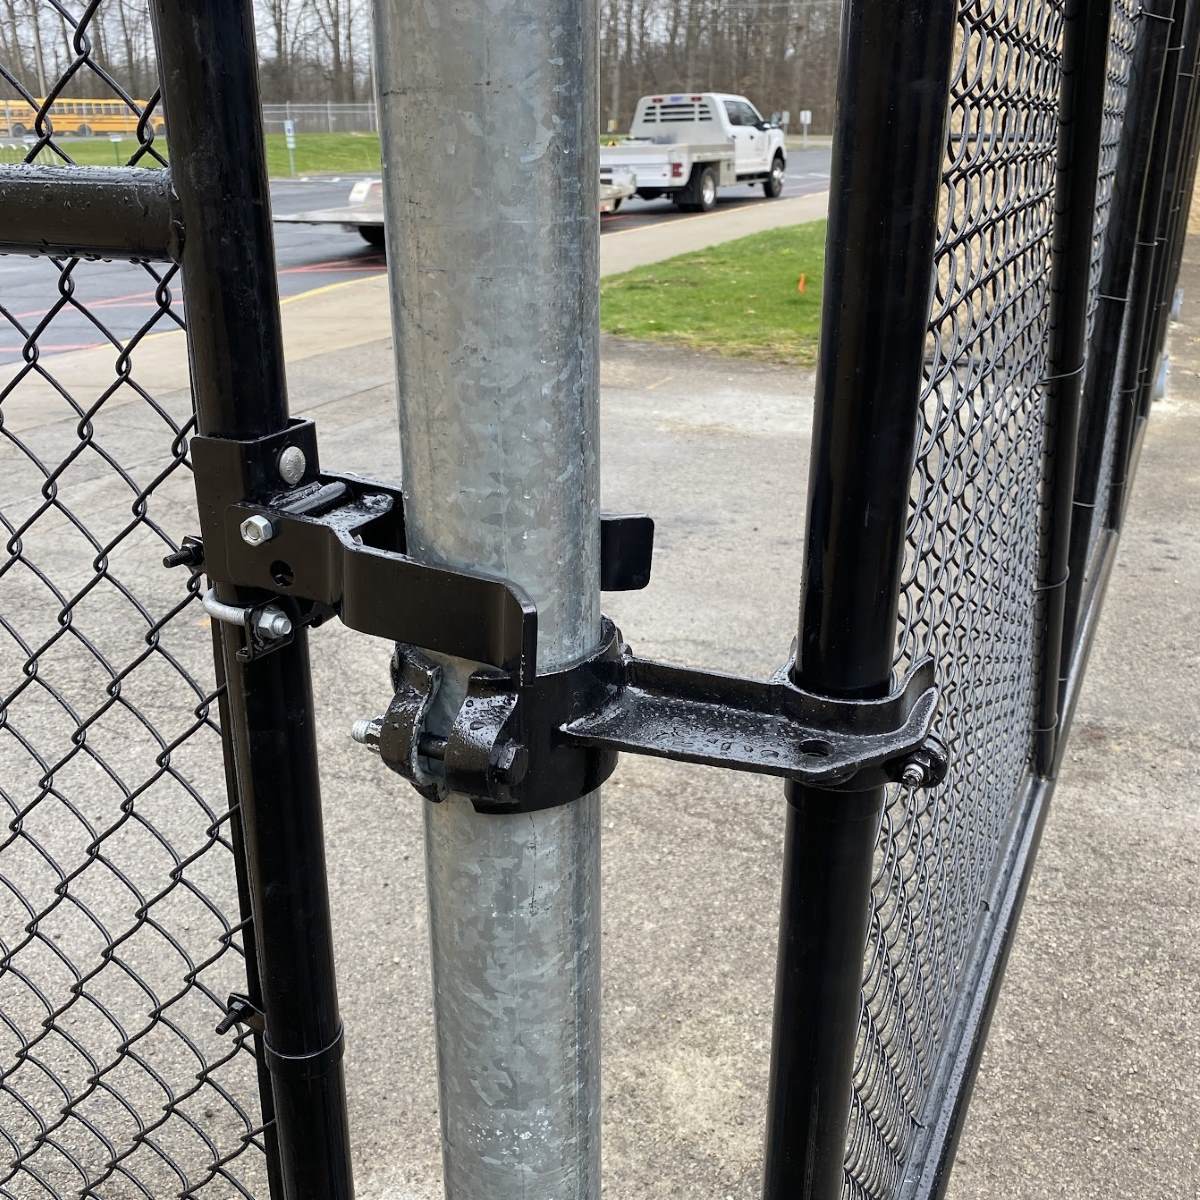
Install a padlock on the gate latch to secure a chain link fence gate. This will prevent unauthorized access and keep your property safe.
Read more: How To Stretch A Chain Link Fence
Step 4: Drill Pilot Holes
Now that you have marked the placement of the lock on your chain link fence gate, it’s time to drill pilot holes for the lock installation. Follow these steps:
- Start with a small drill bit: Begin by selecting a small drill bit that is appropriate for the mounting hardware provided with your lock. This will ensure that you create precise pilot holes.
- Secure the gate: If necessary, prop or secure the gate to prevent it from moving during the drilling process. This will help maintain the accuracy of the holes.
- Drill the pilot holes: Use the small drill bit to carefully drill pilot holes where you marked the placement of the lock. Make sure to drill straight and apply gentle pressure to avoid damage to the gate.
It’s important to drill the pilot holes slightly smaller than the diameter of the mounting hardware. This provides a snug fit and enhances the overall stability of the lock once installed.
If you’re using self-tapping screws with your lock, you may not need to drill pilot holes. In this case, simply skip this step and proceed to the next step.
Once you have drilled the pilot holes, you’re ready to move on to the next step: attaching the lock mechanism to the chain link fence gate.
Step 5: Attach the Lock Mechanism
With the pilot holes drilled on your chain link fence gate, it’s time to attach the lock mechanism. Follow these steps:
- Align the lock mechanism: Place the lock mechanism on the gate, aligning it with the pilot holes. Ensure that it is positioned correctly according to the marks you made earlier.
- Insert the mounting hardware: Take the provided screws, bolts, or brackets and insert them through the pilot holes. Make sure they fit snugly into the holes.
- Tighten the hardware: Using a screwdriver or wrench, depending on the type of hardware, tighten the screws or bolts to secure the lock mechanism in place. Ensure that it is securely fastened and does not wobble or move.
If your chosen lock requires additional mounting brackets or plates, follow the manufacturer’s instructions to properly attach them to the gate. These additional components may enhance the stability and security of the lock.
As you attach the lock mechanism, double-check the alignment and ensure that it is level. This will help ensure that the lock operates smoothly and effectively.
Once the lock mechanism is securely attached, you’re ready to move on to the final step: testing the locking mechanism on your chain link fence gate.
Step 6: Test the Locking Mechanism
After attaching the lock mechanism to your chain link fence gate, it’s crucial to test the locking mechanism to ensure it is functioning properly. Follow these steps:
- Insert the key or set the combination: If you have a key-operated lock, insert the key and turn it to lock and unlock the gate. If you have a combination lock, set the combination according to the manufacturer’s instructions.
- Operate the lock: Test the locking mechanism by opening and closing the gate. Ensure that the lock engages properly and securely holds the gate in place when locked.
- Check for any issues: Examine the lock and gate for any signs of misalignment, stiffness, or other issues. If you encounter any problems, troubleshoot accordingly or seek professional assistance.
While testing the locking mechanism, pay attention to whether there is any resistance or difficulty in operating the lock. The lock should operate smoothly and securely without any hitches.
Additionally, make sure to test the gate by applying some pressure to see if the lock stays in place. This will help verify its strength and capability to withstand external forces.
If the lock mechanism is working well and providing the desired level of security, you have successfully completed the process of locking your chain link fence gate!
Remember, regular maintenance and periodic checks of the lock mechanism are important to ensure its continued functionality. Lubricate any moving parts if necessary and inspect for any signs of wear or damage.
By following these steps and testing the locking mechanism, you can have peace of mind knowing that your chain link fence gate is securely locked and providing the necessary protection for your property.
Conclusion
Securing your property with a locked chain link fence gate is a vital step in maintaining the safety and privacy of your premises. By following the steps outlined in this article, you can successfully install a lock on your fence gate and enhance its security.
Assessing the gate requirements and gathering the necessary tools and materials are crucial initial steps. Measuring and marking the placement of the lock ensures accurate installation, while drilling pilot holes provides a sturdy foundation for the lock mechanism. Attaching the lock and testing its functionality guarantees that your gate is properly secured.
Remember to consider your specific security needs when selecting a lock, and always follow any local regulations or guidelines regarding fence gate locks. Regular maintenance and periodic checks will help keep your lock in optimal condition.
By investing time and effort into securing your chain link fence gate, you can have peace of mind knowing that your property is well-protected. Whether you want to prevent unauthorized access, keep pets or children safely inside, or enhance overall security, locking your fence gate is a crucial step.
So, take the necessary steps and lock your chain link fence gate today. Enjoy the peace of mind and added security that comes with knowing your property is properly protected.
Frequently Asked Questions about How To Lock A Chain Link Fence Gate
Was this page helpful?
At Storables.com, we guarantee accurate and reliable information. Our content, validated by Expert Board Contributors, is crafted following stringent Editorial Policies. We're committed to providing you with well-researched, expert-backed insights for all your informational needs.


0 thoughts on “How To Lock A Chain Link Fence Gate”